Un saludo amigos artesanos y aficionados a los oficios que se desarrollan es esta colmena, en esta ocasión ya pasando unos días traigo la segunda y última parte de la modificación del cuatro venezolano que va de lo no funcional a un instrumento óptimo y totalmente útil para un aprendiz y cualquiera que ejecute el cuatro aunque para profesionales ya sería otro cuatro con otras características constructivas, ya que el músico exigiría otras condiciones armónicas y sonora
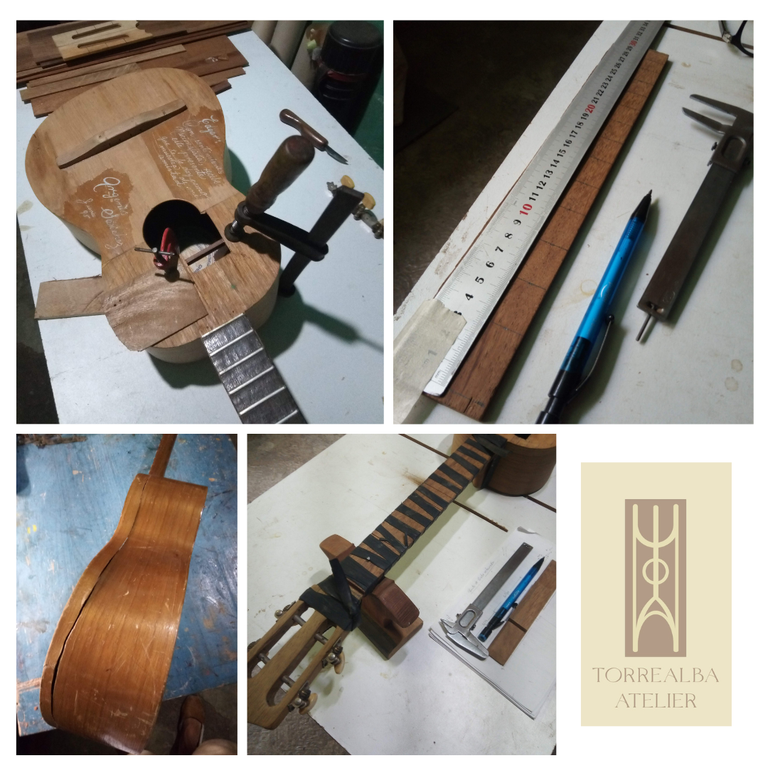
En el post anterior estuvimos tratando los arreglos de la estructura como fracturas y fisuras, además de colocar un nuevo diapasón de madera maciza de samán y un arreglo en el área del golpeador, avanzando en un 50% de los objetivos planteados viendo desde los ligeros cambio un nuevo Cordófono lleno de mucho aprendizaje y gratitud, mi agradecimiento a estos instrumentos que llegan al atelier, pues son una enseñanza.

- cola de carpintero
- sargentos o prensas
- lijas de 80,120,180,220,
- Madera dura o semi-dura de 1.5cm de espesor (saman)
- serrucho
- Sellador y laca

Objetivos
- Raspar y quitar barniz antiguo
- Lijar superficie
- Encolar una barra de refuerzo cerca de la boca y justo debajo del golpeador
- Hacer un nuevo diapasón
- Refuerzo de puente
- Colocarle un golpeador
- Colocarle una tapa en la cabeza del clavijero
- Rectificar diapasón
- Quitar y hacer un nuevo puente con cejilla.
- Montaje, rectificado y coronado de trastes
- Encuerdado y calibración
- Sellado y barnizado

Pulsa aquí para visualizar los primeros avances de instrumento click aqui

Paso 7
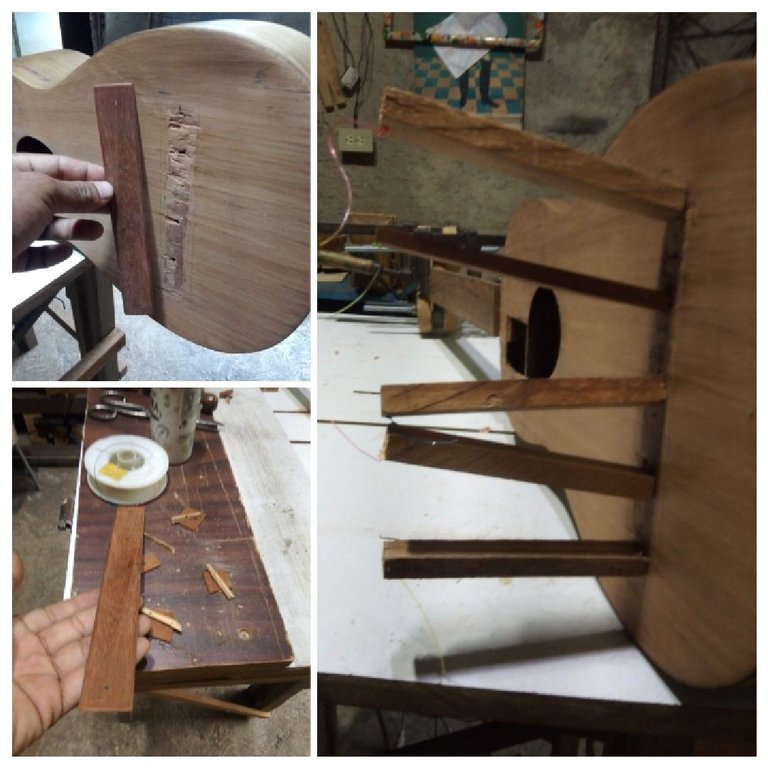
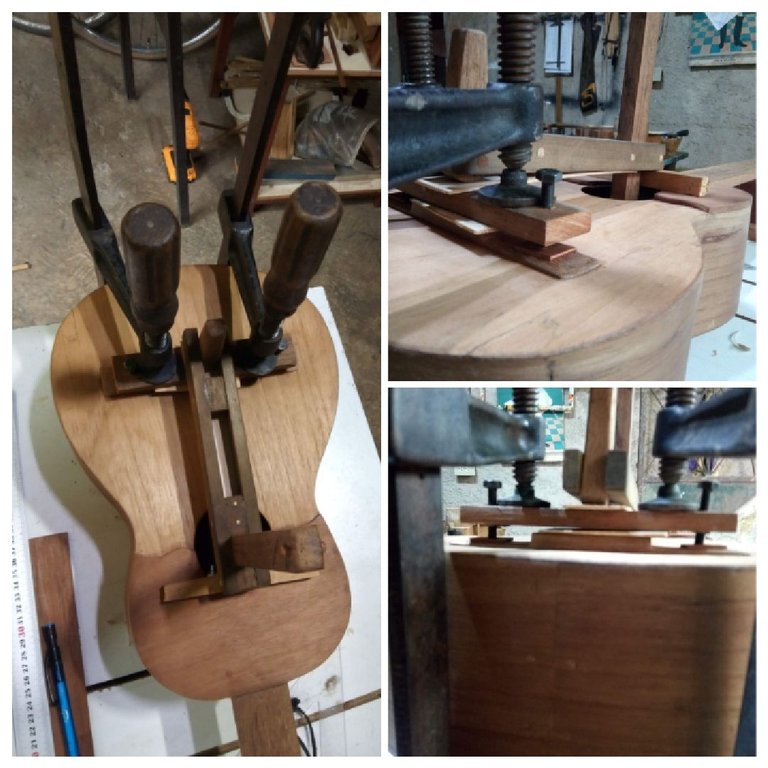
En este paso reforzaremos la parte interna de la tapa armónica justo debajo del puente, en las construcciones se suele hacer para dar mayor refuerzo y apoyo al puente además de que la tapa estaba un poco delgada así aportamos mayor estructura y un poco de rigidez, este refuerzo de puente o bajo puente se puede usar dependiente la construcción del instrumento, así que su uso depende de cómo queremos modelar el instrumento, lo hago de una madera de poca densidad si es posible como la de la tapa, con un espesor de 1 mm, la forma de pegar en este caso es usando un hilo nylon de pesca y prenso con unos taquitos de madera, como la cuerda es elástica al apoyar con la misma genera presión le doy unas 6 horas de secado.
Paso 8
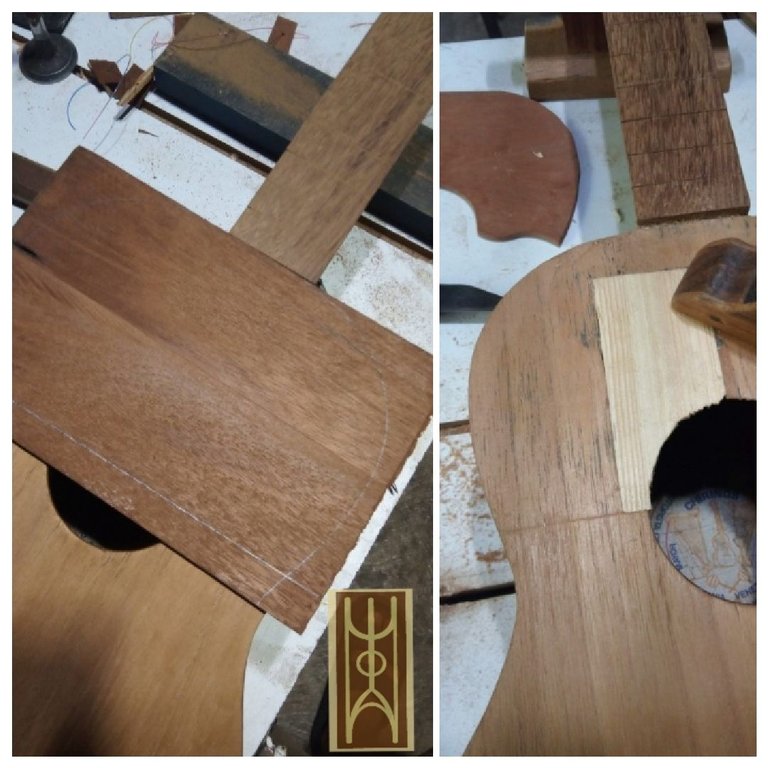
El golpeador lo realicé con una madera de caoba, con el mismo espesor del diapasón, esto es una consideración que debemos de tener en cuenta, unas de las partes, la que queda justo en el traste 14, debe de estar plana, colocamos sobre el instrumento y trazamos
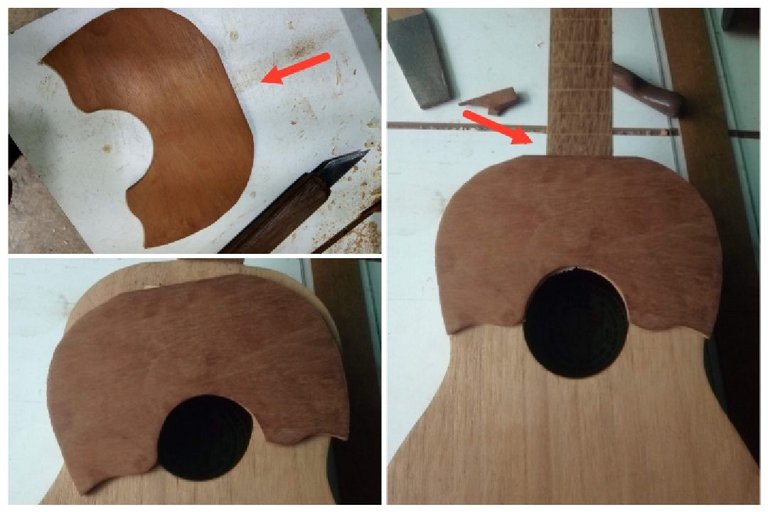
Con la sierra manual, cortamos el golpeador, con la caladora eléctrica manual considero que sería muy violenta para una madera muy delgada, aunque hay unas hojas con dientes más pequeños y esta sería la caladora de mesa, esto por factor de tiempo, pero la manual nos proporciona silencio y controlamos mucho más el margen de error luego encolamos y al estar seca con una lija 80 rebajamos los bordes.
Paso 9
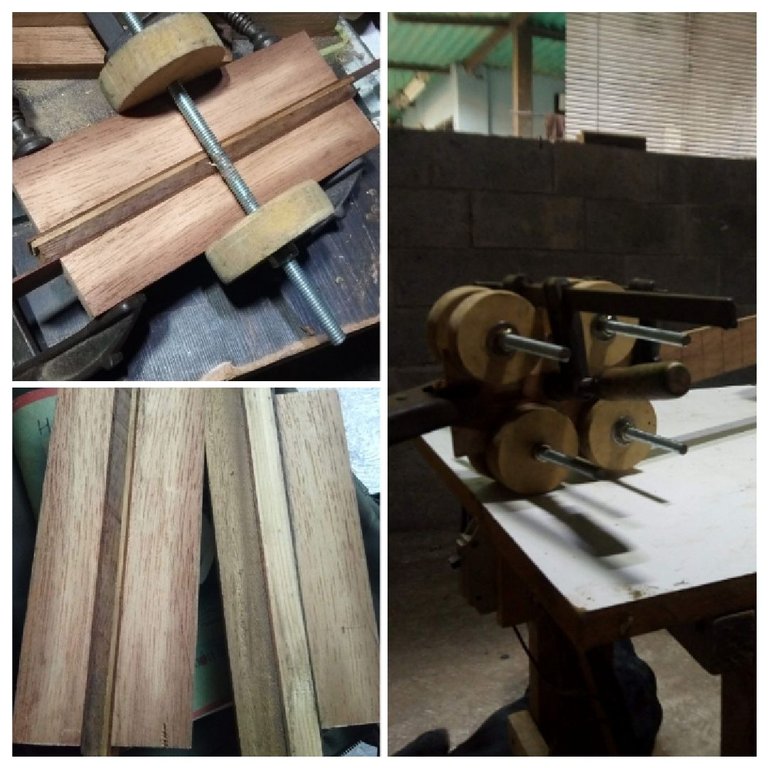
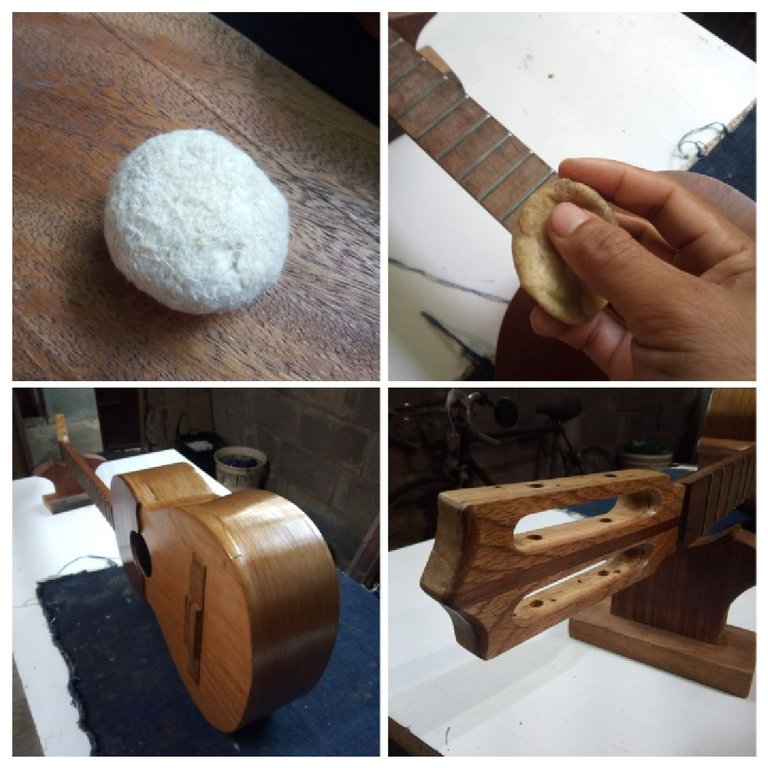
En vista de que la cabeza del clavijero no tenía una tapa y para que tuviera correspondencia con el cambio del golpeador se la coloque, use cedro y en su centro caoba, lo pensé en hacer muy sencilla, en las imágenes a nuestra izquierda podemos ver las distintas formas de hacerlo ya aquí se hace el uso de la estética y el gusto ya es subjetivo podemos combinar con el fondo aros y golpeador, pero como digo nada es estático.
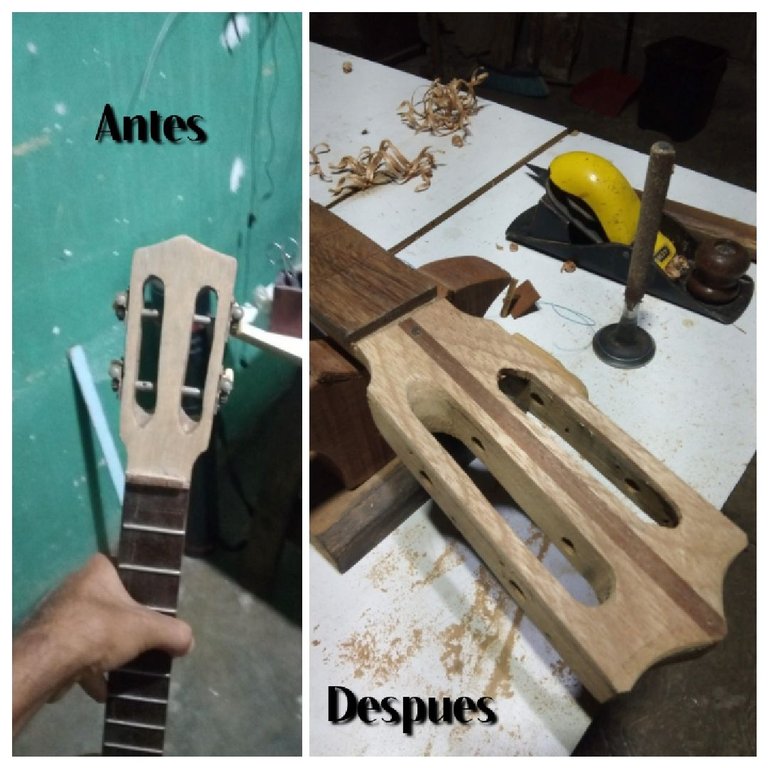
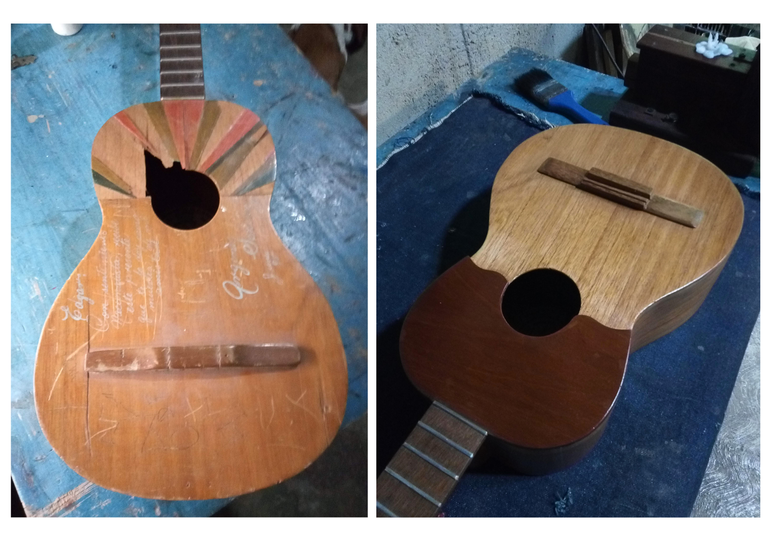
Aquí podemos ver el antes y el después de la cabeza del clavijero, estos detalles son el reflejo de la dedicación y de la muestra de dedicación hacia los instrumentos.
Paso 10
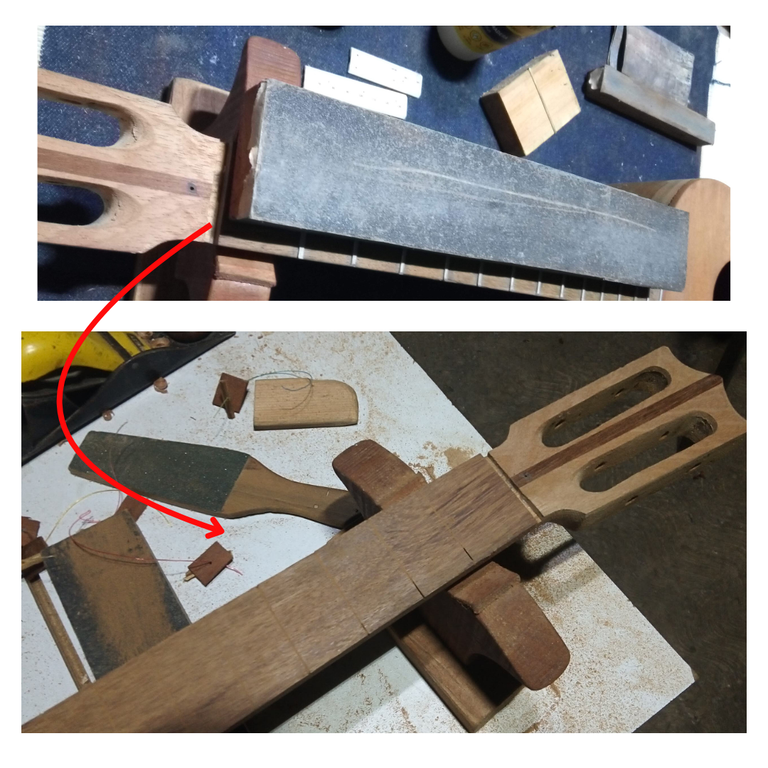
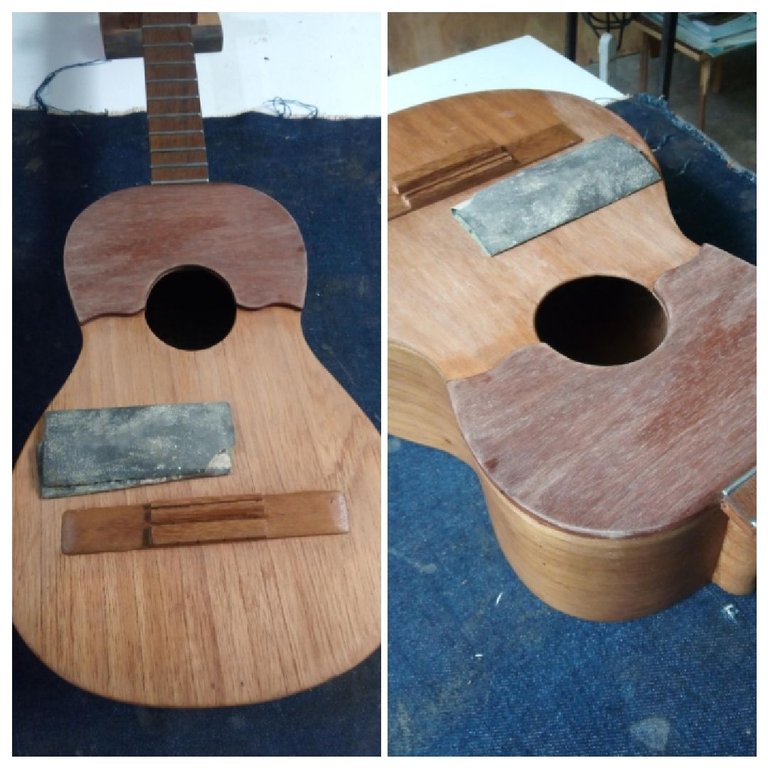
Con un taco de lija 80 como el que podemos ver en la imagen superior rectificamos el diapasón, para así asegurar que esté totalmente plano, la idea siempre es cepillar antes de montar, pero con esto nos aseguramos, ya que el taco es totalmente plano.
Paso 11
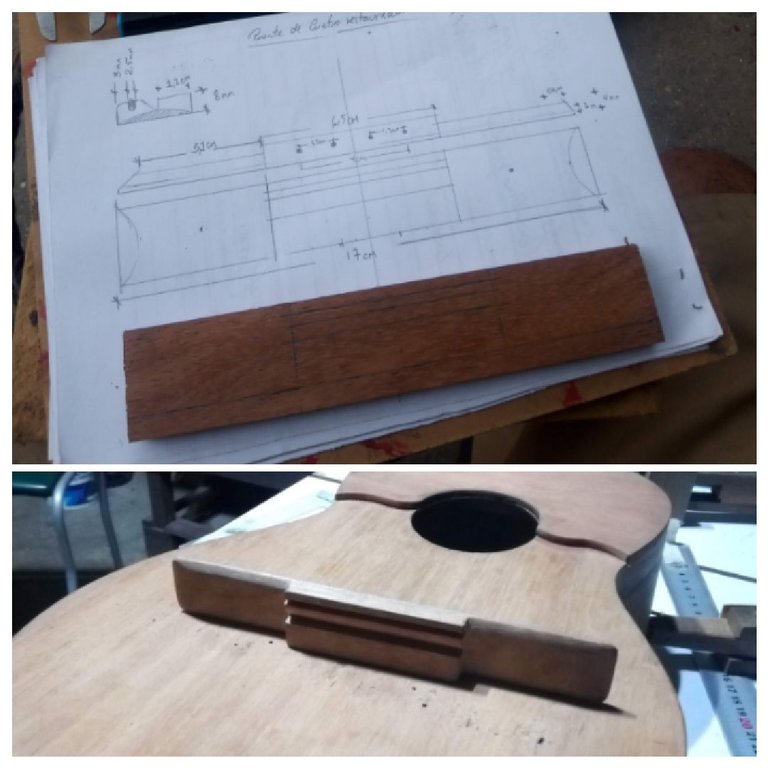
Siempre las ideas las reflejo en un plano, pues tenemos a la mano las medidas precisa para ejecutar el proyecto, en el plano podemos ver que el puente es mucho más grande de lo común, pues tuve que basarme en las medidas del anterior, ya que si lo hacía menos largo quedarían las marcas del anterior, ya que se desprendieron algunas astillas cuando retire el antiguo puesto que este tenía internamente clavos
Paso 12
Una vez que tallamos el puente, centramos y marcamos la distancia o la 8 tava del largo vibrante, marcamos y justo donde se colocara la cejilla se perforan unos clavos como preciso en este post, pegamos y usamos de esta manera unos sargentos, sin mucha presión, dejamos secar por 12 horas.
Paso 13
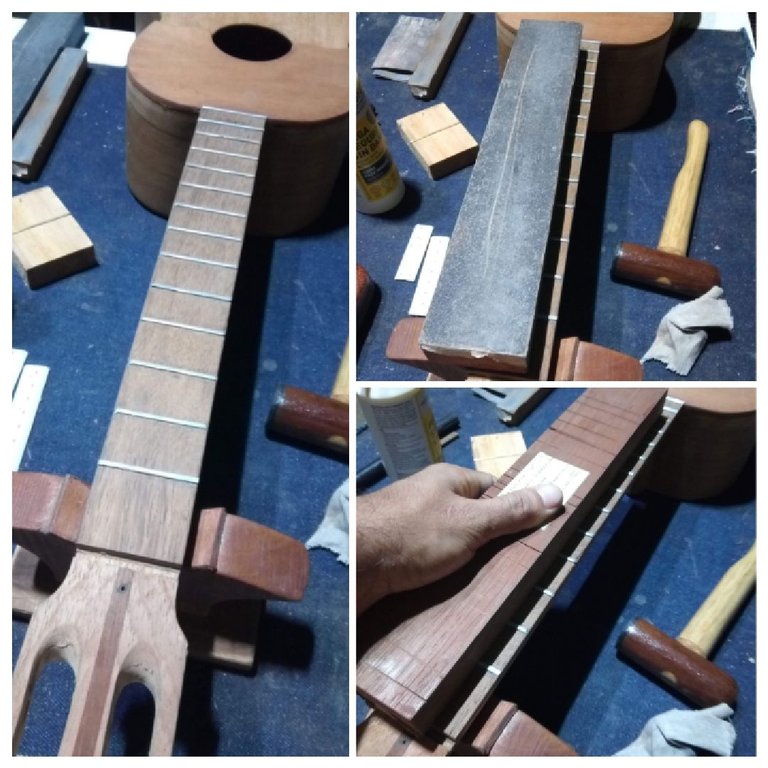
Una vez estando seco el puente nos dirigimos a rectificar los trastes, primero con un taco largo con grano 80 este se pasa unas dos veces y luego con un taco angosto que abarque hasta el traste 5 pasamos del 1 al 5 y del 5 al 14, luego vamos verificando que todos queden con la misma altura es decir que no quede uno más arriba que otro, pero esto se facilita realizando el trabajo de ranura con buena precisión, por últimos coronamos los trastes con el coronador de traste aquí les comparto un post que le muestro dicho instrumento.
Paso 14
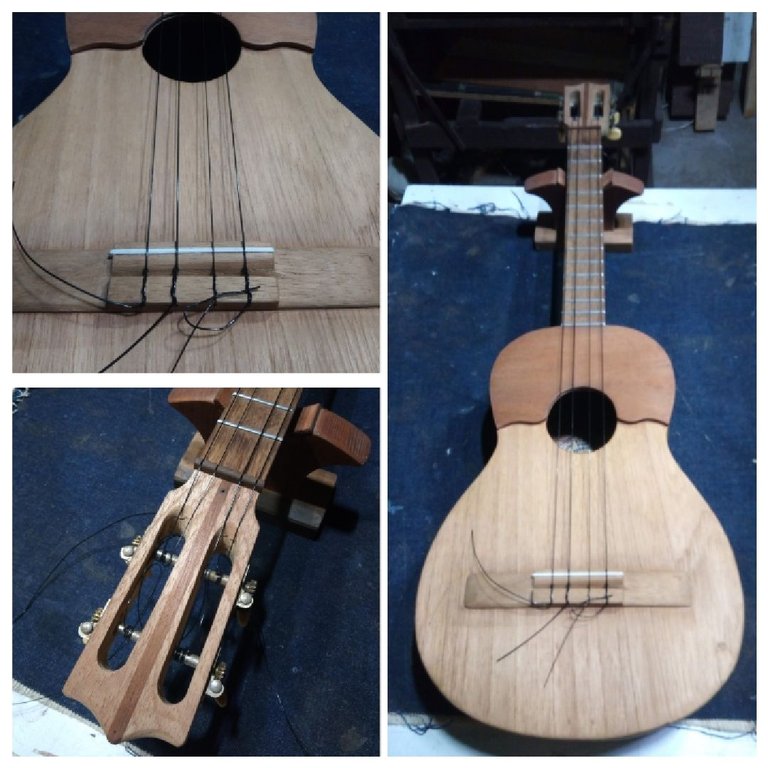
En este paso podemos hacer dos cosas, seguir al sellado y barnizado o colocar las cuerdas, yo me voy a la segunda opción porque podemos calibrar la cejuela con junto a la cejilla y así determinar si se tiene buen agarre o nos incomoda algo, ya que de esta manera podemos hacerlo y así tener mucha más seguridad a la hora de barnizar.
Paso 15
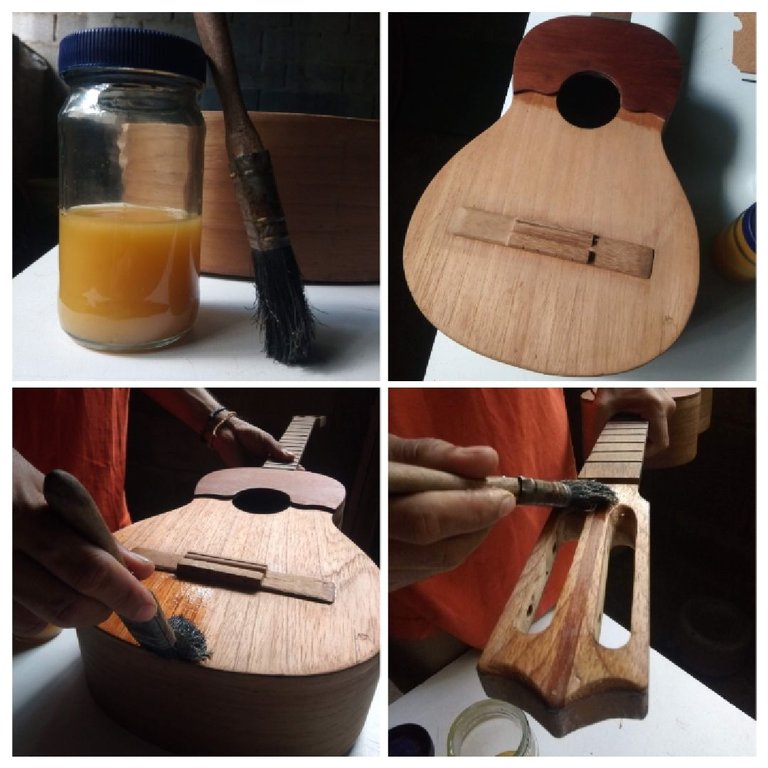
Una vez que hayamos lijado todo el instrumento, sellamos la madera, pasamos unas tres manos con brocha y dos con muñeca más diluida, es importante que la humedad relativa no pase del 60%.
Paso 16

En esta ocasión use laca nitrocelulosa, la barnice a muñeca hasta lograr un brillo satinado, ya que no quería que fuera un brillo espejo sino natural.
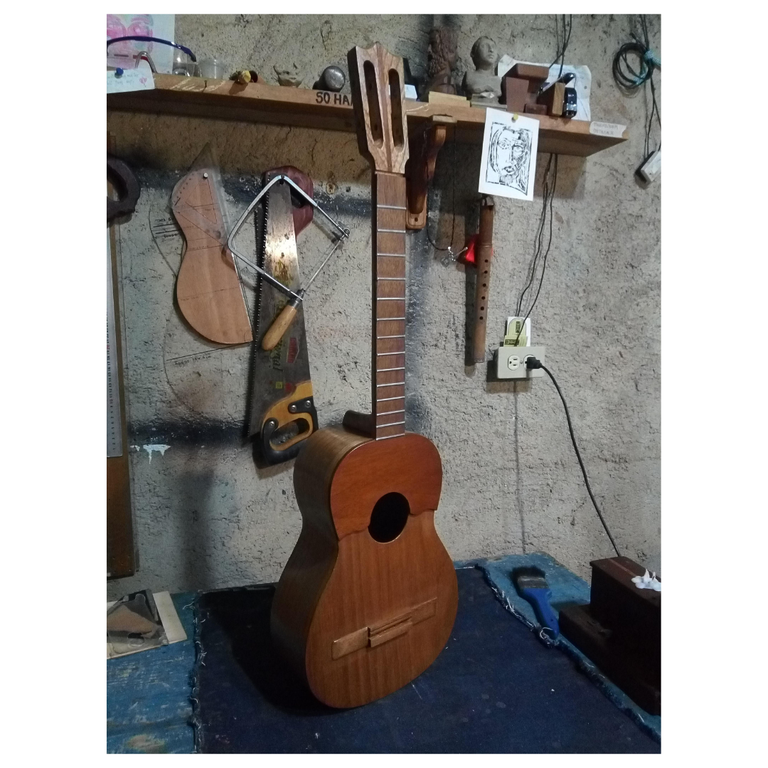
Así culminamos este proyecto el cual tuvo varias fases, pero debo decirles que quede satisfecho con el resultado porque la función acústica es buena, tiene bastante amplitud, en realidad es otro instrumento para como llego al atelier está revivido amigos artesanos.

Me despido y espero que sea de provecho este contenido, muchas gracias por leer, si tienen alguna sugerencia o duda estoy atento a los comentarios y si desean hacer algún pedido o adquirir algún trabajo de los que hago pueden contactarme, hasta una próxima publicación.

- Fotografías tomadas desde mi celular
- texto traducido en deelp
- Edición de imágenes en canva

English version
Completing the repair of a Venezuelan cuatro from dust to light.
Greetings friends craftsmen and fans of the trades that are developed in this hive, this time and after a few days I bring the second and final part of the modification of the Venezuelan cuatro that goes from non-functional to an optimal and totally useful instrument for an apprentice and anyone who plays the cuatro, although for professionals it would be another cuatro with other constructive characteristics, since the musician would demand other harmonic and sonorous conditions.

In the previous post we were treating the arrangements of the structure as fractures and fissures, besides placing a new fingerboard of solid wood of saman and an arrangement in the area of the pickguard, advancing in 50% of the proposed objectives seeing from the slight changes a new Chordophone full of much learning and gratitude, my gratitude to these instruments that arrive to the atelier, because they are a teaching.
Tools and materials
- carpenter's glue
- clamps or presses
- sandpaper of 80,120,180,220,
- Hard or semi-hard wood of 1.5cm thickness (saman)
- saw
- Sealer and lacquer
Objectives
- Scrape and remove old varnish
- Sand surface
- Glue a reinforcement bar near the soundhole and just below the pickguard
- Make a new fingerboard
- Bridge reinforcement
- Fit a pickguard
- Put a cap on the head of the headstock
- Rectify fingerboard
- Remove and make a new bridge with capo.
- Assembly, grinding and crowning of frets + Stringing and calibration
- Stringing and calibration
- Sealing and varnishing
Click here to visualize the first
instrument progress click
Step 7

In this step we will reinforce the internal part of the soundboard just below the bridge, in the constructions is usually done to give greater reinforcement and support to the bridge in addition to the lid was a little thin so we bring more structure and a little stiffness, this reinforcement of bridge or under bridge can be used depending on the construction of the instrument, so its use depends on how we want to model the instrument, I make it of a low density wood if possible as the one of the lid, with a thickness of 1 mm, the way to glue in this case is using a nylon fishing line and press with a few small pieces of wood, as the string is elastic to support with the same generates pressure I give about 6 hours of drying.
Step 8

I made the pickguard with a mahogany wood, with the same thickness of the fingerboard, this is a consideration that we must take into account, one of the parts, the one that is right at the 14th fret, must be flat, we place it on the instrument and we trace

With the manual saw, we cut the striker, with the manual electric jigsaw I consider that it would be very violent for a very thin wood, although there are some blades with smaller teeth and this would be the table jigsaw, this for time factor, but the manual gives us silence and we control much more the margin of error then we glue and when it is dry with a sandpaper 80 we reduce the edges.
Step 9

In view that the head of the pegbox did not have a cover and to have correspondence with the change of the pickguard I put it, use cedar and in its center mahogany, I thought to make it very simple, in the images to our left we can see the different ways to do it already here the use of the aesthetics is done and the taste is already subjective we can combine with the bottom hoops and pickguard, but as I say nothing is static.

Here we can see the before and after of the head of the pegbox, these details are the reflection of the dedication and the sample of dedication towards the instruments.
Step 10

With an 80 grit sanding block as we can see in the image above we rectify the fingerboard, to ensure that it is completely flat, the idea is always to brush before mounting, but with this we ensure that the block is completely flat.
Step 11

I always reflect the ideas in a plan, because we have at hand the precise measures to execute the project, in the plan we can see that the bridge is much larger than usual, because I had to base myself on the measures of the previous one, because if I made it less long the marks of the previous one would remain, since some splinters came off when I removed the old one since it had nails internally.
Step 12

Once we carve the bridge, we center and mark the distance or the 8 tava of the vibrating length, we mark and just where the capo will be placed we drill some nails as I need in this post, we glue and use this way some clamps, without much pressure, let it dry for 12 hours.
Step 13

Once the bridge is dry we go to rectify the frets, first with a long block with grain 80 this is passed about twice and then with a narrow block that covers up to fret 5 we pass from 1 to 5 and from 5 to 14, then we will verify that all are with the same height that is to say that one is not higher than another, but this is facilitated by performing the work of groove with good precision, finally we crown the frets with the fret crowner here I share a post that I show you this instrument.
Step 14

In this step we can do two things, continue with the sealing and varnishing or place the strings, I am going to the second option because we can calibrate the capo with the capo and thus determine if it has a good grip or if it is uncomfortable, since this way we can do it and thus have much more security when varnishing.
Step 15

Once we have sanded the whole instrument, we seal the wood, we pass about three coats with brush and two with more diluted doll, it is important that the relative humidity does not exceed 60%.

Step 16
In this occasion I used nitrocellulose lacquer, I varnished it with the french polish until achieving a satin shine, because I didn't want it to be a mirror shine but a natural shine.

Thus we finished this project which had several phases, but I must tell you that I was satisfied with the result because the acoustic function is good, it has enough amplitude, in fact it is another instrument for as it arrived at the atelier is revived artisan friends.

Posted Using InLeo Alpha
@tipu curate 8
Upvoted 👌 (Mana: 0/75) Liquid rewards.
Muy buena reparación 👍🏻
Saludos @bertrayo gracias colega!!
@tipu curate 8
Your cuatro came out quite nicely. Great sounds will definitely come out of it. Amazing work
Saludos por supuesto que si, para una próxima publicación grabó el sonido!! gracias
Every job that comes along is an opportunity to get a new client, learn something or improve a skill. The jobs that present a challenge are the ones that end up benefiting us the most, but a big challenge can also be exhausting.