✦ Let's go together into the different configurations of mini workstations 🗃 💕 - Collage & Edition in FotoJet, photos by @Tesmoforia ✦

🇪🇸 ~ ¿Sabes lo que es una "mini estación de trabajo"?, es una caja o bandeja con múltiples espacios para almacenar los materiales del proyecto que estes trabajando en este momento y hacerlo fácilmente transportable de un lugar a otro.
Cuando te dedicas a las manualidades por pasatiempo o profesión, el almacenamiento y clasificación de los materiales es todo un universo y cada vez que comienzas un proyecto:
¡Hay que sacar de todos lados un poco de todo!
(╯ ° □ °) ╯ ┻━━┻
Y seamos sinceros, que al final del día si no has terminado o es un "proyecto a largo plazo", regresar todo a su lugar cada vez que quieras continuar tu proyecto es muy agotador y hasta desmotivador.
Una "mini estación de trabajo" a tu medida resolverá ese problema; no mas escritorios, mesas de comedor y camas secuestrados al final del día (っ ˘з (˘⌣˘) ♡
🇺🇸 ~ Do you know what a “mini workstation” is?, it's a box or tray with multiple spaces to store the materials for the project you are currently working on and make it easily transportable from one place to another.
When you're into crafting as a hobby or profession, storing and sorting materials is a whole universe and every time you start a project:
You have to take from everywhere a little bit of everything!
(╯ ° □ °) ╯ ┻━━┻
And let's face it, that at the end of the day if you're not done or it's a “long term project”, putting everything back in its place every time you want to continue your project is very exhausting and even demotivating.
A “mini workstation” tailored to you will solve that problem; no more kidnapped desks, dining tables, and beds at the end of the day (っ ˘з (˘⌣˘) ♡
✦ ✨ 🍓 Strong, spacious, durable and adorable! 🍓 ✨ ✦
✦ "¿Por qué realizar este proyecto?" ✦
¡Un DIY para mejorar tu proceso de DIY!, es irónico y al mismo tiempo encantador, este ítem con su sencillez te ayudara a mantener el orden y el control sobre una variedad de materiales y herramientas puntuales.
⏳ Tiempo: ⭐⭐⭐/ 5.
🚀 Dificultad: ⭐⭐⭐/ 5.
🪙 Costo aproximado: ⭐⭐⭐⭐/ 5.
✦ "Why do this project?" ✦
A DIY to enhance your DIY process!, ironic yet charming, this item's simplicity will help you maintain order and control over a variety of materials and tools.
⏳ Time: ⭐⭐⭐/ 5.
🚀 Difficulty: ⭐⭐⭐/ 5.
🪙 Approximate cost: ⭐⭐⭐⭐/ 5.

« 𝕋 𝕆 𝕆 𝕃 𝕊 • 𝔸 ℕ 𝔻 • 𝕄 𝔸 𝕋 𝔼 ℝ 𝕀 𝔸 𝕃 𝕊 »
 |
|---|
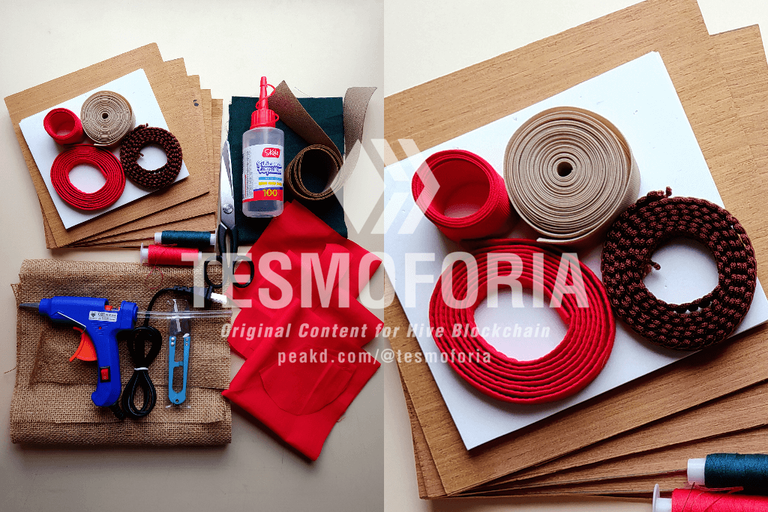
| 🇪🇸 ✦ Las herramientas y materiales que necesitas para elaborar este proyecto son: Madera, pistola de silicón caliente, barras de silicón, tela de yute, cuero sintético, pasamanería, cintas de distintos colores y medidas, tela color rojo-verde-negro, hilo de distintos colores, pegamento silicón liquido, aguja regular, máquina de coser (opcional), regla, lápiz, marcador fino, foami escolar, pinzas de costura, alfileres pequeños, felpa, pintura acrílica, pincel fino, tijera. |
| 🇺🇸 ✦ The tools and materials you need to make this project are: Wood, hot silicone gun, silicone sticks, jute fabric, synthetic leather, trimmings, ribbons of different colors and sizes, red-green-black fabric, thread of different colors, liquid silicone glue, regular needle, sewing machine (optional), ruler, pencil, fine marker, school foami, sewing tweezers, small pins, felt, acrylic paint, fine brush, scissors. |
• ℙ ℝ 𝕆 𝕐 𝔼 ℂ 𝕋 𝕆 •
« Mini Decorated Workstation »

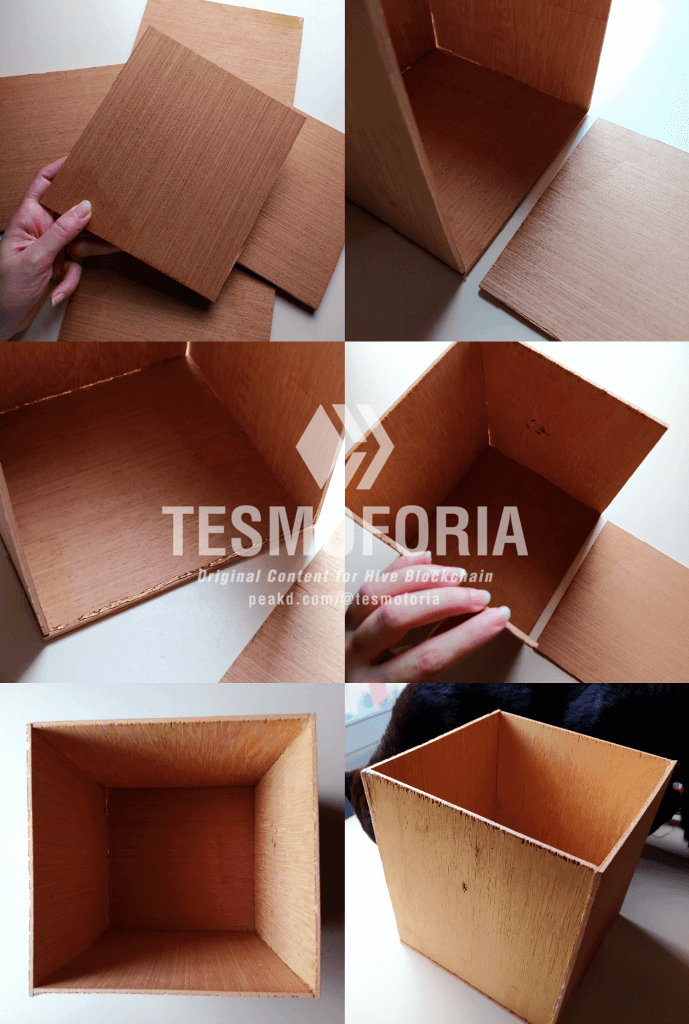
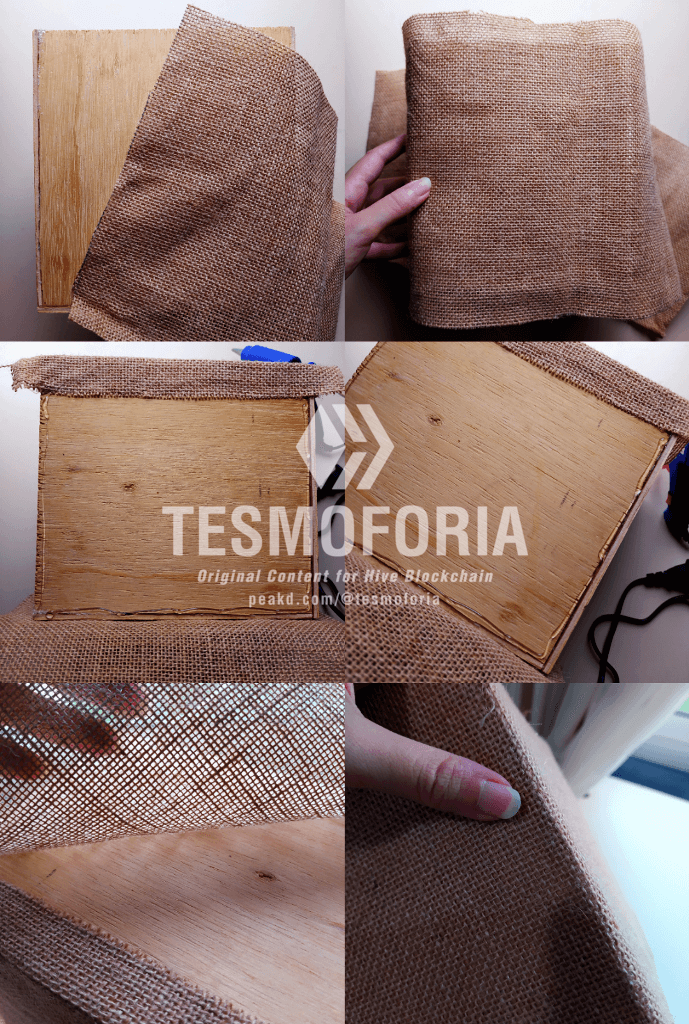
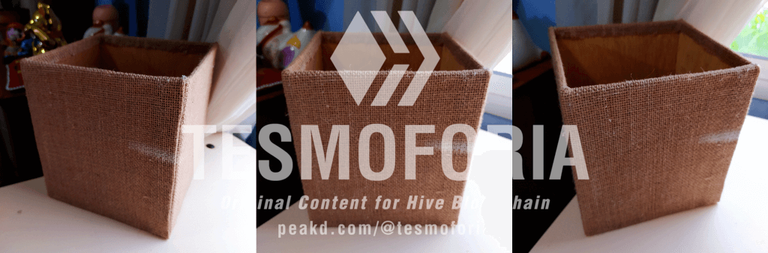
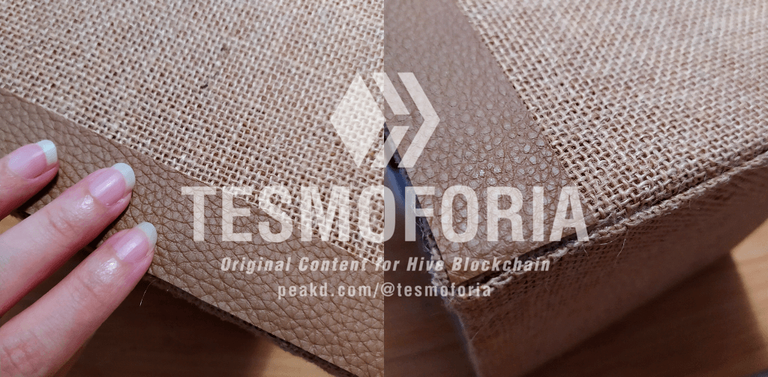

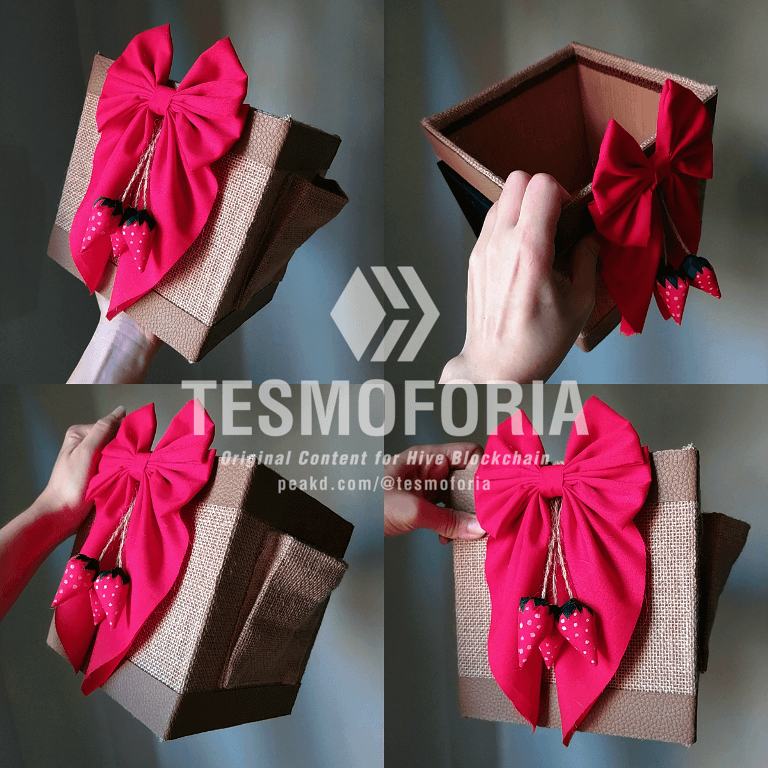
【 PASO 1 】 Corta 4 láminas de madera de 17 cm x 19 cm (paredes de la caja), y 1 lámina de 17 cm x 17,5 cm (piso de la caja), y une todo aplicando silicón caliente. A continuación recorta 1 rectángulo de tela de yute de 75 cm x 24 cm y forra el exterior de la caja pegando poco a poco la tela a la caja con más silicón caliente. Finaliza esta etapa cortando 2 tiras de cuerina sintética de 52 cm x 3 cm y pégalas en el borde exterior superior e inferior de la caja con pegamento silicón frío.
【 STEP 1 】 Cut 4 sheets of wood measuring 17 cm x 19 cm (walls of the box), and 1 sheet measuring 17 cm x 17.5 cm (floor of the box), and join them together using hot silicone. Next, cut out 1 rectangle of 75 cm x 24 cm jute fabric and line the outside of the box, gradually gluing the fabric to the box with more hot silicone. Finish this step by cutting 2 strips of synthetic leather measuring 52 cm x 3 cm and glue them to the top and bottom outer edge of the box with cold silicone glue.
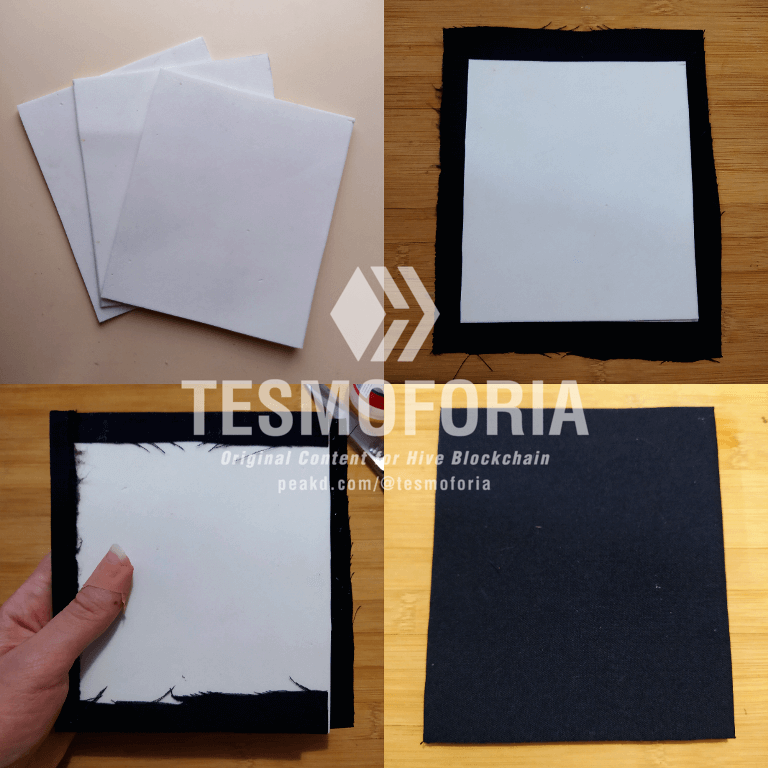
【 PASO 2 】 Toma el foami escolar y recorta 3 rectángulos de 12,5 x 14,5 cm, pégalos para formar una "almohadilla" y forra con tela color oscuro. Esto será una mini pizarra "de corcho" para colocar notas con tachuelas.
【 STEP 2 】 Take the school foami and cut out 3 rectangles of 12.5 x 14.5 cm, glue them together to form a “pad” and line with dark colored fabric. This will be a mini “cork” board for tacking notes.
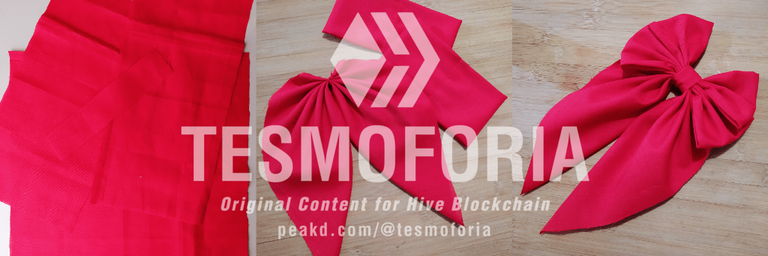
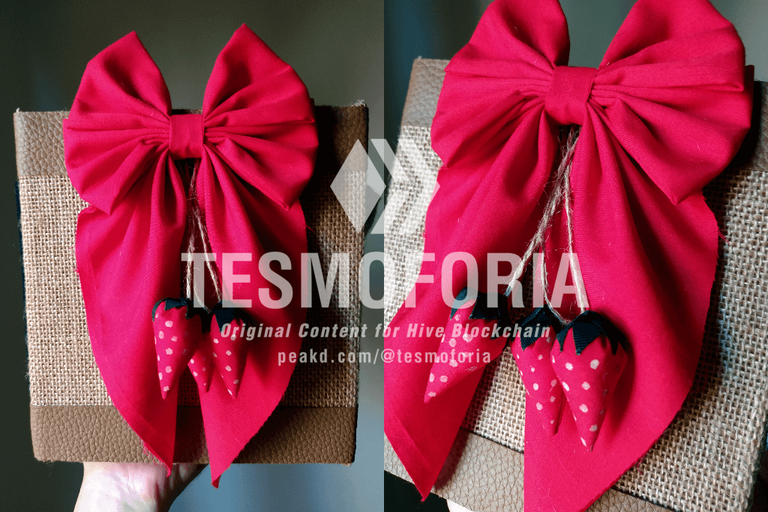
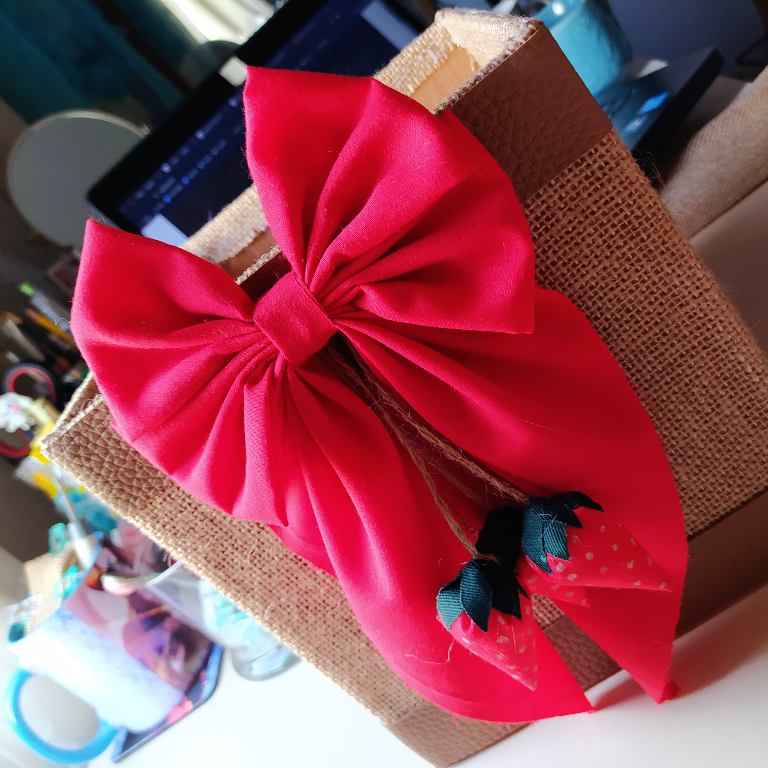
【 PASO 3 】 Para decorar el frente de tu estación de trabajo vamos a hacer un lazo de 3 piezas. Para hacerlo necesitas 1 pieza de tela de 24 cm x 12 cm, otra pieza de 12,5 x 26 cm, y 1 cuadrado de 38 cm x 38 cm. Dobla las primeras 2 piezas 4 veces hacia su centro y haz un acordeón, la tercera pieza dóblala en diagonal y has tambien un acordeón. Une todo con hilo y aguja regular, y cubre el centro con un pedacito extra del mismo tipo de tela.
【 STEP 3 】 To decorate the front of your workstation we are going to make a 3 piece loop. To do this you need 1 piece of fabric of 24 cm x 12 cm, another piece of 12,5 x 26 cm, and 1 square of 38 cm x 38 cm. Fold the first 2 pieces 4 times towards their center and make an accordion, the third piece fold it diagonally and make an accordion as well. Join everything together with regular needle and thread, and cover the center with an extra piece of the same type of fabric.
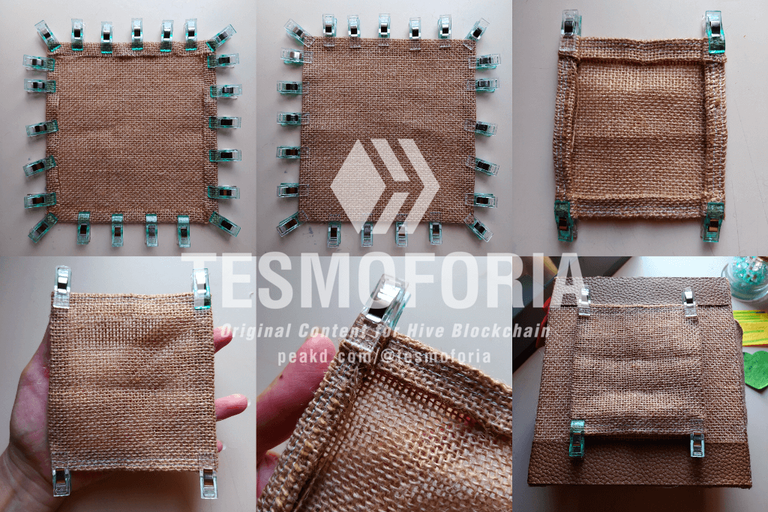
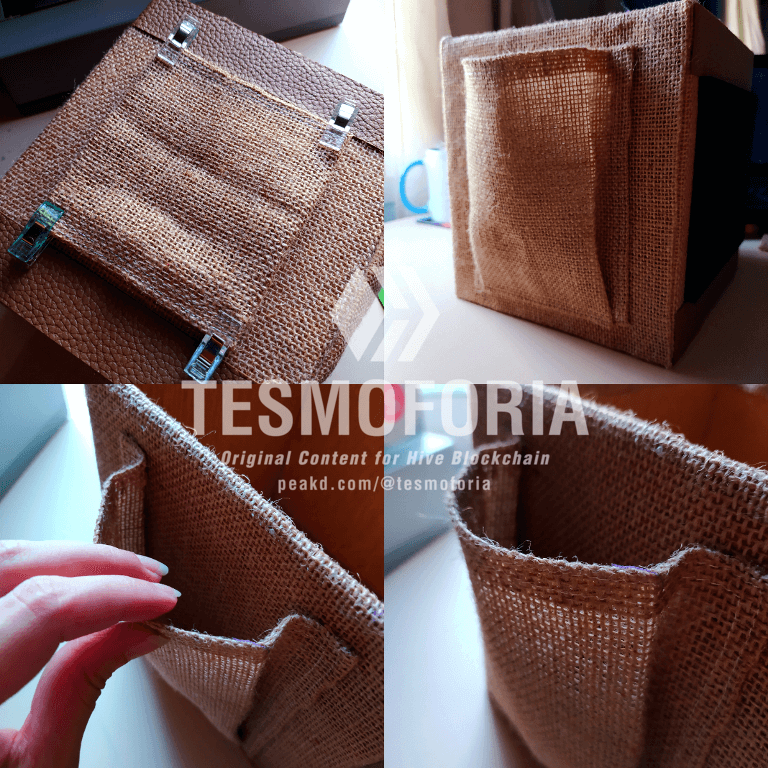
【 PASO 4 】 Para 2 de los lados de tu estación de trabajo necesitamos algunos bolsillos para herramientas pequeñas-medianas. Corta 2 rectángulos de tela de yute de 19 cm x 17 cm, dobla 1 cm hacia dentro desde todos sus lados y lleva a la máquina de coser o cose a mano. Luego, vuelve a doblar hacia dentro como si hicieras un pequeño acordeón y sujeta con las pinzas de costura agregando pegamento solamente en las esquinas de la parte inferior de los rectángulos (mira las imágenes guía); pega de forma permanente al lado derecho y trasero de la caja (yo hice 2 tamaños diferentes de bolsillos pero recomiendo mejor hacer ambos del mismo tamaño).
【 STEP 4 】 For 2 sides of your workstation we need some pockets for small-medium tools. Cut 2 rectangles of jute fabric 19 cm x 17 cm, fold 1 cm inward from all sides and bring to the sewing machine or sew by hand. Then, fold inwards again as if you were making a small accordion and attach with the sewing clamps adding glue only on the bottom corners of the rectangles (see the guide images); glue permanently to the right and back side of the box (I made 2 different sizes of pockets but I recommend making both the same size).
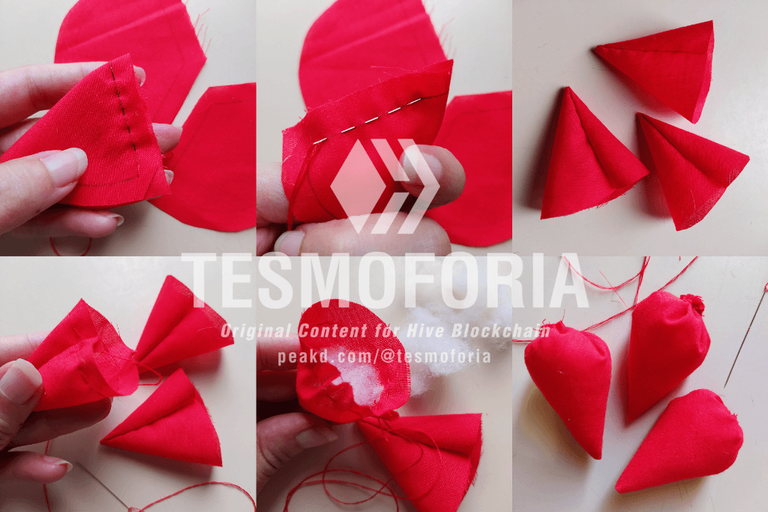
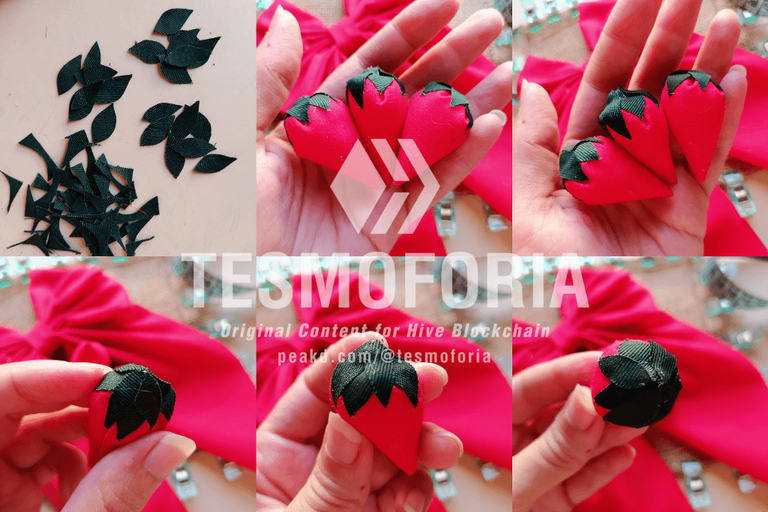
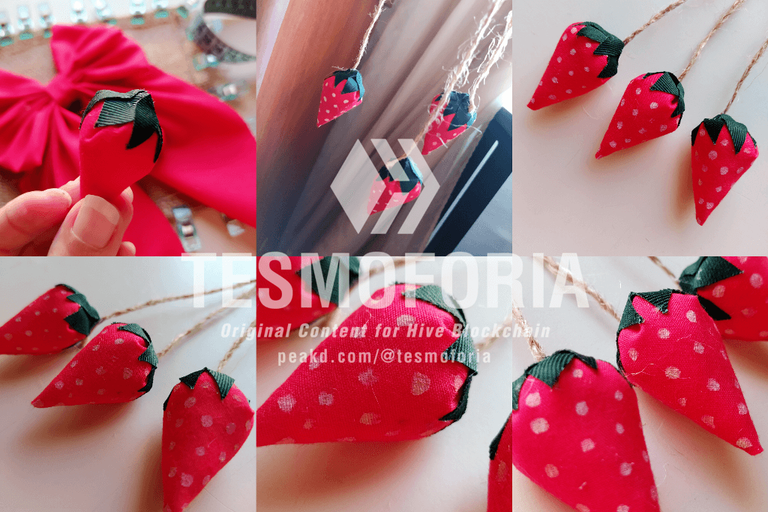
【 PASO 5 】 Para concluir las decoraciones del frente de la caja, vamos a elaborar unas pequeñas fresas de tela. Para hacerlas dibuja un círculo del tamaño de tu preferencia, corta por la mitad, y cose estos medio-círculos doblando por la mitad, omitiendo "la parte curva".
Voltea todos los conos de tela y rellena con un poco de felpa, luego has una puntada básica en la parte superior abierta de los conos y tira del hilo hasta que se cierre.
Agrega unas pequeñas hojas de tela color verde y haz pequeños puntos de pintura acrílica para simular las semillas en toda la superficie de las fresas. Trenza 3 hebras de tela de yute y pega un extremo a cada fresa el otro extremo detrás del lazo de tela.
【 STEP 5 】 To conclude the decorations on the front of the box, let's make small fabric strawberries. To make them draw a circle of the size of your choice, cut in half, and sew these half-circles by folding in half, omitting the “curved part”.
Turn all the fabric cones over and stuff with some plush, then stitch a basic stitch on the open top of the cones and pull the thread until it closes.
Add a few small leaves of green fabric and make small dots of acrylic paint to simulate seeds all over the surface of the strawberries. Braid 3 strands of jute fabric and glue one end to each strawberry and the other end behind the fabric loop.
« ℂ 𝕆 𝕄 ℙ 𝕃 𝔼 𝕋 𝔼 • ℙ ℝ 𝕆 𝕁 𝔼 ℂ 𝕋 »
 |  |
|---|


『 Resumen 』~ ¡Todos necesitamos una mini estación de trabajo!, es de gran ayuda para movilizar y guardar de forma segura todos aquellos materiales y herramientas de distintos tipos que utilizamos temporalmente para uno o mas proyectos específicos, y asi no estén mal ubicados durante ese tiempo en espacios inconvenientes o estén expuestos a extraviarse.
『 Recomendaciones Finales 』~
Escoge las medidas que más se adapten a tus necesidades.
No limites tu creatividad a la hora de decorar.
Y sobre todo disfruta mucho el proceso de elaboración, ¡tambien es un regalo ideal para tus amigos mas creativos! 🎁 💕
『 Summary 』~ We all need a mini workstation! It is a great help to safely mobilize and store all those materials and tools of different types that we use temporarily for one or more specific projects, so that they are not misplaced during that time in inconvenient spaces or are exposed to being misplaced.
『 Final Tips 』~
Choose the sizes that best suit your needs.
Don't limit your creativity when decorating.
And above all, enjoy the process of elaboration, it is also an ideal gift for your most creative friends! 🎁 💕

 |  |  |  |  |  |  |  |  |
|---|
✨ 🍓 All texts and images by @Tesmoforia 🍓 ✨
📸 Tools: Smartphone 📲 Snow 🎬 Remini 🌓 FotoJet 📐
🚨 ¡Please do not take, edit or republish my material without my permission! 🚨
💌 ¿Do you wish to contact me? Discord #tesmoforia 💌
🌙 Banner, signature and separators by Keili Lares
Posted Using InLeo Alpha