
✦ The same functional formula regardless of tape thickness! 💯 📐 - Collage & Edition in FotoJet, photos by @Tesmoforia ✦

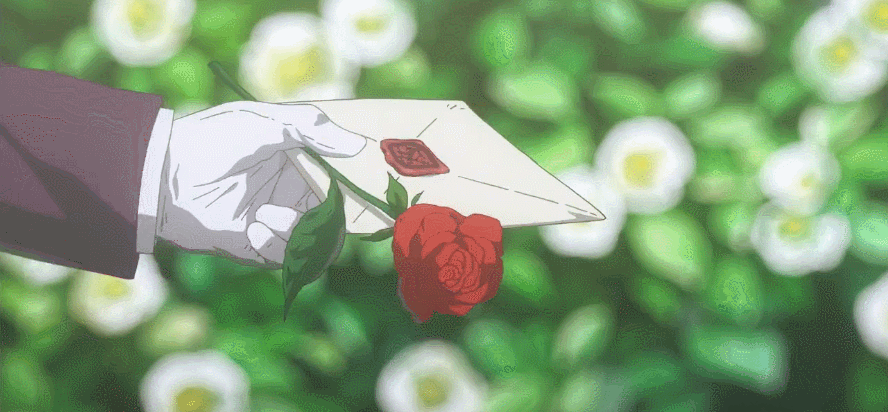
🇪🇸 ~ ¿Rosas de seda perfectas en poco minutos?, ¡claro que sí!, por supuesto que necesitarás algo de práctica para perfeccionar esta técnica pero he aquí el plus del método que quiero señarte hoy:
Las rosas de tela "pétalo a pétalo" son bellísimas pero requieren alta dosis de atención y paciencia (y cuidado con no quemarte los dedos con el yesquero)
🇺🇸 ~ Perfect silk roses in just a few minutes? Of course! You'll need some practice to perfect this technique, but here's the bonus of the method I want to show you today:
Fabric roses made "petal by petal" are beautiful, but they require a great deal of attention and patience (and be careful not to burn your fingers with the lighter).

Por eso hoy quiero que regresemos juntos a unos de mis básicos favoritos para que aprendas una alternativa para fabricar rosas de tela, un complemento de 1.000 usos distintos que necesitaras hoy y siempre tanto para proyectos artísticos, negocio o momentos especiales 🎎 🎁
⏳ Tiempo: ⭐/ 5.
🚀 Dificultad: ⭐⭐/ 5.
🪙 Costo aproximado: ⭐⭐/ 5.
That's why today I want us to go back to one of my favorite basics so you can learn an alternative way to make fabric roses, an accessory with a thousand different uses that you'll need today and always, whether for artistic projects, business, or special moments 🎎 🎁
⏳ Time: ⭐/ 5.
🚀 Difficulty: ⭐⭐/ 5.
🪙 Approximate cost: ⭐⭐/ 5.

« 𝕋 𝕆 𝕆 𝕃 𝕊 • 𝔸 ℕ 𝔻 • 𝕄 𝔸 𝕋 𝔼 ℝ 𝕀 𝔸 𝕃 𝕊 »
 |
|---|
| 🇪🇸 ✦ Las herramientas y materiales que necesitas para elaborar este proyecto son: Plancha para cabello, cinta de seda de diferentes medidas (largo aproximado, 1 metro a metro y medio), cinta adhesiva, aguja regular, hilo, tijera, silicón liquido. |
| 🇺🇸 ✦ The tools and materials you need to make this project are: Hair straightener, silk ribbon in different sizes (approximate length, 1 meter to 1.5 meters), adhesive tape, regular needle, thread, scissors, liquid silicone. |
| 『 Recomendacion 』 🇪🇸 📌 Una plancha para cabello no es un artículo extraño en el repertorio de un artista crafteril por sus distintos usos en el tratamiento de diferentes materiales, pero si no es tu caso y solo cuentas con la que tienes para estilismo de cabello en casa, higienízala primero con un algodón bañado en alcohol de uso médico para retirar particular de grasa natural adheridas a sus placas por el uso, y que podrían manchar las cintas. |
| 『 Tip 』🇺🇸 📌 A hair straightener is not an unusual item in a craft artist's repertoire due to its various uses in treating different materials, but if this is not the case for you and you only have the one you use for styling your hair at home, sanitize it first with cotton wool dipped in medical alcohol to remove any natural oils that have adhered to its plates through use and could stain the ribbons. |
• Fabric Roses •
« Step-by-step method with a single main material »


【 PASO 1 】 Muchas cintas de tela son propensas a las arrugas una vez que salen de su rollo, asi que comenzamos con la preparación del material, que consiste en calentar la plancha para cabello con una temperatura baja a intermedia, y pasarla por toda la cinta ejerciendo una presión moderada. Notaras que "mágicamente se vera como nueva" o sin imperfecciones.
【 STEP 1 】 Many fabric ribbons are prone to wrinkling once they come off the roll, so we begin by preparing the material. This involves heating the hair straightener to a low to medium temperature and running it over the entire ribbon, applying moderate pressure. You will notice that it will “magically look like new” or without imperfections.


【 PASO 2 】 Ubica del centro de tu pieza de cinta y dóblala en forma de "L" como se aprecia en la segunda imagen guía del paso anterior, luego comienza a superponer ambos extremos de la cinta, y por cada superposición, gira la pieza y repite este proceso, imagina que estas creando "un acordeón", pero debes mantener este acordeón presionado cada vez que le das la vuelta. Fíjate como se ve en las fotografías guía.
【 STEP 2 】 Find the center of your piece of tape and fold it into an “L” shape as shown in the second guide image in the previous step. Then begin to overlap both ends of the ribbon, and for each overlap, turn the piece and repeat this process. Imagine that you are creating an “accordion,” but you must keep this accordion pressed down each time you turn it over. See how it looks in the guide photos.

【 PASO 3 】 ¡Esta parte es muy divertida!, sostén firmemente la cinta residual entre tu dedo anular y tu dedo medio, y suelta el acordeón; veras como el material "salta" como un resorte.
【 STEP 3 】 This part is really fun! Hold the residual tape firmly between your ring finger and middle finger, and release the accordion; you will see how the material “jumps” like a spring.

【 PASO 4 】 De los 2 extremos de cinta residuales, tira suavemente de uno de ellos (notaras que uno cede y otro no) y veras como la rosa se va formando. Has este paso con lentitud porque mientras más tires de la cinta menos pétalos tendrá tu rosa. Detente cuando alcances la cantidad de pétalos estimados que quieres. Luego, gira suavemente el botón de rosa para que su forma se despliegue.
【 STEP 4 】 From the two ends of the leftover ribbon, gently pull one of them (you will notice that one gives way and the other does not) and you will see how the rose begins to form. Do this step slowly because the more you pull the ribbon, the fewer petals your rose will have. Stop when you reach the estimated number of petals you want. Then, gently twist the rosebud so that its shape unfolds.


【 PASO 5 】 Cuando la rosa alcance el aspecto final que quieres, toma hilo y aguja y cose la base que has estado sosteniendo entre tus dedos. Unas cuantas puntadas básicas es suficiente. También puedes agregar algunas gotas pequeñas de pegamento por debajo de los pétalos mas grandes para evitar que se muevan de su lugar, en caso quieras darle un extra de resistencia a tus rosas de tela.
【 STEP 5 】 When the rose reaches the final look you want, take a needle and thread and sew the base that you have been holding between your fingers. A few basic stitches are enough. You can also add a few small drops of glue underneath the larger petals to keep them from moving out of place, if you want to give your fabric roses extra strength.
« "What should I do if my silk ribbon has synthetic components or is starched?" »

A veces las cintas de seda que encuentras en tiendas se sentirán algo rígidas a pesar de que te digan que son de tela. En estos casos tu rosa puede necesitar un pequeño ajuste en la forma en que haras "el acordeón".
Sometimes the silk ribbons you find in stores will feel somewhat stiff even though they are labeled as fabric. In these cases, your rose may need a slight adjustment in the way you make the “accordion.”

Por ejemplo, en este caso recomendaría hacer un acordeón mas pequeño, o en su defecto apretar menos las cintas cada vez que super-pongas una con otra.
For example, in this case, I would recommend making a smaller accordion fold, or alternatively, tightening the ribbons less each time you overlap one with another.


Las cintas que son "mas rígidas" no permiten hacer rosas de pétalos abundantes porque el mismo material tiende a atorarse cuando jalas el extremo sobrante de material, pero con algo de paciencia es posible y sobre todo, este tipo de cinta es muy bueno si quieres "rosas planas".
The “stiffer” ribbons do not allow you to make roses with abundant petals because the material itself tends to get stuck when you pull the excess end of the material, but with a little patience it is possible and, above all, this type of ribbon is very good if you want “flat roses.”
« What should I do if I want to use ribbon that is 5 cm or wider? »


Las cintas con un ancho superior a 2 cm son un reto interesante, puedes producir rosas de mayor número de pétalos pero necesitaras unos 50 cm extras de material en comparación a los casos anteriores.
Ribbons wider than 2 cm are an interesting challenge. You can make roses with more petals, but you will need about 50 cm more material than in the previous cases.


El acordeón en este caso no debe ser muy apretado, es decir mientras superpongas cada extremo de la cinta la presión que ejerzas debe ser suave a moderada.
The accordion fold in this case should not be too tight; in other words, as you overlap each end of the tape, the pressure you apply should be gentle to moderate.

Para este tipo de rosas es probable que debas practicar unas cuantas veces y tambien manipular bastante la cinta para que este lo más suave posible (obtendrás unos pétalos más redondeados y bonitos).
For this type of rose, you will probably need to practice a few times and also manipulate the ribbon quite a bit to make it as smooth as possible (you will get more rounded and beautiful petals).
« What if the ribbon I want to use is textured or ribbed? »

Las cintas con textura dan un resultado ciertamente diferente. Lo primero que notaras es que al soltar el acordeón y recogerlo, el botón de rosa no es muy bonito que digamos, pero eso tiene solución: En este caso el acordeón NO SE SUELTA, se retiene con el pulgar y jalas de la cinta hasta formar el botón de rosa (fíjate en las imágenes guía).
Textured ribbons give a distinctly different result. The first thing you will notice is that when you release the accordion and gather it up, the rose button is not very pretty, but there is a solution: In this case, DO NOT RELEASE THE ACCORDION. Hold it with your thumb and pull the ribbon until you form the rose button (see the guide images).

Las rosas hechas con este material se sienten mucho mas rígidas y estables.
Roses made from this material feel much stiffer and more stable.

Para proyectos de mucho uso o accesorios para el cabello, este es mi tipo de cinta preferido.
For high-use projects or hair accessories, this is my preferred type of tape.
« The possibilities are almost endless! I encourage you to experiment with creating fabric roses using ribbons of different colors and thicknesses »


 |  |  |  |  |  |  |  |  |
|---|
✨ 🍓 Texts & photos by @Tesmoforia 🍓 ✨
📸 Tools: Smartphone 📲 Snow 🎬 TinyPNG 🌓 FotoJet 📐
🚨 ¡Please do not take, edit or republish my material without my permission! 🚨
💌 ¿Do you wish to contact me? Discord #tesmoforia 💌
🌙 Graphics Keili Lares - InstaLog 📲
Posted Using INLEO
Guao! Qué flor más bella! Será que podré hacerla? a ver si lo logro. Bella te saltaste una de nuestras reglas, para que estés pendiente de la prox. vez, tu aporte es importante para la comunidad.
¡Claro que podrás hacerla! 👏 ❤️🔥 Si no mal recuerdo has hecho flores antes y en técnicas mucho mas complejas que esta, sería muy genial ver un tutorial a tu manera de este método, la amiga que me enseñó a hacerlas también me dijo que cada quien le agrega su estilo según el ánimo y el gusto (el volumen, la cantidad de pétalos, al altura, etc) ~
Y como decía mi santa abuelita, "pasando pena despues de vieja", mil gracias por indicarme que me pelé algo tan importante 🥺 ❤️🩹 ay ay el conteo de palabras, lo siento mucho (arreglado!) En la edición me faltó un cachito de info importante. Siempre es una alegría poder participar, los quiero mucho 🫂
No reina es la numero uno, to do el post es divino
Ooooh ya lo vi 😭 Gracias por tomarte el tiempo de decirme, estaré mas atenta para marcarlo y lo enviaré cuando llegue a los 7 días en este caso 👏
Hermosas flores @tesmoforia, parecen sencillas de hacer y con tu completa explicación mucho mejor.
Saludos!
Hola @samuell12 muchas gracias 🥰
Hermosas esas rosas, espero algún día hacerlas tan bellas como tú, muchas gracias por compartir tus trucos. 🥰🫂
Gracias a ti por comentar Sara 💐 estoy segura que lograras hacerlas, se ve complicado pero no lo es, solo se necesita practica, y despues es como andar en bicicleta (nunca se te olvida) 🌟
Vaya, esto es muy agradable. Realmente amo el esfuerzo que agregaste ;)
I'm glad to know that you found something nice here 😄
Me encanta esta técnica para hacer rosas, es sencilla y rápida, la aprendí hace unos años y es mi favorita💖 pero lo que más amé de tu post fue el detalle de la diferencia entre cada material, ideal para saber qué elegir según el trabajo que vaya a realizarse, porque vaya que es amplio el campo para agregar estas lindas rosas, desde prendas de vestir y accesorios, hasta tarjetería✨
Muchas gracias por compartir tan excelente tutorial🤗
Hola @mavilan30! 💜 Encantadísima de encontrar una amiga aquí que conozca la técnica porque estoy segura viste este post con lupa inquisidora ~
Agregué ese apartado extra porque es algo que aprendes con el tiempo cuando comienzas a adquirir variedad de cintas y crees que todas te darán el mismo resultado, por experiencia aprendes que no es asi y reconocí una pausa importante en este método, ojala le evite una equivocada inversion de material a algún amigo creativo.
Gracias a ti por compartir tus impresiones! 💗