Hola amigos de HIVEDIY, para esta semana quise compartir con ustedes mi experiencia realizando una maqueta como asignación para un curso de diseño gráfico que hice el año pasado, donde a lo largo del mismo, tuve que realizar varias actividades y composiciones. Esta actividad me gustó mucho porque siento que logré crear una composición simple pero bien cohesiva y armónica donde reflejara todos los conceptos vistos en clase.
Hello friends of HIVEDIY, for this week I wanted to share with you my experience making a model as an assignment for a graphic design course that I did last year, where throughout it, I had to carry out various activities and compositions. I really liked this activity because I feel that I managed to create a simple but very cohesive and harmonious composition that reflected all the concepts seen in class.
Para esta asignación vimos los conceptos de la teoría de la Gestalt, la cual busca explicar como nuestras mentes perciben las formas, y el Espacio Positivo y Negativo. El objetivo de esta asignación era poner a prueba los conocimientos obtenidos en clase para reflejar de alguna manera creativa el postivo y negativo de nuestra composición en la misma maqueta.
For this assignment we looked at the concepts of Gestalt theory, which seeks to explain how our minds perceive shapes, and Positive and Negative Space. The objective of this assignment was to test the knowledge obtained in class to reflect in some creative way the positive and negative of our composition in the same model.

📖 Concepto de Diseño /// Design Concept
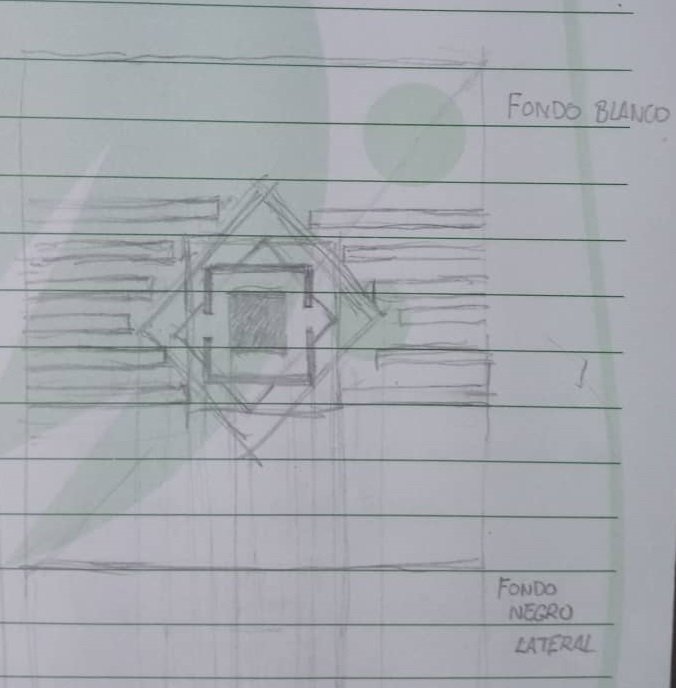
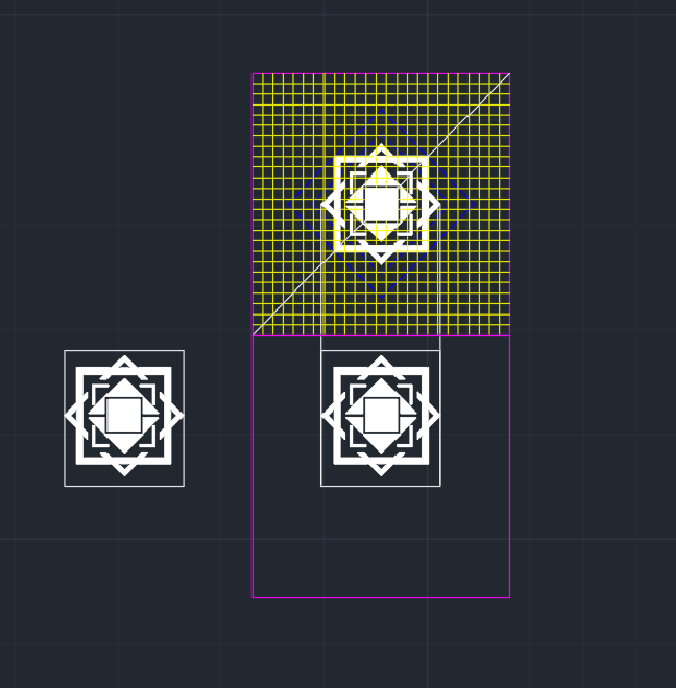
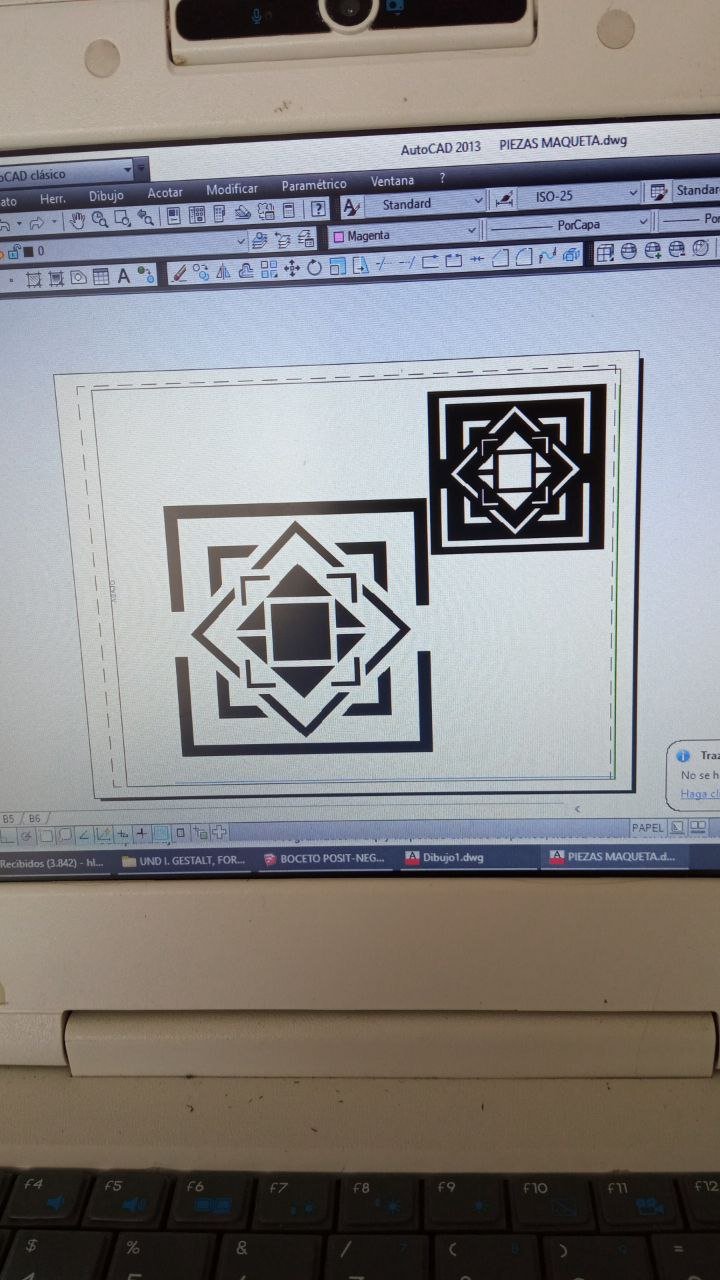
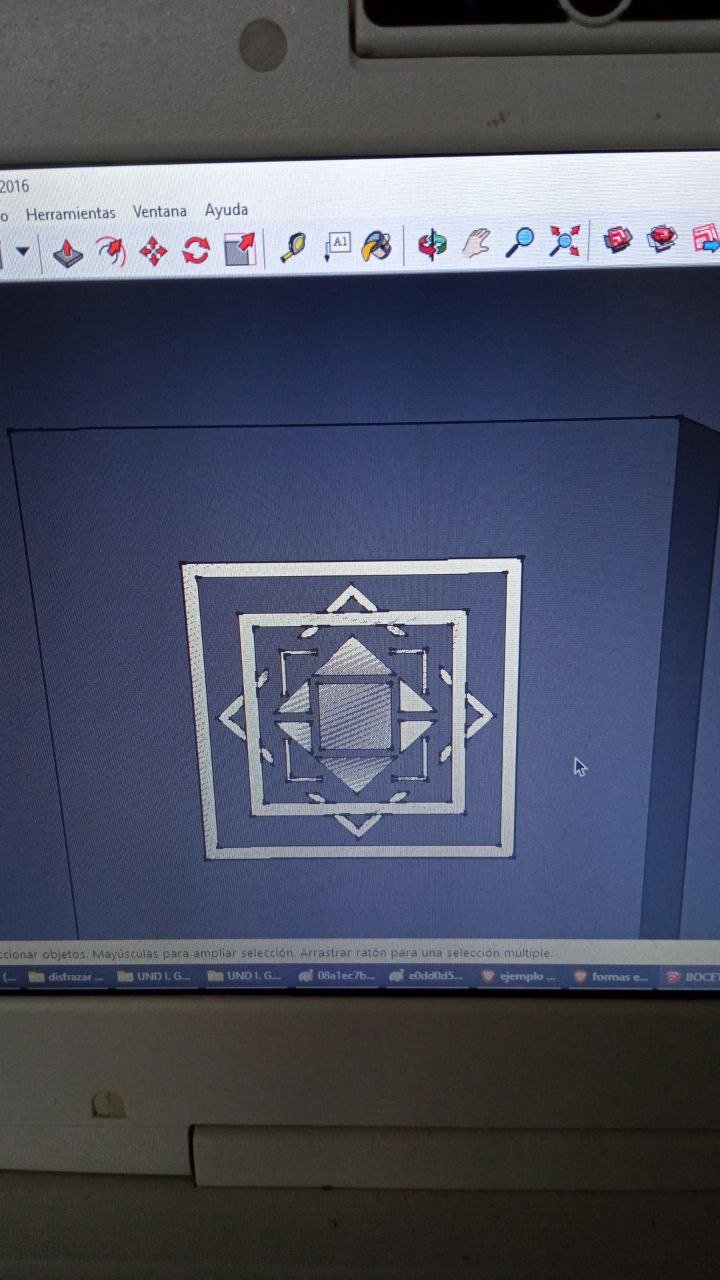
Como el profesor siempre decía que no limitáramos nuestra creatividad, decidí buscar la forma de hacer 1 sola maqueta donde pudiera tener ver un espacio distinto dependiendo desde donde viera la maqueta. Para ello realicé mi primer boceto a mano en el cuaderno, donde realicé mi primera idea de composición y reflejé la idea de que un espacio se viera desde arriba, y el otro espacio se vería desde el frente. Luego abrí el AutoCAD para crear una cuadrícula y comencé a digitalizar mi boceto proporcionalmente para luego ir creando los cambios necesarios en la composición hasta llegar a la versión final.
Since the teacher always said that we should not limit our creativity, I decided to find a way to make 1 single model where I could see a different space depending on where I saw the model from. For this I made my first sketch by hand in the notebook, where I made my first idea of composition and reflected the idea that one space would be seen from above, and the other space would be seen from the front. Then I opened AutoCAD to create a grid and began to digitize my sketch proportionally and then create the necessary changes in the composition until I reached the final version.
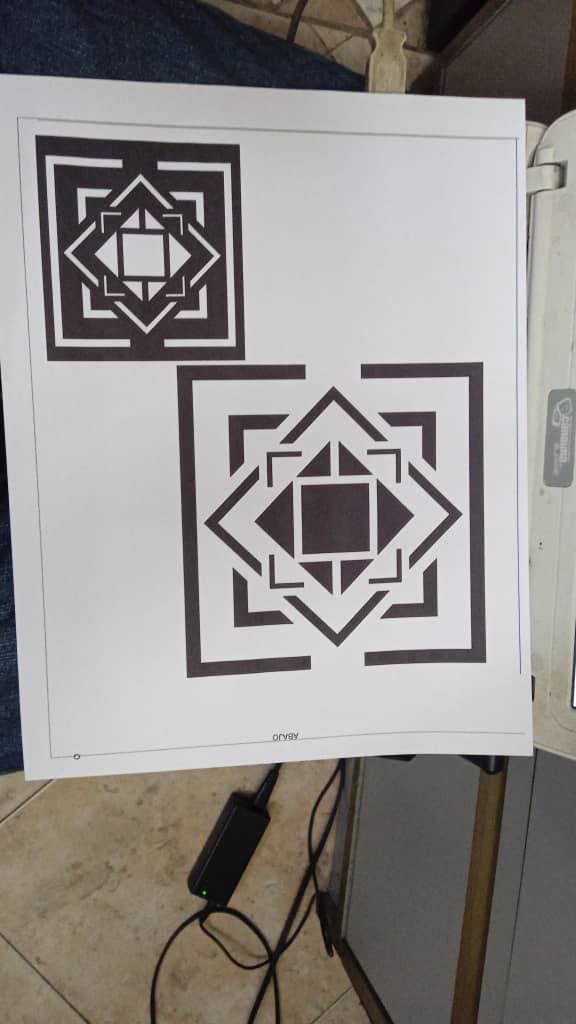
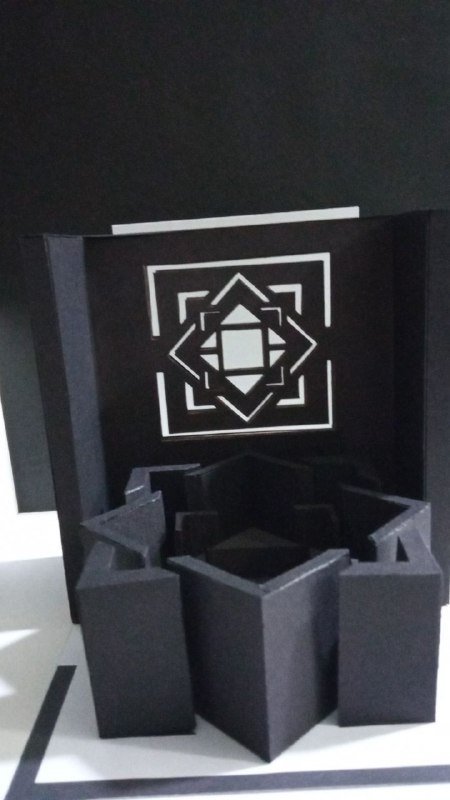
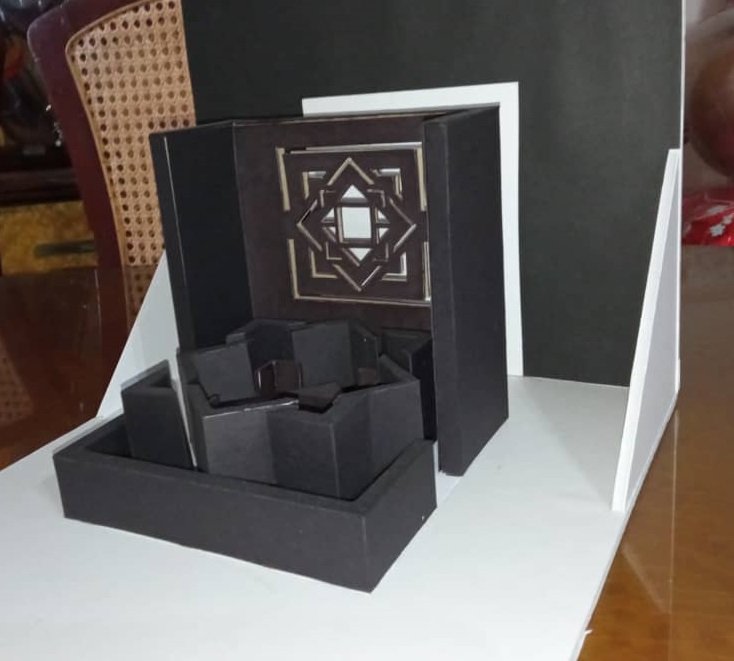
Para el diseño de la maqueta, decidí realizar una composición sencilla conformada por el uso de cuadrados y triángulos (algunos puros y otros abiertos/con sustracciones) para jugar con la percepción de las formas y aplicar con ellos algunos conceptos de la Teoría de la Gestalt.
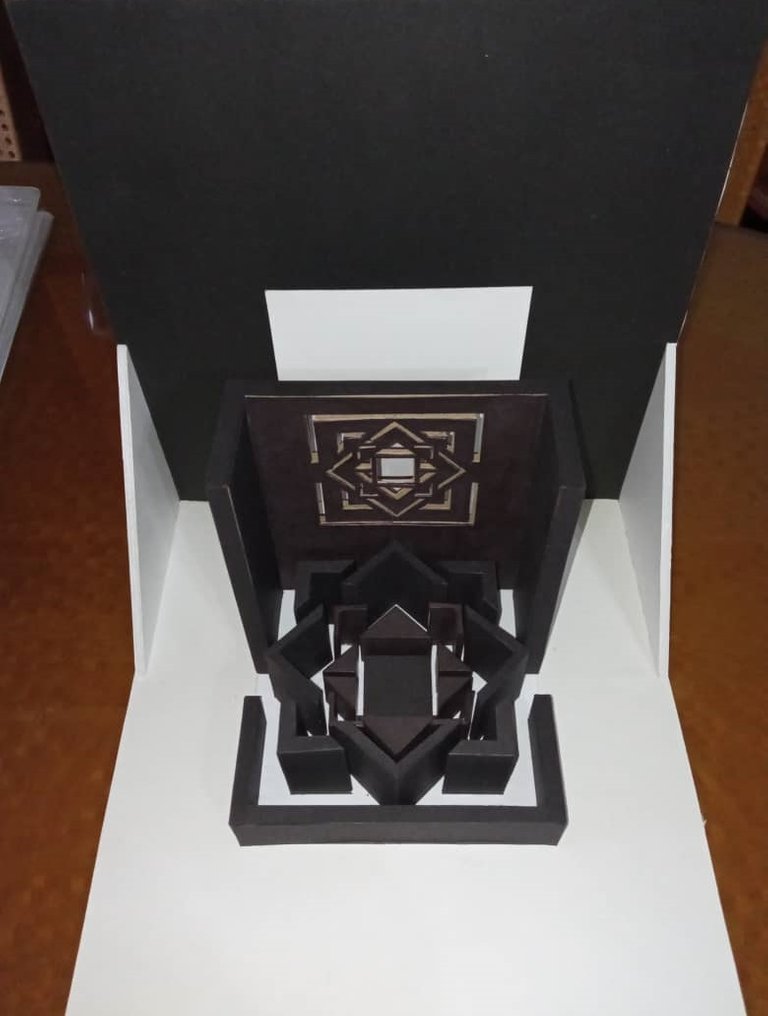
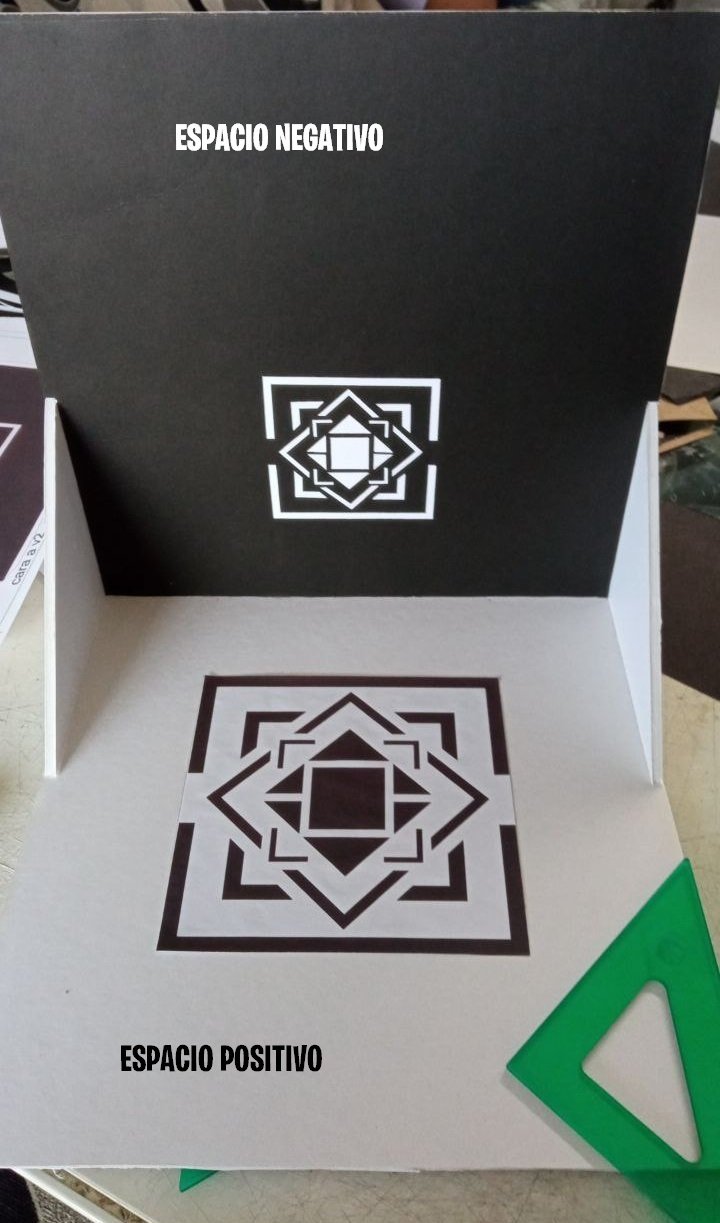
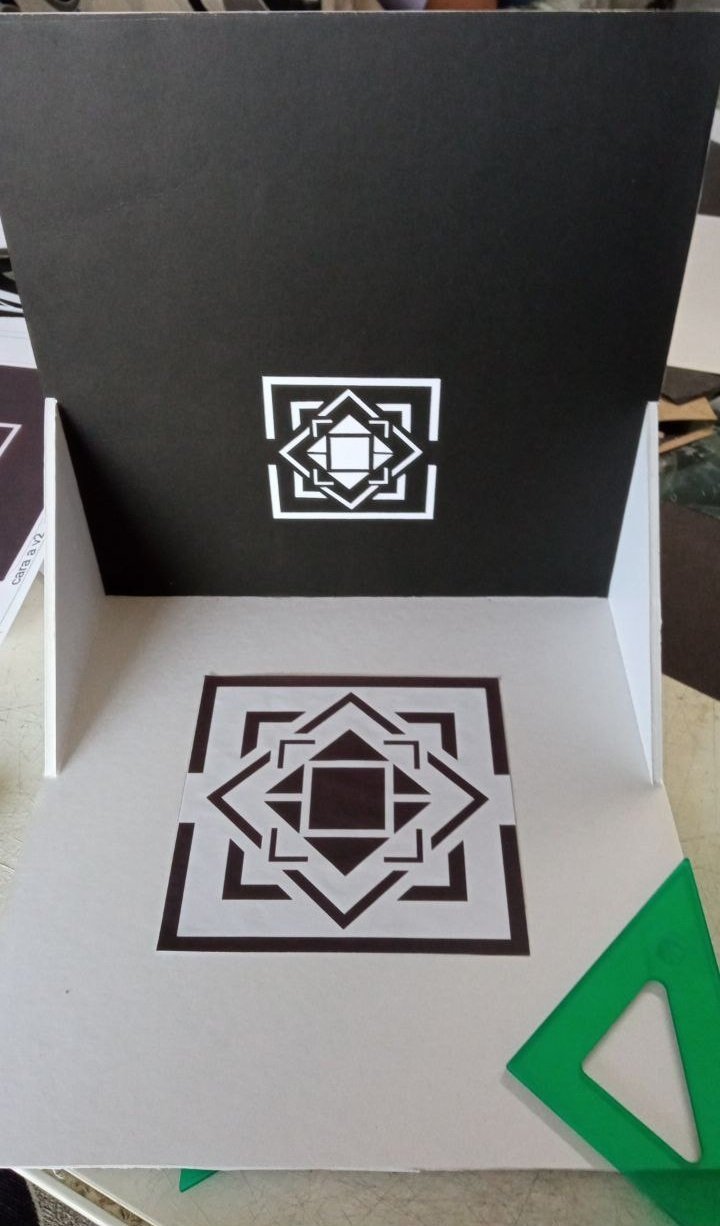
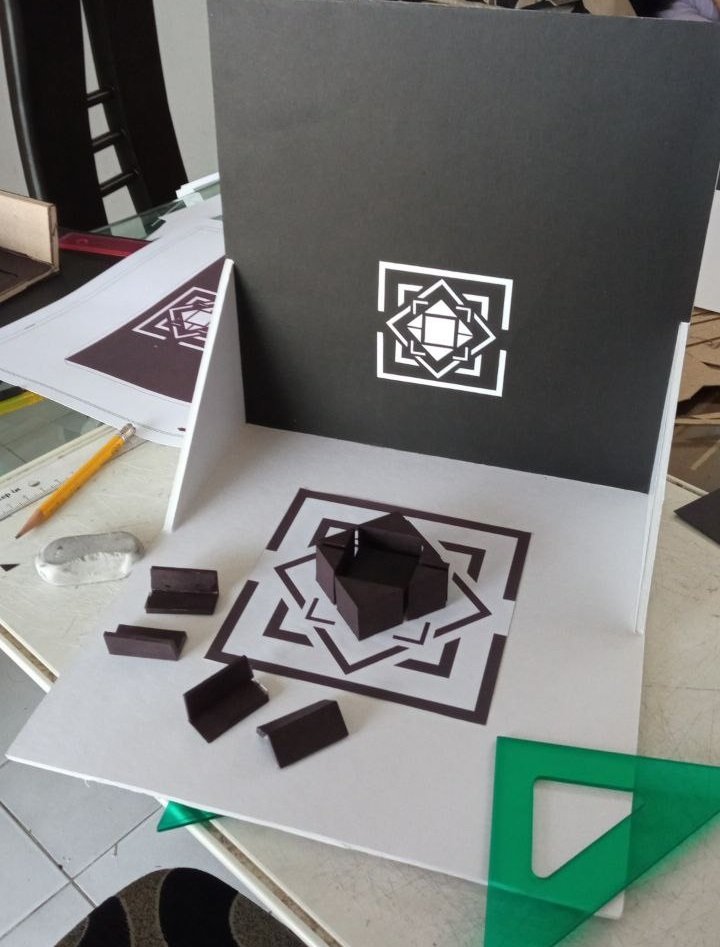
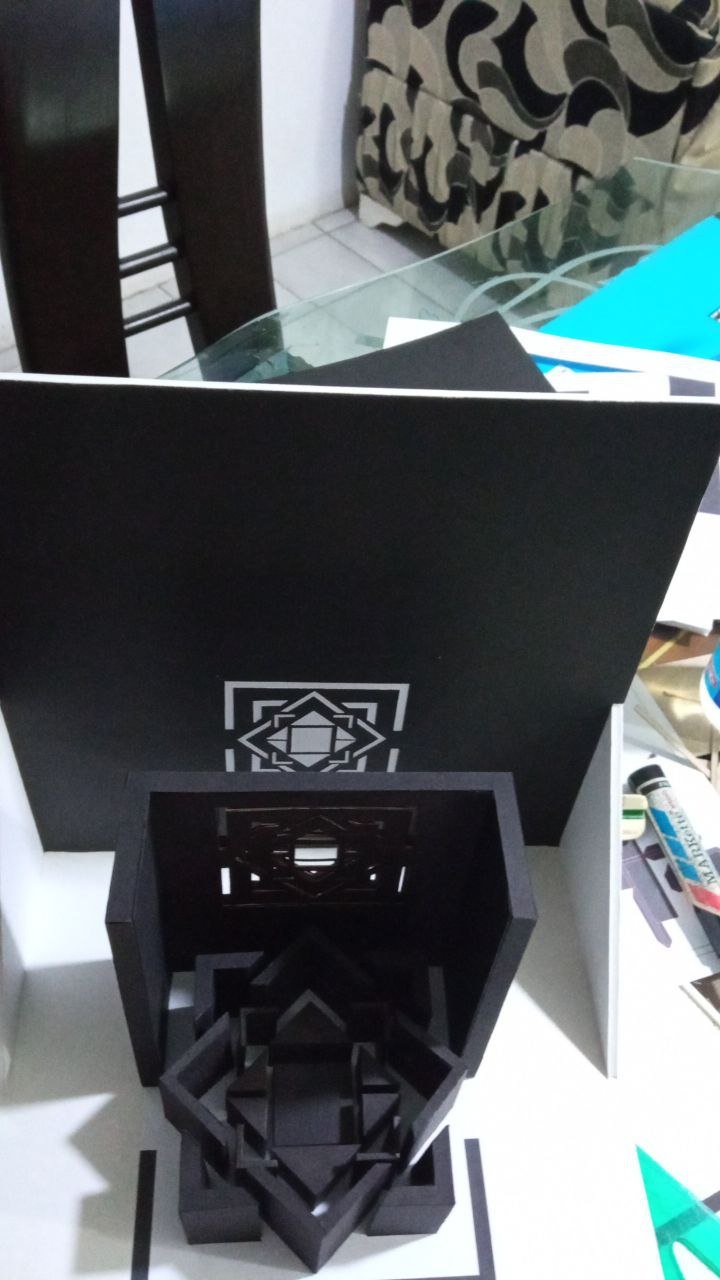
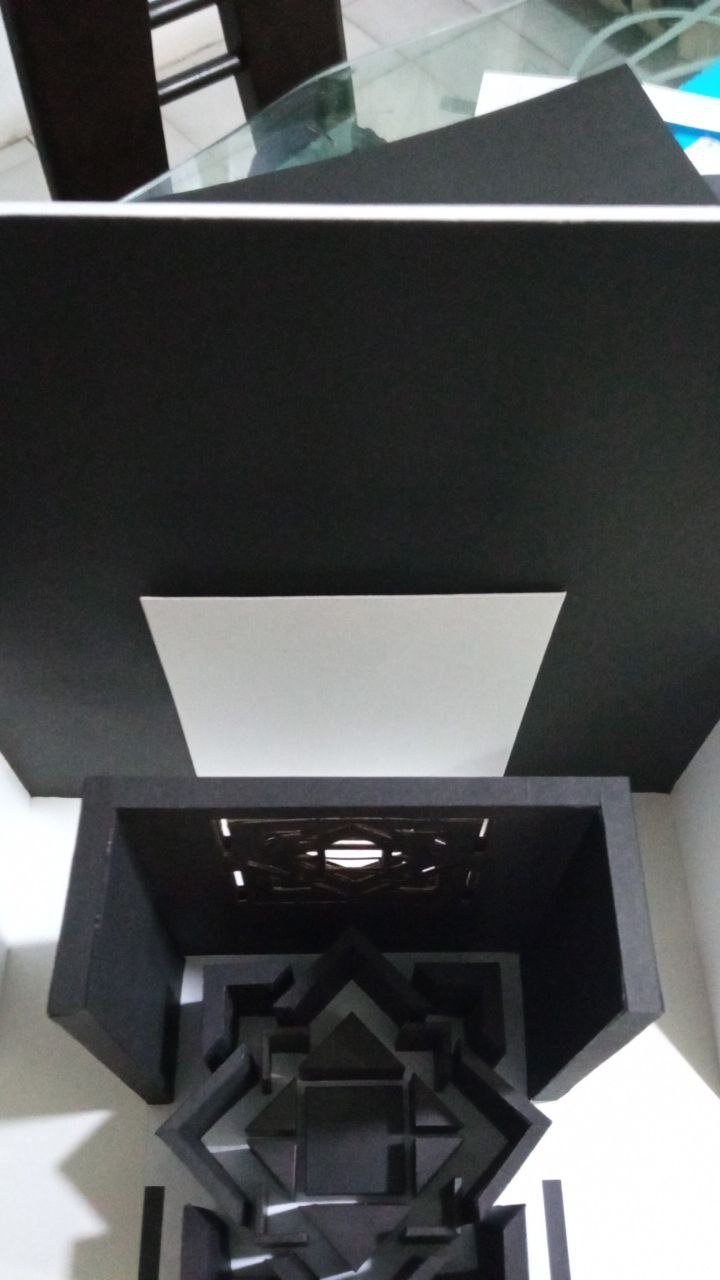
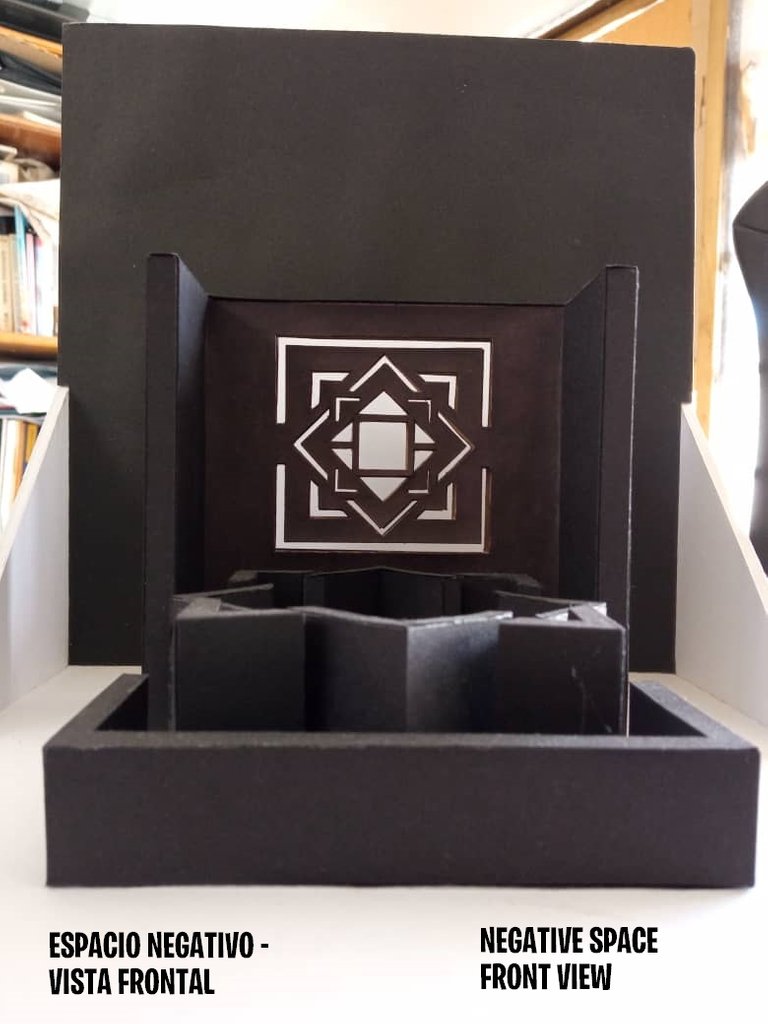
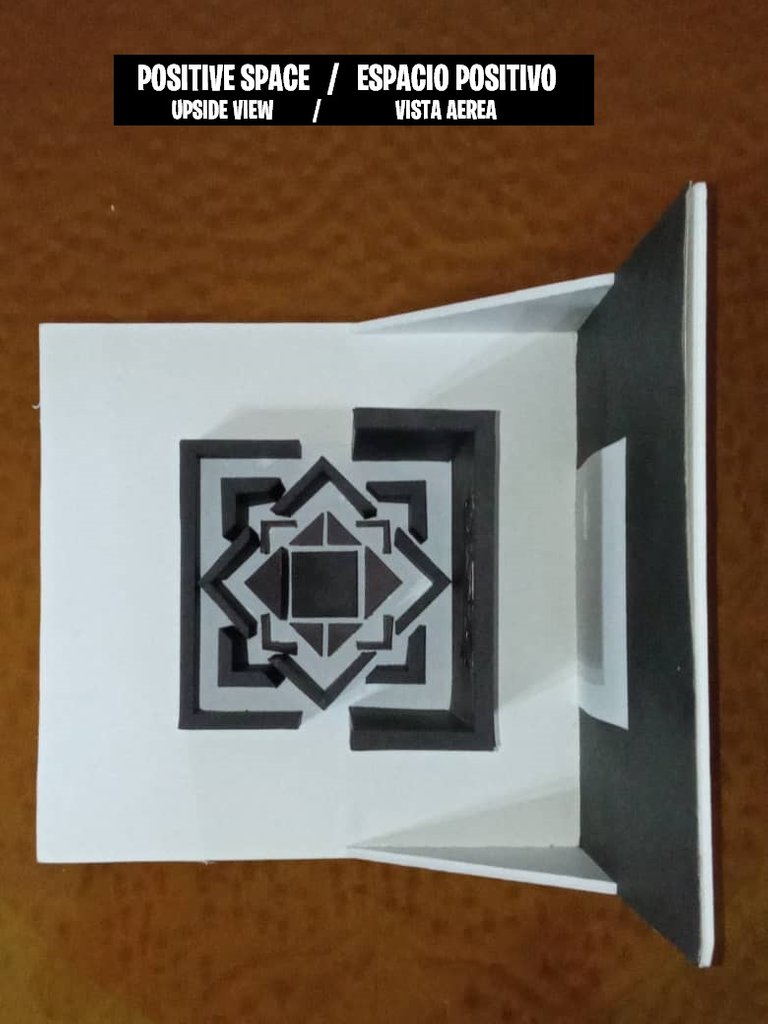
En cuanto a la base de la maqueta decidí que el Espacio Positivo (la base con fondo blanco y los elementos de la composición en color negro) sería el espacio principal de mi maqueta, de modo que la composición se vería desde arriba de la misma. En cuanto al Espacio Negativo (la base de color negro con la composición en color blanco), lo colocaría en una base que estaría pegada a un lado de la base principal tal como podemos ver en la foto de abajo.
For the design of the model, I decided to make a simple composition made up of the use of squares and triangles (some pure and others open/with subtractions) to play with the perception of shapes and apply some concepts of Gestalt Theory to them.
Regarding the base of the model, I decided that the Positive Space (the base with a white background and the elements of the composition in black) would be the main space of my model, so that the composition would be seen from above it. As for the Negative Space (the black base with the white composition), I would place it on a base that would be attached to one side of the main base as we can see in the photo below.

✍️ Materiales Empleados /// Materials

Imagen de pvproductions en Freepik

🎨 Proceso de Maqueteado /// Maquette Process
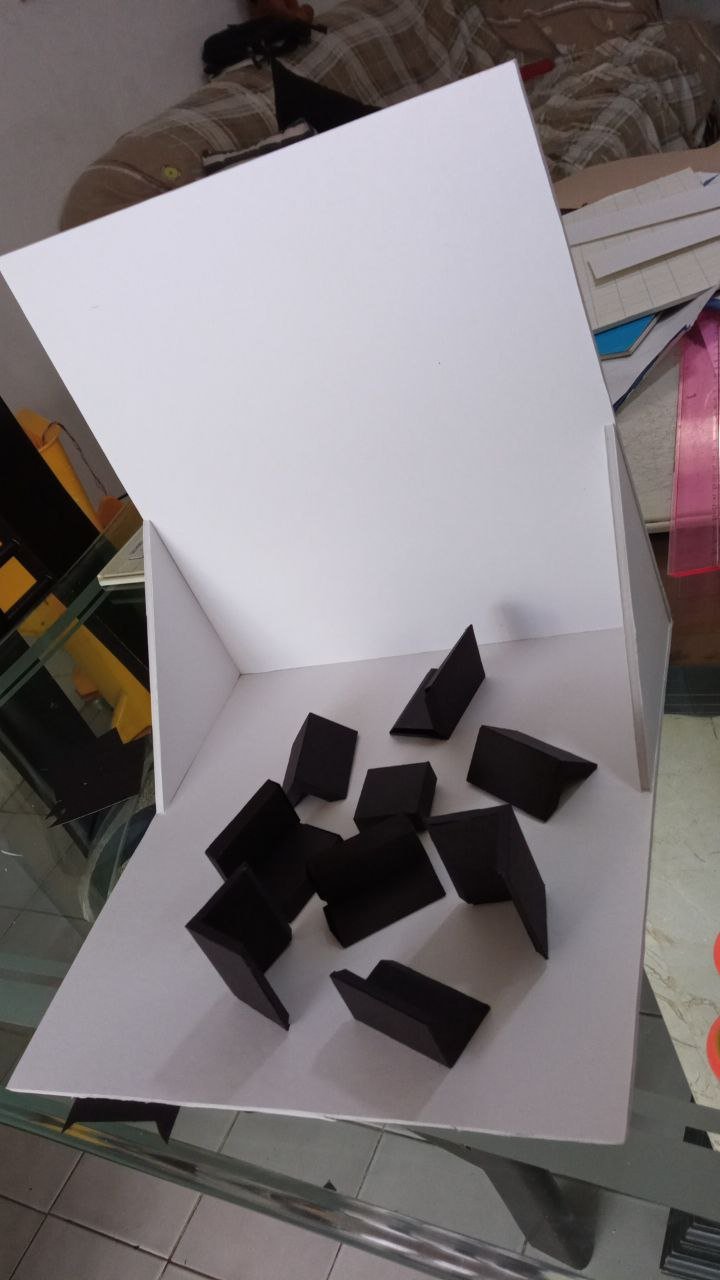
Como pudieron ver en la última imagen, la composición cambió un poco con respecto al boceto inicial. Para las bases usé anime comprimido y las pegue una a otra con silicon frío. Luego procedí a cubrir cada base con una lámina de cartulina blanca y una lámina de cartulina negra respectivamente, para generar los Espacios en Positivo y Negativo, luego simplemente imprimí la composición que dibuje en el software de AutoCAD para pegarla en el centro de cada base y así tener la ubicación exacta de cada elemento (aunque en el caso de la composición en negativo esa guía no se usó ya que la idea principal cambió un poco, pero ya lo veremos más adelante).
As you could see in the last image, the composition changed a bit from the initial sketch. For the bases I used compressed anime and glued them together with cold silicone. Then I proceeded to cover each base with a sheet of white cardboard and a sheet of black cardboard respectively, to generate the Positive and Negative Spaces, then I simply printed the composition that I drew in the AutoCAD software to paste it in the center of each base and thus having the exact location of each element (although in the case of the negative composition that guide was not used since the main idea changed a bit, but we will see that later).
Antes de continuar contando el proceso, quisiera aclarar que al momento de hacer esta maqueta no pensaba publicar las fotos en ningún sitio y el diseño fue evolucionando mediante la iba haciendo ya que veía modificaciones que podía hacer sobre la marcha para mejorar el diseño de algún modo, es por eso que no tengo fotos de todos los pasos.
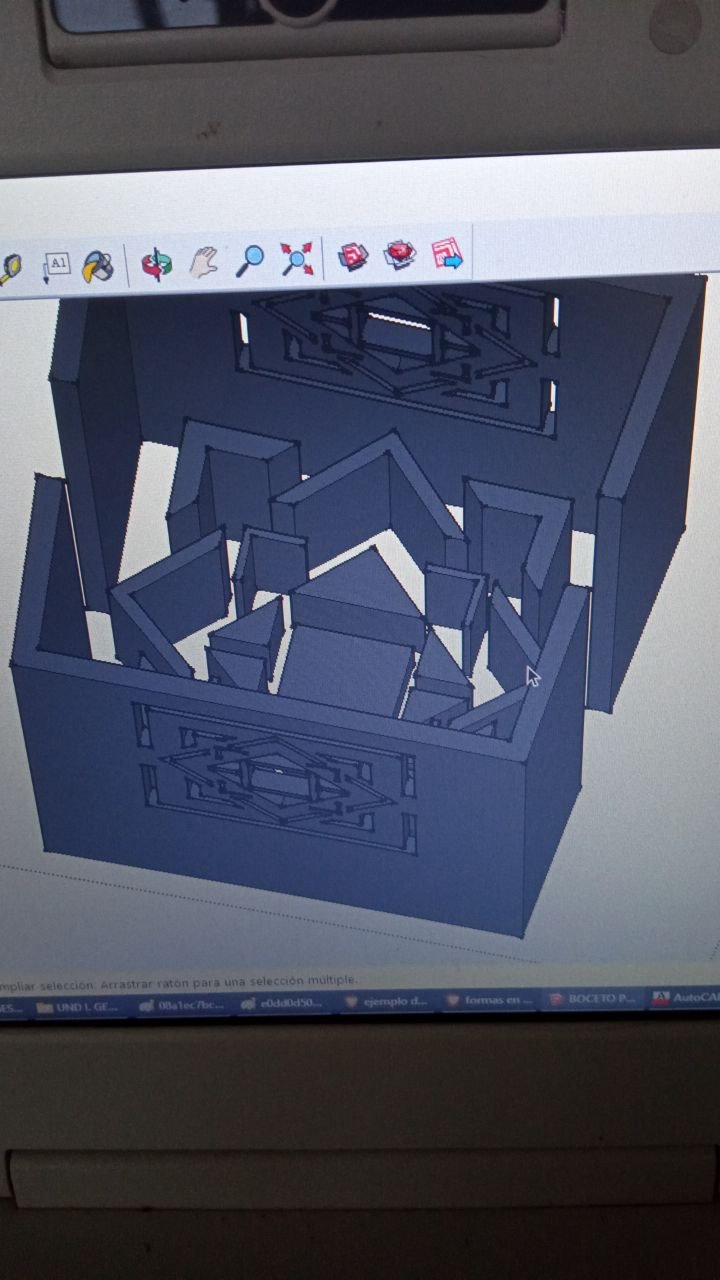
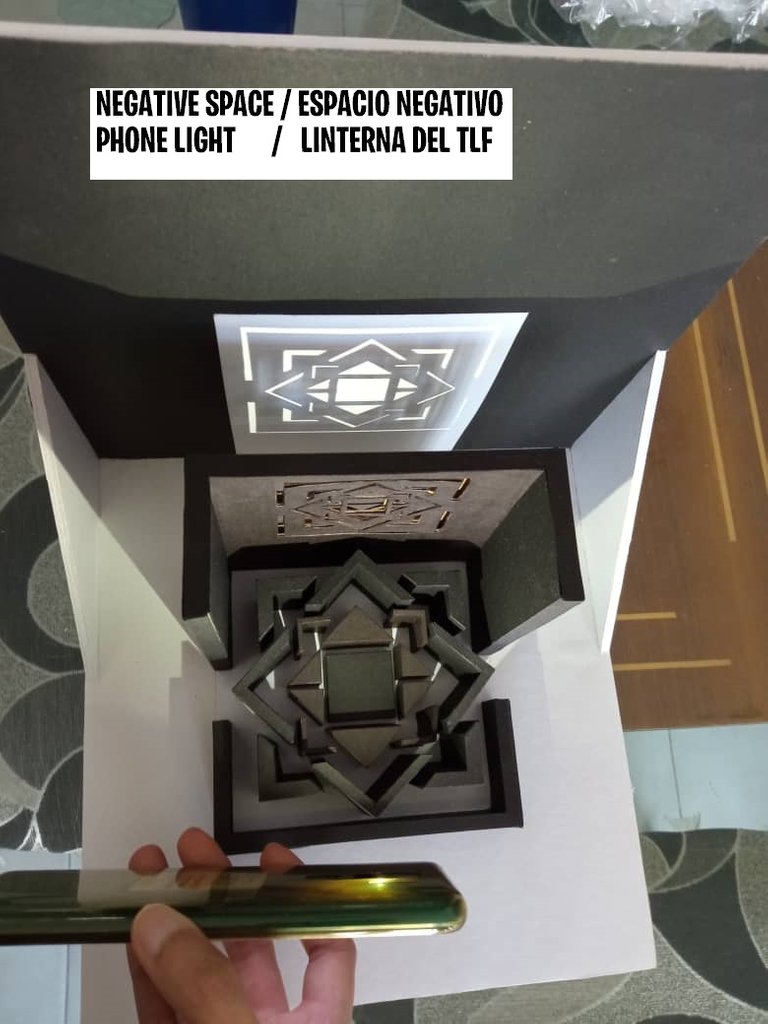
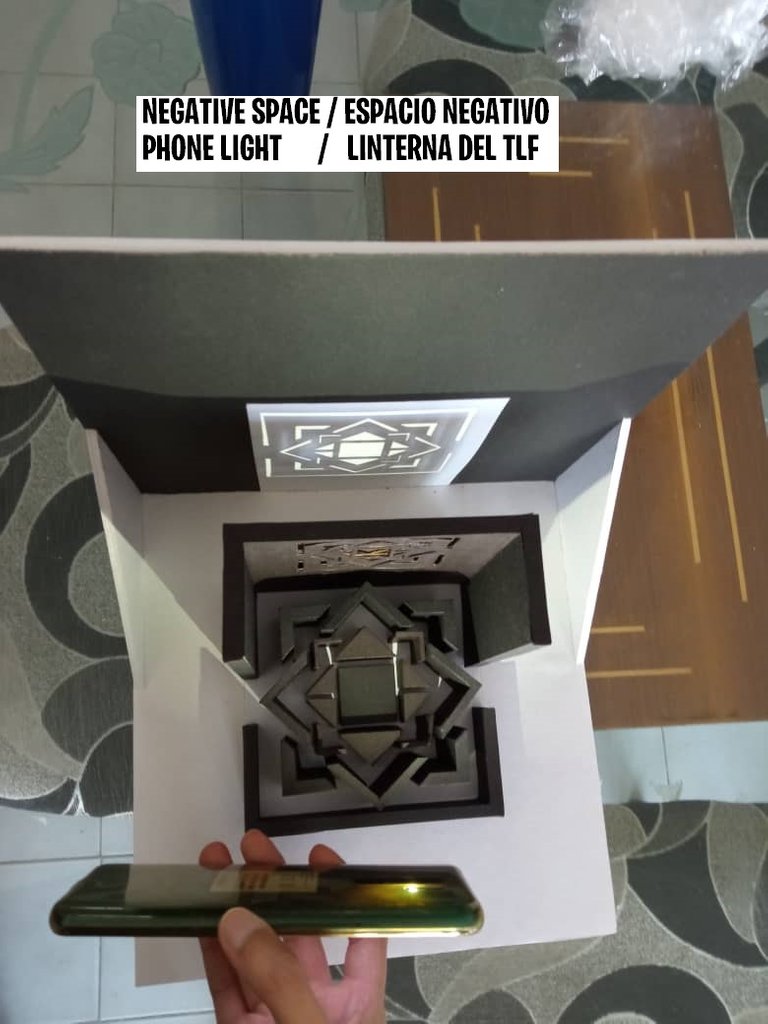
De hecho originalmente la idea era que el Espacio Negativo se formara al ver a través de 2 volúmenes de la composición del Espacio Positivo (como se muestran en las imágenes de abajo realizadas con el software 3D de Sketchup) sin embargo, debido a desperfectos a la hora de cortar, tuve que optar por cambiar esos volúmenes dejando uno solo más alto y que la linterna del teléfono reflejara la composición en el Espacio Negativo (este cambio lo veremos más adelante). Ahora si, sigamos.
Before continuing with the process, I would like to clarify that at the time of making this model I was not planning to publish the photos anywhere and the design evolved as I was doing it as I saw changes that I could make on the fly to improve the design in some way. , that's why I don't have photos of all the steps.
In fact originally the idea was that the Negative Space was formed by looking through 2 volumes of the Positive Space composition (as shown in the images below made with Sketchup 3D software) however due to imperfections to the When it was time to cut, I had to choose to change those volumes leaving only one higher and for the phone's flashlight to reflect the composition in the Negative Space (we'll see this change later). Now yes, let's continue.
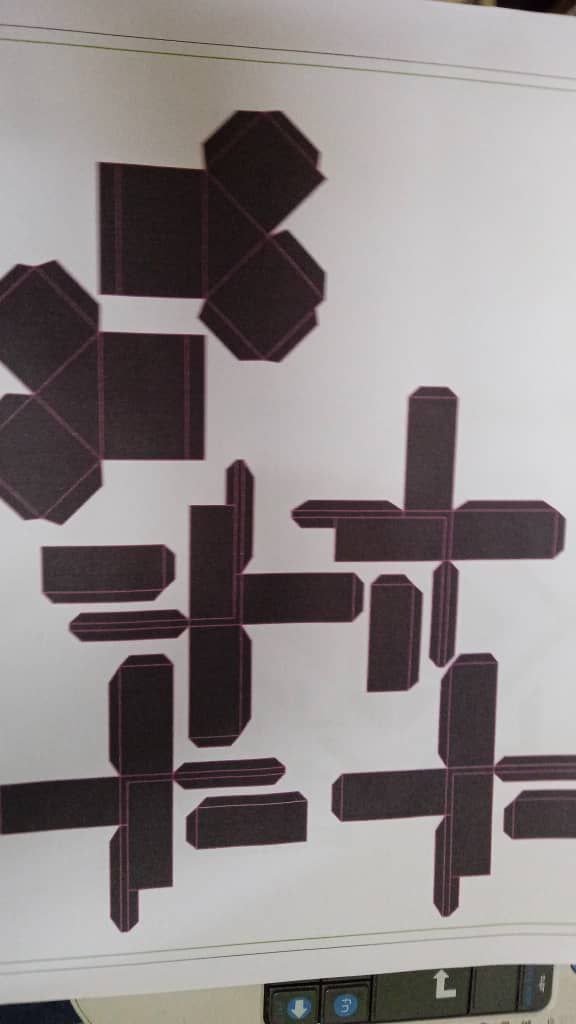
Una vez listas las bases, dibujé en AutoCAD todas las piezas de la maqueta para luego imprimirlas, esto lo hice para ahorrar cartulina ya que no disponía de suficiente cartulina negra.
Once the bases were ready, I drew all the parts of the model in AutoCAD and then printed them, I did this to save cardboard since I did not have enough black cardboard.
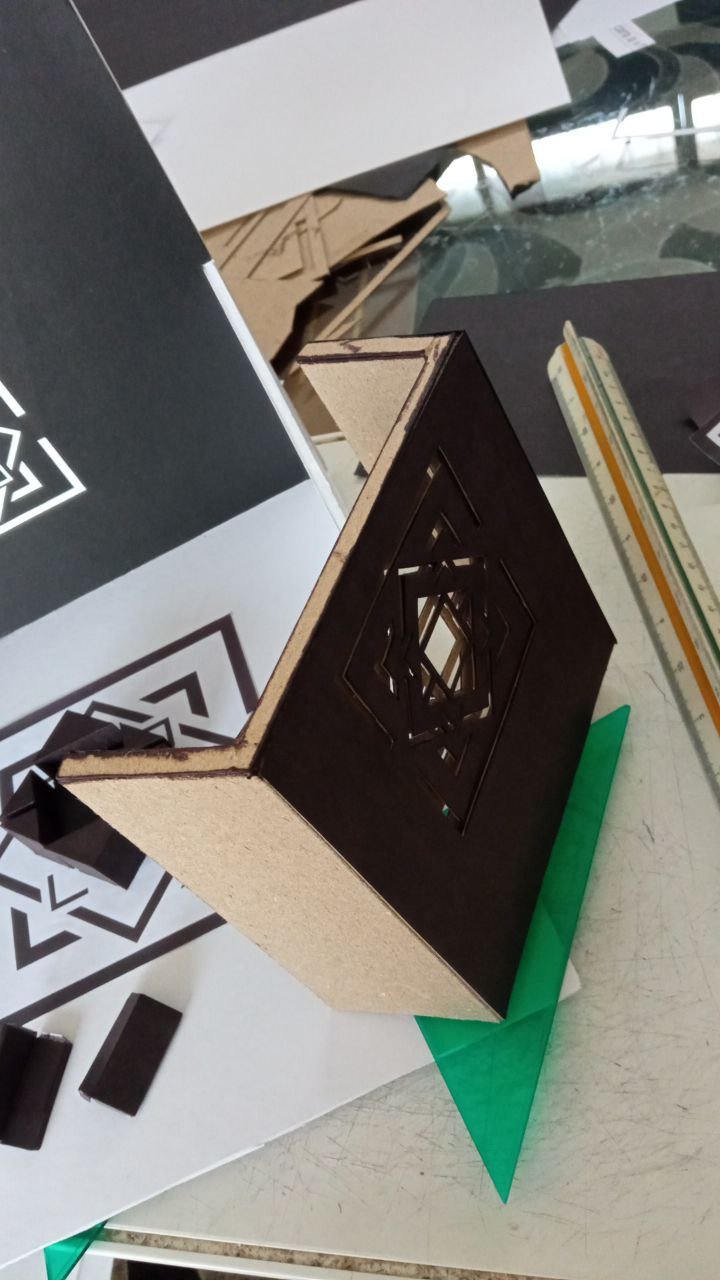
En cuanto al volumen mas alto, donde estaría los huecos/vanos para que pase la luz, fue un poco más complejo de realizar ya que la cartulina es muy endeble y al tener tantos cortes se deformaría un poco, por lo que para darle algo de rigidez a esa figura, opté por armarla primero con cartón y luego la forré de cartulina negra.
As for the highest volume, where the holes/openings would be for the light to pass through, it was a little more complex to make since the cardboard is very flimsy and having so many cuts would deform it a bit, so to give it some rigidity to that figure, I chose to build it first with cardboard and then I covered it with black cardboard.
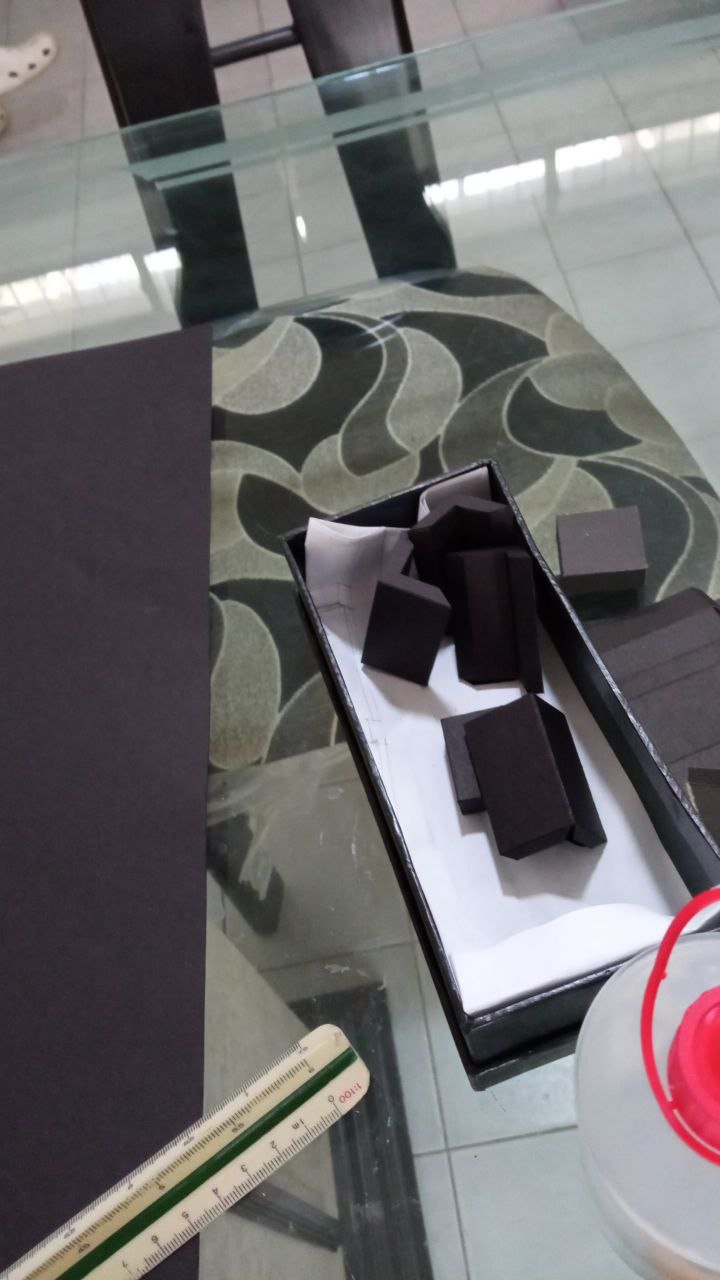
Luego procedí a cortar y pegar con silicon cada pieza hasta ir formando la composición en la base de la maqueta.
Then I proceeded to cut and glue each piece with silicone until I formed the composition at the base of the model.

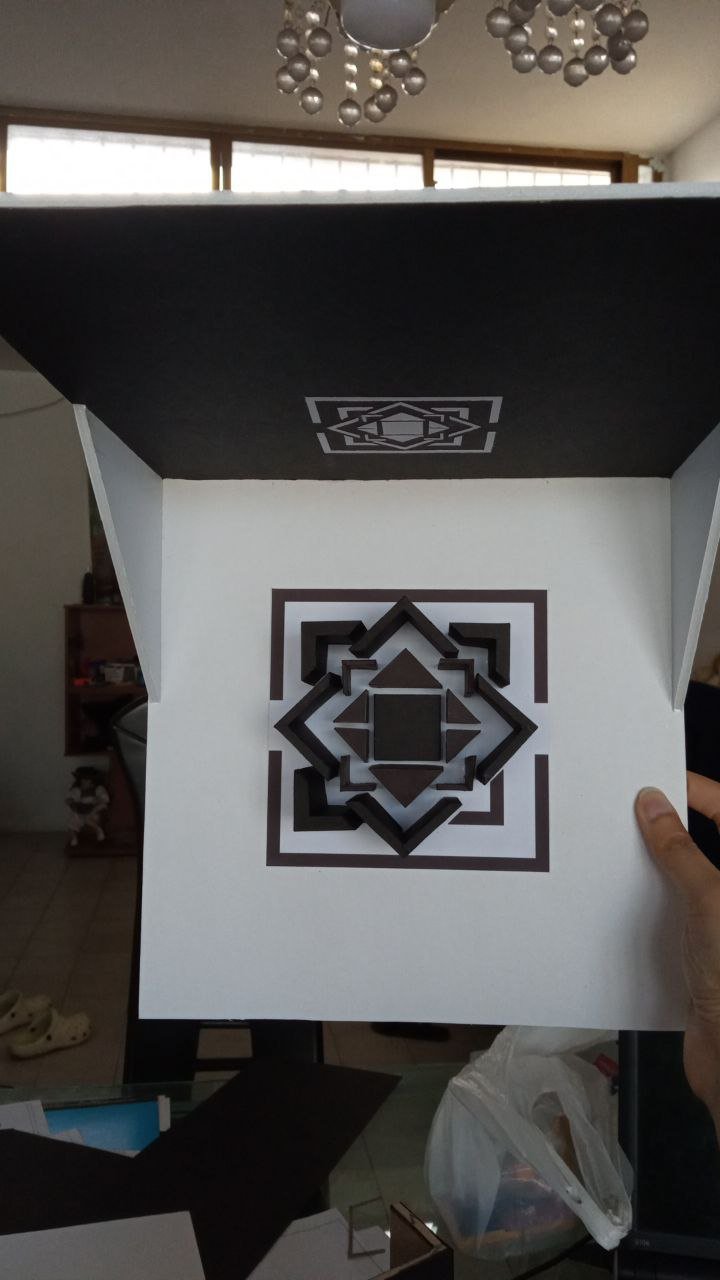
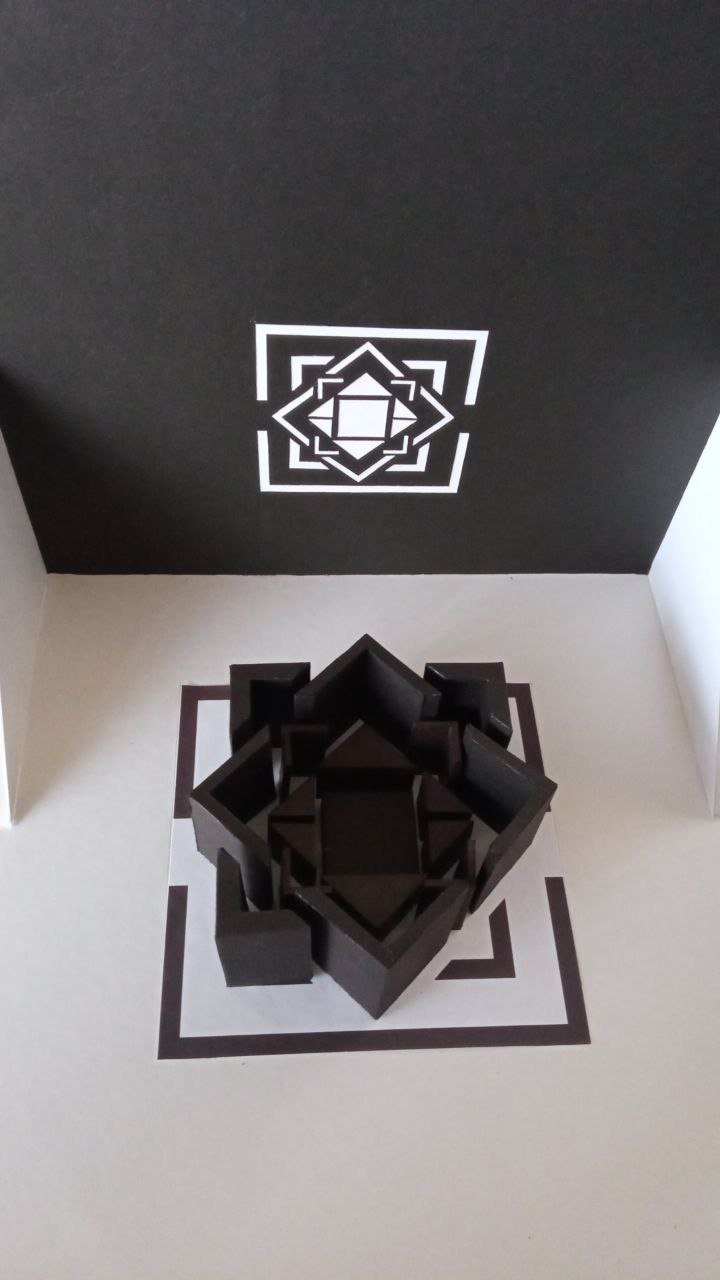
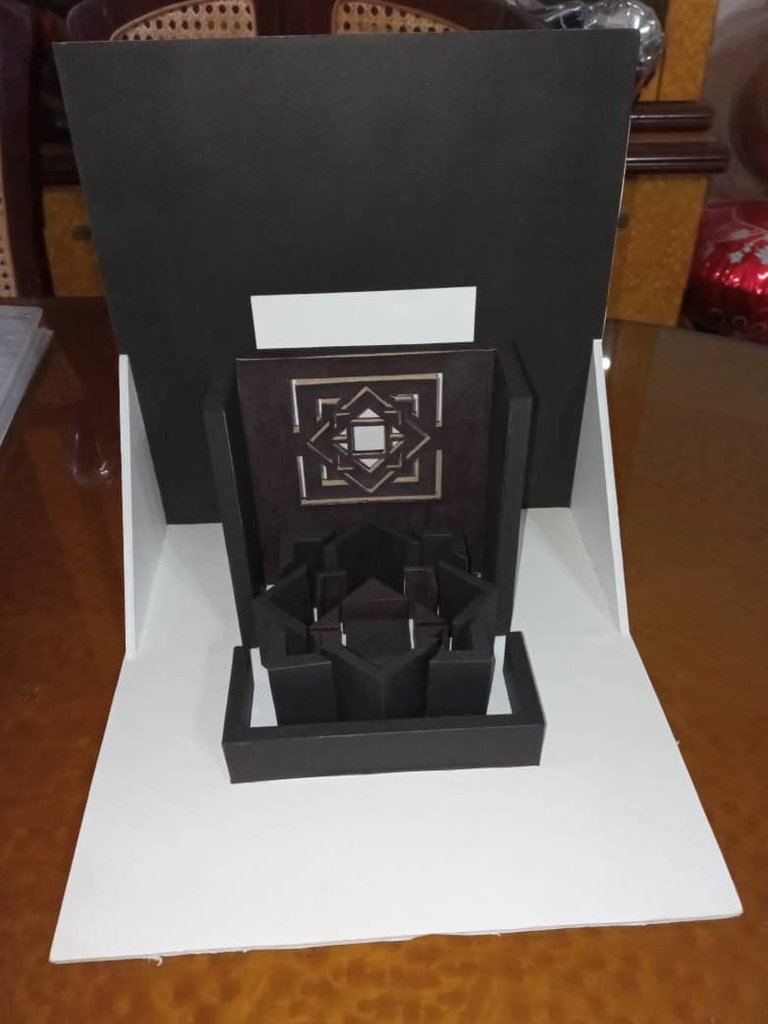
Y bueno, ya llegamos al final, como vieron cambió un poco en uno de los volúmenes ya que si el semi rectángulo de adelante lo hacia tan alto como el de atrás, debido al angulo en que lo vieras los cortes no coincidirían y no se vería bien la composición en el Espacio Negativo, por eso opté por simplificar las cosas. Aun así el resultado final me agradó ya que la composición se formaba si veías la maqueta desde el frente o si alumbrabas con la linterna del Teléfono.
And well, we have reached the end, as you saw it changed a bit in one of the volumes, because if the front semi-rectangle made it as high as the back one, due to the angle at which you saw it, the cuts would not coincide and it would not be visible. The composition in Negative Space is good, so I opted to keep things simple. Even so, I liked the final result since the composition was formed if you saw the model from the front or if you shined it with the flashlight of the Telephone.


¡Gracias por leer hasta acá! Espero que les haya gustado, no duden en dejarme su comentario mas abajo ^^
Thanks for reading this far! Here I leave an image of the final result of the drawing, I hope you liked it, do not hesitate to leave me your comment below ^^
📱 ¡Sígueme en mis redes! /// ¡Follow me on my RRSS!
👀You can follow me on my social networks so that you are aware of my next works! 👇
💫 Twitter 💫 Deviantart 💫 Instagram 💫 My old Instagram 💫 Furaffinity
Guao no se ve fácil , y el resultado es muy hermoso, me imagino que sacaste excelente nota ya que te quedo muy bien, saludos 🖖
hola! muchas gracias! la verdad si tiene su grado de dificultad pero la satisfacción al terminarla valió la pena jajaja y la verdad si salí bien! =)
Un excelente trabajo de mucha creatividad de còmo llevar el conocimiento adquirido acerca de la gestalt, por medio de una maqueta. Una forma de integrar conceptos con lo manual.
Èxitos
hola, muchas gracias por sus palabras!
Congratulations @rioluerr! You have completed the following achievement on the Hive blockchain And have been rewarded with New badge(s)
Your next target is to reach 100 replies.
You can view your badges on your board and compare yourself to others in the Ranking
If you no longer want to receive notifications, reply to this comment with the word
STOPCheck out our last posts:
Esa maqueta quedó genial, y mira que no es trabajo fácil. Gracias por este lindo e instructivo post. Saludos y bendiciones.
Gracias a ti, por tu comentario!