Para recibir la Navidad🎄con todo listo, es súper importante prepararse, organizarse con tiempo, ahorrar si es posible. Me refiero a todas estás al tema de las "Decoraciones". Las manualidades en éste sentido son sumamente importantes al igual que el reciclaje ♻️.
To welcome Christmas🎄 with everything ready, it is super important to prepare, organize yourself in advance, save if possible. I am referring to all of you on the subject of "Decorations". Crafts in this sense are extremely important as well as recycling ♻️.
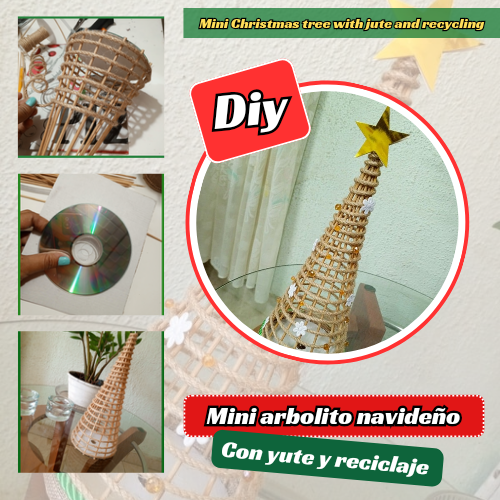
Muchas familias entre ellas la mía 🤱, amamos las decoraciones navideñas, tanto las que podemos comprar como las que hacemos con mucho amor 💚. En estos momentos, la lista de cosas por hacer tiene sus pendientes 📝, aún así esperamos que todo esté listo para la llegada de la época más linda del año🎉. Les dejo por aquí el paso a paso de un hermoso mini arbolito navideño 🎄en colores neutros, materiales rústicos y reciclaje ♻️. Será la referencia para la decoración de navidad 🎄 en casa 🏡.
Many families, including mine 🤱, love Christmas decorations, both those we can buy and those we make with a lot of love 💚. Right now, the to-do list has its pending items 📝, but we still hope that everything is ready for the arrival of the most beautiful time of the year🎉. Here I leave you the step by step of a beautiful mini Christmas tree 🎄 in neutral colors, rustic materials and recycling ♻️. It will be the reference for Christmas decoration 🎄 at home 🏡.
Materiales- Materials
🔅Tela de yute - Jute fabric.
🔅Silicón en barra o frio líquido - Silicone bar or liquid cold.
🔅Pistola de silicón caliente - Hot silicone gun.
🔅Palillos de bambú - Bamboo chopsticks.
🔅Cordón triple verde - Green triple cord.
🔅Exacto - Exact
🔅Tijera - Scissors.
🔅Cartón reciclado - Cartón reciclado.
🔅Hilo de yute - Jute twine.
🔅Retazo de cartulina espejo - Scrap of mirror cardboard.
🔅CD - CD.
🔅Apliques de murano - Murano wall lights.
🔅Flores blancas de tela - White fabric flowers.
Procedimiento - Procedure
El punto de partida para este proyecto es buscar un CD 💿 que tengamos reciclado, igualmente cartón de cajas que nos servirá para darle más soporte al CD para el siguiente paso. Tomamos la medida del CD en el cartón, cortamos y pegamos con silicón caliente.
The starting point for this project is to find a CD 💿 that we have recycled, as well as cardboard from boxes that will serve to give more support to the CD for the next step. We take the measurement of the CD on the cardboard, cut it and glue it with hot silicone.
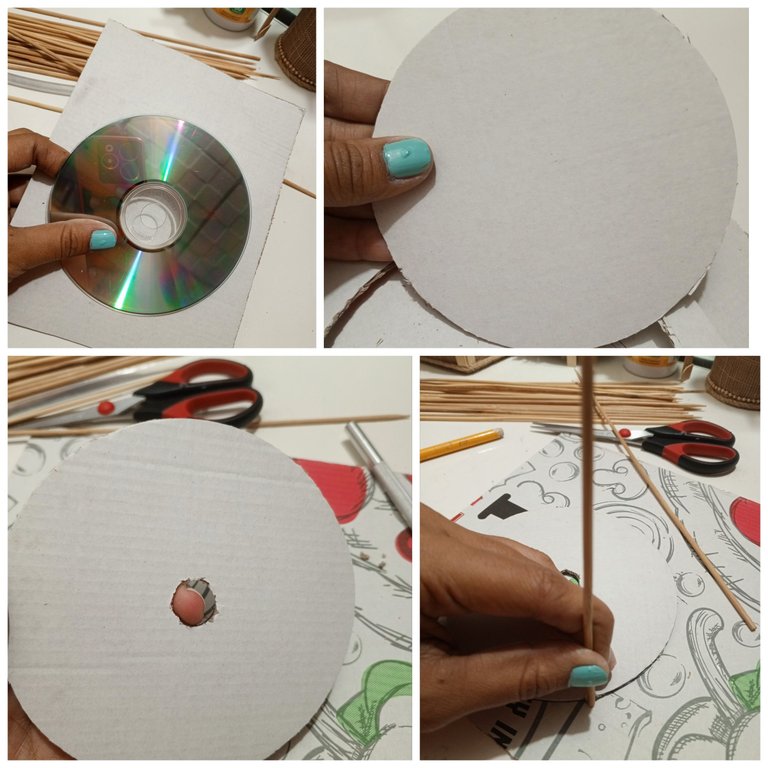
Lo siguiente será ir pegando uno a uno los palillos de bambú alrededor del CD 💿, dejando 1 cm aproximadamente entre ellos. Todo va a depender de la creatividad de cada persona, si lo quiere más cerrado o más abierto. Al tener todos los palillos pegados con el silicón caliente, debemos asegurarlos todos en la punta. Se formará una especie de cono.
The next step is to glue the bamboo sticks one by one around the CD 💿, leaving approximately 1 cm between them. Everything will depend on the creativity of each person, whether they want it more closed or more open. Once all the sticks are glued with the hot silicone, we must secure them all at the tip. A kind of cone will form.
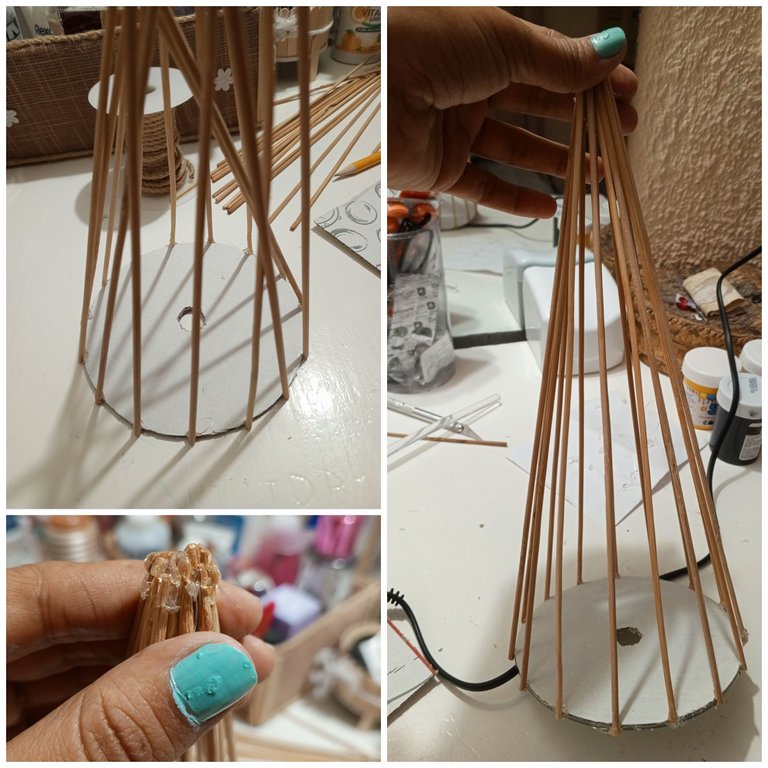
El paso a seguir es comenzar a pegar con silicón caliente el hilo de yute. Desde la base hasta la punta, de forma que se vaya rodeando todo el cono. Igualmente que el paso anterior, va a depender de si lo queremos más tupido o no.
The next step is to start gluing the jute thread with hot silicone. From the base to the tip, so that it surrounds the entire cone. Just like the previous step, it will depend on whether we want it thicker or not.
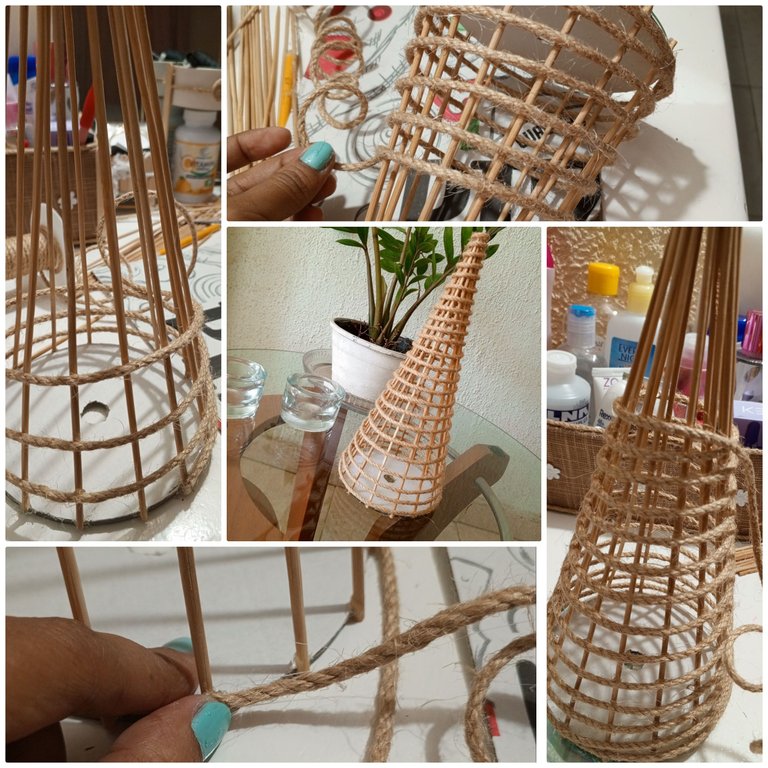
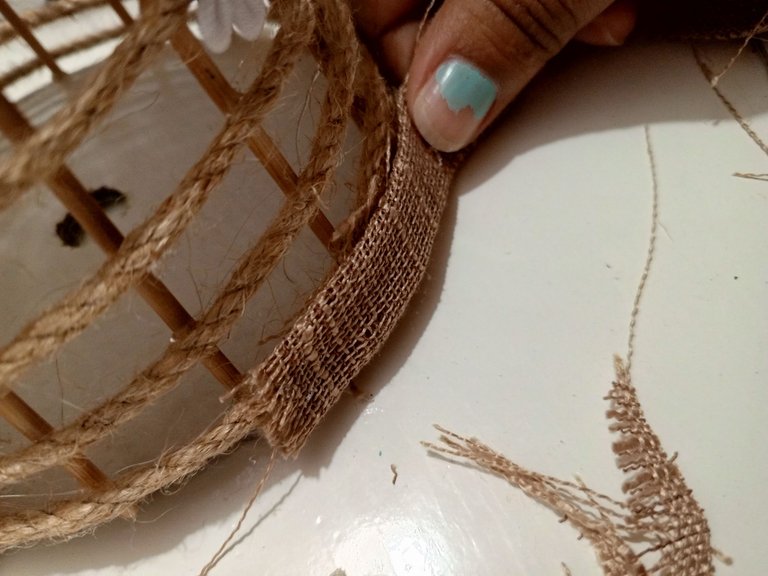
En éste punto, vamos a comenzar con los detalles que harán destacar éste arbolito de navidad 🎄. Para cubrir las imperfecciones de los palillos en la base y a la vez darle un toque más rústico y natural a nuestra decoración, agregué un retazo de tela de yute, que fui doblando a medida que lo iba pegando, de tal manera que se viese un trabajo prolijo.
At this point, we are going to start with the details that will make this little Christmas tree stand out 🎄. To cover the imperfections of the toothpicks at the base and at the same time give a more rustic and natural touch to our decoration, I added a scrap of jute fabric, which I folded as I glued it, so that it looked like a neat job.
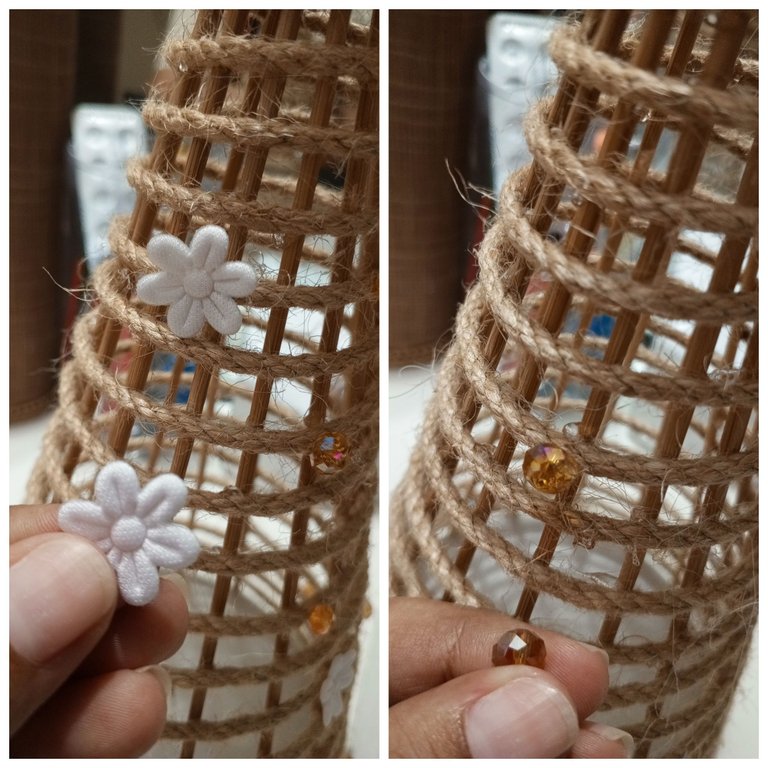
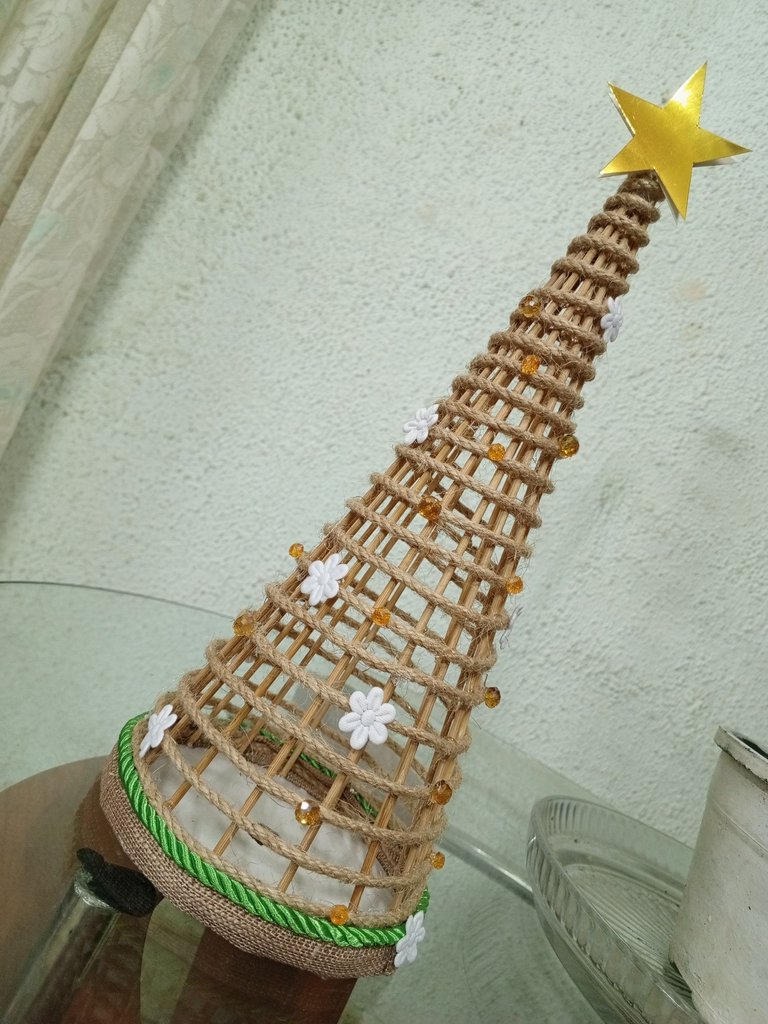
Teniendo todos los detalles resueltos, el arbolito armado y firme, llegó la hora de la decoración. Para mantener el estilo rústico y neutro, pero a la vez navideño, decidí agregarle una piedras de murano en color naranja 🧡 que harán el papel de bambalinas. El color no es demasiado llamativo, aún tienen un hermoso brillo 🔆 que me encanta. También agregué flores de tela blancas 🤍 para darle un toque más de color y manteniendo el neutro.
With all the details sorted out, the tree assembled and firm, it was time for the decoration. To keep the rustic and neutral style, but at the same time Christmassy, I decided to add some orange Murano stones 🧡 that will act as the baubles. The color is not too flashy, they still have a beautiful shine 🔆 that I love. I also added white fabric flowers 🤍 to give it a touch more color while keeping it neutral.
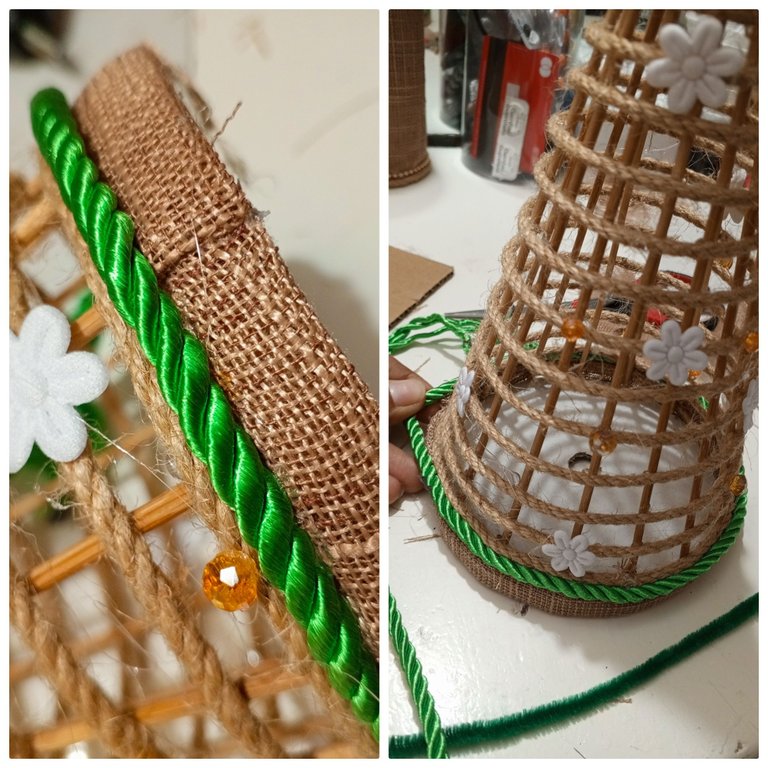
Con la tela yute asegurada en la base, agregaremos un cordón triple en un color verde 💚. Esto no solo le dará un toque más navideño a nuestro mini arbolito, sino que además cubrirá cualquier detalle.
With the jute fabric secured at the base, we will add a triple cord in a green color 💚. This will not only give a more Christmassy touch to our mini tree, but will also cover any details.
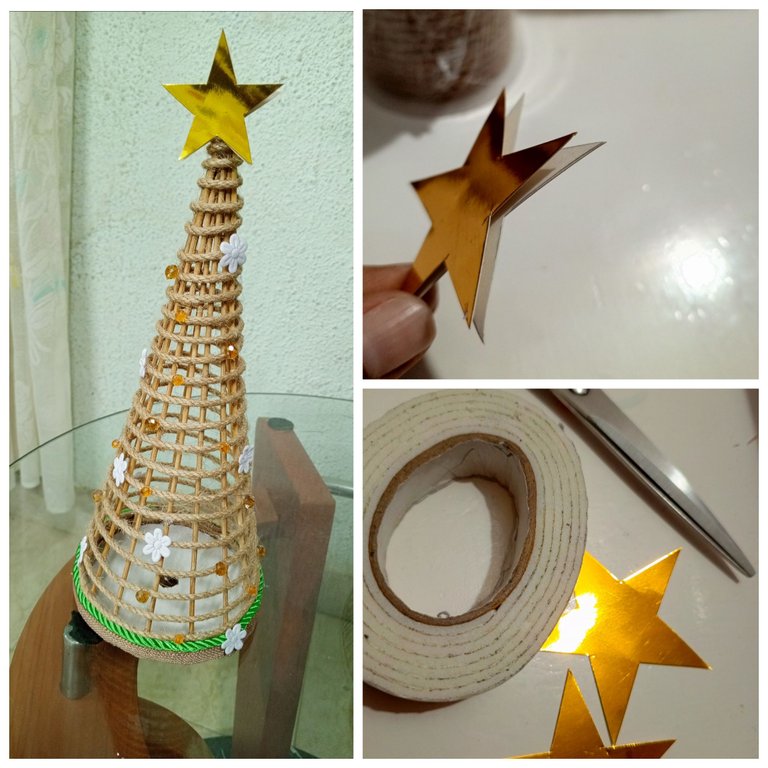
Para finalizar nuestro lindo mini pino navideño 🎄, llegó el momento de colocar la estrella en la cima del árbol, en la realidad es la tarea que mas aman los niños, Jejeje. Ésta estrella 💫 la realicé con cartulina tipo espejo en color dorado. Corte dos estrellas iguales para colocarlas una sobre otra con ayuda de cinta doble cara, éste efecto quedó súper lindo.
To finish our cute mini Christmas pine 🎄, it's time to place the star on top of the tree, in reality it's the task that children love the most, hehe. I made this star 💫 with gold mirror-type cardboard. I cut two identical stars to place them on top of each other with the help of double-sided tape, this effect was super cute.
Al principio del tutorial les mostré como crear más soporté al CD o base del arbolito con el cartón reciclado ♻️, pero también se puede notar un orificio en el centro. Ese circulito hueco servirá para incluir las luces navideñas. Éste arbolito funciona como decoración con o sin luces 🚨, sin embargo está esa posibilidad abierta.
At the beginning of the tutorial I showed you how to create more support for the CD or base of the tree with the recycled cardboard ♻️, but you can also notice a hole in the center. That hollow circle will serve to include the Christmas lights. This little tree works as a decoration with or without lights 🚨, however that possibility is open.
La Navidad 🎄 es la época que más me encanta del año, las decoraciones son hermosas, a temporales, algunas novedosas, existe todo tipo de detalles que nacen de la imaginación, es magia pura, por eso y por más amo la Navidad, igualmente lo hecho a mano con amor 😉❤️💚...
Christmas 🎄 is the time of year that I love the most, the decorations are beautiful, some temporary, some novel, there are all kinds of details that are born from the imagination, it is pure magic, for that reason and for more I love Christmas, equally the handmade with love 😉❤️💚...
Es todo por éste tutorial. Gracias por llegar hasta aquí 📝☝️💚❤️...
That's all for this tutorial. Thanks for getting here 📝☝️💚❤️...
Creditos - Credits
Traductor English translator
Stickers realizado en Bitmoji | Stickers made in Bitmoji.
Fotografias capturadas con mi teléfono Tecno Spark 10 pro | Photos captured with my Tecno Spark 10 pro phone.

Un excelente proyecto para decorar nuestras mesas en Navidad.
Muchas gracias por compartir este proyecto 🤗🤗🤗
Ay está bien bonito me gusta mucho y es divertido de hacer
Gracias Miri, quedó hermosos, en casa le encantó a todos, y con las luces se verá más lindo. Y así es, fue divertido hacerlo, y sencillo 🤗🤗🤗
Pero qué bellísimo te quedo el arbolito, me prometo hacer uno así para decorar en esta Navidad, adoro ese color natural del beige, porque se adopta para cualquier ocasión y espacio decorativo de la casa. Gracias por compartirnos este valioso tutorial, felicidades.🤗
Gracias amiga, así es, los colores son neutros y se ajustan a cualquier ambiente, esa es la idea, además de que quiero ésta temática en todo. Seguramente si lo haces quedará muy bien, es súper sencillo, lo demás es tu toque personal 🤗🤗🤗
Hay si amiga es muy bello. La Navidad es un momento mágico que hay que aprovechar.🙂🤗
Muy bonito y fácil de hacer, con pocos materiales, gracias por compartirlo, saludos.
Así es, súper facil, y la decoración depende de cada quien. Me encanto mi arbolito 🤗
Super bello amiga, esas arbolitos son tendencia, y esta opción que nos traes hoy esta preciosa, me encanta 💖
Super creativa mi amiga
Jejeje, hay si amiga, estos colores están muy de moda, la verdad me gustó muchísimo como quedó, es algo diferente al rojo y verde tradicional, pero es lo que quiero en todo para ésta Navidad, Jejeje. Gracias por lo de súper creativa ami, tu tan linda como siempre🤗
Me gusta mucho amiga, se le puede colocar en el interior algunas lucecitas led ❤️🫶🏻✨
Si, amiga, esa es la idea, por eso le dejé el orificio, por allí irán las luces, tengo algunas LED pero son muy grandes, estoy buscando las más pequeñitas 🤗
Bellísimo me gustó mucho está idea 💡
Un bonito y decorativo arbol navideño, me encanto el diseño y los adornitos de flores, esta muy lindo 😍
Muchas gracias, mi sobrino de 4 años lo amo, ya quiere que le introduzca las luces, Jejeje. Realmente me gustó mucho la combinación, así quisiera todo en la casa, pero vamos a ver qué se puede hacer. 🤗🤗🤗