
🎄✨🎄✨🎄✨🎄✨🎄✨🎄✨🎄✨
Hola comunidad de hive diy y comunidad artesana! ,hoy les traigo una pequeña manualidad que puede hacer para decorar algún espacio de su casa ,y que no lleva muchos materiales , pero de un toque bonito y elegante al espacio , todo eso sin ser extremadamente complicado ,este es una versión de un arbolito navideño hecho con cartón reciclado y foami que tenía tiempo queriendo intentar y he aquí el resultado 🤩, de verdad que a mí me encantó y uno puede variarle la decoración y hacer muchos diseños diferentes,más abajo les dejo las fotos del paso a paso.↘️⬇️↙️
Materiales
🎄 Cartón reciclado
🎄 Foami escarchado dorado
🎄 Foami escarchado blanco
🎄 Foami amarillo
🎄 Pistola de silicona y barras de silicon
🎄 Regla ,tijeras
🎄 Cordón decorativo de grosor mediano
🎄 Pintura dorada acrílica, puntura dorada de tela , pintura marron de tela
🎄 Exacto o cúter
English Version
🎄✨🎄✨🎄✨🎄✨🎄✨🎄✨🎄✨
Hello hive diy community and artisan community! Today I bring you a small craft that you can do to decorate a space in your house, and that does not take many materials, but gives a nice and elegant touch to the space, all that without being extremely complicated, this is a version of a Christmas tree made with recycled cardboard and foam that I had been wanting to try for a long time and here is the result 🤩, I really loved it and one can vary the decoration and make many different designs, below I leave you the photos of the step by step. ↘️⬇️↙️
Materials
🎄 Recycled cardboard
🎄 Golden frosted foam
🎄 White frosted foam
🎄 Yellow foam
🎄 Silicone gun and silicone bars
🎄 Ruler, scissors
🎄 Medium thickness decorative cord
🎄 Acrylic gold paint, gold fabric paint, brown fabric paint
🎄 Exact or cutter
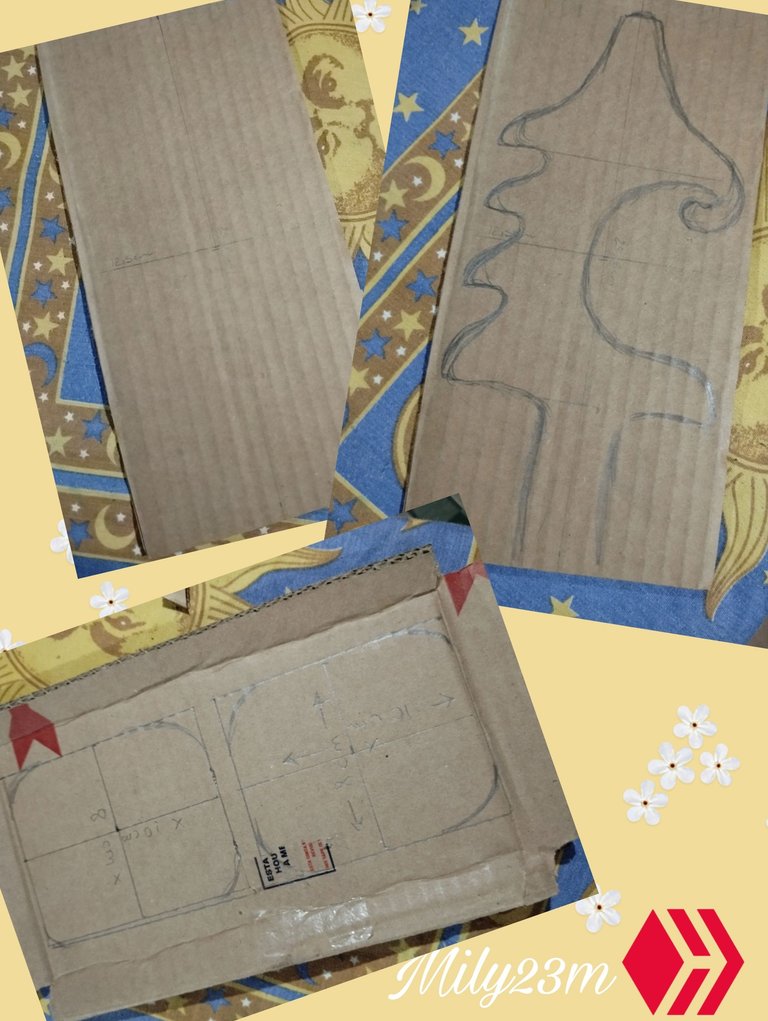
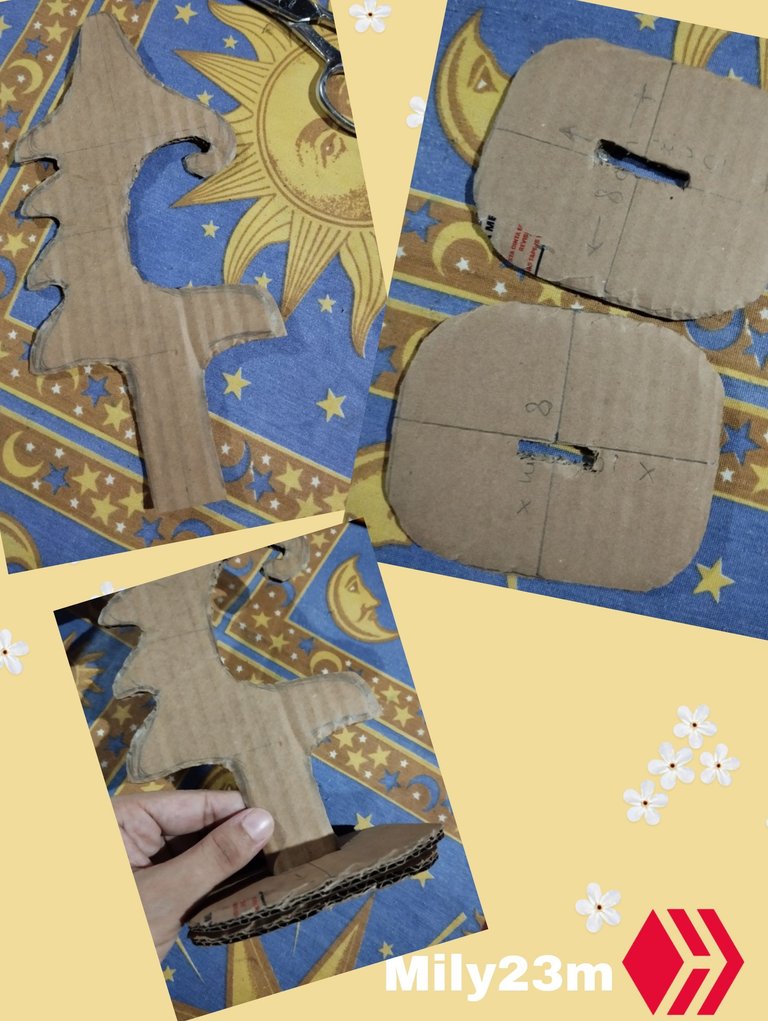
#1 Para el paso 1 , usaremos un cartón que tengamos por allí , y haremos una cruz en el medio que nos sirva de guía,a mí me salió el diámetro de la línea vertical de 25 CM x 12,5 CM de diámetro horizontal, aquí luego empecé a dibujar la forma del arbolito haciéndolo con los picos en el lado izquierdo, y dejando un vacío curvo en el derecho ,como si le faltara un pedazo, aquí irá colgando un diseño. Luego en otro cartón hice dos rectángulos de 10 cm de largo horizontal x 8 CM de alto, y les redondee las esquinas, recorte ambas y en todo el medio bien centrado le hice una ranura de 3 cm que es el tamaño del tronco del árbol, esto es para introducir el tronco del árbol allí y que funcione de base. Recorte todo el contorno del arbolito ,y probé que quedara el tronco en ambas ranuras de las bases , está ranura la fui recortando con un exacto tipo bisturí de precisión.
English Version
#1 For step 1, we will use a cardboard that we have around, and we will make a cross in the middle that serves as a guide, I got the diameter of the vertical line of 25 CM x 12.5 CM of horizontal diameter, here then I began to draw the shape of the tree doing it with the peaks on the left side, and leaving a curved void on the right, as if a piece were missing, here a design will hang. Then on another cardboard I made two rectangles of 10 cm long horizontally x 8 CM high, and I rounded the corners, cut both out and in the whole middle well centered I made a 3 cm slot which is the size of the tree trunk, this is to introduce the tree trunk there and work as a base. I cut out the entire outline of the tree, and tested that the trunk fit in both slots of the bases, I cut this slot with an exact type of precision scalpel.
#2 Pegué las dos bases para que no se soltara y recorté un poco los excedentes que tenía una de la otra para hacerlas parejas, con silicón caliente también pegue la figura de cartón a un foami amarillo para que está fuera la parte de atrás del diseño, recorte por toda la orilla todo el excedente ,y luego para la parte frontal pegué un Foami escarchado dorado ,en la foto se puede ver qué lo estoy probando para ver si entraba porque no tenía suficiente dorado jejeje pero funcionó.
English Version
#2 I glued the two bases so that they wouldn't come loose and I trimmed a little of the excess that I had from one to the other to make them even, with hot silicone I also glued the cardboard figure to a yellow foam so that the back part of the design is outside, I trimmed all the excess along the entire edge, and then for the front part I glued a golden frosted Foam, in the photo you can see that I am testing it to see if it would fit because it didn't have enough gold hehehe but it worked.
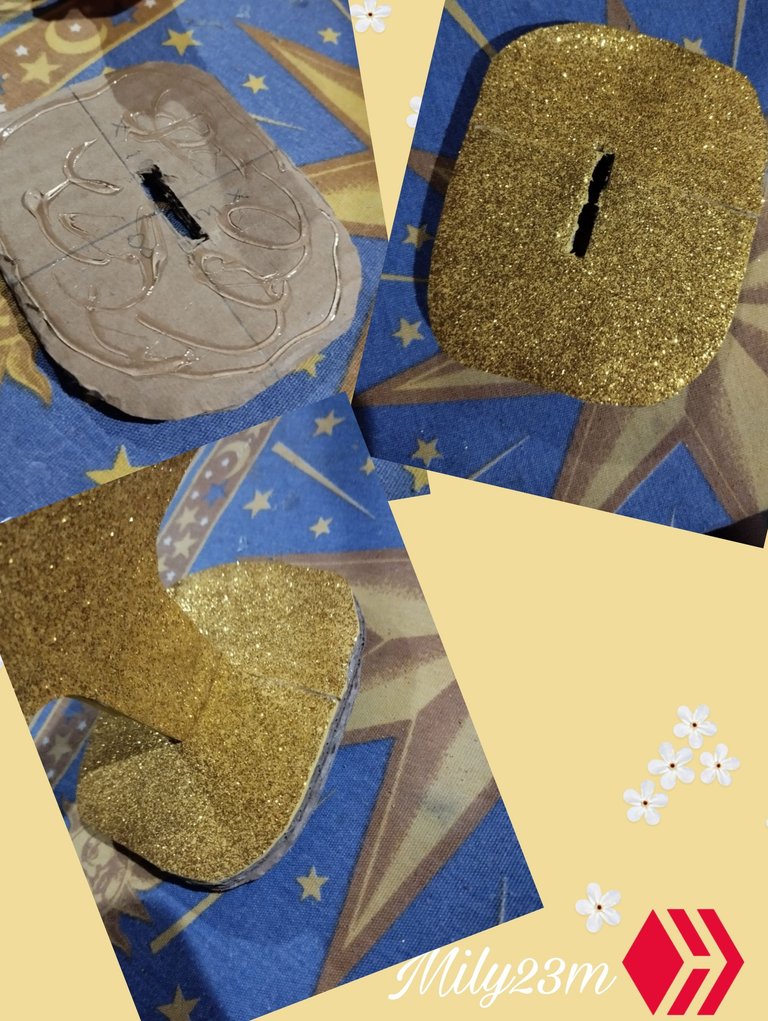
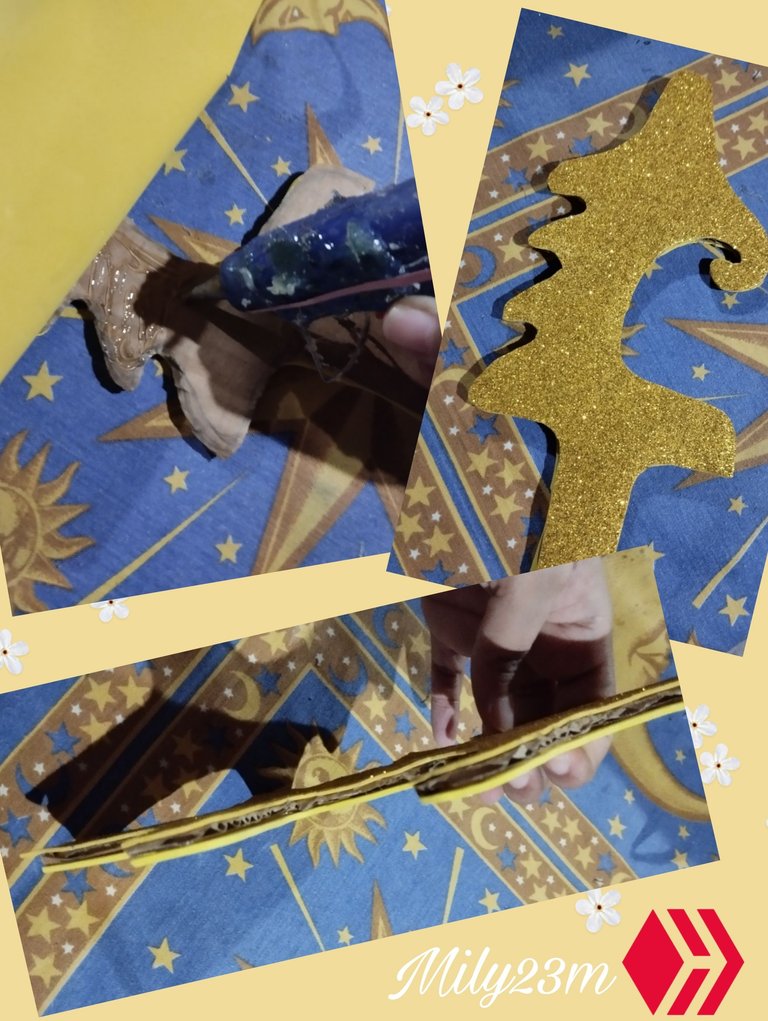
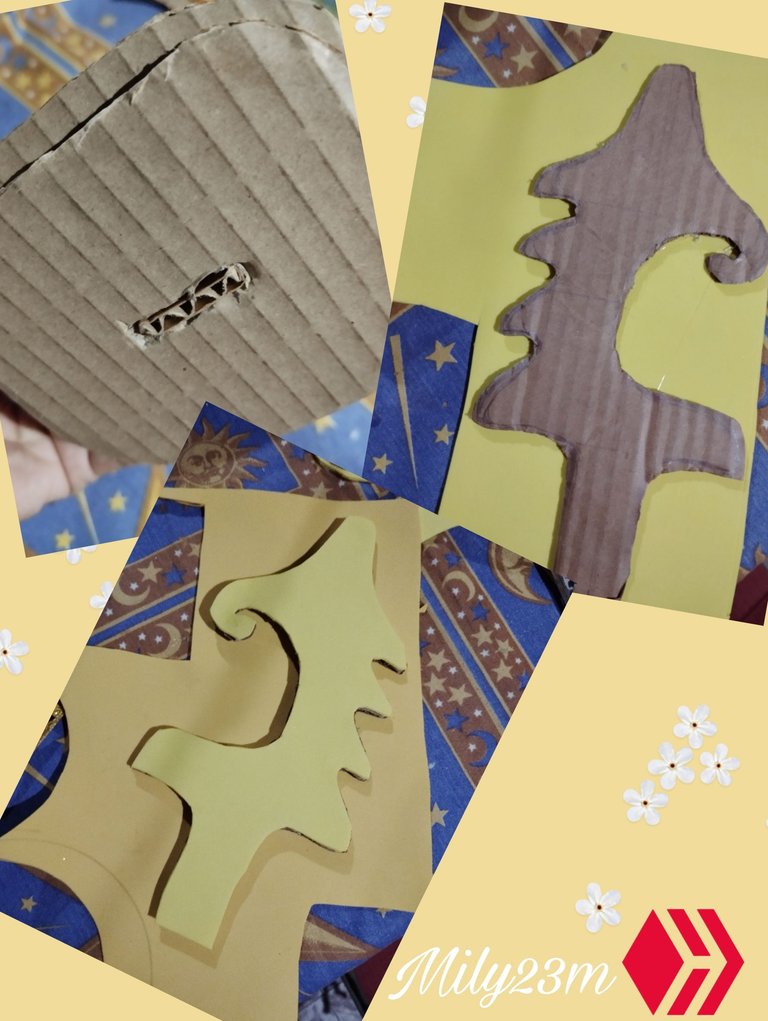
**#3 Para el cuerpo de arbolito me asegure de pegar bien toda la superficie del cartón al Foami escarchado, y recorté el sobrante con mucho cuidado , esto hace que la figura quede con ambos lados dorados en foami ,pero le queda un filo del cartón y la unión de los dos foamis que hay que tapar después. Para la base usé retazos de foami dorado que uni para forrarlo y corté la ranura de nuevo con el cúter para que se pudiera introducir el tronco del árbol.
English Version
**#3 For the body of the tree I made sure to glue the entire surface of the cardboard to the frosted foam, and I cut off the excess very carefully, this makes the figure have both sides covered in gold foam, but there is still an edge of the cardboard and the joint of the two foams that must be covered later. For the base I used scraps of gold foam that I joined together to cover it and I cut the slot again with the cutter so that the tree trunk could be inserted.
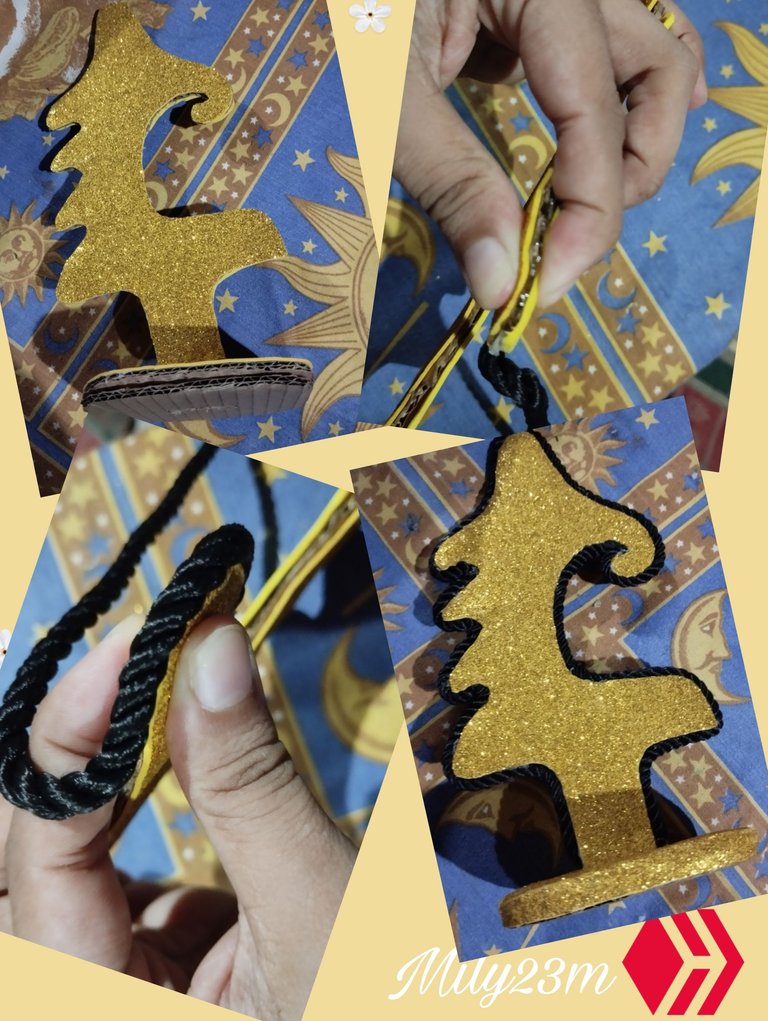
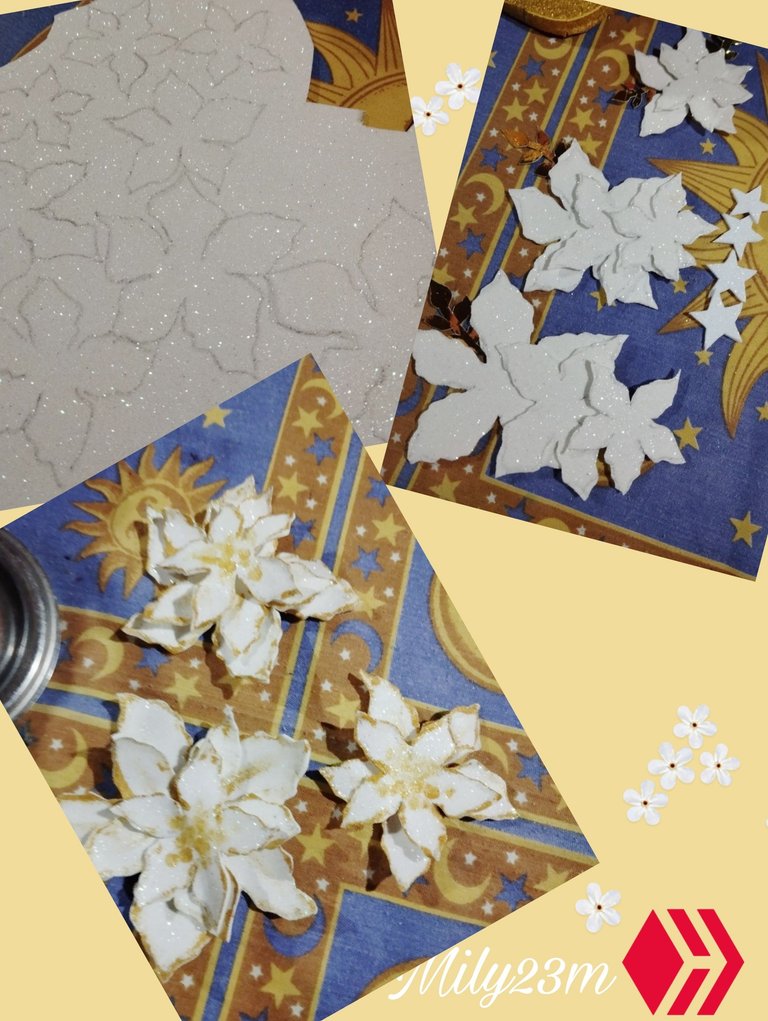
**#4 volví a probar que entrar bien el arbolito a la ranura ya que ahora tiene el grosor de los dos foamis , pero entro bien todavía. Luego quería forrarle los borde con tiras de foami dorado (pero se me había acabado 🫢) y pensé entonces en cintas pero eran muy finas ,y encontré este cordón super bonito que es trenzado y es como para cojines, y justo era de un grosor que me servía,así que con mucho cuidado lo fui pegando por todo el contorno del arbolito ,otra cosa es que mientras agregaba silicón caliente a la orilla ,presionaba con mis dedos los dos lados para así quedará un poco más "fina" esa unión del cartón y los dos foamis y luego pegaba encima el cordón siempre tratando de tapar paras la cara frontal,con cuidado hice todo el contorno con el cordón. Luego lo que quería hacer era una especie de flores navideñas pero las hice en foami escarchado blanco , así que saqué dos flores grandes , 3 flores medianas ,y 3 flores pequeñas de cinco pétalos cada una, y trate de darles un efecto ondulado a los pétalos para darle un toqué más parecido a las florecitas navideñas.Tambien saqué 4 estrellitas pequeñas en foami escarchado blanco, e hice una ramitas con hojitas en cartulina espejo dorada dos medianas y dos pequeñas. Para darle más movimiento a las flores las calenté un poco con la plancha y les dí volumen, luego con pintura dorada acrílica le hice todo el contorno en dorado y algo de colo en los pétalos, para que se viera natura al igual que para darle el efecto de pistilos hice puntos dorados en el centro de la flor.
English Version
**#4 I tried again to get the tree into the slot well since now it is the thickness of the two foams, but it still fit well. Then I wanted to cover the edges with strips of gold foam (but I had run out 🫢) and then I thought about ribbons but they were very thin, and I found this super pretty cord that is braided and is like for cushions, and it was just a thickness that worked for me, so very carefully I glued it around the entire outline of the tree, another thing is that while I was adding hot silicone to the edge, I pressed the two sides with my fingers so that the union of the cardboard and the two foams would be a little "thinner" and then I glued the cord on top, always trying to cover the front face, carefully I made the entire outline with the cord. Then what I wanted to do was a kind of Christmas flowers but I made them in white frosted foam, so I took out two large flowers, 3 medium flowers, and 3 small flowers with five petals each, and I tried to give them a wavy effect to the petals to give it a touch more similar to the Christmas flowers. I also took 4 small stars in white frosted foam, and I made some twigs with leaves in gold mirror cardstock, two medium and two small. To give the flowers more movement I heated them a little with the iron and gave them volume, then with gold acrylic paint I made the entire outline in gold and some color on the petals, so that it looked natural, as well as to give it the effect of pistils I made gold dots in the center of the flower.
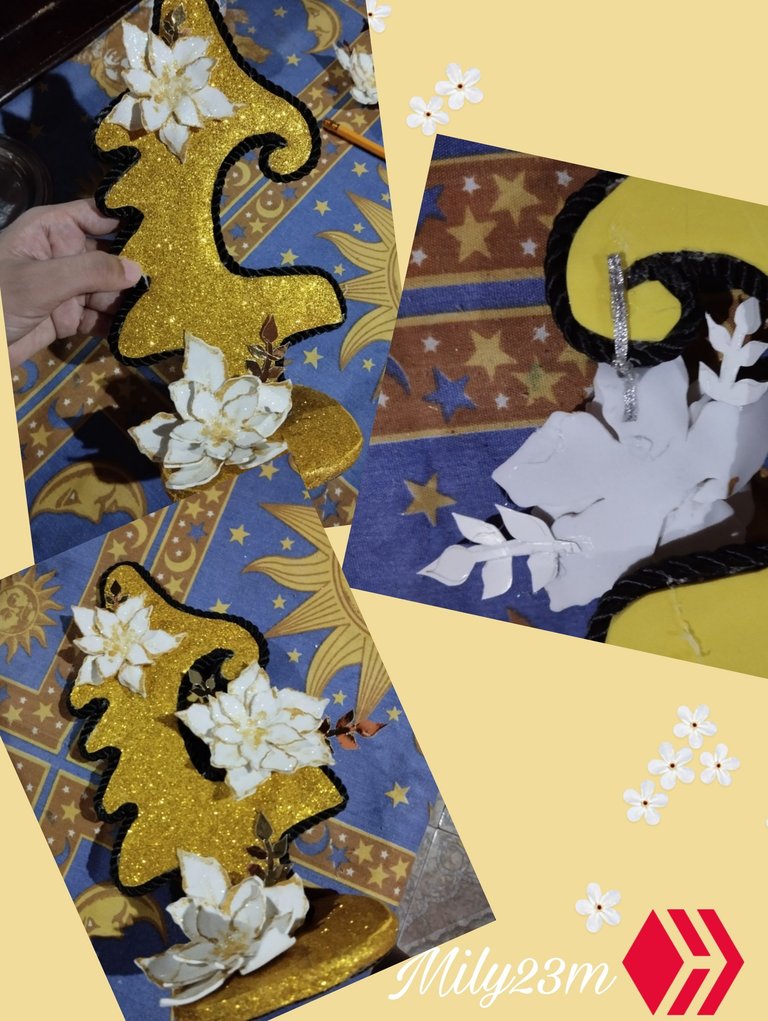
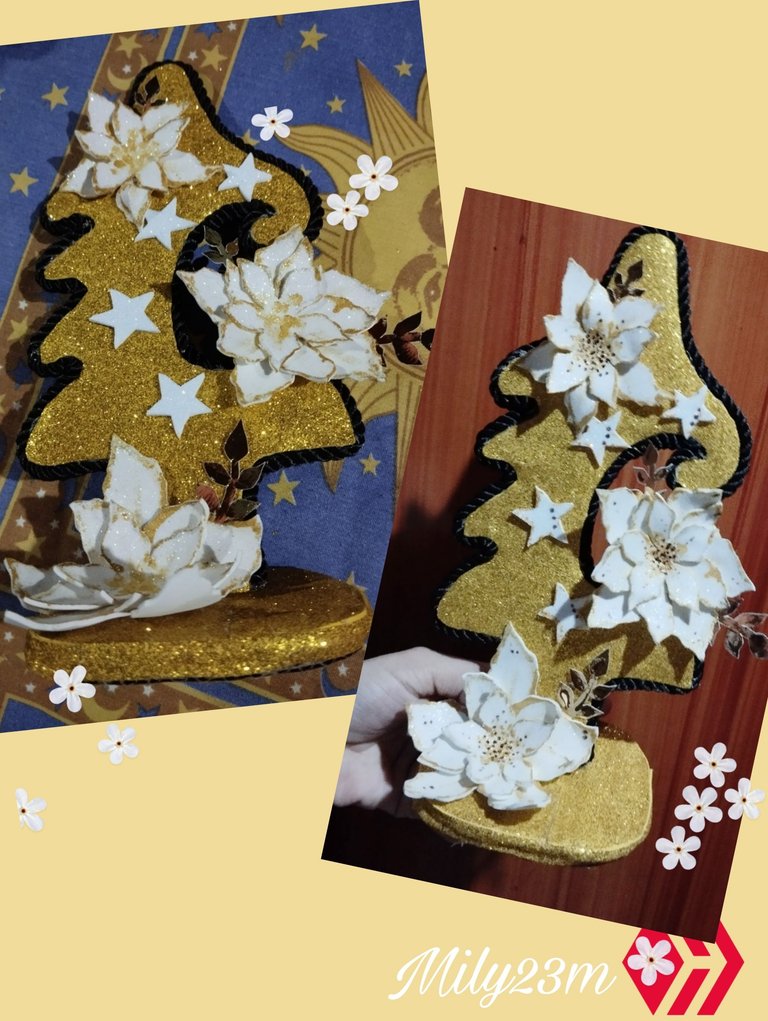
**#5 Luego armé las flores ,salieron dos grandes y una pequeña ,le agregué a la más grande la hojita dorada más grande y la ubiqué en la parte inferior del árbol con cayendo en la base , a la otra grande la termine y le puse dos hojitas doradas ,una pequeña y otra a la derecha más grande , para esta flor la idea es ponerla colgando en la parte "faltante " del arbolito por lo que con un cordoncito de cinta la pegue cayendo del árbol y por la parte de atrás de la flor y para que no se viera la unión, pegué un pedazo de foami amarillo tapandolo, la idea es que quede como un elemento móvil, aquí igual se podía poner la más pequeña pero no me gusto como quedarían ambas flores grandes del otro lado , así que lo deje de esa forma, dejando así a la más pequeña en el lado izquierdo superior del arbolito.Luego de pegar las flores, con pintura de tela dorada( para que quede un poco con relieve hice puntitos en el centro de la flor) ,agregué las estrellas alrededor de la curva del árbol, y también les di otros puntitos con pintura marron de tela para hacer pistilos contrastantes, otro detalles fueron que pinte el contorno de las estrellitas ,y le agregué tres puntos con pintura marron para darle un toqué bonito, y con esta misma pinta les hice algunos detalles a las hojas. también corté una tira de foami dorado de 1 CM de grosor que complete con retazos para tapar el grosor de la base.
English Version
**#5 Then I assembled the flowers, two large ones and one small one, I added the largest golden leaf to the largest one and placed it at the bottom of the tree falling at the base, to the other large one I finished it and put two golden leaves on it, one small and one on the right larger, for this flower the idea is to put it hanging on the "missing" part of the tree so with a little piece of ribbon I glued it falling from the tree and on the back of the flower and so that the join couldn't be seen, I glued a piece of yellow foam covering it, the idea is that it remains as a mobile element, here you could also put the smallest one but I didn't like how both large flowers would look on the other side, so I left it that way, leaving the smallest one on the upper left side of the tree. After gluing the flowers, with gold fabric paint (so that it looks a little raised I made dots in the center of the flower), I added the stars around the curve of the tree, and I also gave them some other dots with brown fabric paint to make contrasting pistils, other details were that I painted the outline of the stars, and I added three dots with brown paint to give it a nice touch, and with this same paint I made some details to the leaves. I also cut a strip of 1 CM thick golden foam that I completed with scraps to cover the thickness of the base.
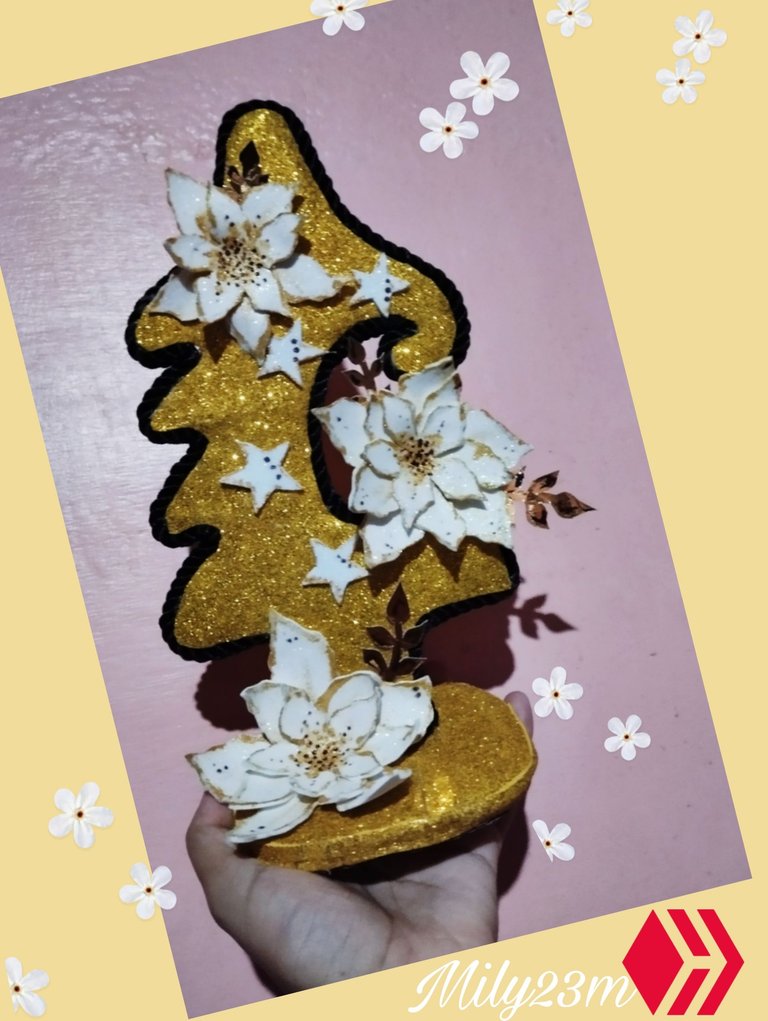
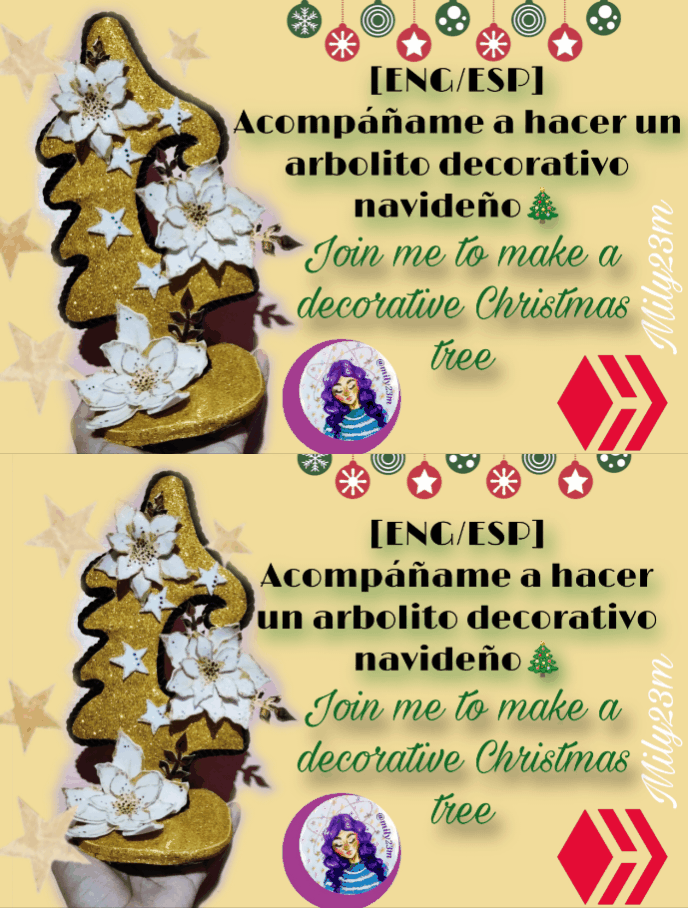
🎄🤩 Y listo ! El diseño quedaría así como está la imagen , ame el resultado , porque siento que solo el cordón negro alrededor eleva el diseño , en conjunto con los colores dorado y blanco siempre va a verse bonito y elegante , con el toque de las flores navideñas blancas , me parece que se ve como un adorno que decora bastante y es llamativo pero que tampoco es muy caro o muy difícil de hacer , hay que destacar que también el diseño dependerá de los detalles para adornarlo y los materiales , puede ser desde agregar un mini nacimiento, más flores , un santa Clos , algún mensaje bonito ,💖las posibilidades son infinitas 💖 ,dime te gustó el diseño? Lo harías ?.
# Fotos tomadas por mi en mi equipo redmi note 12 editadas en pics art y gifs creados en app creador de gifs texto traducido en Google traductor.
English Version
🎄🤩 And that's it! The design would be like the image, I loved the result, because I feel that only the black cord around it elevates the design, together with the gold and white colors it will always look pretty and elegant, with the touch of the white Christmas flowers, it seems to me that it looks like an ornament that decorates quite a bit and is eye-catching but that is not very expensive or very difficult to make, it should be noted that the design will also depend on the details to decorate it and the materials, it can be from adding a mini nativity scene, more flowers, a Santa Clos, some nice message, 💖 the possibilities are endless 💖 , tell me did you like the design? Would you do it?.
# Photos taken by me on my redmi note 12 device edited in pics art and gifs created in the gif creator app text translated in Google translator.


Posted Using InLeo Alpha
👏☺️🤩👍
Gracias @claudy27 😊💜
Bueno si es una linda decoración y con pocos materiales, el cordón le da un toque llamativo, muy creativo, gracias por compartir, saludos.😁❤️
Muchas Gracias @ikigaidesing 😁💜✨ oye de verdad que ese tipo de cordón eleve los diseños , pasa que ahora están un poco más as costosos jejej porqué sí no compro varios para agregarlo a las manualidades
Hermosa idea para decorar los espacios del hogar, llegó la navidad.
Me gustó muchísimo, saludos. 🌲
Muchas gracias ☺️💜✨@ljfenix 😁 me alegro que te gustará la idea ✨
Bello y creativo 🎄
Aww Muchas gracias ☺️💜✨ @marile21
Una lindura sin duda, yo amo las cosas con foami escarchado dorado, son bellísimas y este arbolito no es la excepción. 🥰🫂
Muchas gracias 💜✨@sarangzg7 oye es que el dorado y blanco es una cosa de elegancia ,y por qué mentir amiga como que nos recuerda a cosas de plata jajaja o por lo menos a mí 🫢
Que hermosa idea, gracias por compartir✨❤️
Gracias a ti por leer y comentarme 💜✨☺️
Congratulations @mily23m! You have completed the following achievement on the Hive blockchain And have been rewarded with New badge(s)
Your next target is to reach 600 comments.
You can view your badges on your board and compare yourself to others in the Ranking
If you no longer want to receive notifications, reply to this comment with the word
STOP