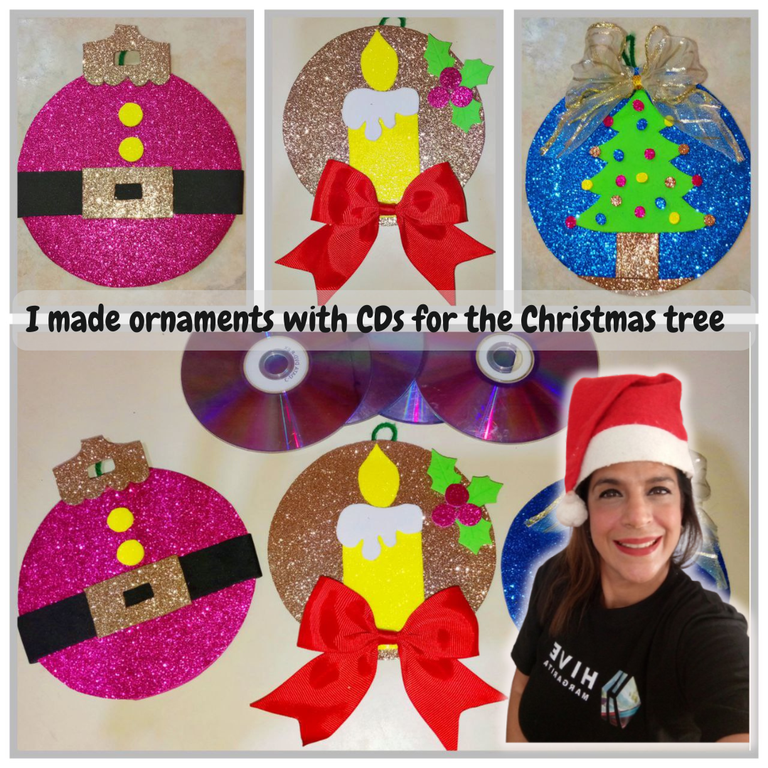
¡Hola querida comunidad! Bendiciones y espero que se encuentren muy bien en unión de sus familiares.
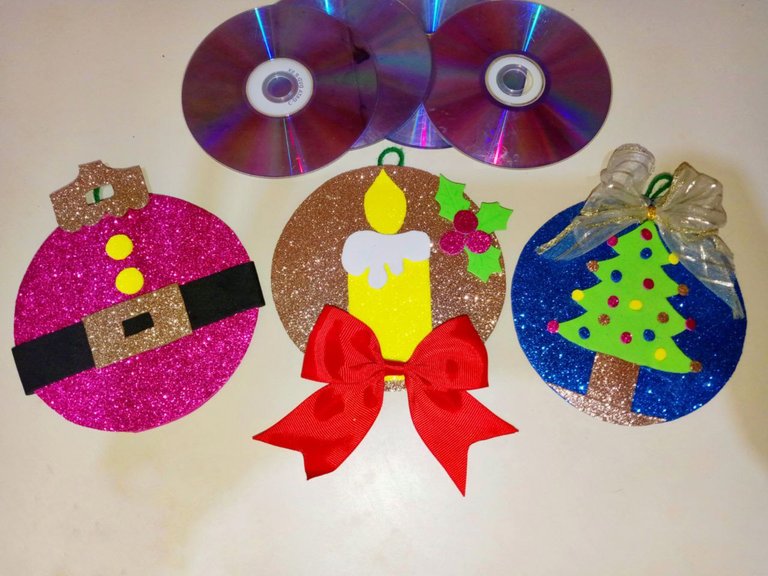
Estos días los he aprovechado limpiando y poniendo un poco de orden en mi hogar, viviendo esa sensación que se apodera de muchos en esta época del año, el querer hacer lugar para lo nuevo y botar o donar lo que ya no se necesita. En esas limpiezas encontré unos Cd viejísimos de peliculas infantiles de mi hijo y otros de música que tenía guardados, así que decidí hacer estos bonitas bolas para colgar en el árbol de Navidad y mostrarles el proceso por acá, pero antes vi algunos videos en "You Tube" en los que esta manualidad me pareció muy fácil de hacer. Los materiales utilizados fueron:

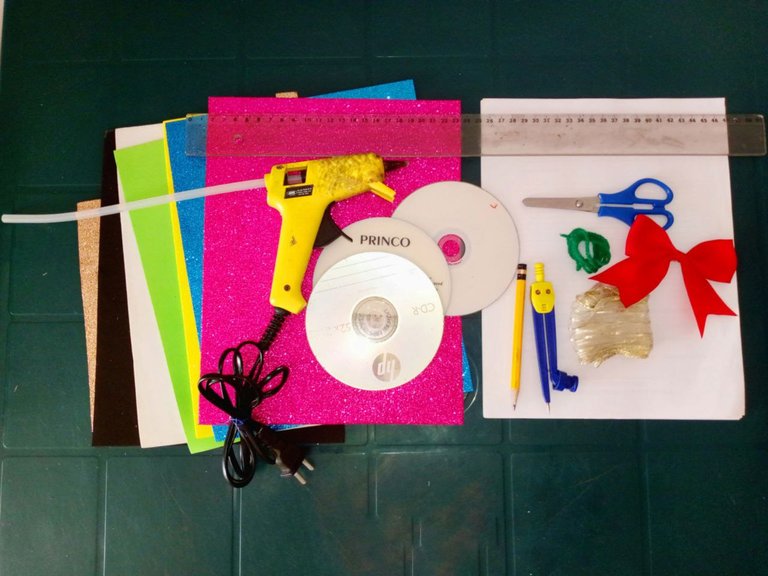
Materiales :
CDs que ya no usen
Foami escarchados y lisos de varios colores
Silicón frío o barra de silicón
Tijera
Cintas
Lápiz
Regla
Pistola para silicón
Compás
Estambre
Hojas blancas o de reciclaje

Paso a paso:
Empezaremos haciendo el traje de Papá Noel, para lo que explicaré con más detalle los pasos para forrar la parte delantera y trasera del CD. Para hacer la vela y el árbol, vuelve a ver estos pasos.
Traje de Santa Claus:
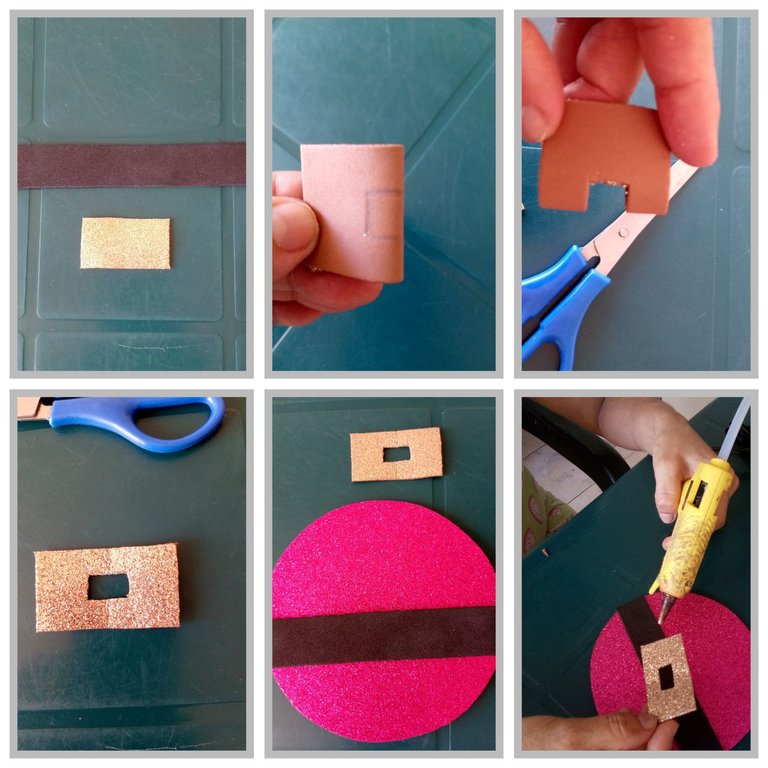
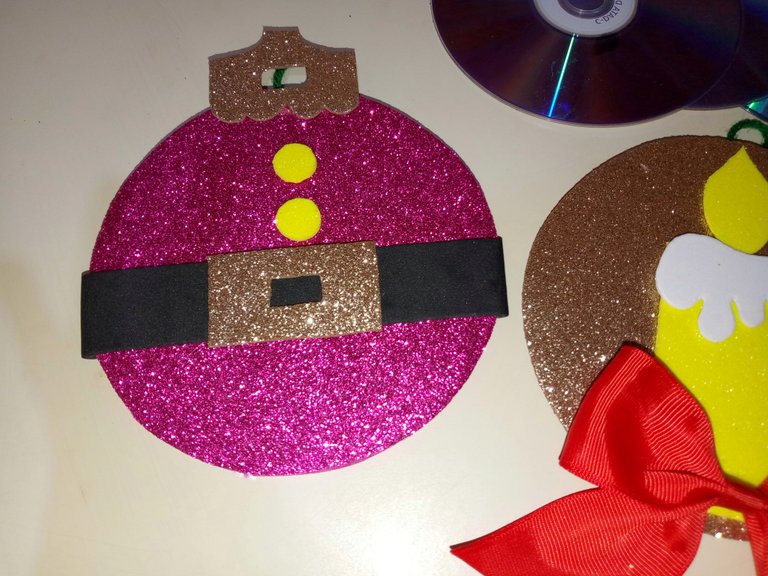
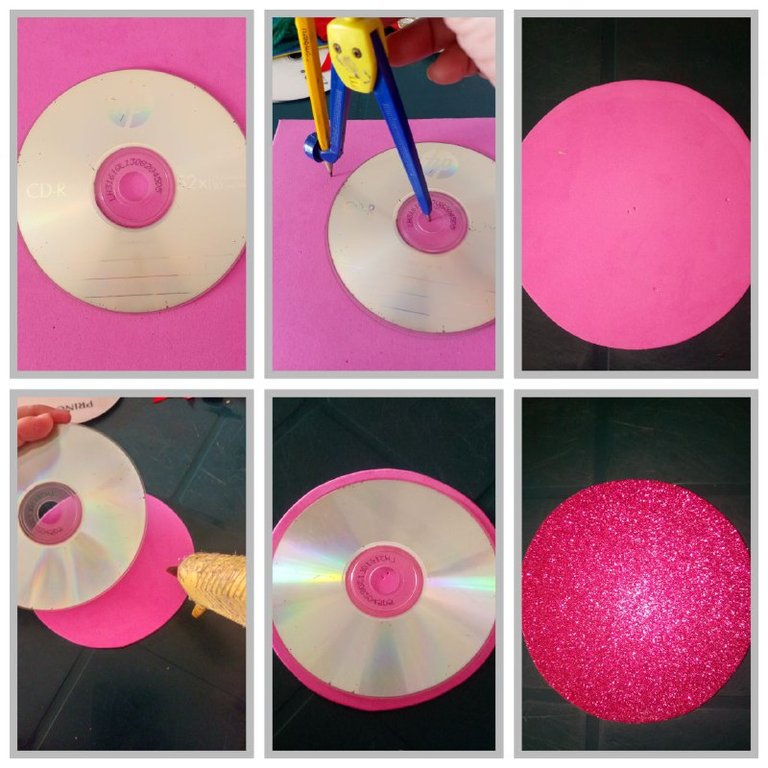
Paso 1: Coloca el CD sobre el foami y dibuja con un compás un círculo 1/2 cm más grande que el tamaño del CD. Recorta el CD y pégalo al foami con el silicon. Dale la vuelta y ésta será nuestra parte delantera.
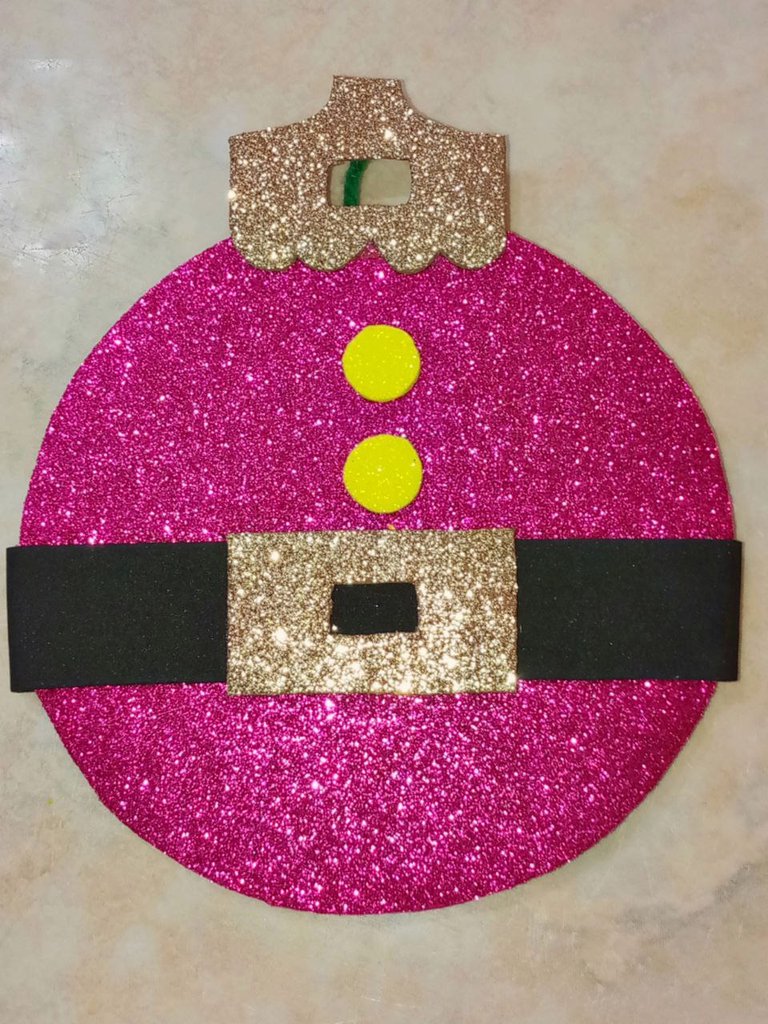
Paso 2: Hacemos el cinturón cortando una tira de foami negro de 15 cm de largo x 2,5 cm de ancho y para la hebilla una pieza en foami dorado de 5 cm de largo x 3 cm de ancho, la cual doblamos a la mitad y con un lápiz trazamos 3 lineas para formar el cuadrado del interior de la hebilla y recortamos.
Pegamos el cinturón y el sobrante por detrás del CD, luego se pega la hebilla.
Paso 3: Luego dibujé en un papel lo que sería el colgante de la esfera, para ello doblé el papel por la mitad y dibujé el modelo como lo pueden ver en la fotos, me guié por el tamaño de la parte superior de la esfera. Recorté siguiendo las líneas y el molde lo transferí al foami dorado Para hacer los botones coloqué un CD sobre el foami y dibujé dos circulos en foami amarillo. Pegué las piezas.
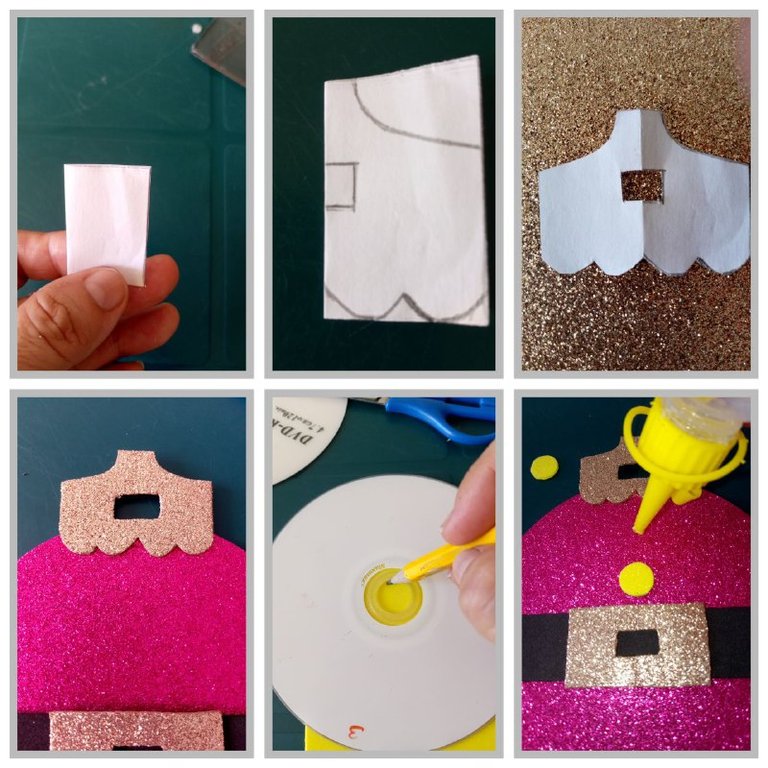
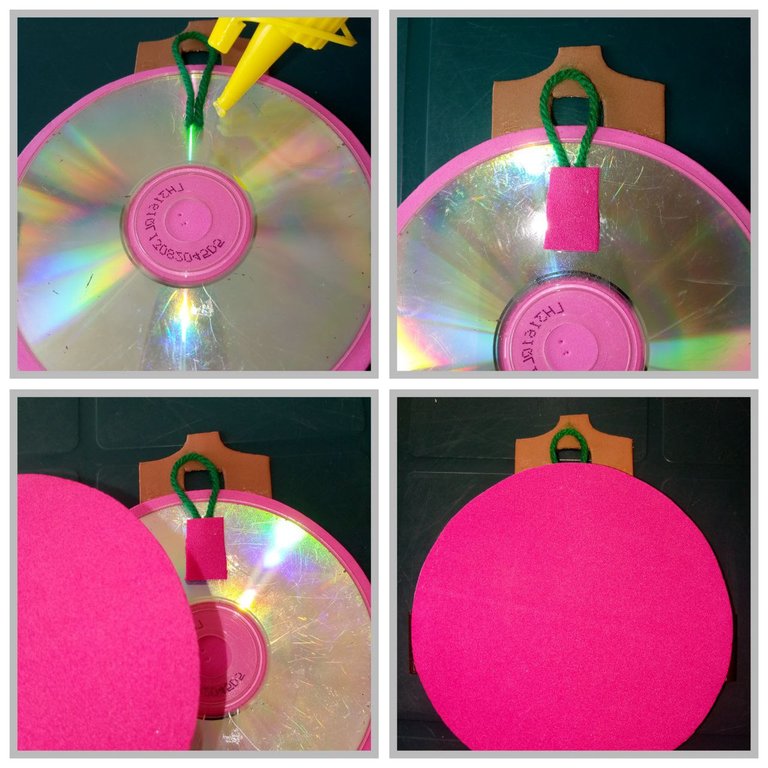
Paso 4: Ahora, damos la vuelta al CD y trabajemos en la parte trasera. Cortamos 10 cm de estambre y pegamos con el silicón en la parte superior. A continuación, se coloca un trocito de foami encima del hilo para sujetarlo.
Se corta otro círculo de foami siguiendo el "Paso 1 " para colocar la tapa trasera. Pegar con silicón.

Vela Navideña :
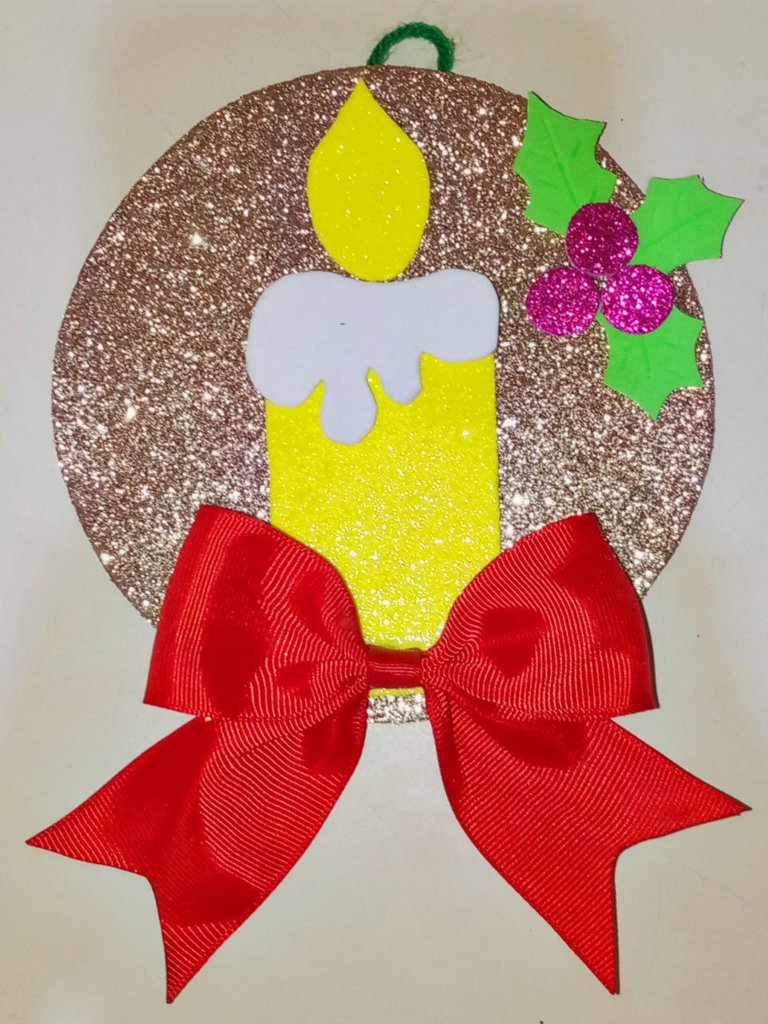
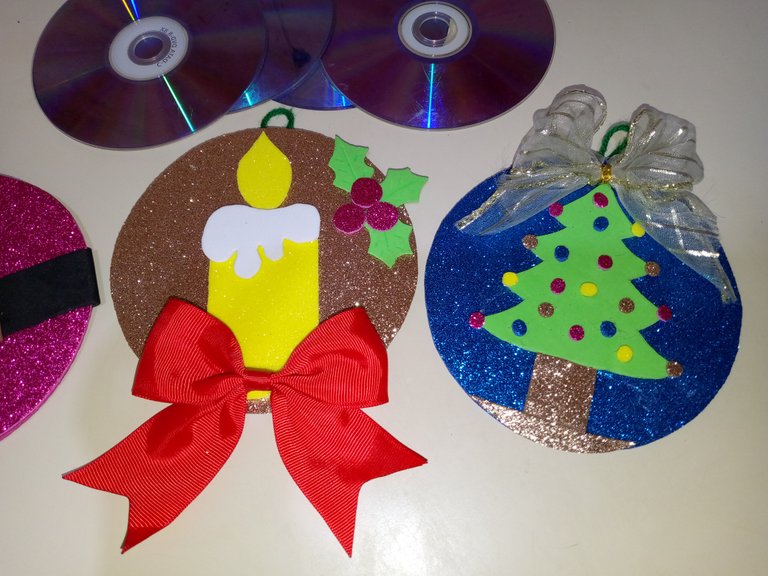
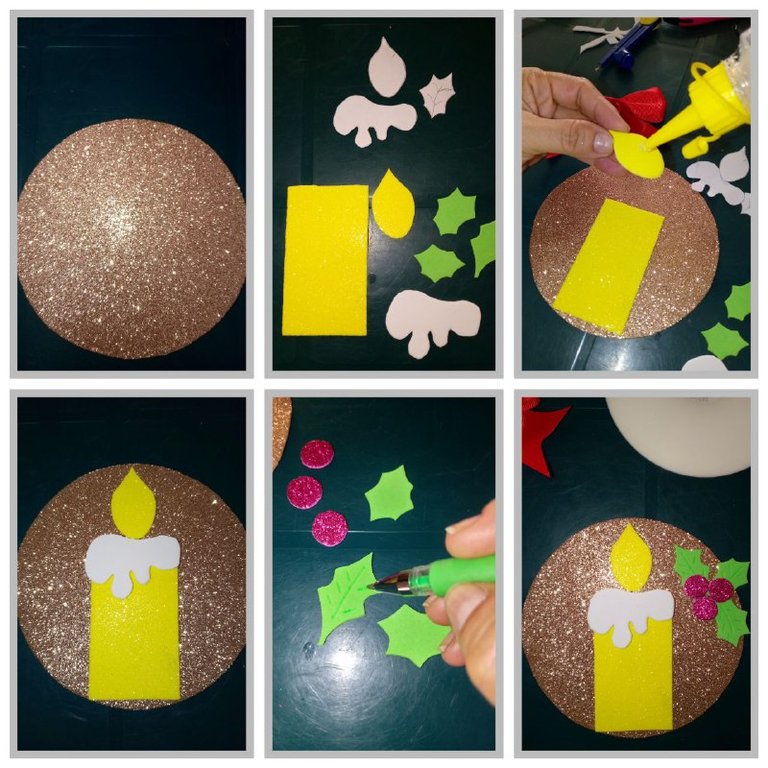
Seguir las instrucciones del Paso 1 del "Traje de Santa Claus" para forrar la parte delantera del CD. Aquí utilicé foami escarchado color dorado.
Para el cuerpo de la vela corté un trozo de foami amarillo de unos 8,5 cm de largo x 4,5 cm de ancho. Para el esperma, la llama y las hojas busqué moldes en Internet y los adapté al tamaño de la vela. Los transferí al foami y los recorté. Pegamos las piezas (cuerpo de la vela encima la pieza del esperma y la llama).
Utilicé un marcador verde para dibujar líneas en las hojas y con un Cd dibujé tres círculos en en foami fucsia que pegué junto a las hojas. Pegamos en el lateral.
Para finalizar, tenía un lazo rojo hecho y lo pegué en la base de la vela, siento que le dio un toque muy navideño.
Para la parte de atrás repetimos el Paso 4 del "Traje de Santa Claus"

Árbol Navideño :
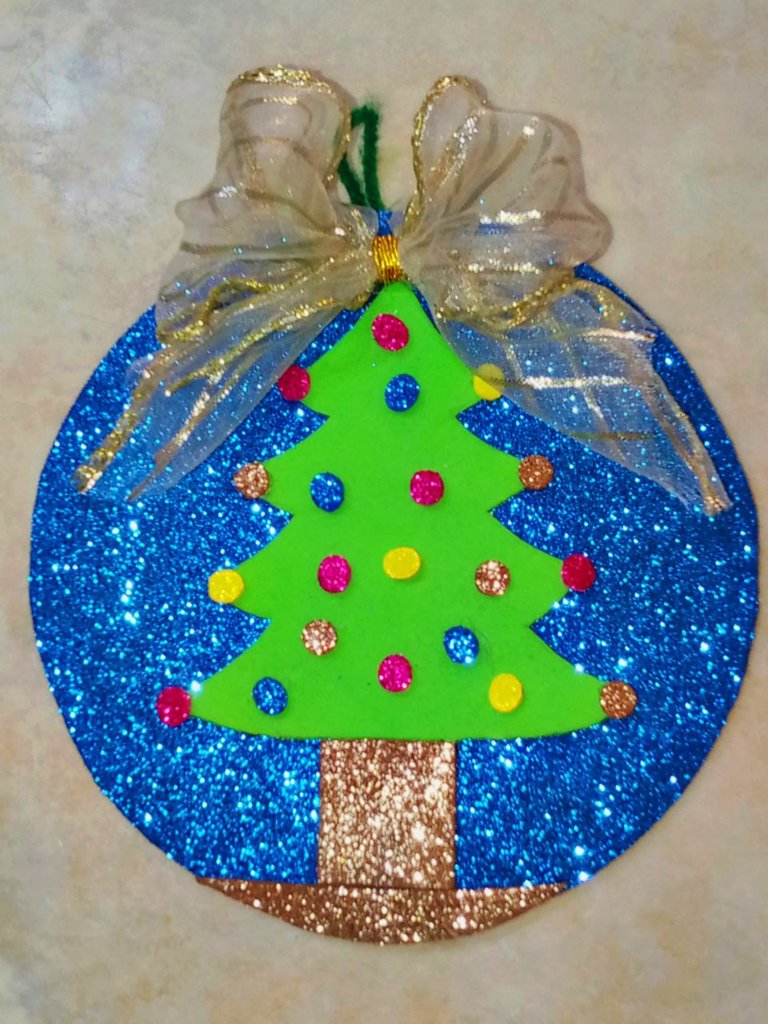
Seguir las instrucciones del Paso 1 del "Traje de Santa Claus" para forrar la parte delantera del CD. Aquí utilicé foami escarchado color azul.
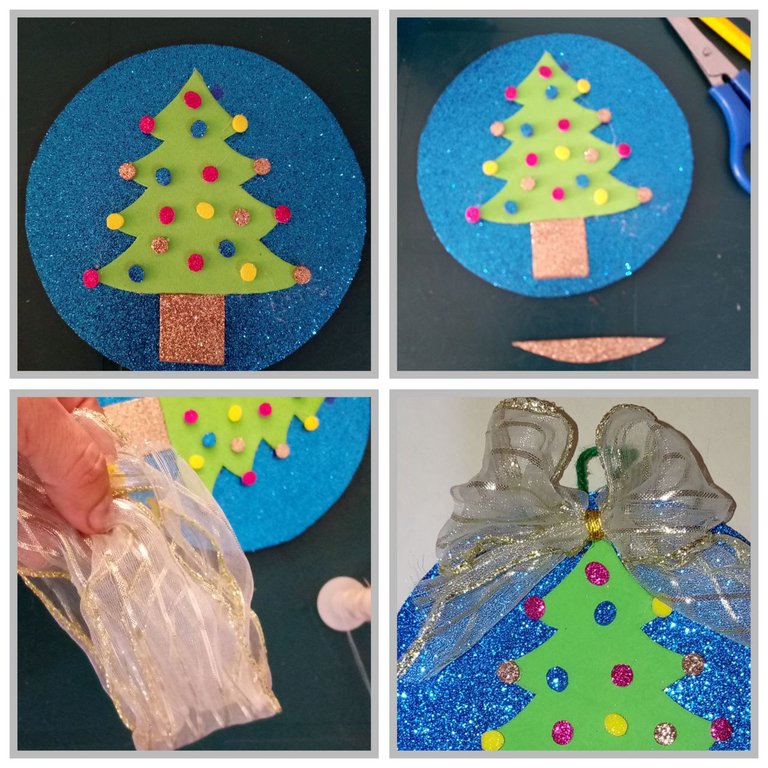
Busqué en Internet y encontré el molde de árbol. Lo dibujé en papel y luego lo transferí al foami verde y dorado. Recorté las piezas y las pegué sobre el foami azul .
Y con una perforadora hice pequeños círculos en foami de varios colores para colocarlos sobre el árbol.
Ahora vamos a pegar con el silicón los pequeños circulos de foami, hice el tronco del árbol, pero no me llegó hasta el borde del CD, así que recorté un trocito de foami para que fuera la base del tronco.
Para hacer el lazo tomé un trozo de cinta navideña de 33 cm de largo x 6 cm de ancho, lo anudé al centro con hilo dorado y lo pegué sobre la punta del árbol.
Para la parte de atrás repetimos el Paso 4 del "Traje de Santa Claus"
Es un lindo proyecto que puede hacerse en familia, así que si estás limpiando y ordenando y te encuentras estos Cds puedes aprovecharlos con esta manualidad. Otra idea que se me ocurrió es hacer lo que queremos manifestar el año que viene, muchos tienen por costumbre colocar esos deseos en el árbol: ya sea una casa , un carro, un viaje o cualquier otra cosa, buscamos patrones , recortamos y pegamos ¡Las posibilidades son infinitas!

ENGLISH
Hello dear community! Blessings and I hope you are doing well with your families.
These days I have made the most of them cleaning and putting some order in my home, living that feeling that takes over many at this time of the year, wanting to make room for the new and throw away or donate what is no longer needed. In those cleanings I found some old CDs of my son's children's movies and other music CDs that I had saved, so I decided to make these beautiful balls to hang on the Christmas tree and show you the process here, but before I saw some videos on "You Tube" in which this craft seemed very easy to do. The materials used were:

Materials
CDs that are no longer in use
Frosted and plain foams of various colors
Cold silicone or silicone stick
Scissors
Ribbons
Pencil
Ruler
Silicone gun
Compass
Yarn
White or recycled sheets


Step by step
We will start by making the Santa suit, for which I will explain in more detail the steps for lining the front and back of the CD. To make the candle and the tree, go back to these steps.
Santa Claus Costume:
Step 1: Place the CD on the foami and draw with a compass a circle 1/2 cm bigger than the size of the CD. Cut out the CD and glue it to the foami with the silicone. Turn it over and this will be our front part.
Step 2: We make the belt by cutting a strip of black foami 15 cm long x 2.5 cm wide and for the buckle a piece of gold foami 5 cm long x 3 cm wide, which we fold in half and with a pencil draw 3 lines to form the square inside the buckle and cut out.
Glue the belt and the excess behind the CD, then glue the buckle.

Step 3: Then I drew on a piece of paper what would be the pendant of the sphere, for this I folded the paper in half and drew the model as you can see in the pictures, I was guided by the size of the top of the sphere. I cut along the lines and transferred the mold to the gold foami. To make the buttons I placed a CD on the foami and drew two circles in yellow foami. I glued the pieces together.

Step 4: Now, turn the CD over and work on the back side. Cut 10 cm of yarn and glue it with the silicone on the top. Next, place a small piece of foami on top of the yarn to hold it.
Cut another circle of foami following "Step 1" to place the back cover. Glue with silicone.


Christmas Candle :
Follow the instructions in Step 1 of the "Santa Claus Costume " to line the front of the CD. Here I used gold colored frosted foami.
For the body of the candle I cut a piece of yellow foami about 8.5 cm long x 4.5 cm wide. For the sperm, the flame and the leaves I looked for molds on the Internet and adapted them to the size of the candle. I transferred them to the foami and cut them out. We glued the pieces (body of the candle on top of the sperm piece and the flame).
I used a green marker to draw lines on the leaves and with a Cd I drew three circles on fuchsia foami that I glued next to the leaves. We glued them on the side.
To finish, I had a red ribbon made and glued it on the base of the candle, I feel it gave it a very christmasy touch.
For the back we repeat Step 4 of the "Santa Claus Costume


Christmas Tree :
Follow the instructions in Step 1 of the "Santa Claus Costume" to line the front of the CD. Here I used blue frosted foami.
I searched the Internet and found the tree mold. I drew it on paper and then transferred it to the green and gold foami. I cut out the pieces and glued them on the blue foami.
And with a hole puncher I made small circles in foami of various colors to place them on the tree.
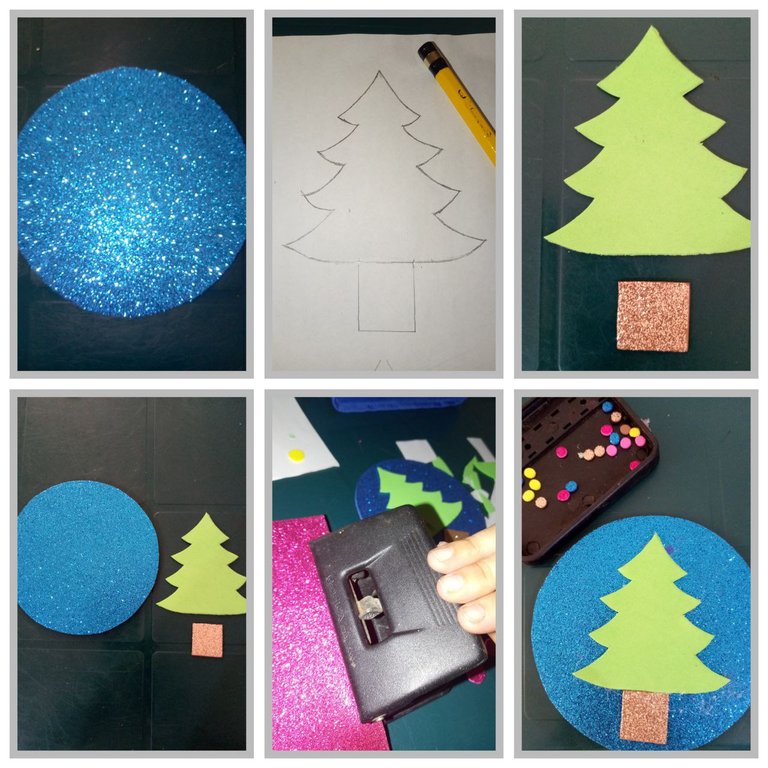
Now we are going to glue with the silicone the small circles of foami, I made the trunk of the tree, but it did not reach the end of the tree, so I cut a small piece of foami to be the base of the trunk.
To make the bow I took a piece of Christmas ribbon 33 cm long x 6 cm wide, I knotted it in the center with gold thread, then I glued it on the tip of the tree.
For the back of the tree, repeat Step 4 of the "Santa Claus Costume ".


It is a nice project that can be done as a family, so if you are cleaning and tidying and you find these CDs you can take advantage of them with this craft. Another idea I came up with is to make what we want to manifest next year, many have the habit of placing those wishes on the tree: whether it's a house, a car, a trip or anything else, we look for patterns, cut out and glue the possibilities are endless!


Fotos hechas por mí - Photos made by me / Portada - Separadores y Banners realizados en Canva- Cover, Dividers y Banners created in Canva / Traducción realizada con www.DeepL.com - Translation made with www.deepl.com
Posted Using InLeo Alpha



¿ᴺᵉᶜᵉˢᶦᵗᵃˢ ᴴᴮᴰ? ᵀᵉ ˡᵒ ᵖʳᵉˢᵗᵃᵐᵒˢ ᶜᵒⁿ
Gracias por la información. Excelente ¡¡¡ 🫶💯
Hola!!! Me encantan las decoraciones y tu tutorial. Nuestra comunidad ha actualizado sus normas, te invito a leerlas para que apliques a la portada en tus siguientes publicaciones.
https://peakd.com/hive-130560/@hive-130560/actualizacion-de-nuestras-reglas-en-la-comunidad-updating-our-community-rules-espeng
Saludos apreciada amiga, no me había percatado de las actualizaciones , agradezco mucho por compartirlas, he leído cada uno de los cambios!
Estaré muy al pendiente para mis futuras publicaciones en la comunidad.
Un abrazo 🤗❤️
Quedaron súper lindas y además son muy creativas. Es genial poder darle otra utilidad a las cosas que tenemos por casa.
Aparte explicaste muy bien la manera de realizarlas. Muy buen post ✨
Te agradezco mucho tu comentario ❤️Hola @mandysmoon, me alegro que te haya gustado, siiiii, absolutamente una forma genial de aprovechar lo que a veces acumulamos en casa y pensamos que ya no es útil.
¡Hay que bellos!!! Me encanto como te quedaron, es un momento de mucha felicidad para inspirarnos con la llegada de la Navidad. ✨💞
Totalmente amiga, la magia de la navidad haciendo de las suyas, hay muchas ideas preciosas
Gracias❤️
Totalmente amiga, es un momento mágico, que no podemos desperdiciar con tantas ideas preciosas que podemos innovar. 💖
Están bien bonitos y aquí en mi casa hay cd
Anímate a aprovechar esos CDs , estoy segura harás bellezas con ellos ♥️
It is nice way to recyle old CD disk 😊
Hey, happy holiday!
Hi Happy Holidays to you too , yes it is a very creative way to recycle these CD's .
Thanks for commenting 💫😉
Wao que excelente idea y asi reciclar lo que ya no se utiliza para darle un nuevo uso, en este caso un uso navideño que por cierto esta muy bello 😍
Holaaaa Buhito!!! Gracias ❤️🤗
Que bueno tenerte por acá 😚 me alegra que te haya gustado esta idea , si está genial para darle una segunda oportunidad a esos materiales que tenemos por allí olvidados.
Me encantan los proyectos Diy que incluyen el aprovechamiento de material, para darle no solo una segunda oportunidad en su vida útil, sino que realmente son un gran apoyo para nosotros economizar con estos materiales. Además, te quedaron bellos.
Hola amiga muchas gracias.
Ciertamente en estos tiempos donde queremos decorar y a la vez ajustarnos a un presupuesto, estas ideas son las mejores , A veces solo falta buscar un poco para encontrar inspiración y darle rienda suelta a la creatividad para darle nueva vida a esos materiales. Un abrazo grande y gracias a ustedes por ser una comunidad re-linda♥️
Congratulations @mergusa88! You have completed the following achievement on the Hive blockchain And have been rewarded with New badge(s)
Your next target is to reach 1500 comments.
You can view your badges on your board and compare yourself to others in the Ranking
If you no longer want to receive notifications, reply to this comment with the word
STOPCheck out our last posts: