¡Hola querida comunidad! En esta ocasión quiero compartirles una hermosa tarjeta pop- up con un bonito y tierno osito. Esta es una manualidad ideal para regalar o para complementar un obsequio y así hacerlo más personal y creativo, aprovechando que se acerca el día del amor y la amistad, no te pierdas del paso a paso y sorprende a tus seres queridos con esta idea.
Hello dear community! This time I want to share with you a beautiful pop-up card with a cute and cuddly teddy bear. This is an ideal craft to give as a gift or to complement a gift and thus make it more personal and creative, taking advantage of the approaching day of love and friendship, do not miss the step by step and surprise your loved ones with this idea.
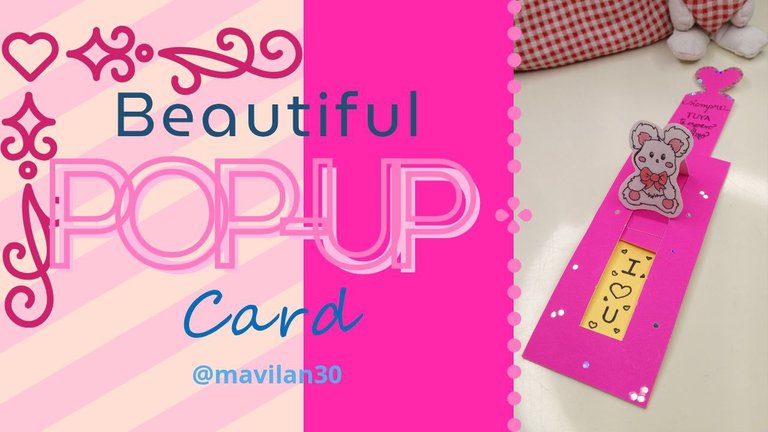
Imagen creada por mí en Canva / Image created by me in Canva
Materiales:
- Cartulina
- Papel (de colores o decorado)
- Tijeras
- Cúter
- Regla
- Lápiz
- Lápices de colores
- Rapidógrafo/lapicero/marcador
- Pegamento blanco
- Brillitos decorativos
Procedimiento:
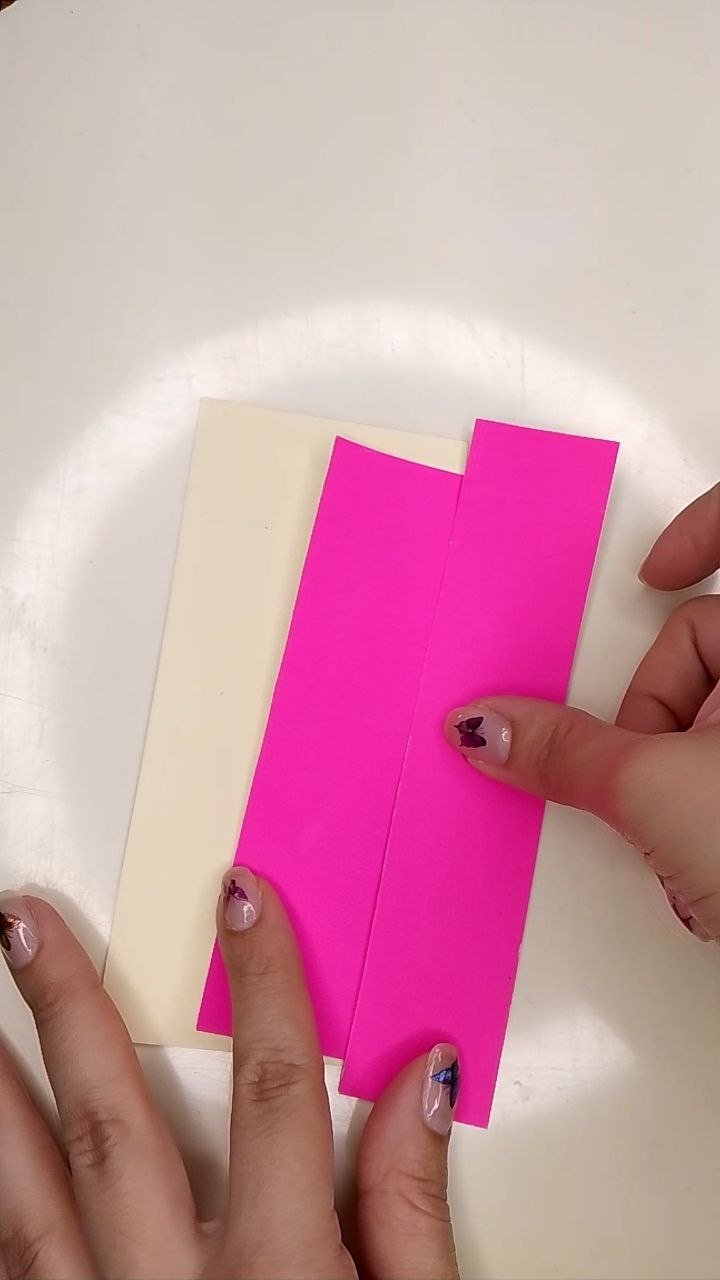
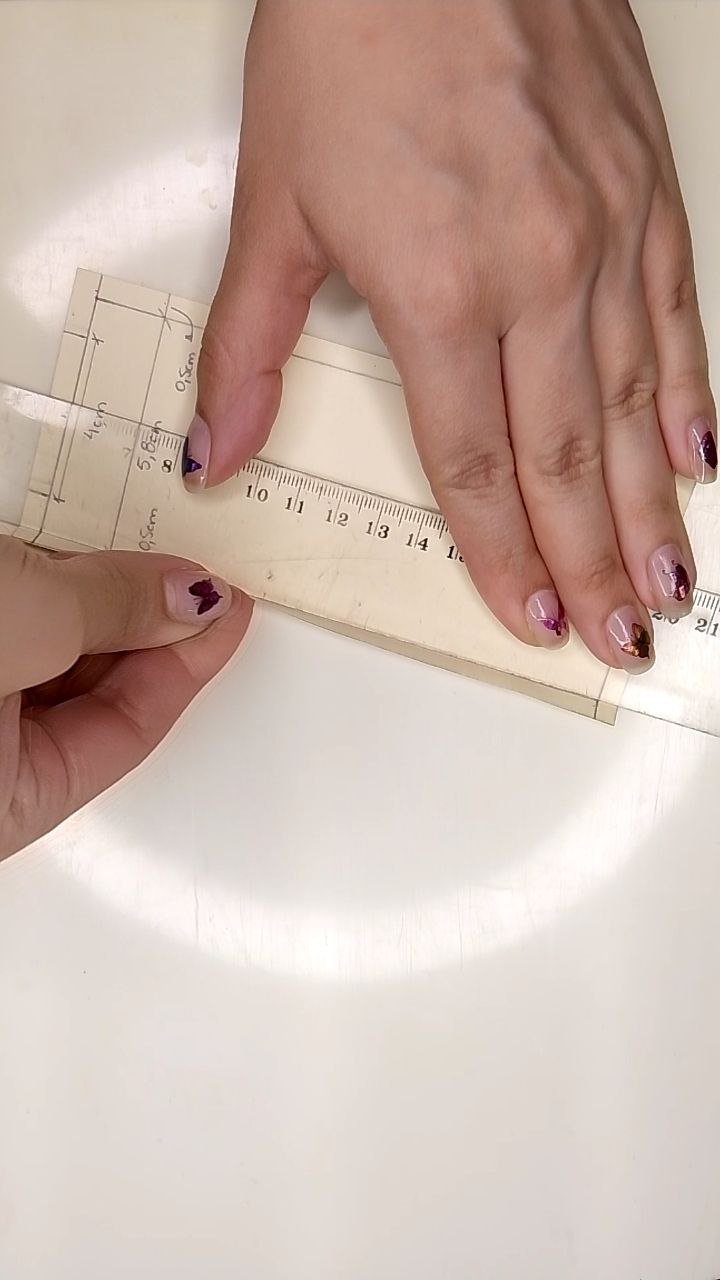
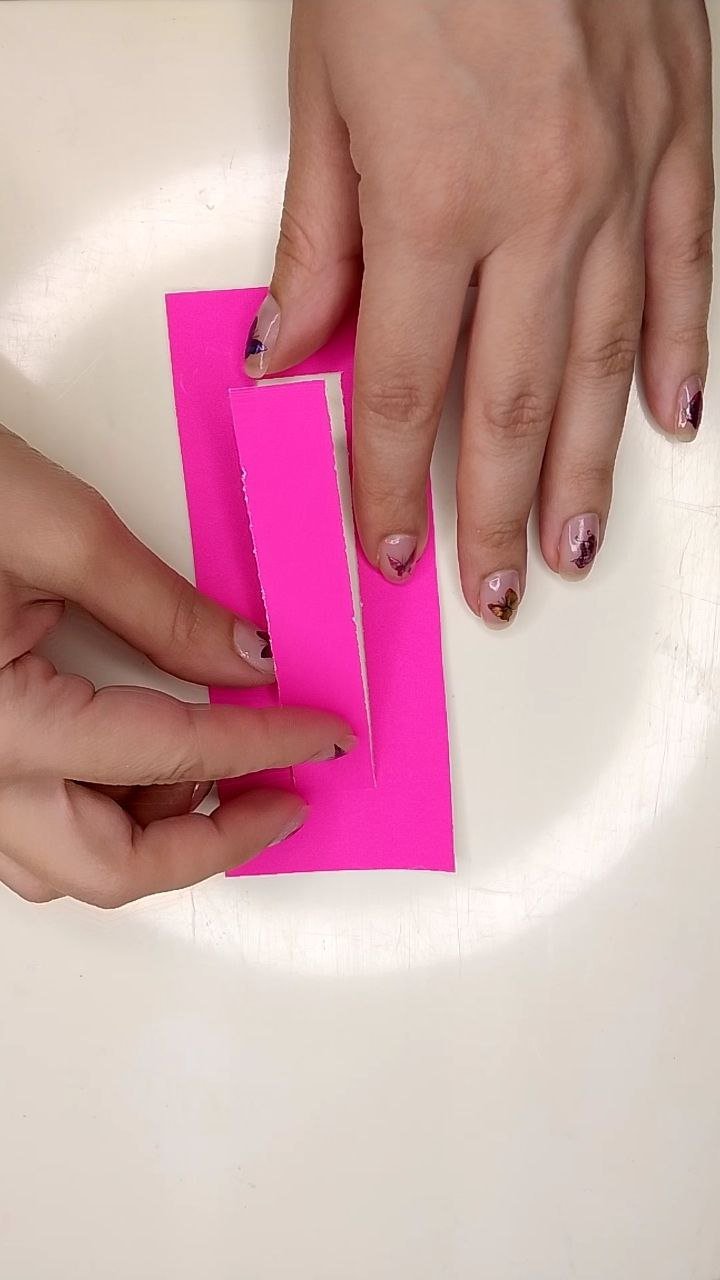
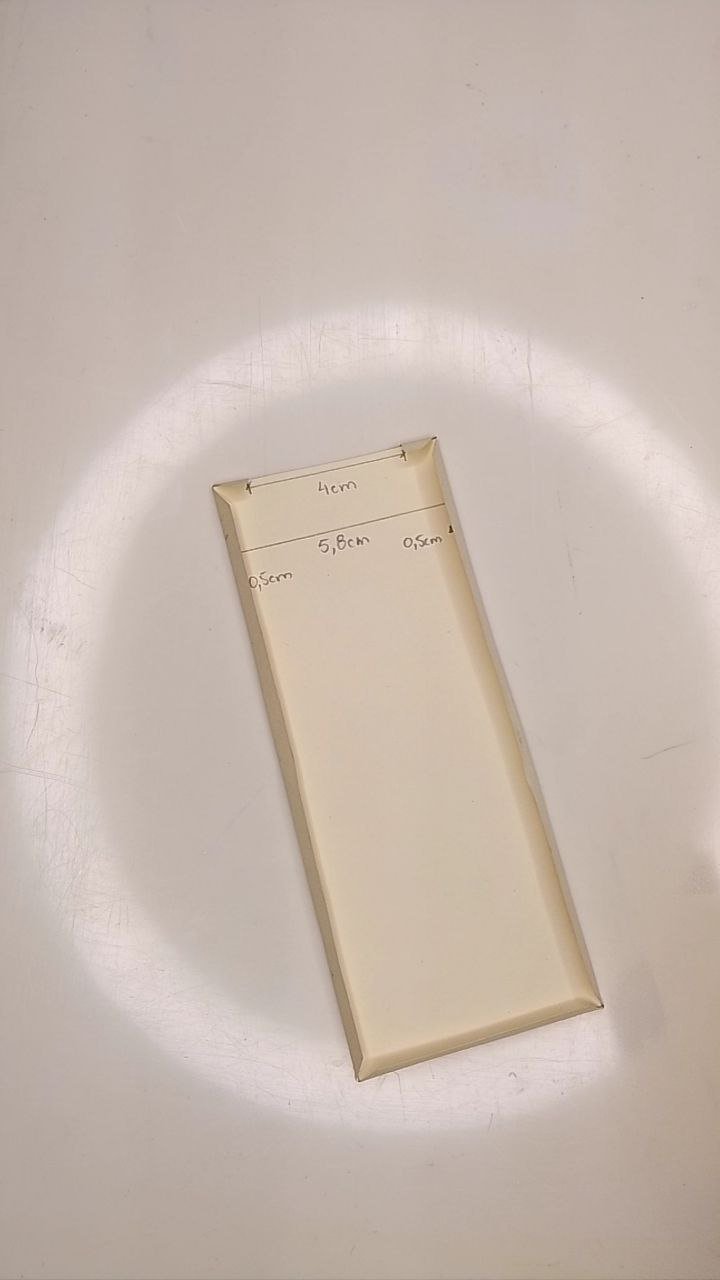
Comenzamos recortando tres rectángulos de cartulina de los colores de nuestra elección, en mi caso tomé una cartulina doble faz fucsia y reutilicé una carpeta amarilla que tenía por allí guardada para darle un segundo uso. Los dos rectángulos anchos tienen 24 cm de largo y los anchos pueden verlos en las imágenes a continuación (el rectángulo más fino debe ser más largo que los anteriores).
Materials:
- Card stock
- Paper (colored or decorated)
- Scissors
- Cutter
- Ruler
- Pencil
- Colored pencils
- Rapidograph/pencil/marker
- White glue
- Decorative glitter
Procedure:
We start by cutting out three rectangles of cardboard in the colors of our choice, in my case I took a double sided fuchsia cardboard and reused a yellow folder I had lying around to give it a second use. The two wide rectangles are 24 cm long and the widths can be seen in the images below (the thinner rectangle should be longer than the previous ones).
 |  |  |
|---|
Piezas de la tarjeta / Card parts
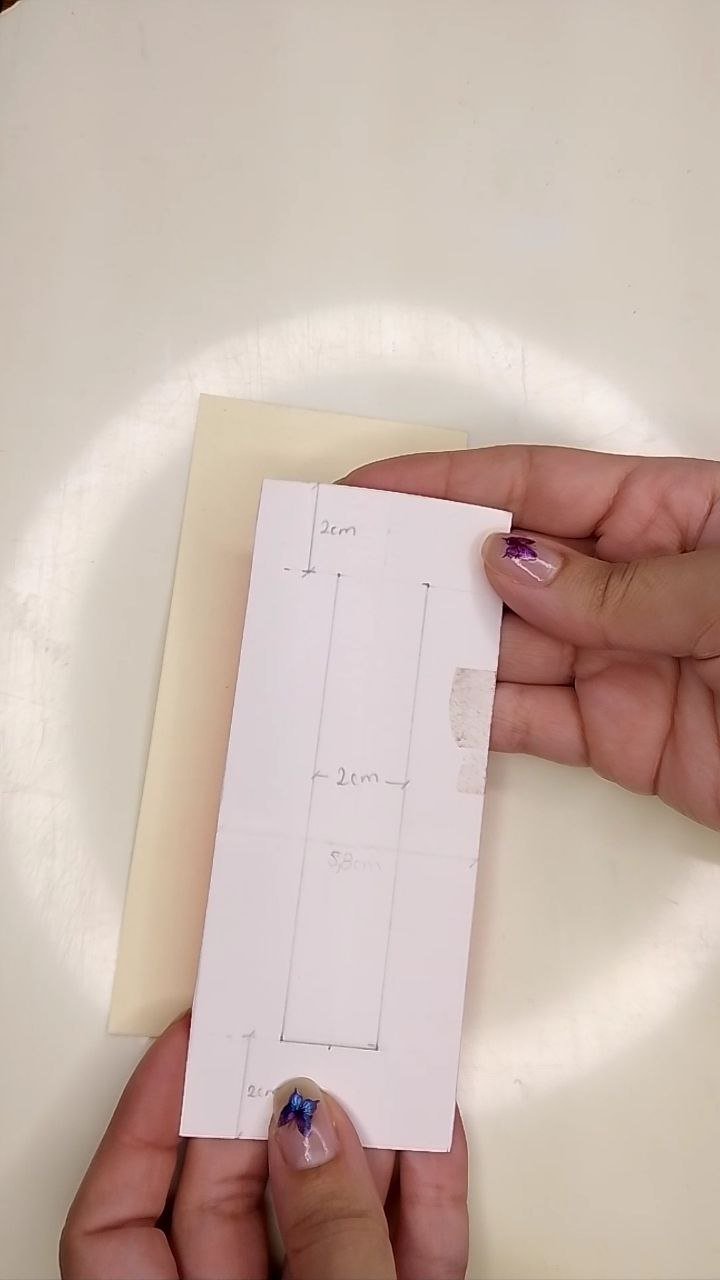
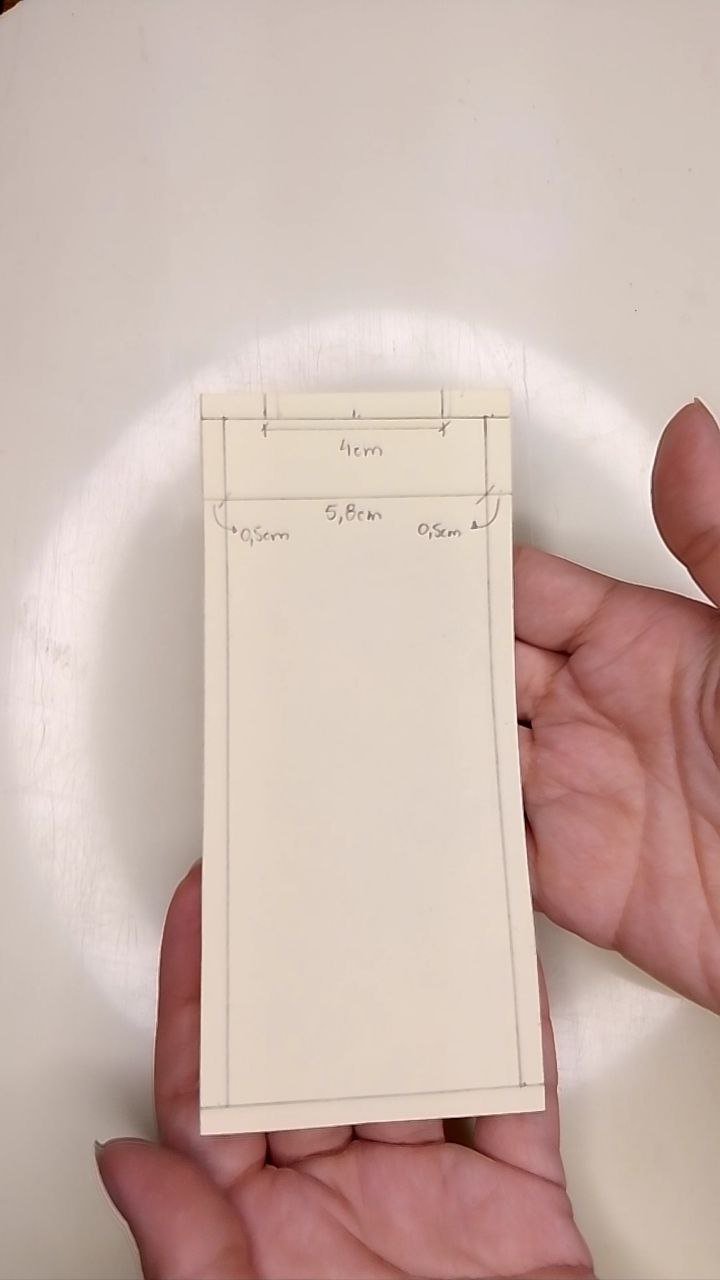
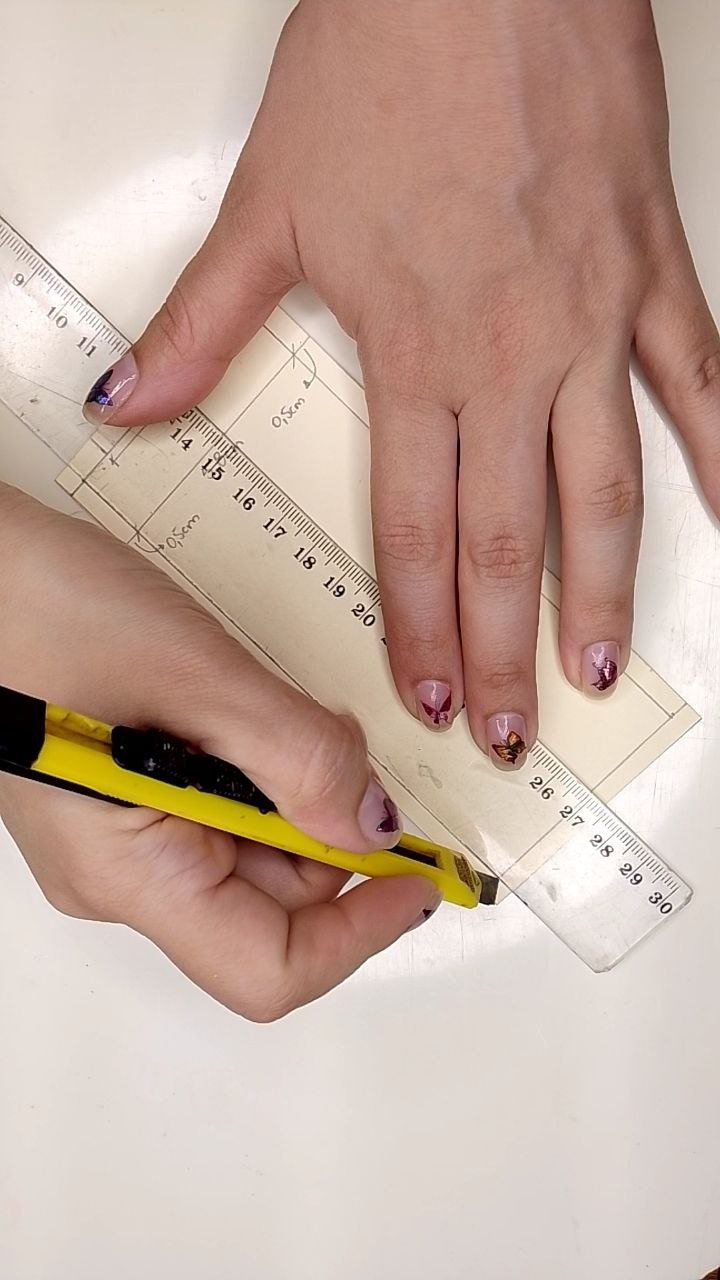
Con el cúter marcaremos las líneas que trazamos hacia los bordes de la cartulina amarilla, estos bordes son los límites de las pestañas que nos permitirán pegar el cuerpo completo de la tarjeta. Se debe tener cuidado de solo marcar y no cortar, puesto que lo siguiente será doblar esas pestañas hacia adentro ayudándonos con la regla e inmediatamente, cortamos las esquinas en diagonal, respetando siempre la esquina del rectángulo interno.
With the cutter we will mark the lines that we draw towards the edges of the yellow cardboard, these edges are the limits of the tabs that will allow us to glue the entire body of the card. Be careful to only mark and not cut, since the next step is to fold these tabs inwards with the help of the ruler and immediately cut the corners diagonally, always respecting the corner of the inner rectangle.
 |  |  |
|---|
Doblando las pestañas / Folding the tabs
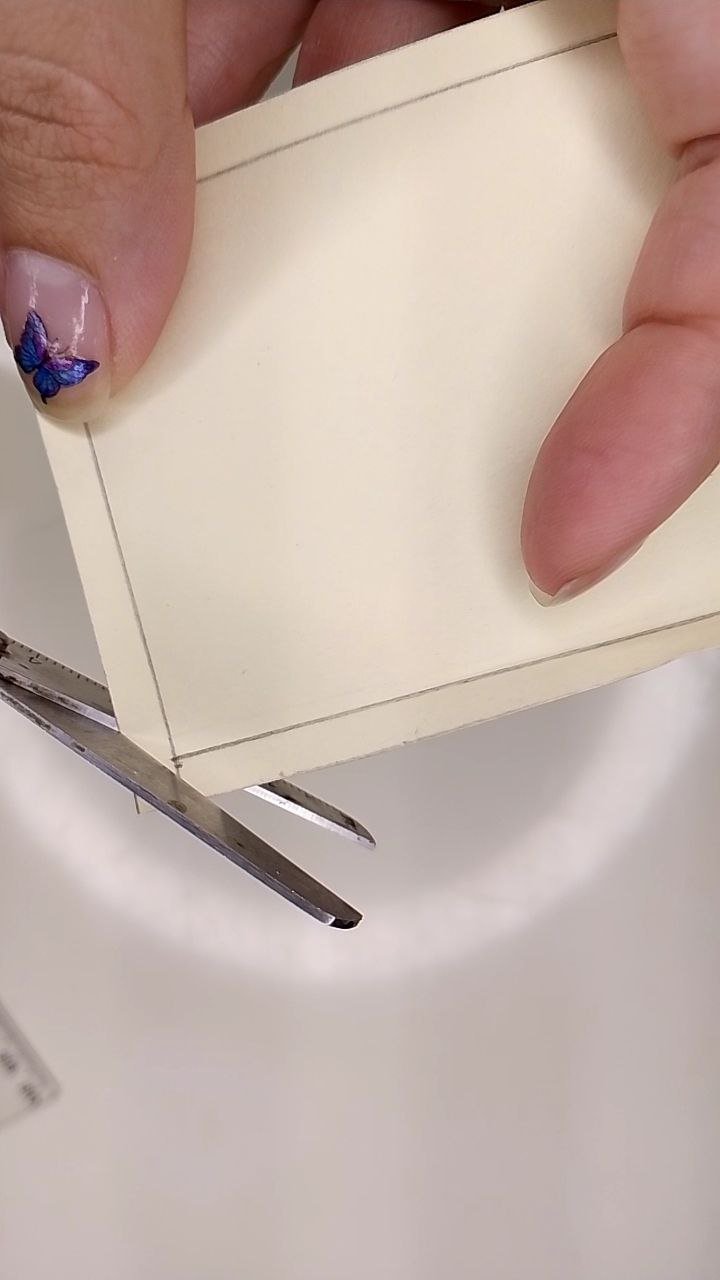
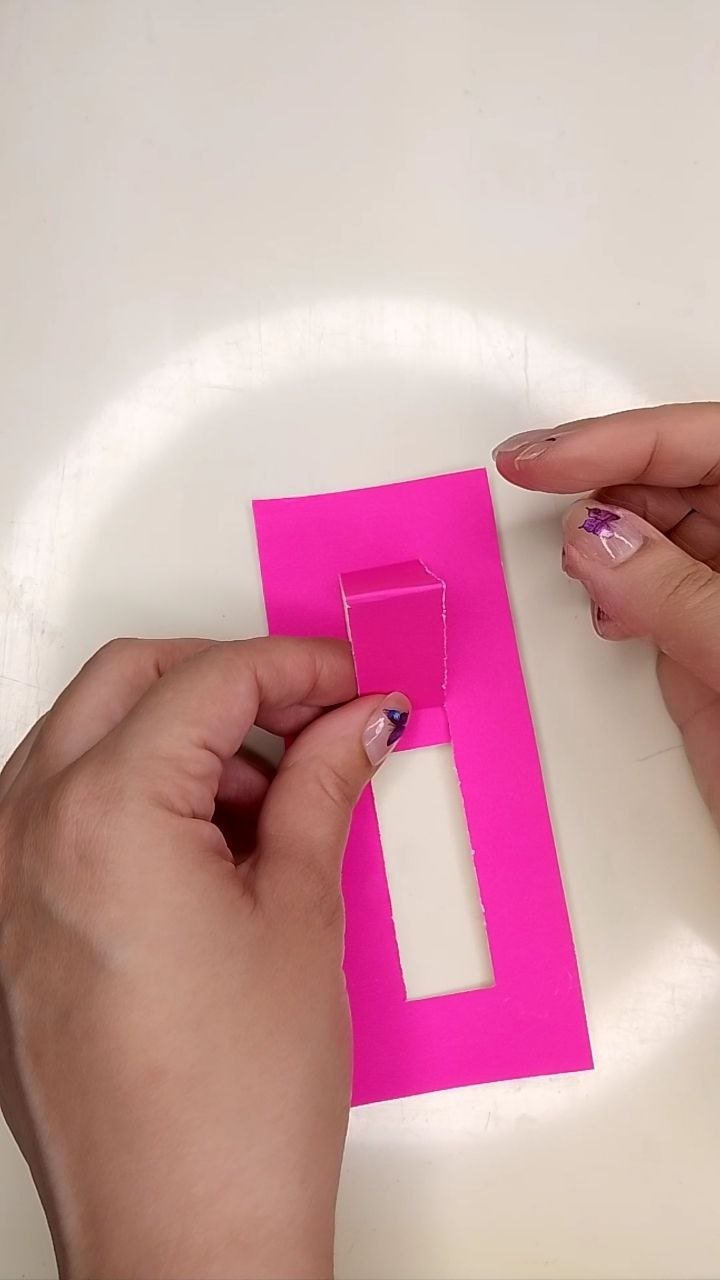
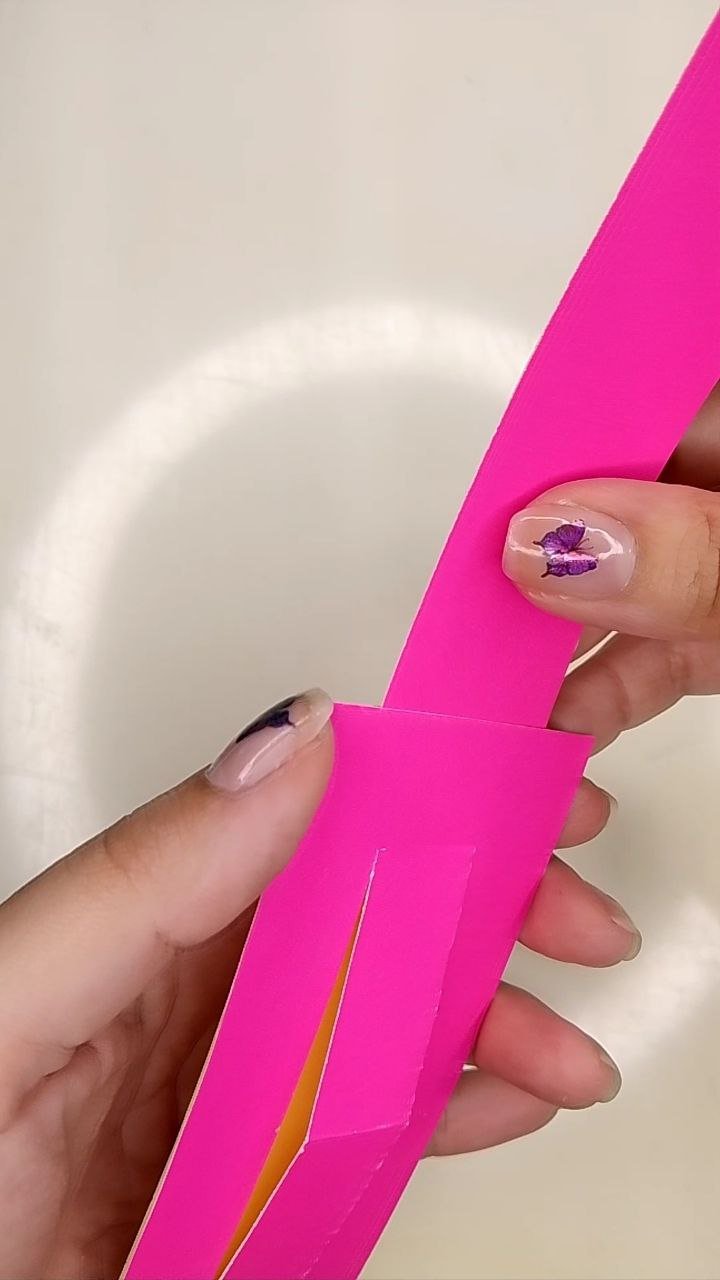
Ahora, haciendo uso del cúter una vez más, cortamos la pieza rectangular interna de la figura fucsia. Debo hacer énfasis en que no se olviden de que en este caso solo se recortarán tres de los lados del rectángulo, es decir, la pieza seguirá unida a la principal por uno de sus lados de menor extensión.
Now, using the cutter once again, we cut the inner rectangular piece of the fuchsia figure. I must emphasize that do not forget that in this case only three of the sides of the rectangle will be cut, that is, the piece will still be joined to the main piece by one of its shorter sides.
 |  |
|---|
Recortando rectángulo interno / Trimming internal rectangle
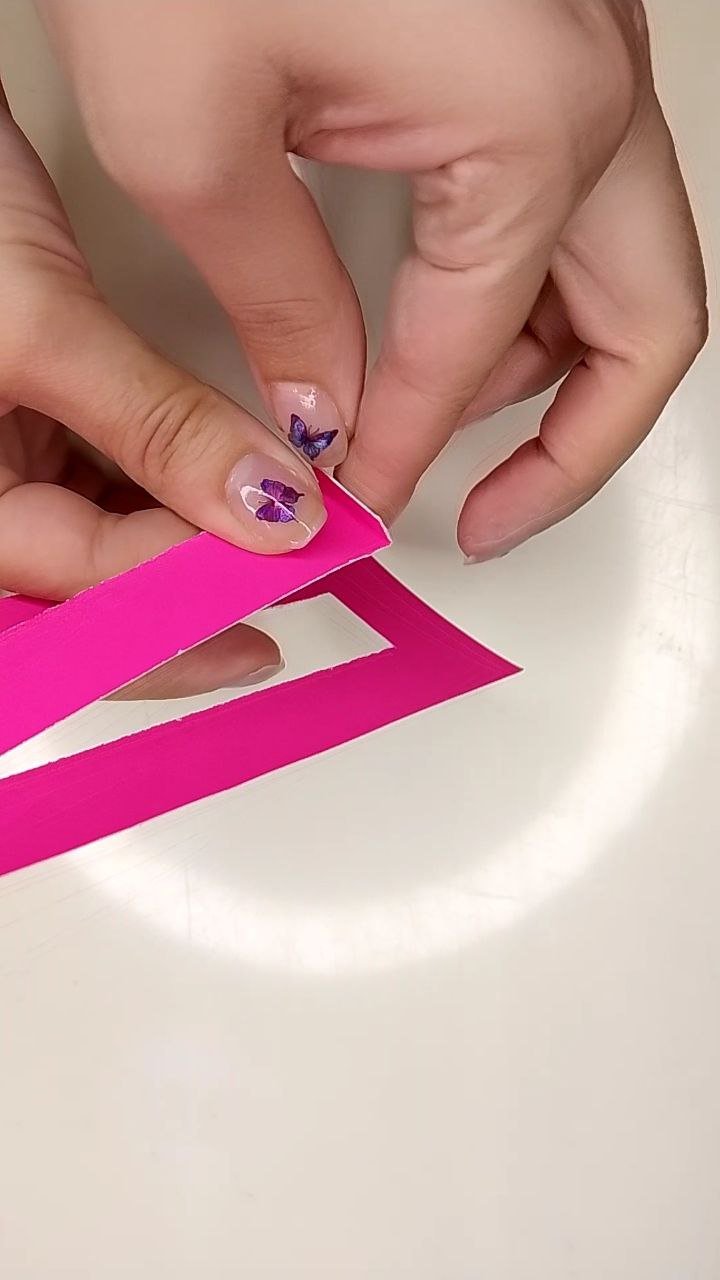
A continuación, doblaremos una pequeña pestaña en el extremo libre del rectángulo interno de la figura fucsia y luego, doblaremos el resto de ese rectángulo a la mitad.
Next, we will fold a small tab on the free end of the inner rectangle of the fuchsia figure and then, we will fold the rest of that rectangle in half.
 |  |
|---|
Dobleces del rectángulo interno / Internal rectangle folds
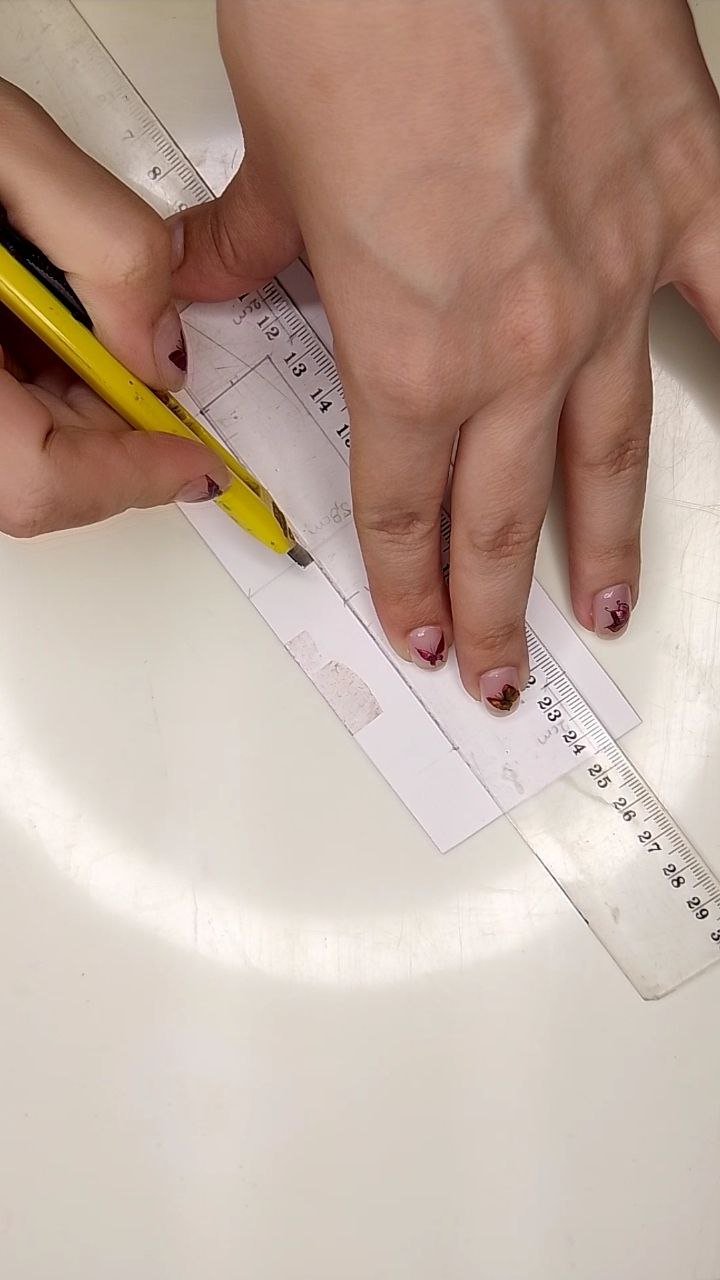
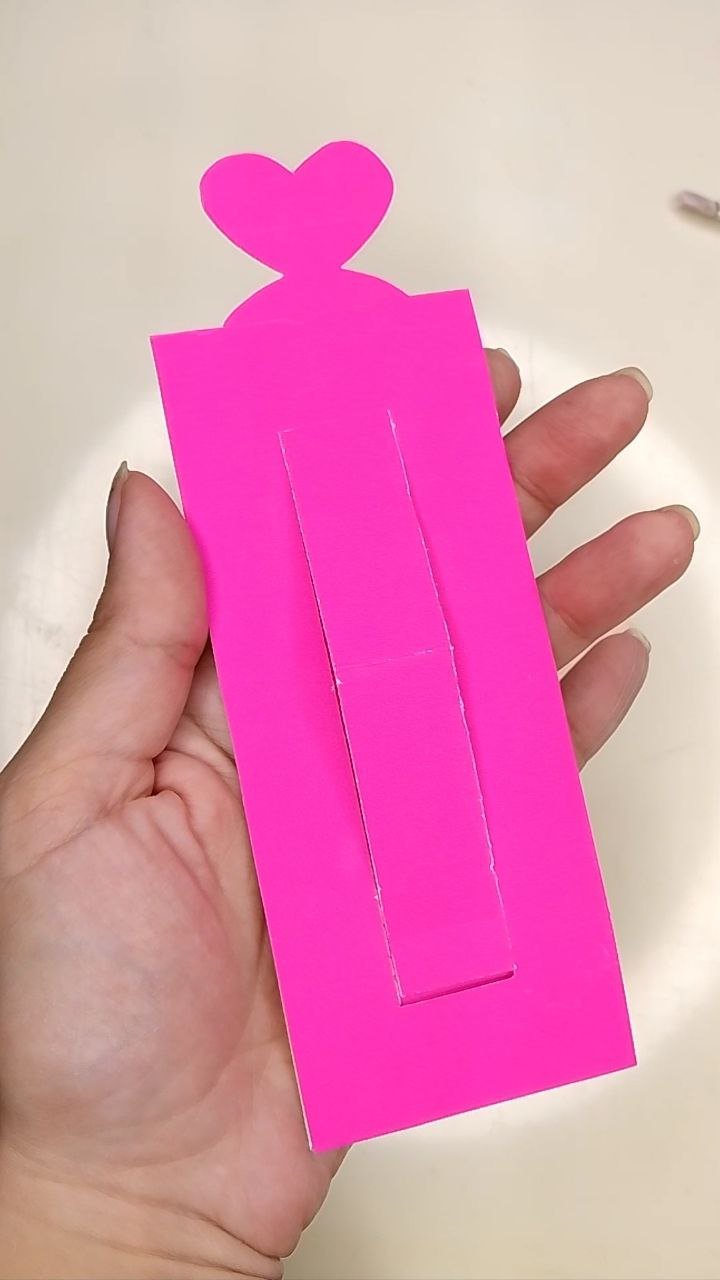
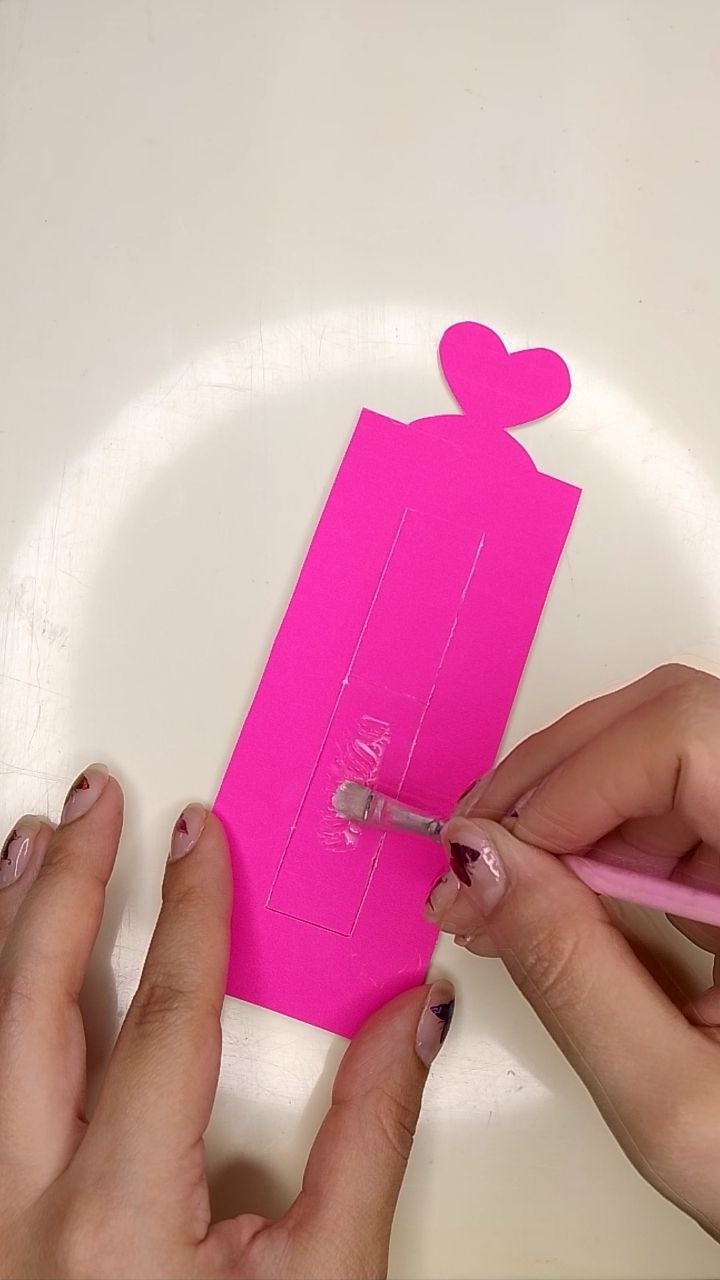
Para el rectángulo más fino, lo dejé considerablemente más largo que los rectángulos anchos porque quería hacer un diseño de corazón en su extremo superior, este debemos recortarlo con las tijeras.
For the thinner rectangle, I left it considerably longer than the wide rectangles because I wanted to make a heart design at its top end, this we must trim with the scissors.
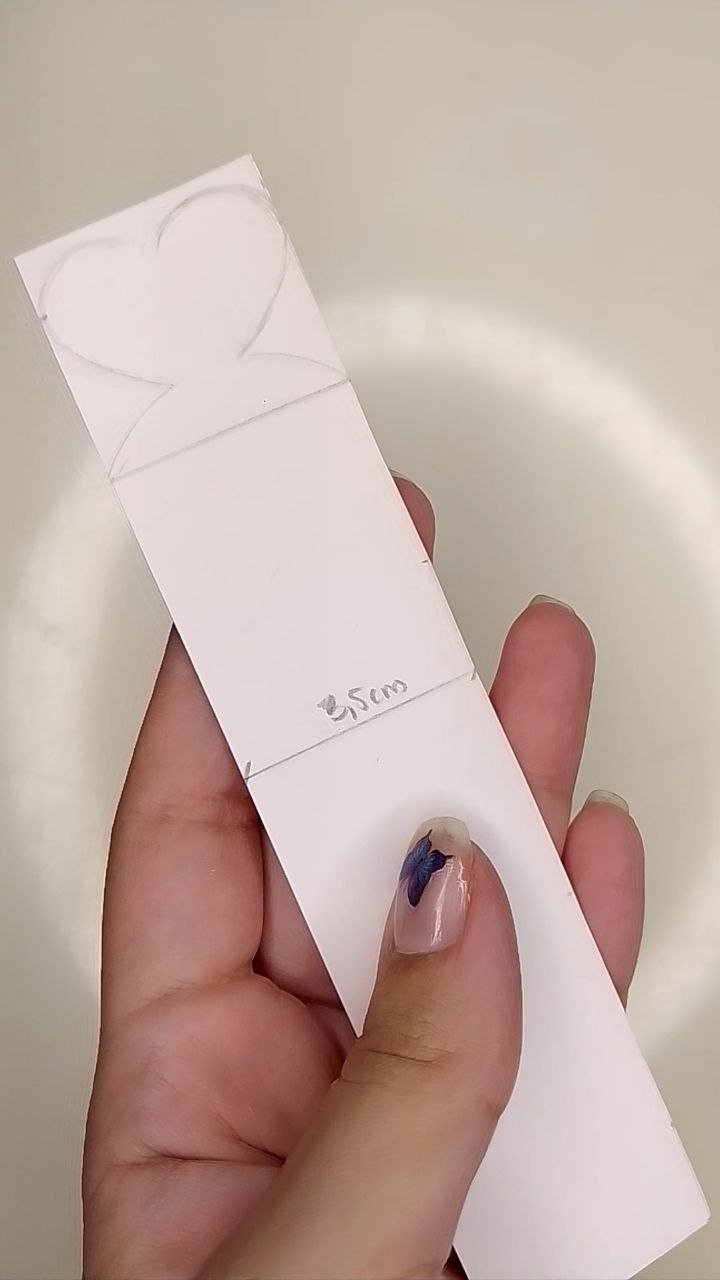
Diseño de corazón / Heart design
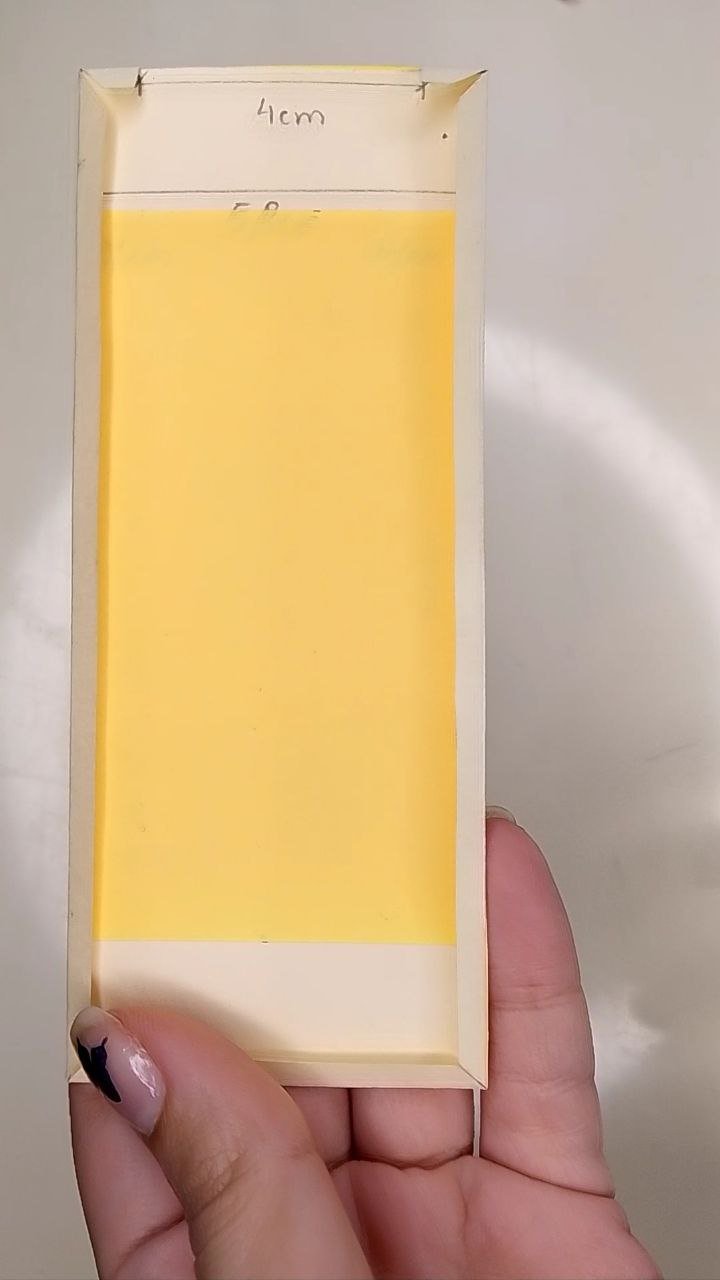
Ya teniendo bien dobladas las pestañas de la figura amarilla y habiendo recortado el rectángulo superior de 4 cm de ancho en la parte de la pestaña, por donde pasará el rectángulo fino de 3,5 cm de ancho, procedemos a forrar con un papel bonito, yo he elegido uno de un color amarillo llamativo. La parte externa la he forrado completa pero en la parte interna solo he forrado el centro, lo que he considerado que puede llegarse a ver al activar el mecanismo pop-up.
Once the tabs of the yellow figure are well folded and having cut out the upper rectangle of 4 cm wide in the part of the tab, where the thin rectangle of 3.5 cm wide will pass, we proceed to line with a nice paper, I have chosen one of a bright yellow color. The external part I have lined it completely but in the internal part I have only lined the center, what I have considered that can be seen when activating the pop-up mechanism.
 |  |  |
|---|
Forramos / We line
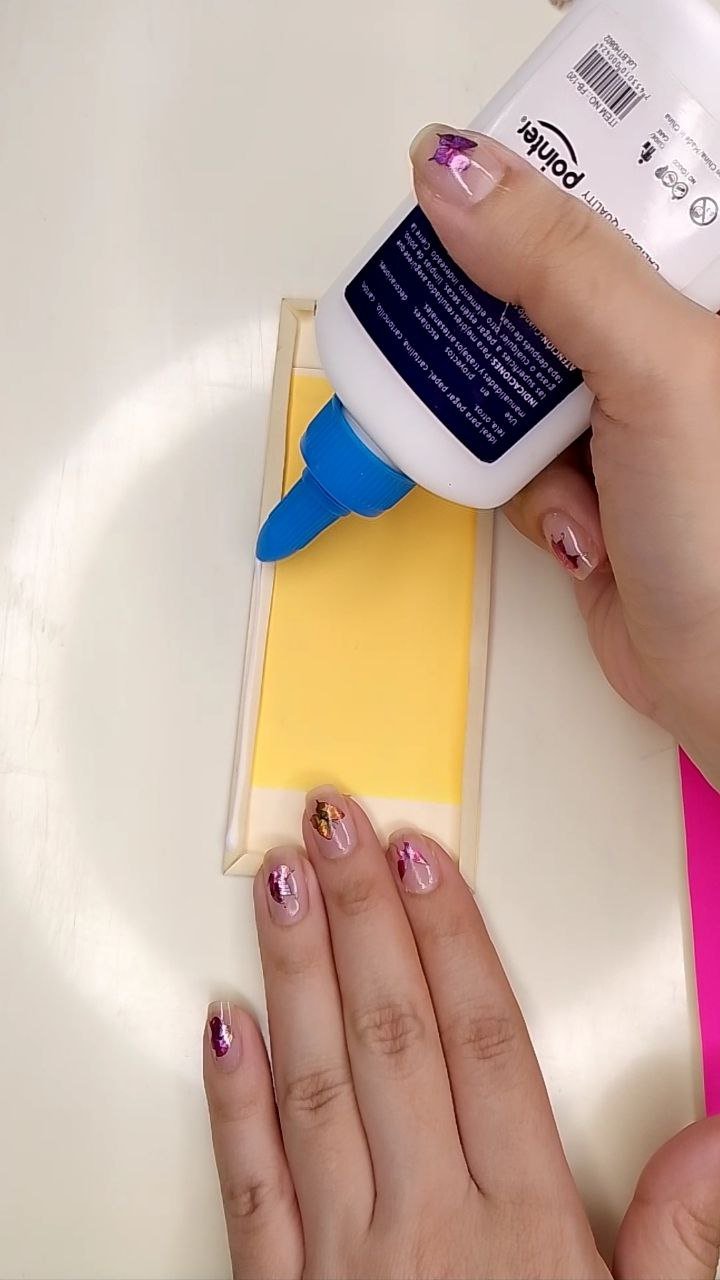
Ahora añadimos algo de pegamento a las pestañas y adherimos la pieza fucsia, lo que sería la cara delantera de la tarjeta.
Now we add some glue to the tabs and adhere the fuchsia piece, which would be the front side of the card.
Añadiendo pegamento / Adding glue
Cuando ya ha secado el pegamento, introducimos el rectángulo fino al cuerpo de la tarjeta.
When the glue has dried, we insert the thin rectangle into the body of the card.
 |  |
|---|
Introduciendo la pieza interna / Inserting the inner part
Es momento de colocar algo de pegamento en la pestaña del rectángulo interno de la cara delantera de la tarjeta y pegarlo a la pieza movible, es decir, al rectángulo fucsia más fino que ya se encuentra dentro de la tarjeta.
It is time to put some glue on the tab of the inner rectangle on the front side of the card and glue it to the movable piece, i.e. the thinner fuchsia rectangle already inside the card.
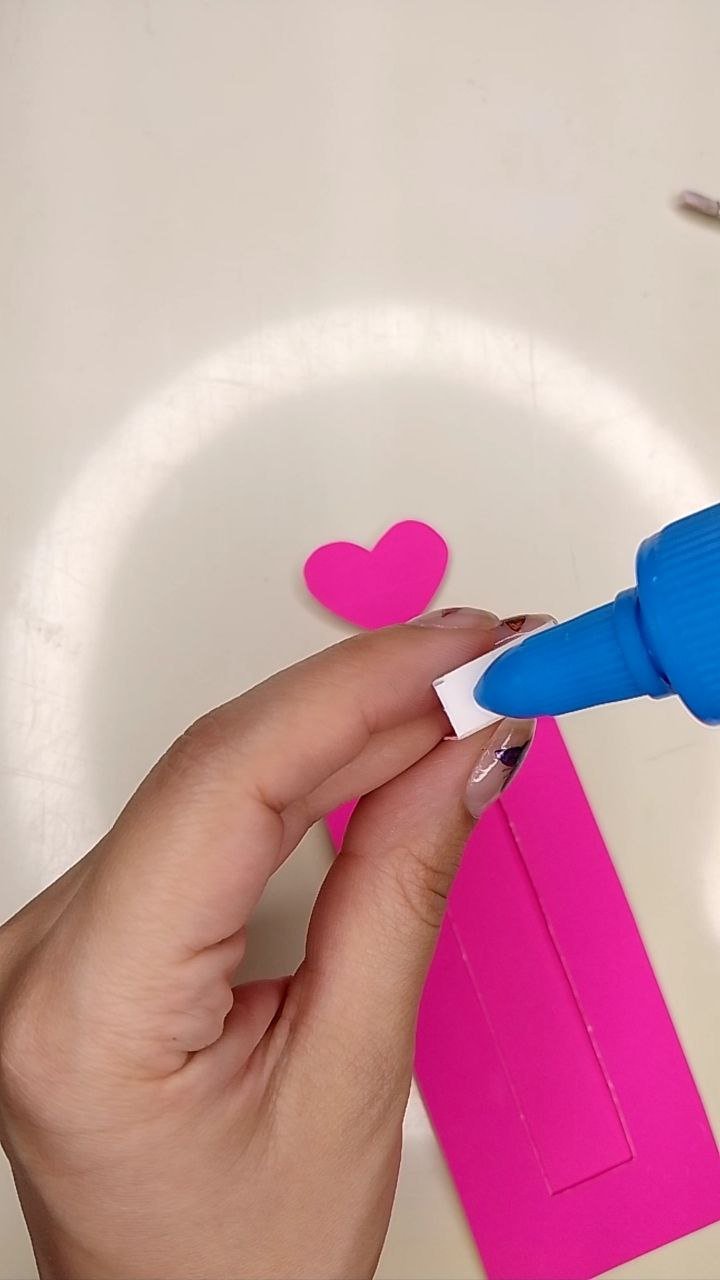
Añadiendo pegamento / Adding glue
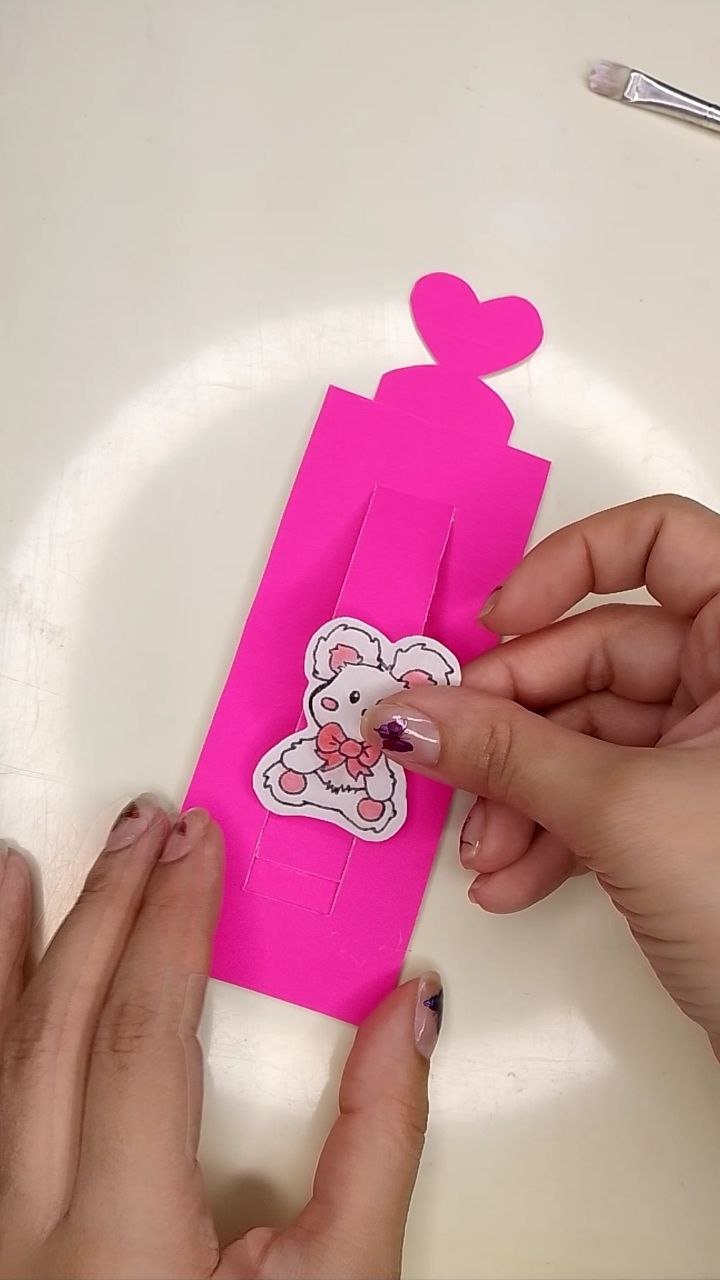
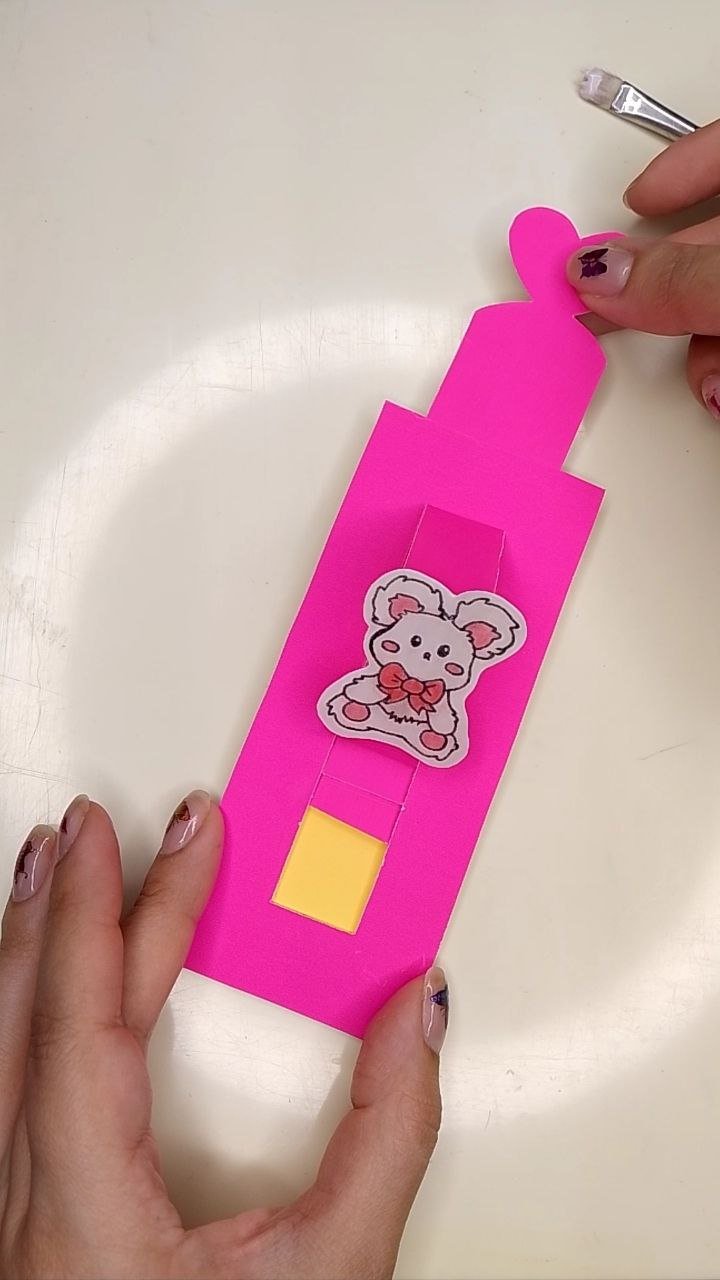
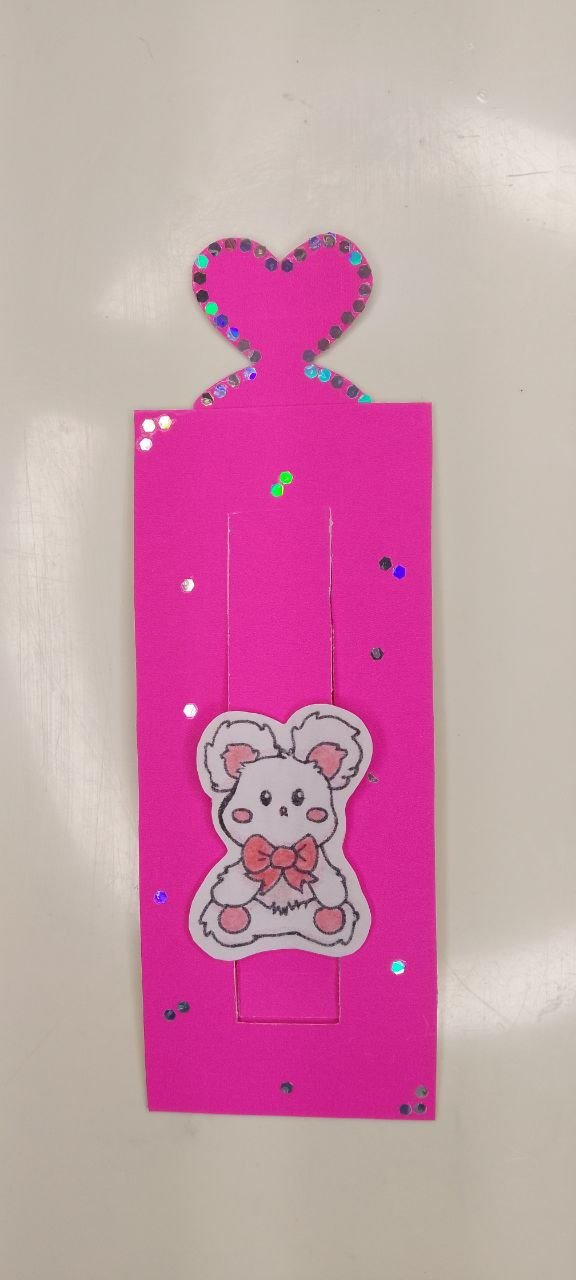
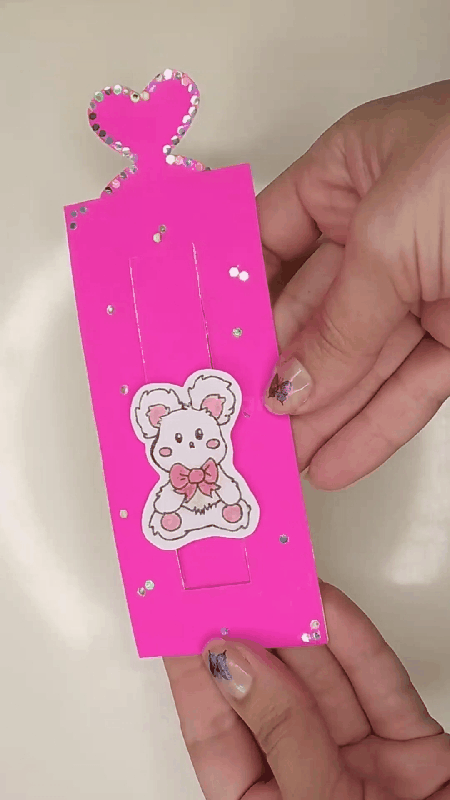
Cuando ya ha secado, añadimos alguna decoración principal, yo decidí colocar un osito que dibujé en cartulina. Para este paso, es importante colocar el mecanismo en la posición de 3D y así medir que nuestra figura, el osito en mi caso, no choque con ninguna parte del resto de la tarjeta y se levante sin problemas, una vez nos hemos asegurado de esto, pegamos y esperamos a que seque.
When it has dried, we add some main decoration, I decided to place a teddy bear that I drew on cardboard. For this step, it is important to place the mechanism in the 3D position and thus measure that our figure, the teddy bear in my case, does not collide with any part of the rest of the card and rises smoothly, once we have ensured this, we glue and wait for it to dry.
 |  |  |
|---|
Decorando con el osito / Decorating with the teddy bear
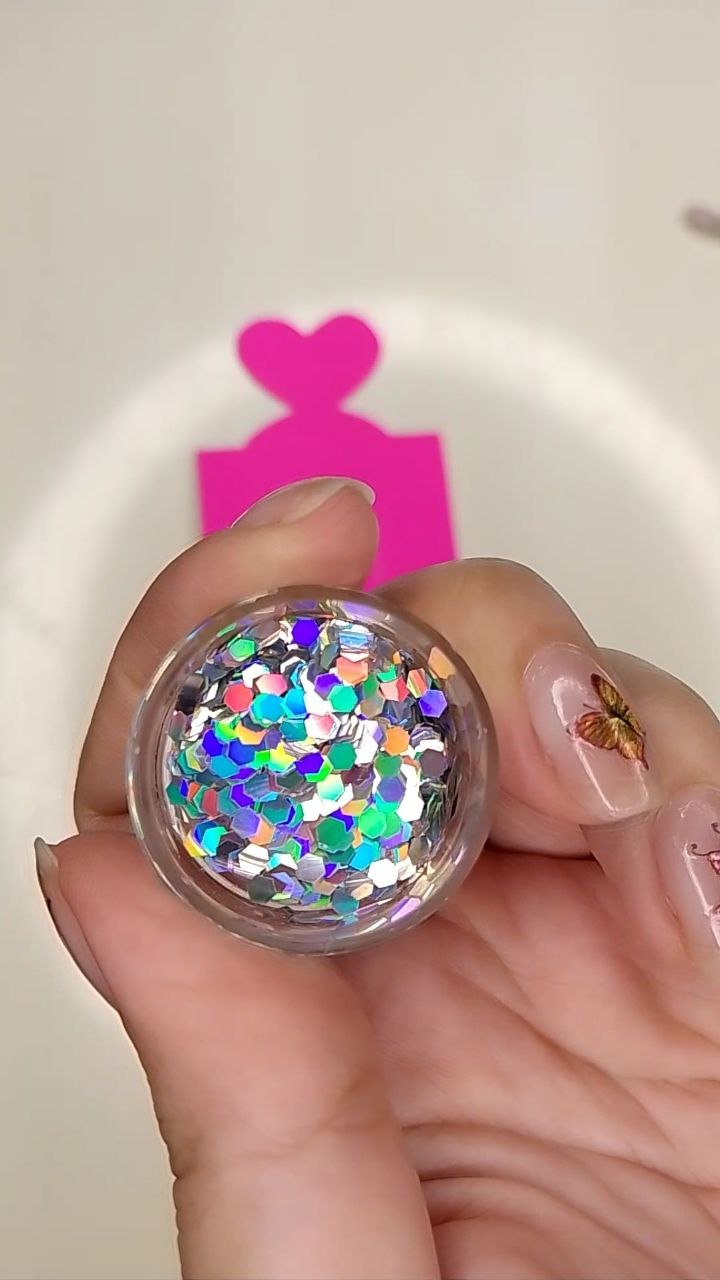
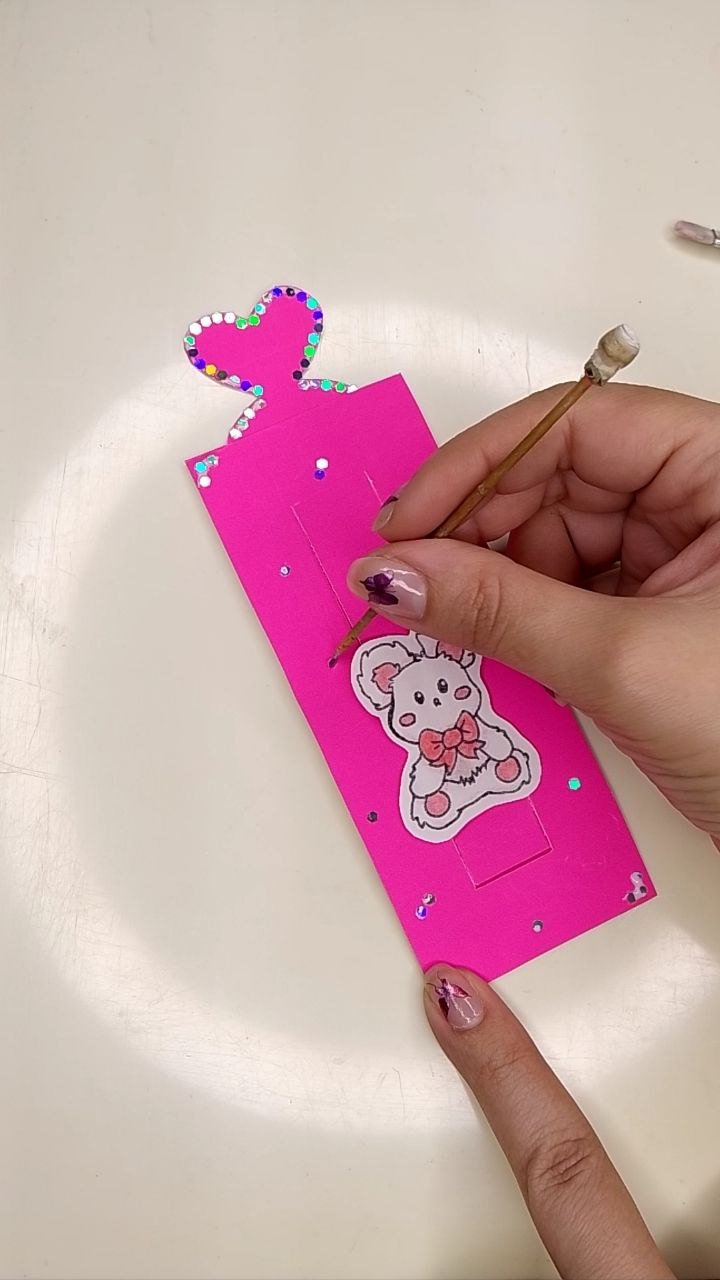
Seguimos las decoraciones y como a mí me encanta el brillo, coloqué estos brillitos plateados en lugares estratégicos que me pareció que se verían muy bien y con cuidado de no recargarla. Para pegarlos me ayudé con un palillo al que le agregué una gotita minúscula de pegamento para poder agarrar los brillos.
We continued with the decorations and since I love glitter, I placed these little silver glitters in strategic places that I thought would look great, being careful not to overload it. To glue them I used a toothpick to which I added a tiny drop of glue to hold the glitter.
 |  |  |
|---|
Decorando con brillitos / Decorating with glitter
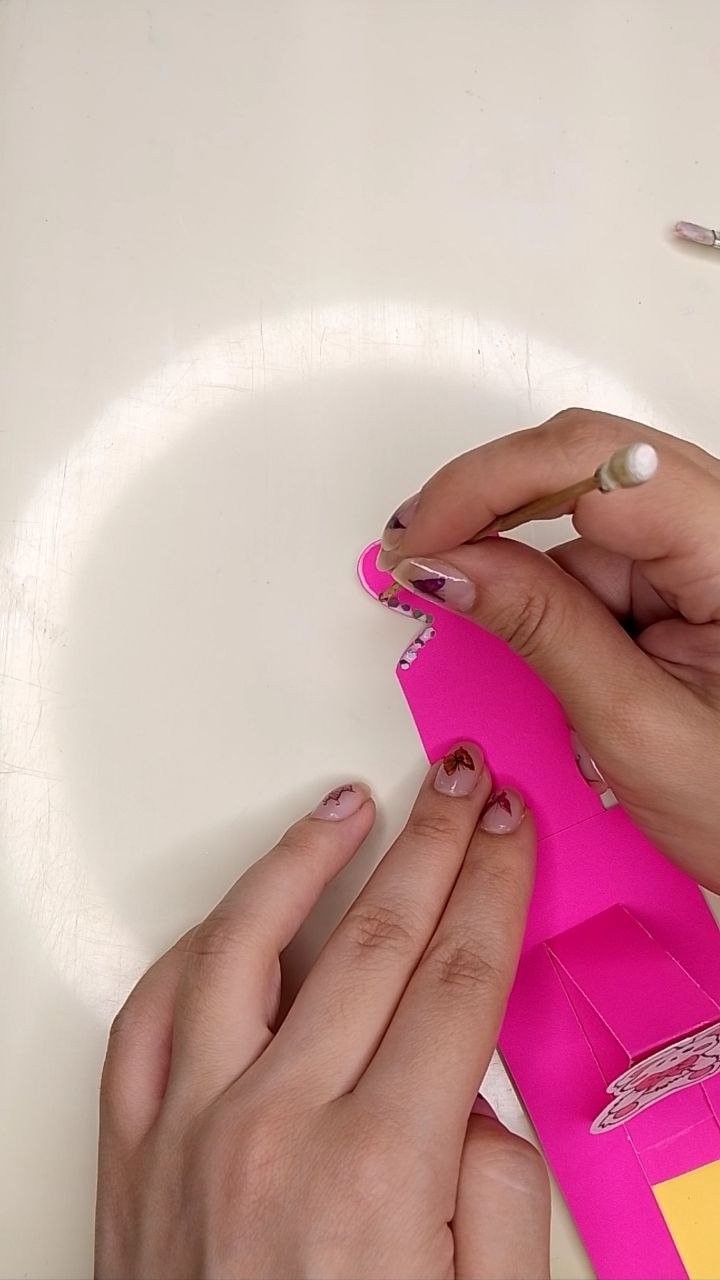
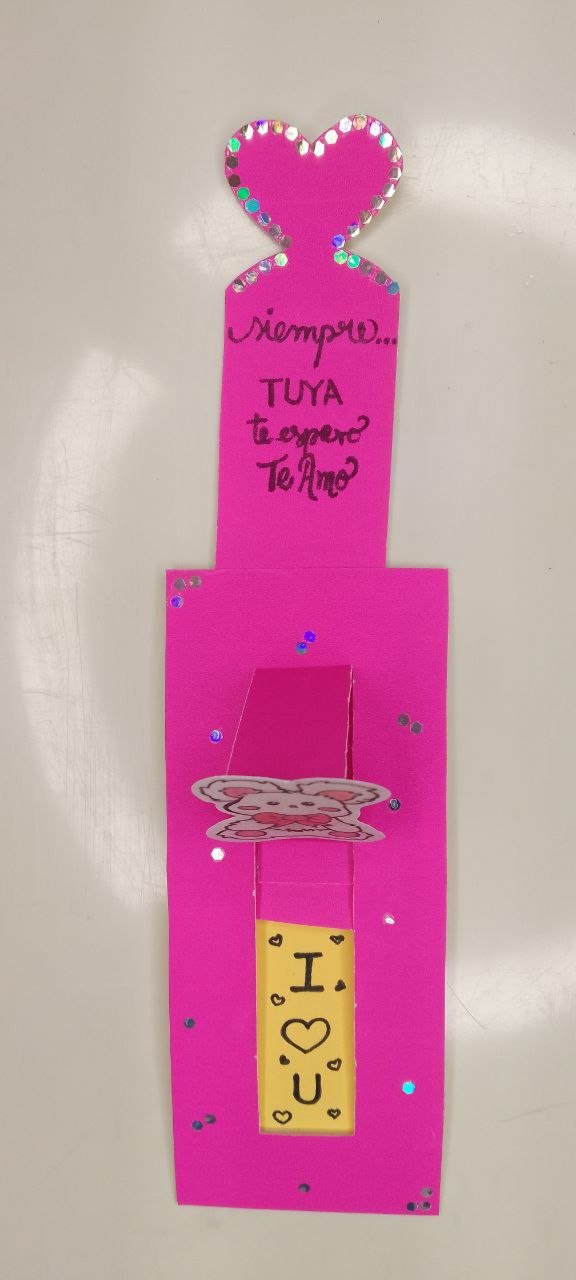
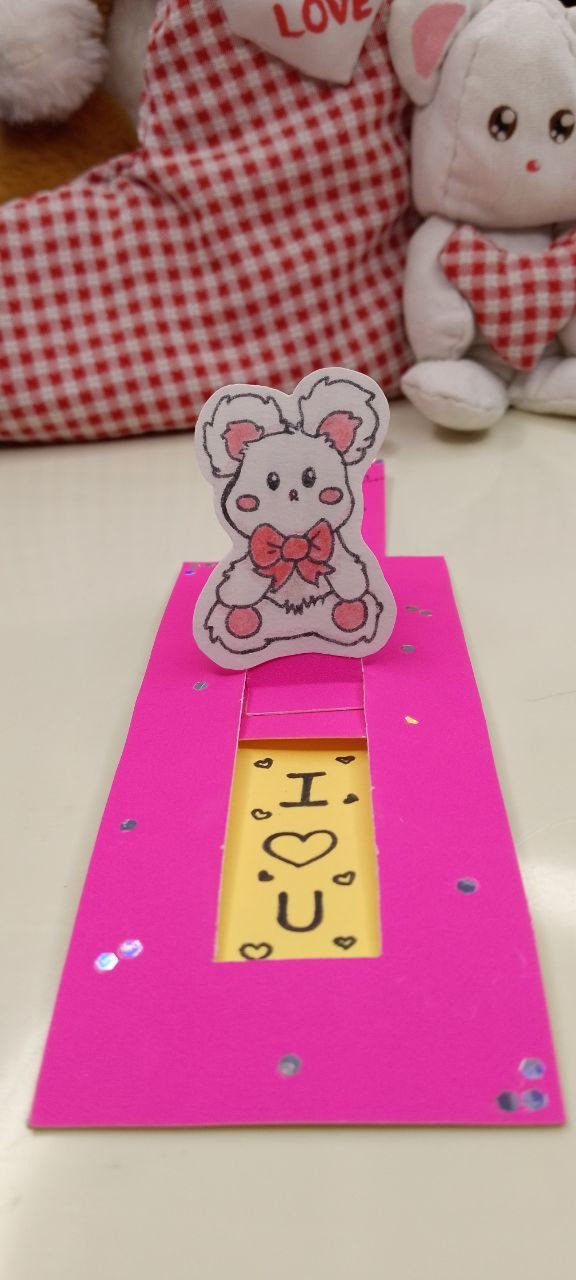
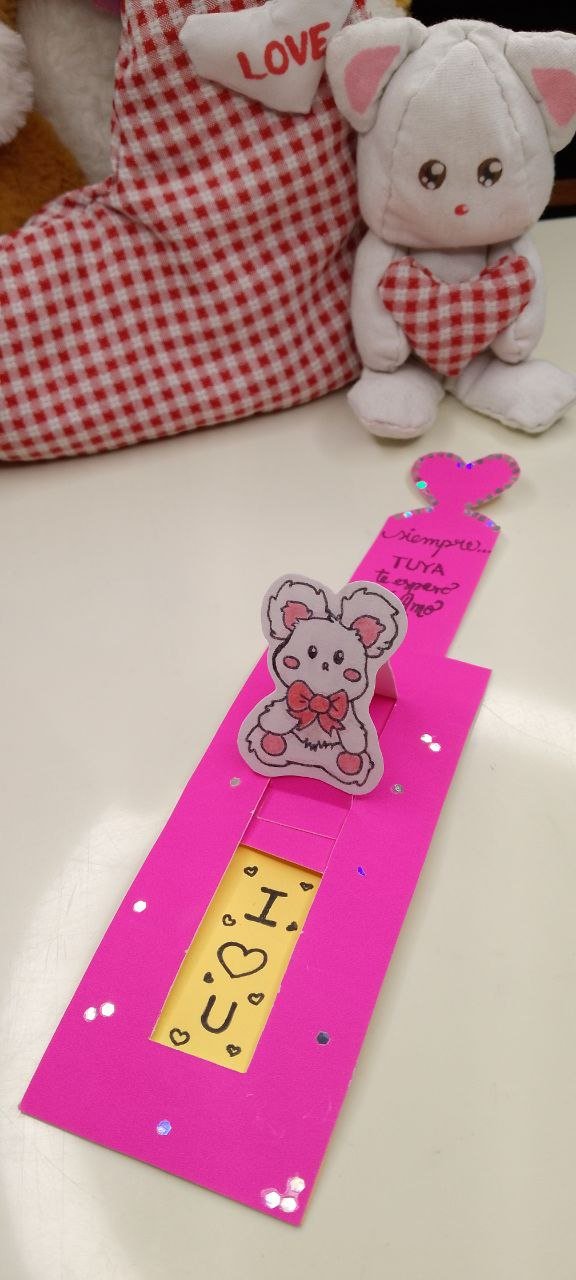
Cuando ya todo estuvo seco, procedí a agregar mis mensajitos de amor con mi rapidógrafo y así quedó el resultado:
When everything was dry, I proceeded to add my little messages of love with my rapidograph and this is how the result turned out:
 |  |  |  |
|---|
Resultado final / Final result
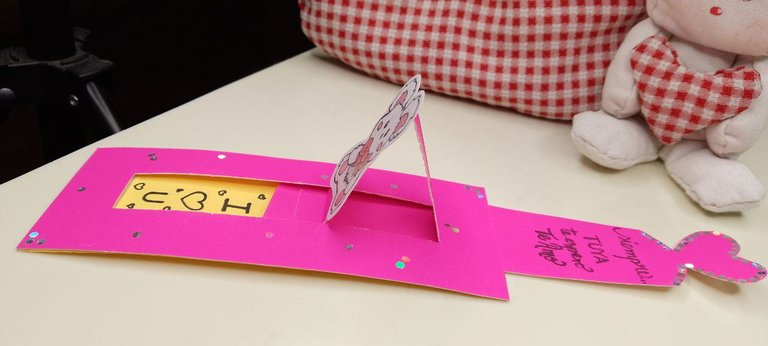
Y así se ve en movimiento:
And this is how it looks in motion:
Gif hecha con GIF Maker / Gif made with GIF Maker
¡Muchas gracias por leerme!
Thank you so much for reading me!
Fotografías propias, tomadas con mi Tecno Spark 10C.
Traducido al inglés con DeepL.
Own photographs, taken with my Tecno Spark 10C.
Translated to English with DeepL.

Posted Using INLEO
Que linda tarjeta, me encantan esas que se pueden mover. Saludos!! 😊
Muchísimas gracias☺️ me alegra que te gustara ✨
Wow I really wish I can try this someday.
It's really beautiful
Thank you so much! I hope you can try it soon ☺️✨
Congratulations @mavilan30! You have completed the following achievement on the Hive blockchain And have been rewarded with New badge(s)
Your next target is to reach 700 upvotes.
You can view your badges on your board and compare yourself to others in the Ranking
If you no longer want to receive notifications, reply to this comment with the word
STOPSencillo pero con cuidado de los detalles. Me gustó mucho Amor!!!
Gracias mi amor 🥰❤️✨
Me encantan tus tarjetas interactivas ! @mavilan30 ,está perfecta para el 14 , y se pueden hacer de diferentes motivos usando el mecanismo y agregando otro dibujo depende de a quien le regales ! Está genial está idea 💖
Muchas gracias Mily💖 las tarjetas interactivas son mis favoritas ✨