Hola amigos de Hive Diy, es un gusto compartir con ustedes parte de mis proyectos, espero tengan un excelente día 😊
Una de las cosas favoritas en mi vida y que mas adoro es cuidar y coleccionar plantas, actualmente estoy comenzando a organizar un poco el espacio que aparte en mi patio para hacer mi jardín, allí quiero tener una decoración muy linda de plantas y decidí comenzar a organizar y utilizando algunos materiales de reciclaje, ven y te muestro mi primera decoración para mi jardín
Hello friends of Hive Diy, it is a pleasure to share with you part of my projects, I hope you have a great day 😊
One of the favorite things in my life and what I love most is taking care of and collecting plants. I am currently starting to organize a bit of the space I set aside in my patio to make my garden. There I want to have a very nice decoration of plants and I decided to start organizing and using some recycling materials, come and I'll show you my first decoration for my garden
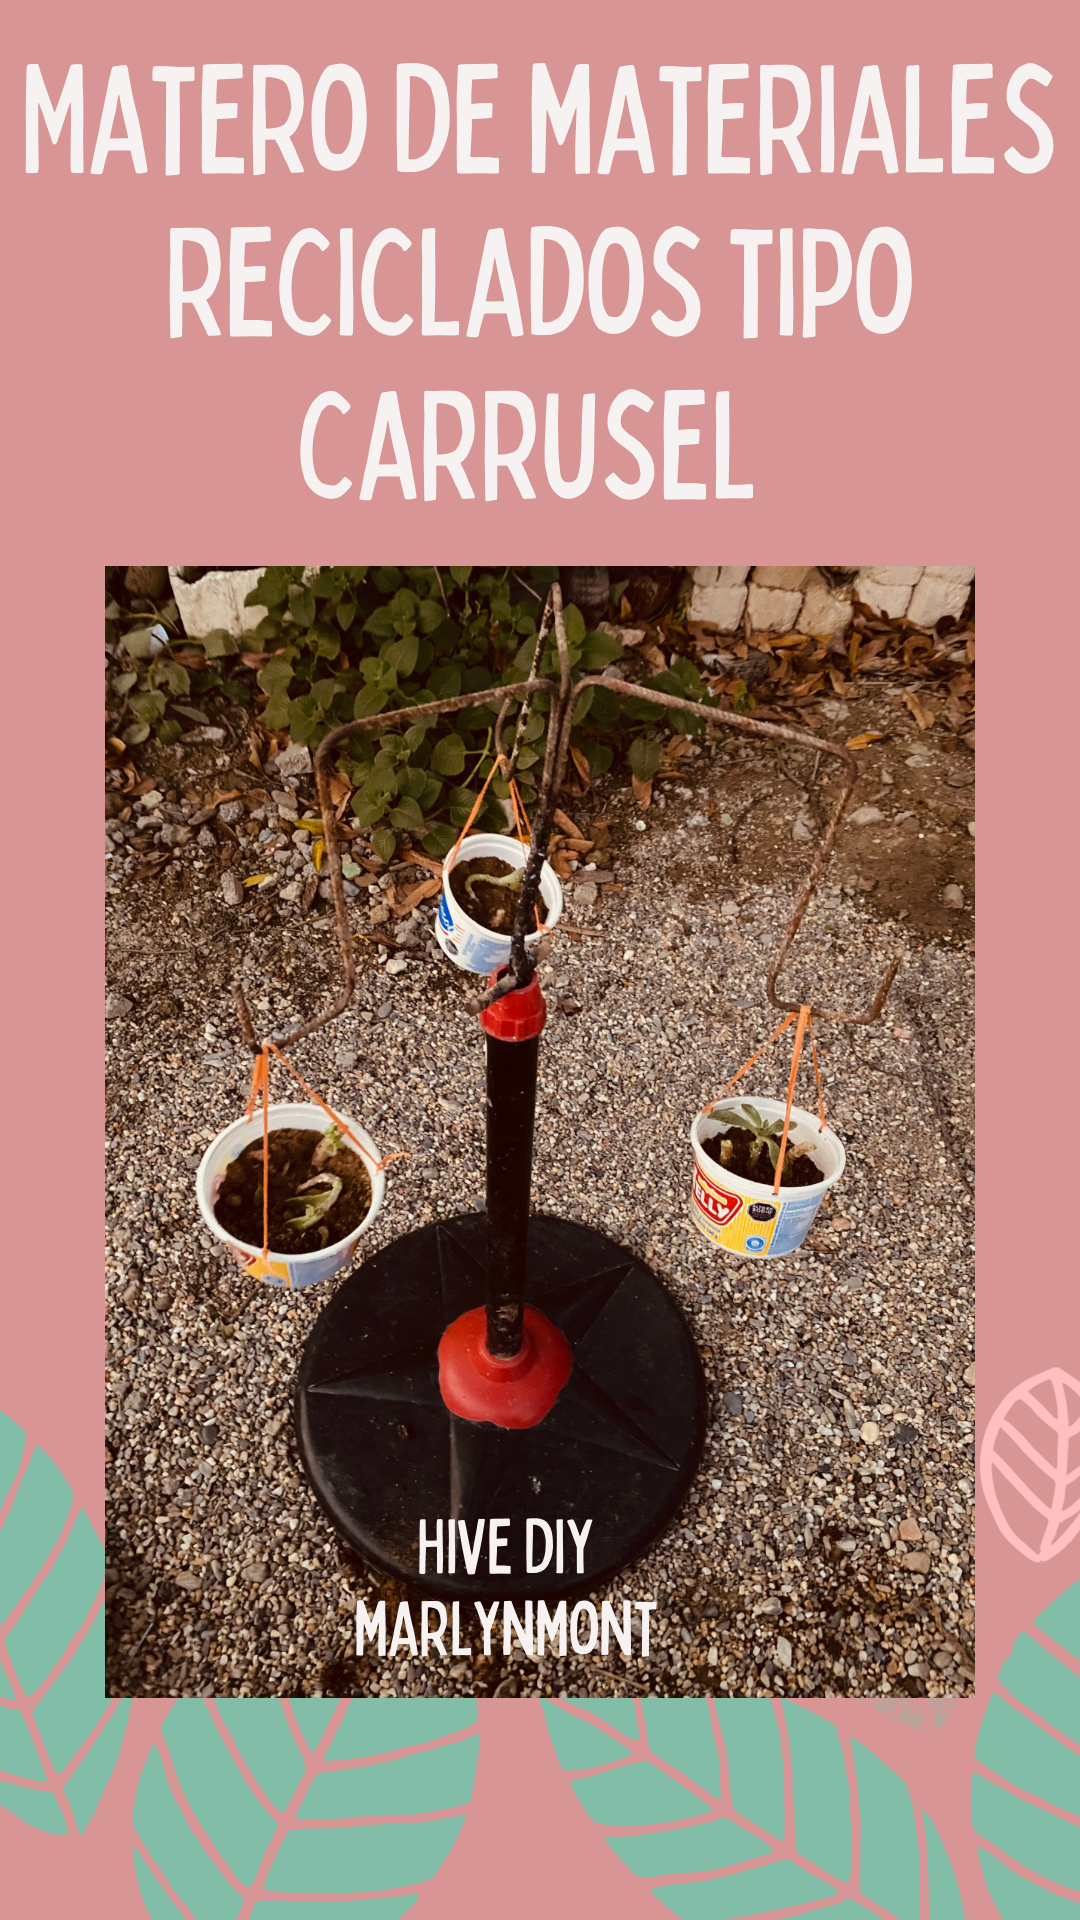
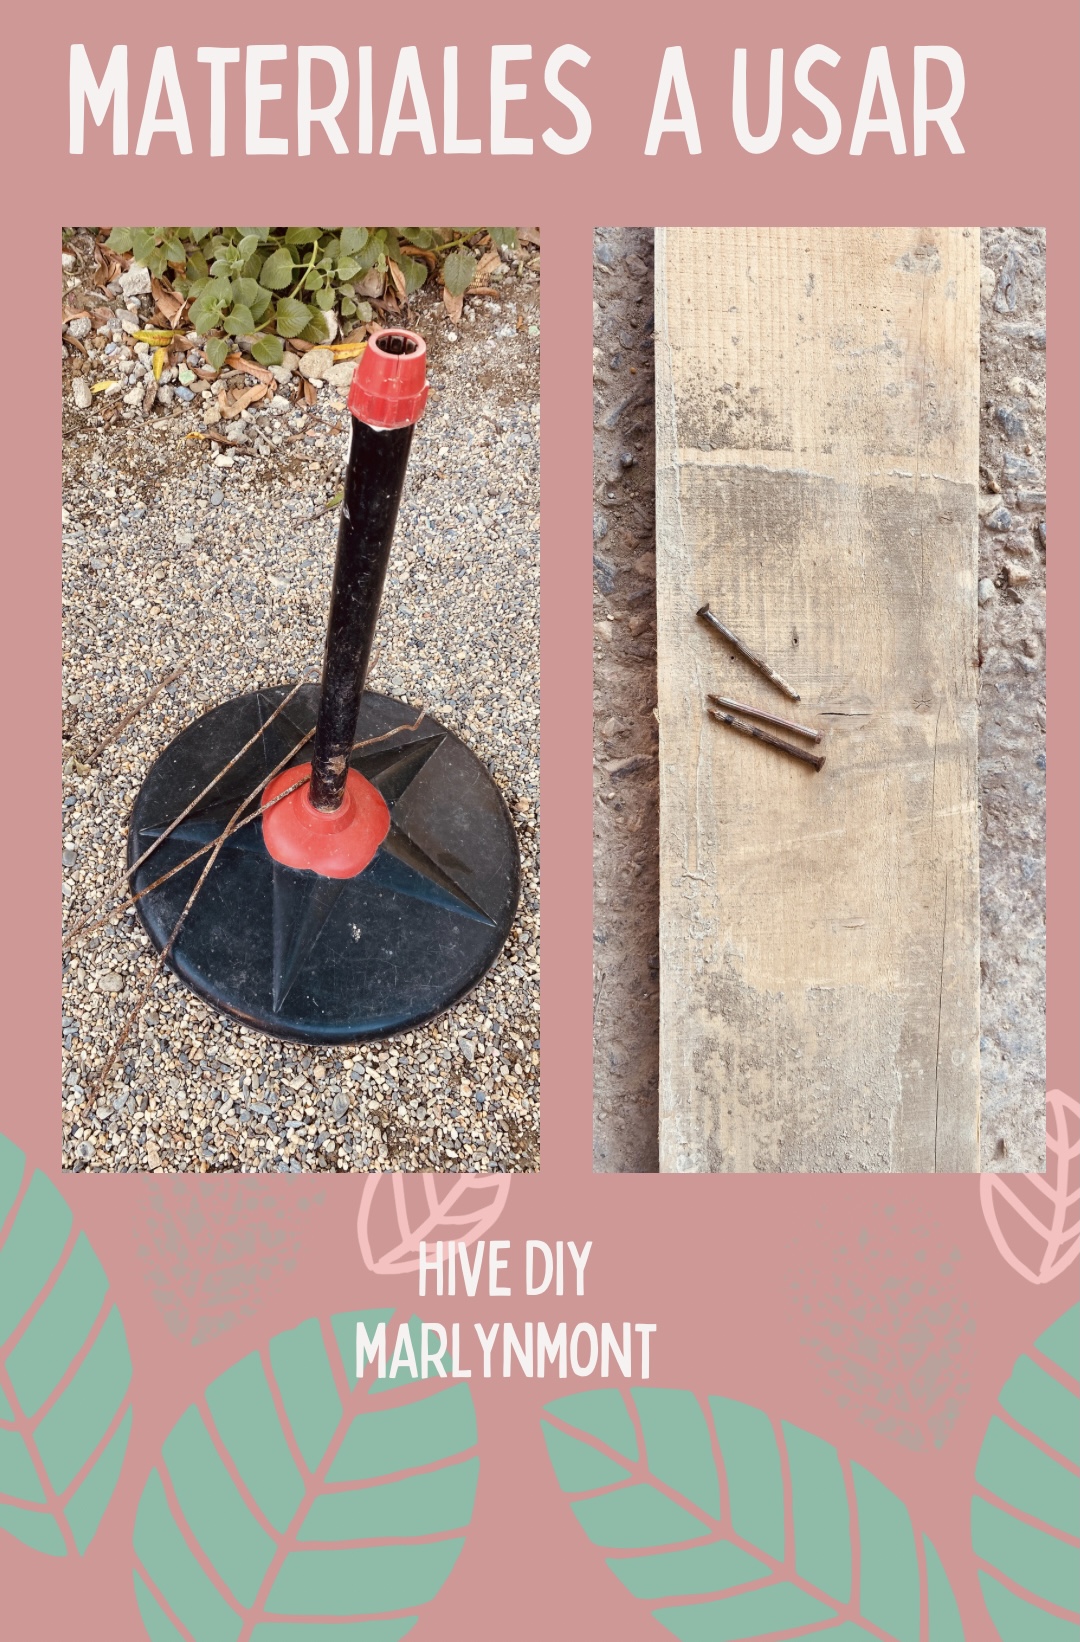
Para mi proyecto de jardín con materiales reciclados voy a utilizar un tipo de base de ventilador los cuales son muy comunes y casi siempre tenemos alguno dañado en nuestros hogares y guardados con la esperanza de algún día encontrarles utilidad, hoy quiero compartir en esta querida comunidad una idea que se me ocurrió para hacer un matero tipo carrusel para decorar nuestros jardines y colocar esas plantas que nos encanta cuidar.
Aquí te dejo la lista de materiales que utilicé para hacer este matero
- Base de ventilador
- 3 varillas de aproximadamente medio metro
- 3 envases plásticos
- Alambre para amarrar o soldadura
- abono y plantas de tu preferencia
For my garden project with recycled materials I am going to use a type of fan base which are very common and we almost always have some damaged ones in our homes and saved in the hope of one day finding a use for them. Today I want to share in this dear community a idea that occurred to me to make a carousel-type planter to decorate our gardens and place those plants that we love to take care of.
Here is the list of materials I used to make this pot.
- Fan base
- 3 rods of approximately half a meter
- 3 plastic containers
- Wire for tying or welding
- fertilizer and plants of your choice
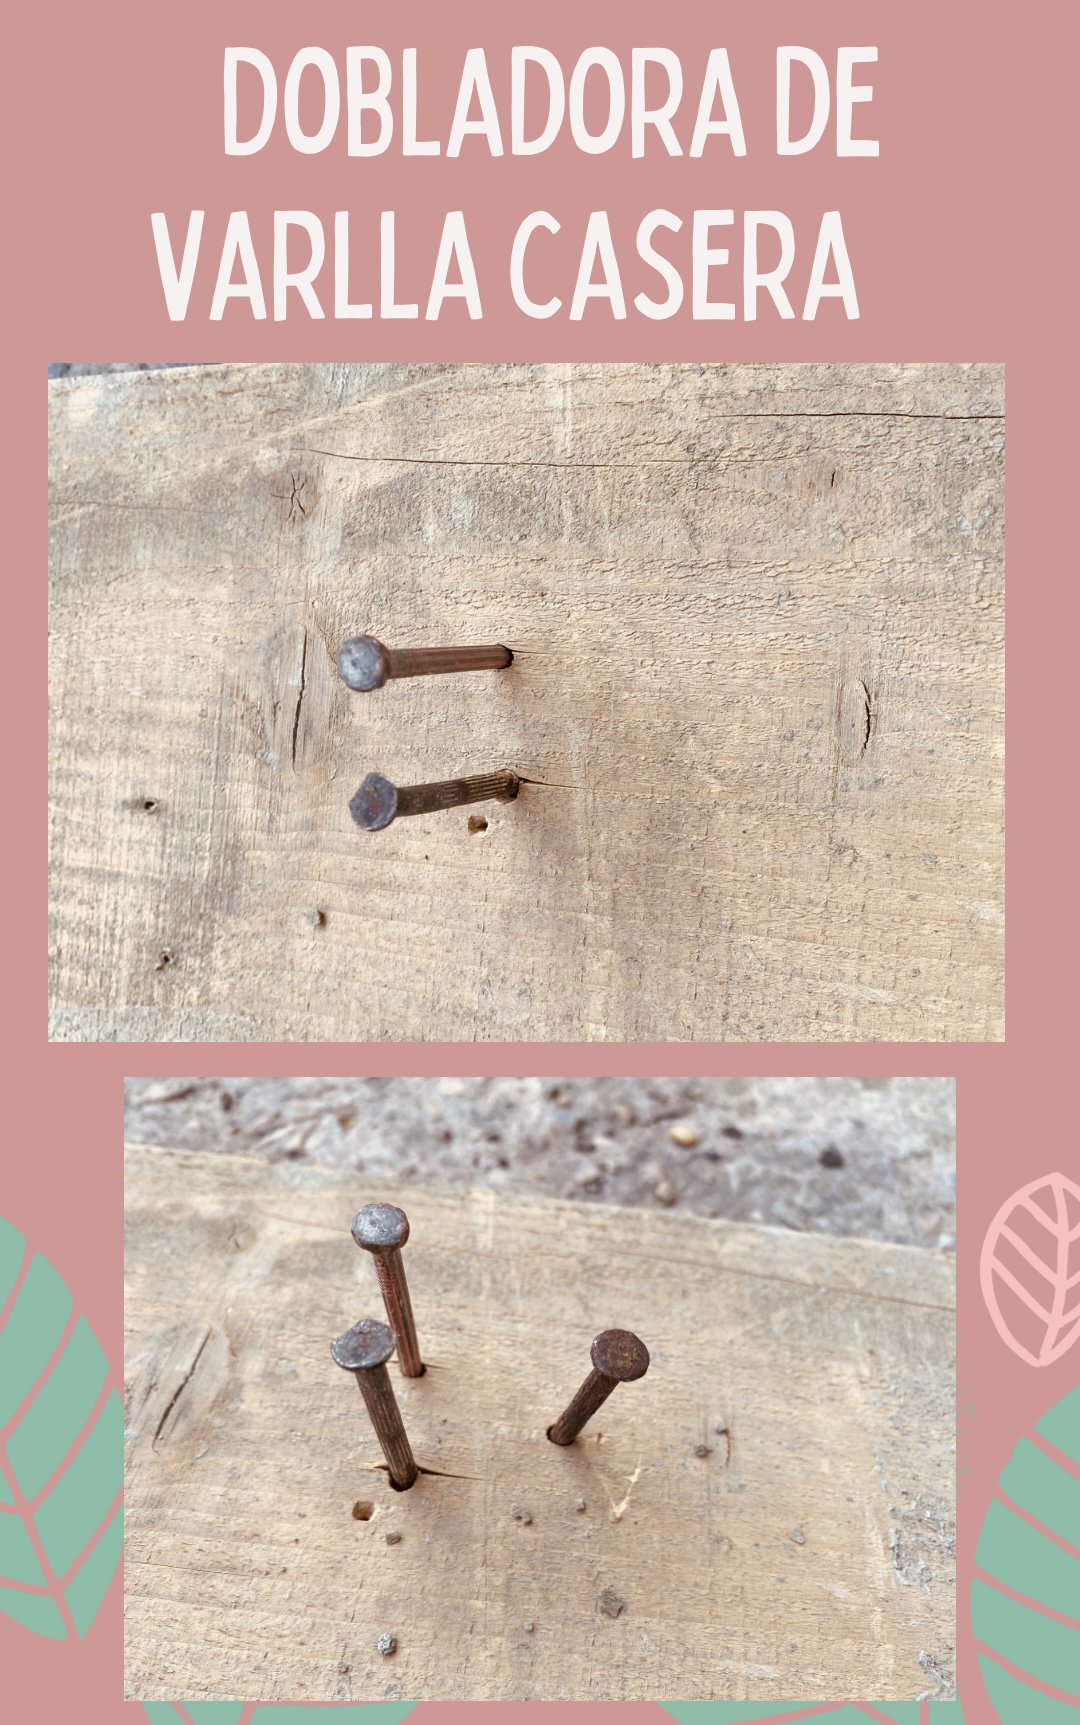
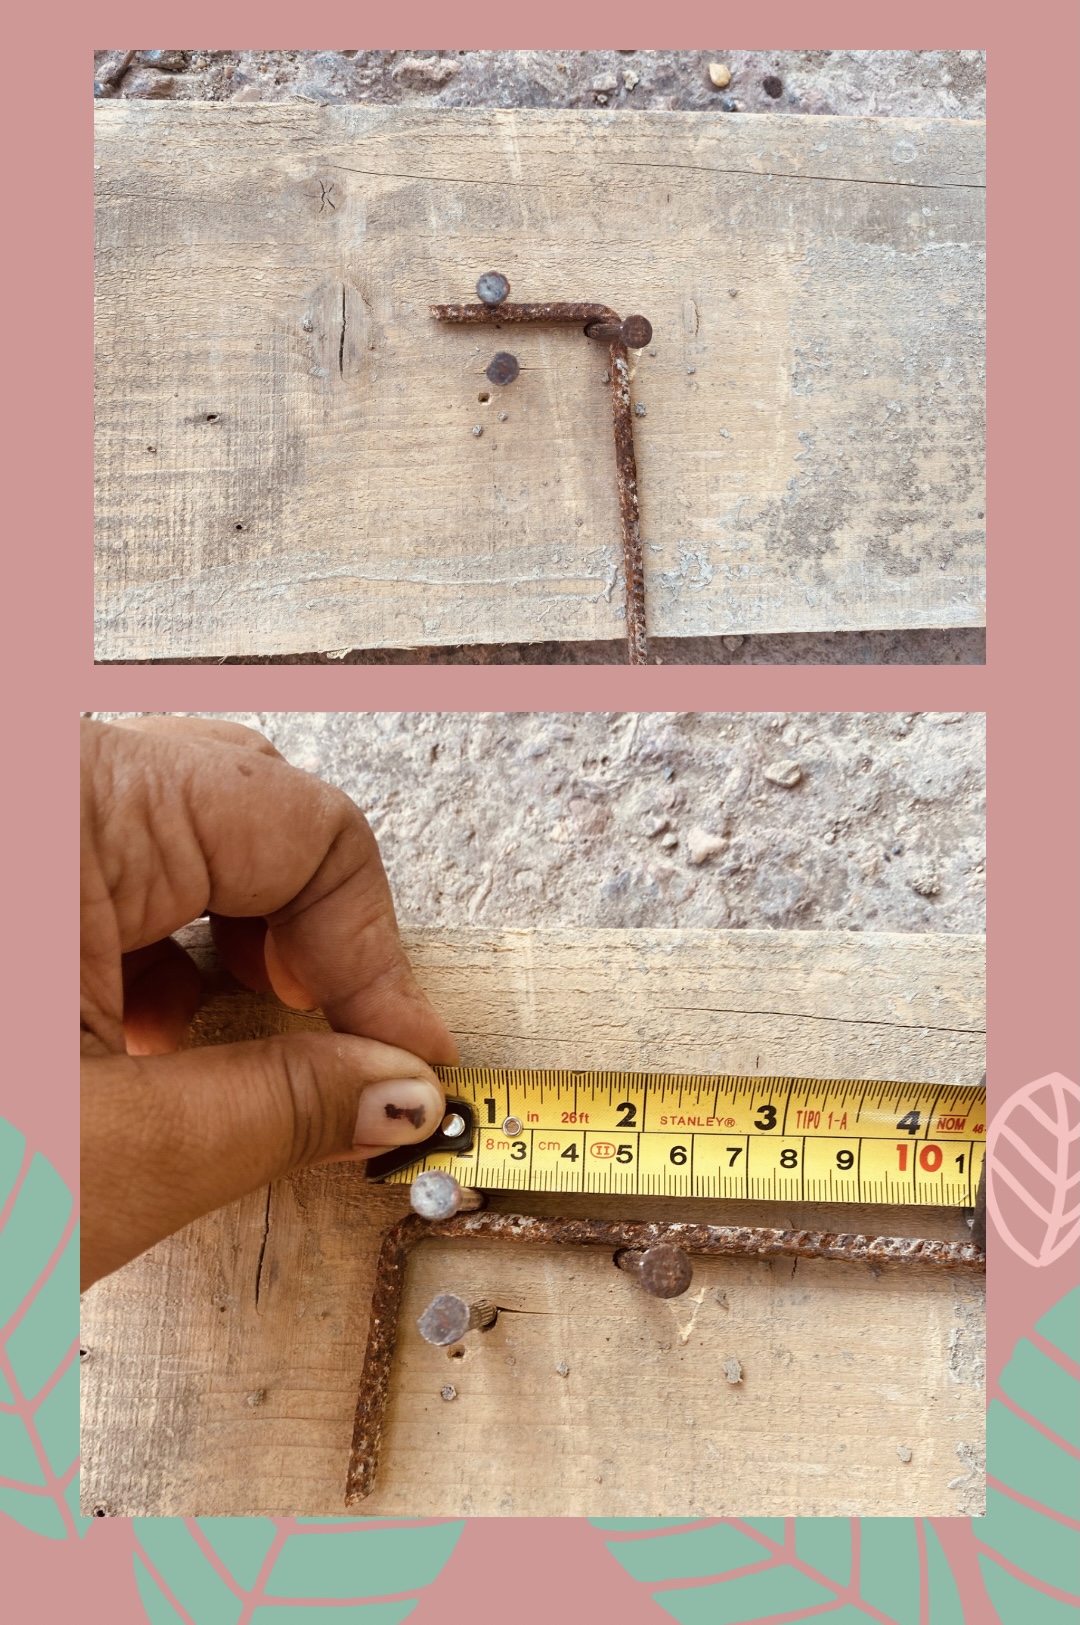
Para hacer la dobladora de varillas casera vamos a utilizar:
- 3 clavos preferiblemente de acero
- 1 listón de madera
- Martillo
To make the homemade rod bender we are going to use:
- 3 nails preferably made of steel
- 1 wooden slat
- Hammer
➿➿➿➿🪴♻️➿➿➿➿
PASOS PARA HACER LA DOBLADORA DE VARILLA CASERA
STEPS TO MAKE THE HOMEMADE ROD BENDER
Para hacer nuestra dobladora casera de varillas vamos a hacer especie de un triángulo con nuestros tres clavos, dos de ellos los vamos a colocar a una distancia de cuatro a 5 cm el otro lo colocaremos aproximadamente a 6 cm a haciendo la figura de un triángulo.
De esta forma sencilla vamos a poder doblar varillas de las más delgadas hasta 3/8, si queremos doblar varillas más gruesas tenemos que buscar una madera más ancha y resistente, y reemplazaremos los clavos por trozos de varilla 3/8 y los colocaremos en la misma posición que hemos colocado los clavos dejando una distancia de 10 cm
To make our homemade rod bender we are going to make a sort of triangle with our three nails, two of them we are going to place at a distance of four to 5 cm, the other we will place approximately 6 cm away, making the figure of a triangle.
In this simple way we will be able to bend the thinnest rods up to 3/8, if we want to bend thicker rods we have to look for a wider and more resistant wood, and we will replace the nails with pieces of 3/8 rod and place them in the same position that we have placed the nails leaving a distance of 10 cm
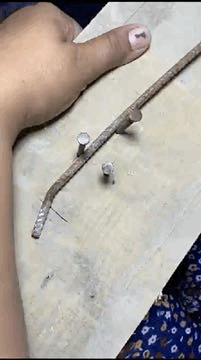
Para utilizar nuestra dobladora de varilla vamos a colocar en el medio de los dos clavos que están juntos la varilla y la parte que vamos a doblar en el otro clavo
To use our rod bender we are going to place the rod and the part that we are going to bend in the middle of the two nails that are together on the other nail.
➿➿➿➿🪴♻️➿➿➿➿
PASOS PARA HACER EL MATERO CON MATERIALES RECICLADOS
STEPS TO MAKE THE MAT WITH RECYCLED MATERIALS
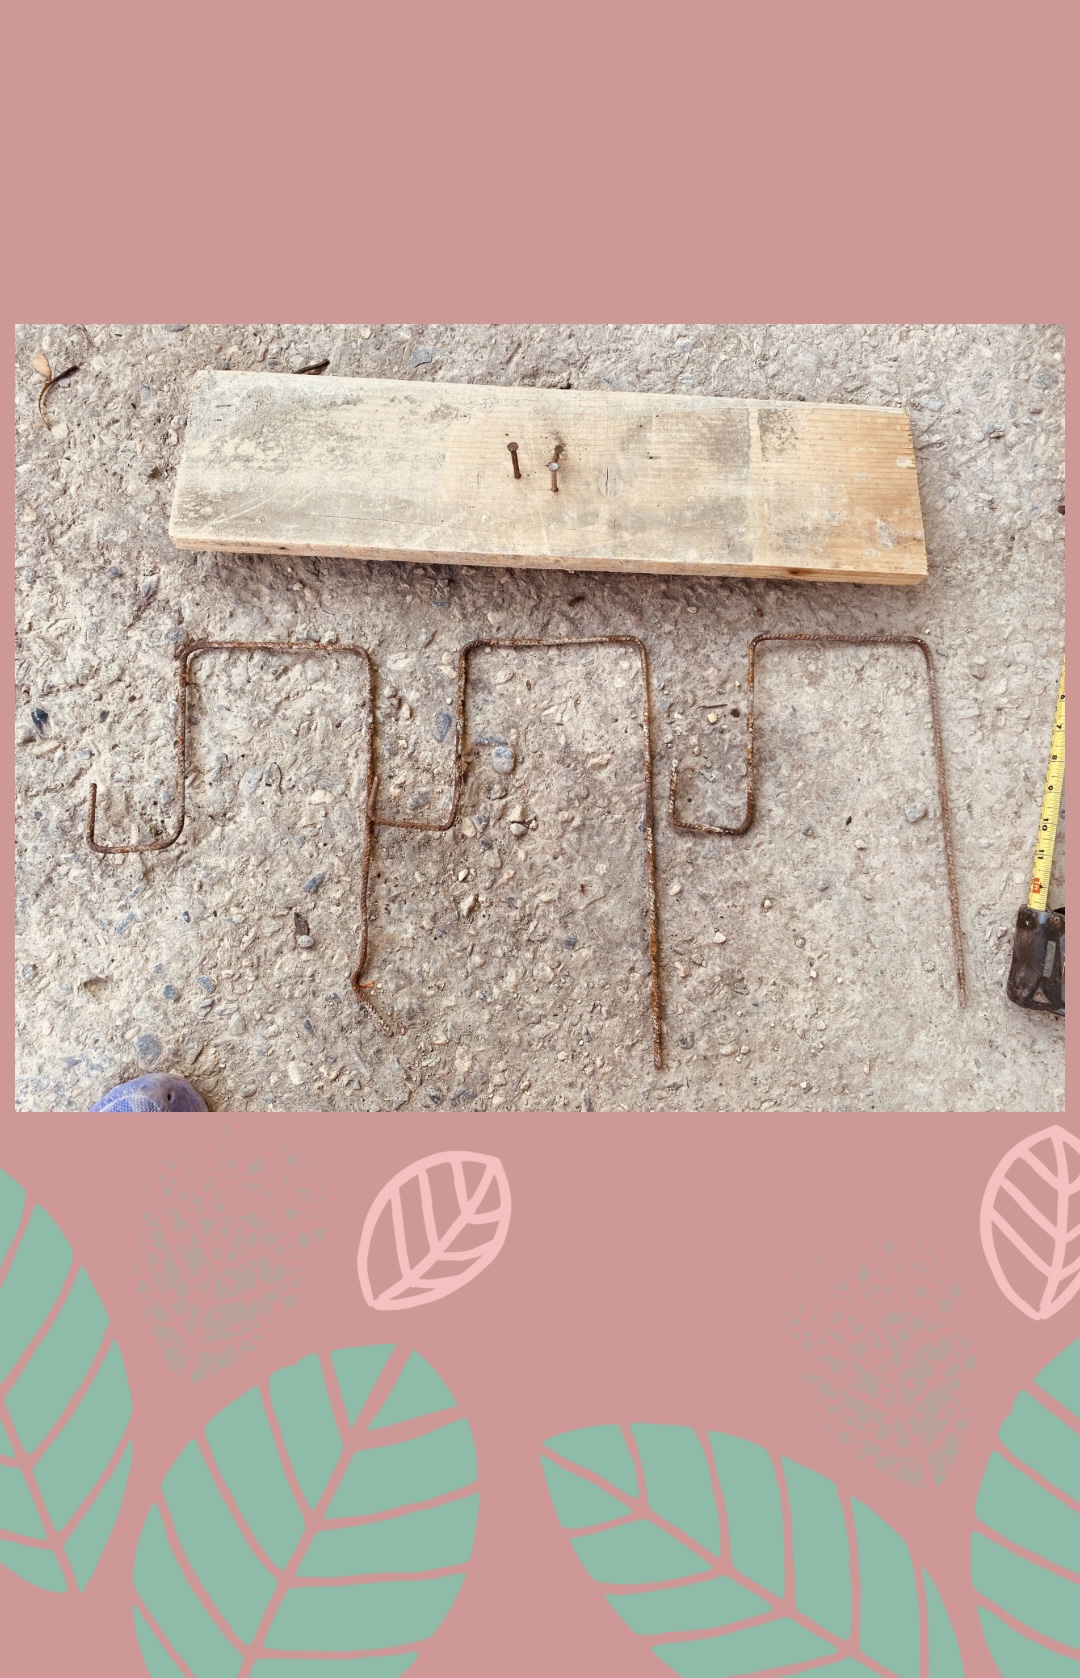
Comenzaremos haciendo el primer dobles, este lo haremos en la punta de cada una y los centímetros que deseemos, pueden ser de 2 o 3cm.
Para el segundo dobles vamos a medir 6cm y volvemos a doblar haciendo como la mitad de un cuadrado
We will start by making the first double, we will do this at the tip of each one and the centimeters we want can be 2 or 3cm.
For the second double we are going to measure 6cm and we fold again making about half a square
Luego haremos un dobles de 15 cm al lado contrario del dobles anterior y nuevamente haremos otro dobles de 15 cm de manera que nos dé la forma cuadrada y debe quedar así como les muestro en mi imagen
Then we will make a 15 cm double on the opposite side of the previous double and again we will make another 15 cm double so that it gives us the square shape and it should look like I show you in my image
Al tener dobladas nuestras tres varillas las vamos a unir, puede ser amarrándolas con alambre o con soldadura, en mi caso como estoy practicando la soldadura hice mi primer trabajo y logré unirlas, la soldadura no me quedó perfecta pero para ser mi primera vez me contenta que lo logre 😊
By having our three rods bent we are going to join them, it can be by tying them with wire or with welding, in my case since I am practicing welding I did my first job and managed to join them, the welding was not perfect but for being my first time I am happy May I achieve it 😊
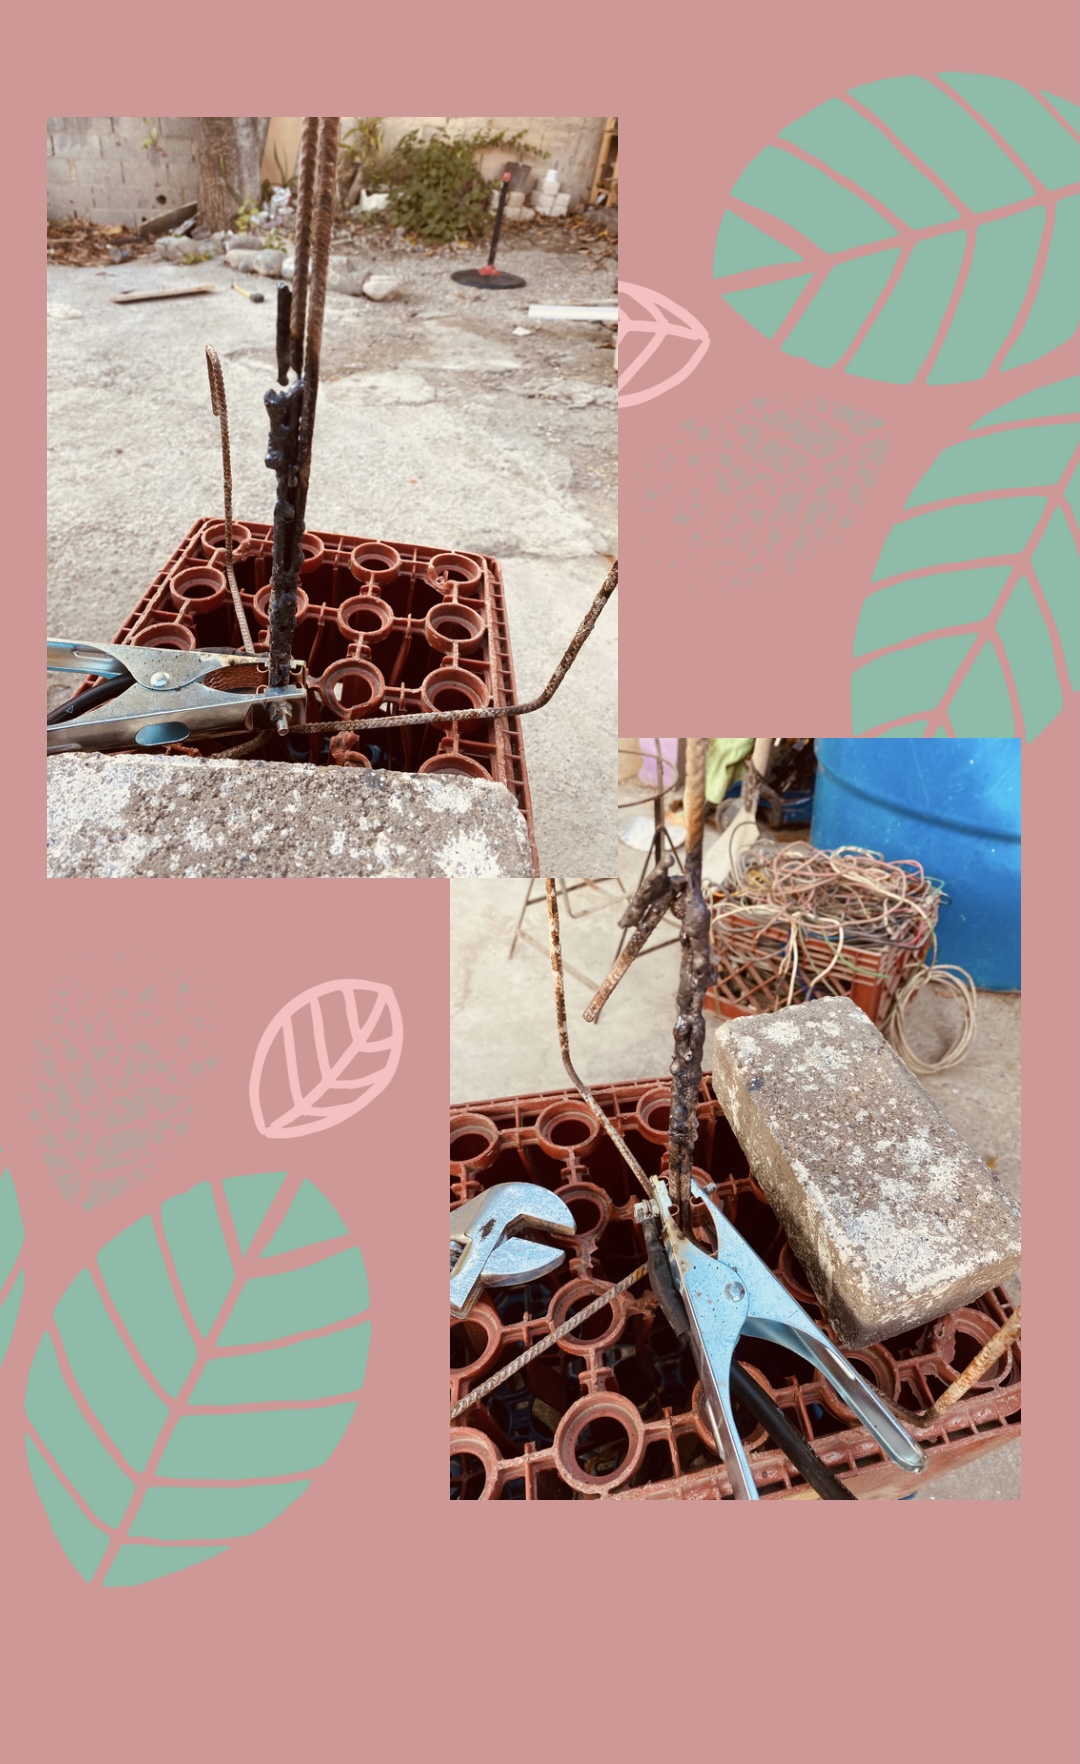
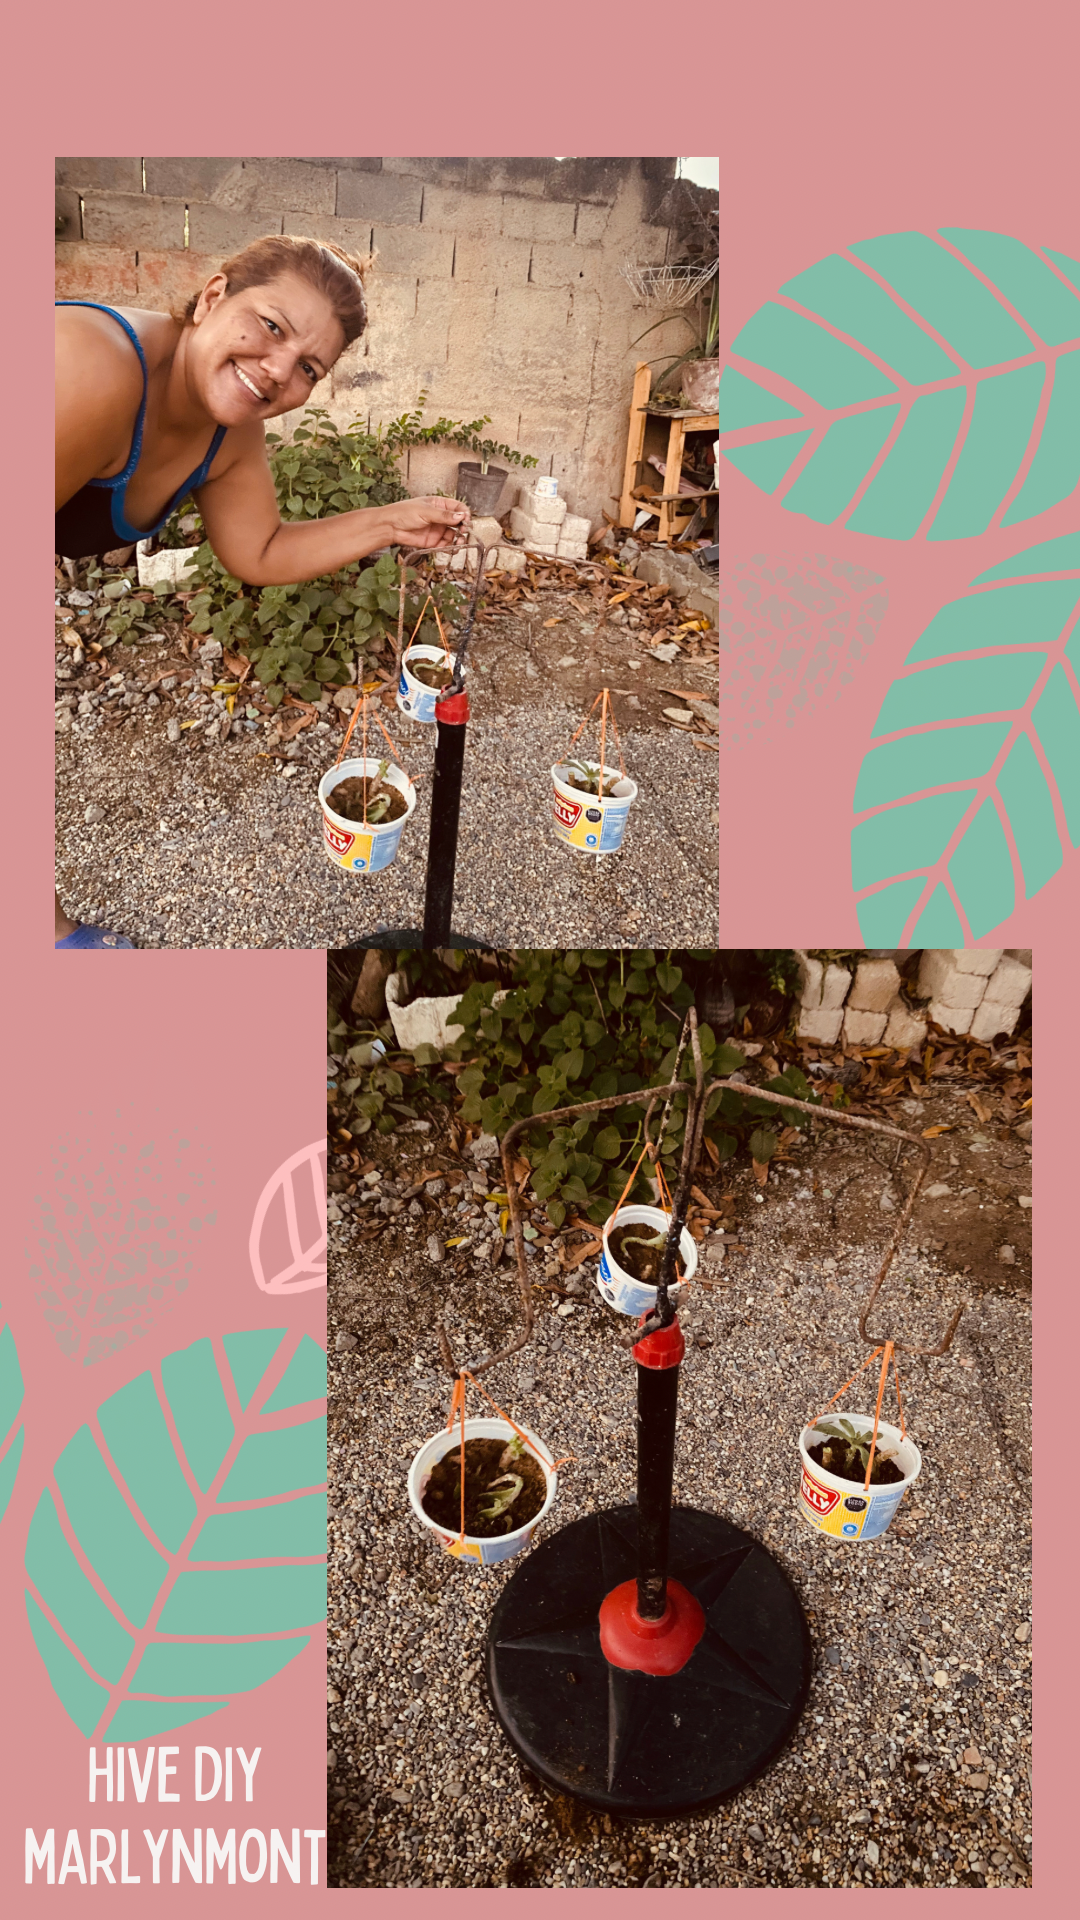
Para finalizar el colgante de materos le colocaremos como un anclaje al tio de varillas para evitar que se vaya para adentro del tubo, introducimos nuestros colgantes de materoa en la base de ventilador y ya está casi terminado.
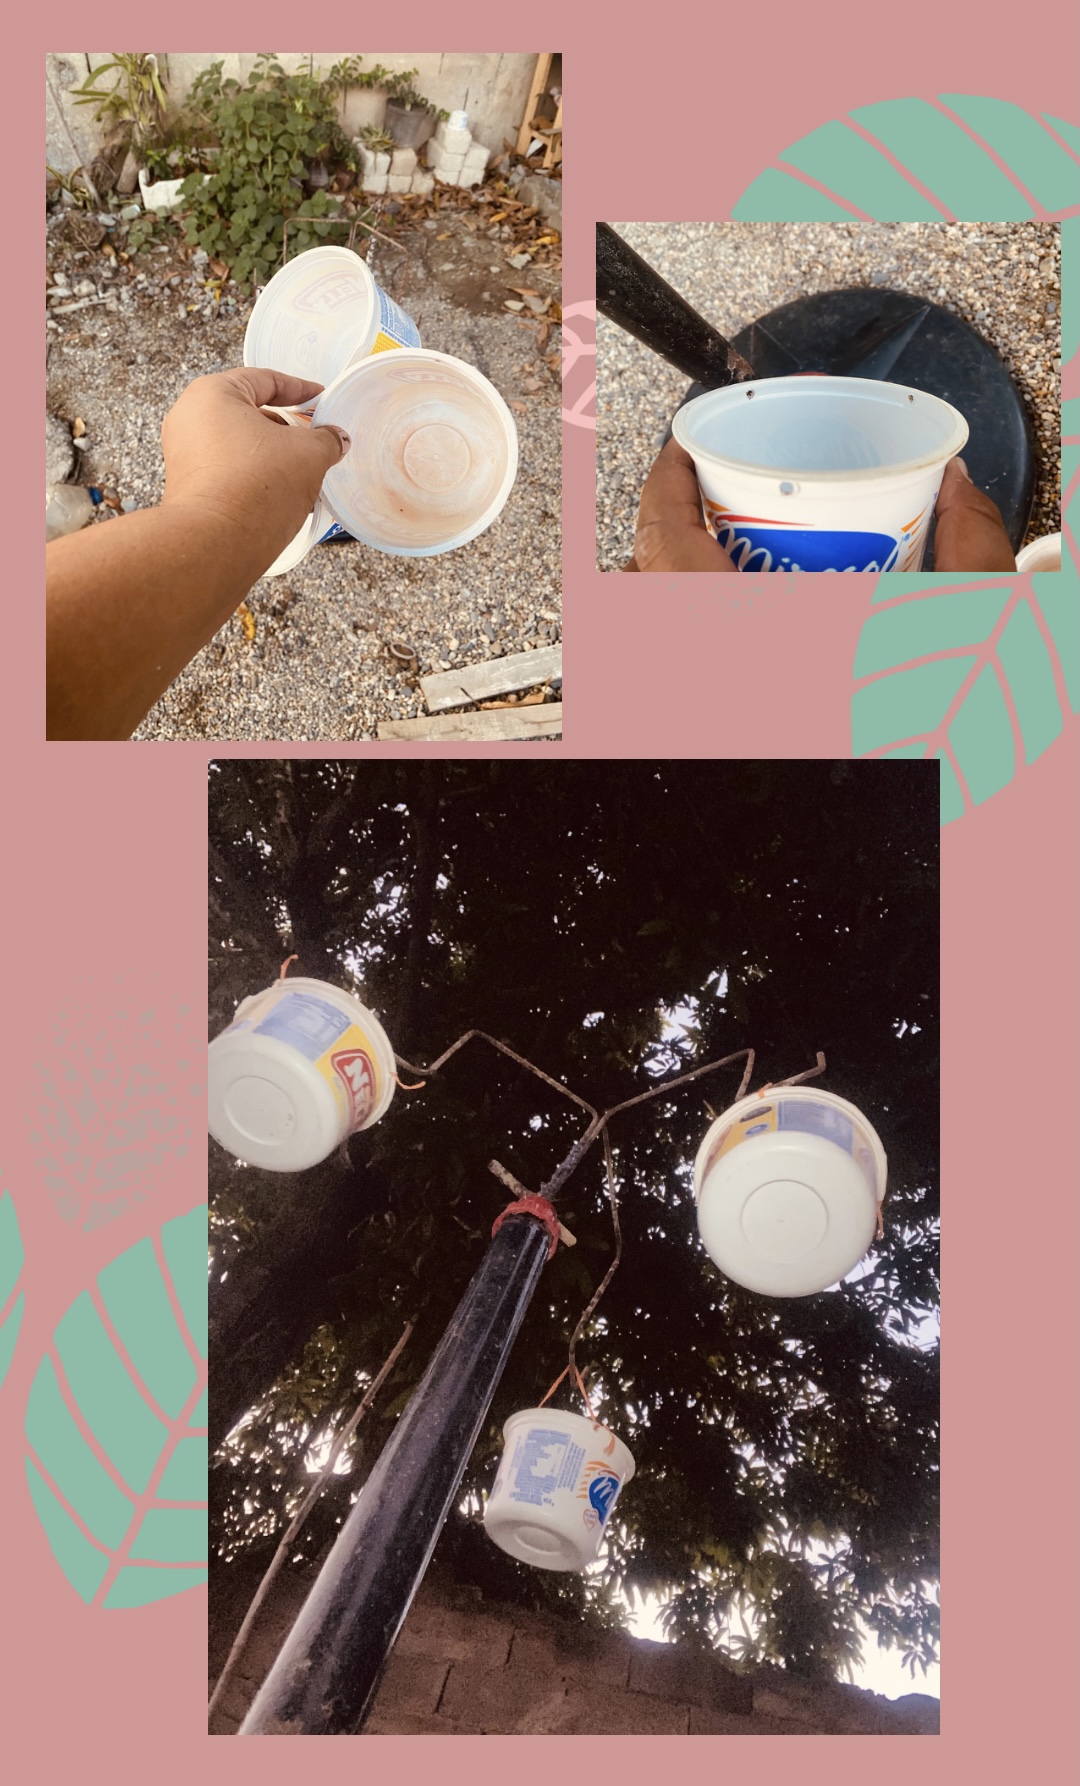
Para finalizarlo como debe ser, le colocaremos unos materos con unas lindas plantas 🌱 , buscamos 3 envases plásticos, yo utilice de mantequilla, le abri 3 huequitos coloque cinta y colgué en cada extremo, le coloque abono a cada taza y sembre una especie de suculenta la cual se me estaba secando, con este nuevo matero la voy a recuperar en unos días, lo bueno es que este tipo de planta se recupera rápidamente.
To finish the materoa pendant we will place it as an anchor to the rod guy to prevent it from going inside the tube, we insert our materoa pendants into the fan base and it is almost finished.
To finish it as it should be, we will place some pots with some pretty plants 🌱, we look for 3 plastic containers, I used butter, I opened 3 little holes, placed tape and hung them at each end, put fertilizer in each cup and planted a type of succulent which was drying out, with this new pot I will recover it in a few days, the good thing is that this type of plant recovers quickly.
Tenía días pensando en hacer este trabajo, y por fin lo hice, el resultado me encantó 🥰🪴, mis materos quedaron giratorios como un carrusel y pude darle un buen uso a estos materiales
I had been thinking about doing this job for days, and I finally did it, I loved the result 🥰🪴, my mats turned like a carousel and I was able to put these materials to good use
vale la pena guardar todas esas cosas que sabemos que algún día lo encontraremos utilidad, todos los materiales que utilicé son de reciclaje, las varillas son de una vieja construcción las cuales recuperé, la base es de un ventilador dañado, las tasas son reusadas, esto me genera mucha felicidad al saber que podemos hacer este tipo de creaciones con materiales que quizás íbamos a desechar y creando le podemos dar un segundo uso.
Agradecida por visitar mi publicación 🥰❤️
It is worth saving all those things that we know that one day we will find them useful, all the materials I used are recycled, the rods are from an old construction which I recovered, the base is from a damaged fan, the rates are reused, this It makes me very happy to know that we can make these types of creations with materials that perhaps we were going to throw away and by creating we can give them a second use.
Thankful for visiting my post 🥰❤️
Amiga está súper esa idea éxitos 😉
Gracias amiga 😊
Wow! una excelente para colocar las plantas, reciclar y ahorrar espacio; siempre se pueden aprovechar los recursos que tenemos en casa.
Saludos!
Así es amiga, gracias por comentar, saludos 😊
Wow,muchas gracias por compartir!
Gracias 😊
That's an interesting project and useful too. Not to mention the amazing recycling part. Well done.
Thank you 😊