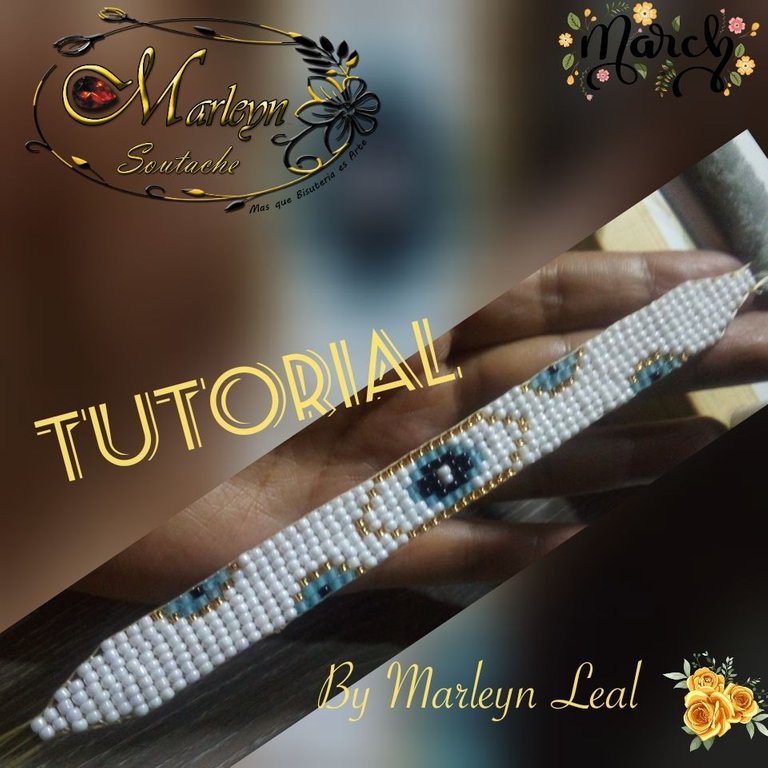
Feliz y Bendecido día amigos, vamos a aprender con animo, con alegría, llenos de bendiciones,comenzamos este nuevo proyecto felices, brillando, llenos de energía este proyecto es algo diferente, incluso es la primera vez que lo hago! es una pulsera espectacular del ojo turco realizada en un telar para mostacillas, mi telar es artesanal, para mi fue hermoso aprender a realizar estas pulseras, hay tanta cantidad de modelos que podemos hacer, bueno con esta pulsera dure 4 días haciéndola, no es difícil, solo que como era la primera vez fui paso a paso mas lento cuidando cada detalle, estas pulseras se realizan con unas mostacillas que se llaman Miyuki porque son perfectas todas del mismo tamaño, lamentablemente acá en Venezuela no las e encontrado para comprarlas, y sin dejarme desanimar pensé por que no intentar con mostacillas, y pues realmente el resultado me sorprendió y por supuesto quede encantada, me gusta, queda hermoso! se distingue muy bien la figura, si en algunas partes me quedo extraño es porque esta es la primera.
Happy and blessed day friends, we are going to learn with encouragement, with joy, full of blessings, we start this new project happy, shining, full of energy this project is something different, it is even the first time I do it! it is a spectacular Turkish eye bracelet made on a beaded loom, my loom is handmade, for me it was beautiful to learn how to make these bracelets, there are so many models that we can make, well with this bracelet it lasted 4 days making it, it is not difficult , except that as it was the first time I went step by step slower taking care of every detail, these bracelets are made with some beads called Miyuki because they are perfect all of the same size, unfortunately here in Venezuela I have not found them to buy them, and without Letting myself get discouraged I thought why not try with beads, and the result really surprised me and of course I was delighted, I like it, it looks beautiful! the figure is very well distinguished, if in some parts I remain strange it is because this is the first.

Segun Wikipedia, El Ojo turco es un amuleto que está destinado a proteger contra el mal de ojo. Es más común en Turquía. Se puede encontrar casi siempre presente en las oficinas y hogares, en joyería, para los bebés, en los vehículos, puertas, caballos e incluso teléfonos celulares. El ojo turco se conoce, también, con el nombre de "nazar", El uso del ojo turco depende de que quieras proteger. Muchos lo cuelgan en las entradas de las casas para desviar las malas energías; otros, en sus negocios para cuidar la economía; en aritos o colgantes para desviar las miradas negativas o en donde sientan que es necesario.
The Evil Eye is an amulet that is meant to protect against the evil eye. It is more common in Turkey. It can be found almost always present in offices and homes, in jewelry, for babies, on vehicles, doors, horses and even cell phones. The Turkish eye is also known by the name of "nazar". The use of the Turkish eye depends on what you want to protect. Many hang it at the entrances of the houses to deflect bad energies; others, in their businesses to take care of the economy; in earrings or pendants to deflect negative looks or where they feel it is necessary.

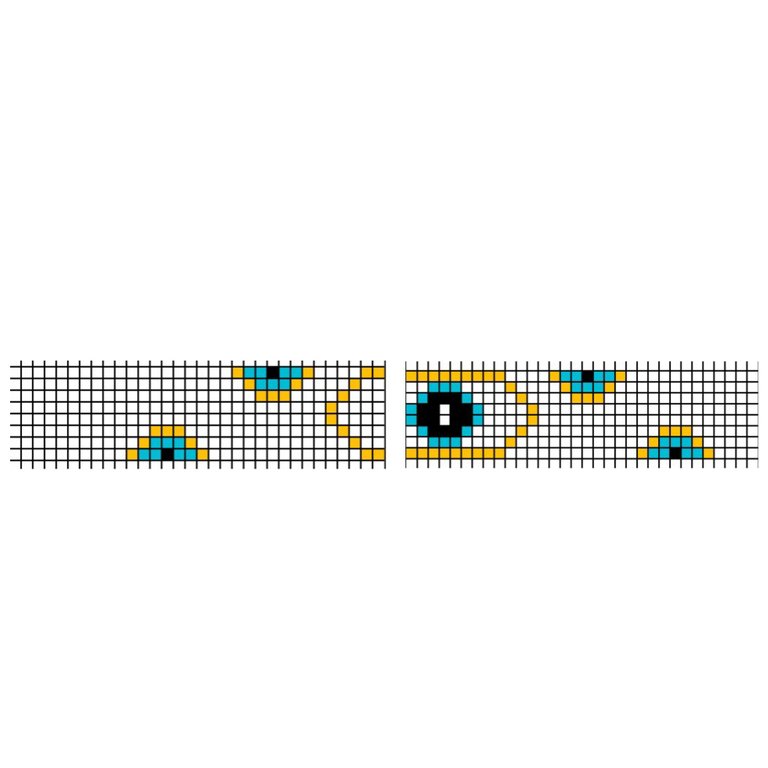
Como ves en esta imagen, este es el patron que vamos a realizar, cada cuadro representara una mostacilla, las 10 primeras lineas de cada punta, se va a comenzar de la siguiente forma primera y segunda linea 2 mostacillas en cada una, tercera y cuarta linea coloca 4 mostacillas, quinta y sexta linea se colocaran 6 mostacillas, y las 5 lineas siguientes vamos a colocar 8 mostacillas blancas en cada linea hasta la linea 11 que se comienza con el patrón que te muestro en esta imagen, igualmente si ves eh colocado las 10 primeras lineas en cuadros blancos... En los pasos a continuación explicare como vamos a colocar las mostacilla.
As you can see in this image, this is the pattern that we are going to make, each square will represent a bead, the first 10 lines of each point, it will start as follows first and second line 2 beads in each one, third and fourth line place 4 beads, fifth and sixth line 6 beads will be placed, and the next 5 lines we will place 8 white beads in each line until line 11 that begins with the pattern that you I show in this image, also if you see I have placed the first 10 lines in white boxes... In the following steps I will explain how we are going to place the mostacilla.
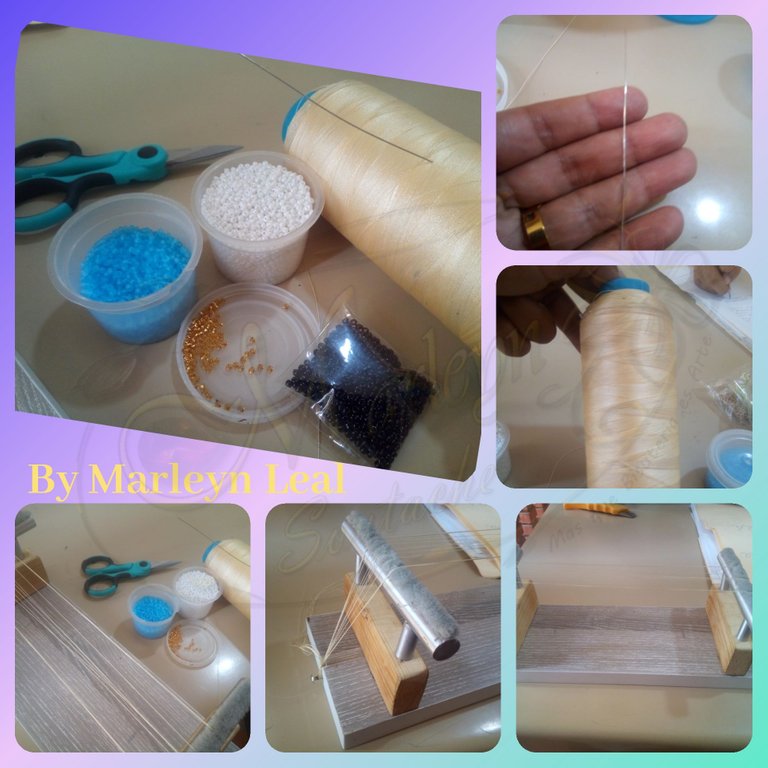
MATERIALES: Tijera, Aguja para mostacillas larga, Mostacillas blanca, azul cielo, negra y dorada.. si tienes la posibilidad de comprar mostacilla Miyuki debes utilizar la #11, Hilo para talabarteria el color de tu elección, Telar para tejer mostacillas.
MATERIALS: Scissors, long beading needle, white, sky blue, black and gold beads... if you have the possibility to buy Miyuki bead you should use #11, saddlery thread the color of your choice, Loom to weave beads.

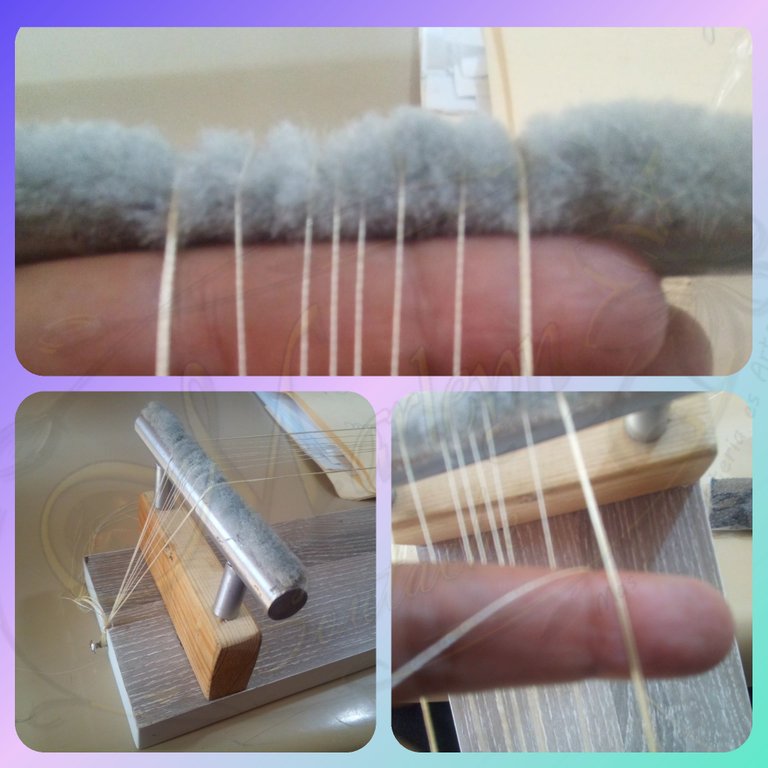
PASO 1: Por mas difícil que parezca esta pulsera es realmente muy fácil, todo es repetitivo y si tienes calma y paciencia hasta terapéutico puede ser, Bueno para comenzar yo coloque 12 hilos en mi telar, en cada lado coloque el hilo triple para que quedara mas grueso digamos, y 6 hilos centrales, cada hilo lo deje de 35 centímetros de largo es mejor que me sobre hilo y no que me falte, la parte tejida de mi pulsera mide 15.5 centímetros, los hilos deben ir lo mas prensado que puedas, ahora vamos a ensartar la aguja, yo le e colocado a la aguja 2 metros de hilo y la otra punta la vamos a amarrar del ultimo hilo del lado derecho como ves en la tercera imagen, como el hilo esta muy largo este tiende a enredarse debes ser super cuidadoso.
STEP 1: As difficult as this bracelet may seem, it is really very easy, everything is repetitive and if you are calm and patient it can even be therapeutic, Well to start I put 12 threads on my loom, on each side place the triple thread so that it would be thicker, let's say, and 6 central threads, each thread should be 35 centimeters long, it is better that I have an excess thread and not that I lack it, the woven part of my bracelet measures 15.5 centimeters, the threads must be as pressed as possible, now we are going to thread the needle, I have placed 2 meters of thread on the needle and the other end we are going to tie the last thread on the right side as you see in the third image, as The thread is very long, it tends to get tangled, you must be very careful.

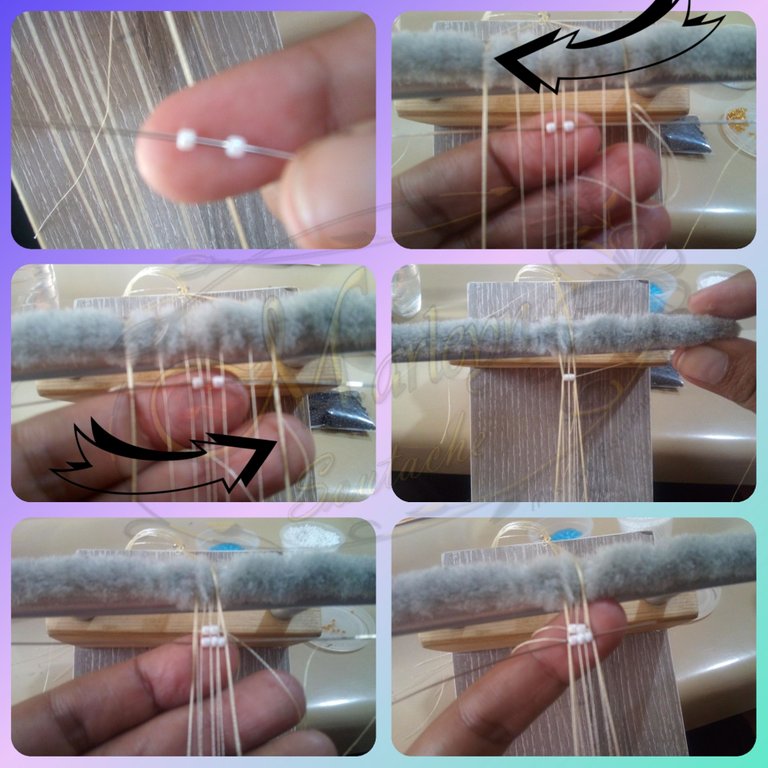
PASO 2: Vamos a introducir 2 mostacillas blancas en la aguja, vamos a pasarlas por abajo de los hilos, subirlas como te muestro en la segunda imagen que encajen por abajo en el centro de los hilos, saca la aguja por el lado izquierdo realizando presión a las mostacillas con tu dedo, y devuelve la aguja esta vez por la parte de encima de los hilos atravesando las mostacillas y luego halamos con cuidado, en la segunda linea nuevamente colocaremos 2 mostacillas, en la tercera y cuarta linea colocaremos 4 mostacillas es siempre el mismo proceso, quinta y sexta linea se colocaran 6 mostacillas, y las 5 lineas siguientes vamos a colocar 8 mostacillas blancas en cada linea hasta la linea 11 que se comienza con el patrón que te muestro en la imagen de arriba, esto tal vez te puede resultar algo tedioso pero vale la pena el resultado final.
STEP 2: We are going to insert 2 white beads on the needle, we are going to pass them under the threads, raise them as I show you in the second image so that they fit below in the center of the threads , take the needle out from the left side pressing the beads with your finger, and return the needle this time through the top of the threads going through the beads and then carefully pull, on the second line again we will place 2 beads, in the third and fourth line we will place 4 beads is always the same process, fifth and sixth line 6 beads will be placed, and the next 5 lines we will place 8 white beads in each line until line 11 which begins with the pattern that I show you In the image above, this may be a bit tedious, but the end result is worth it.

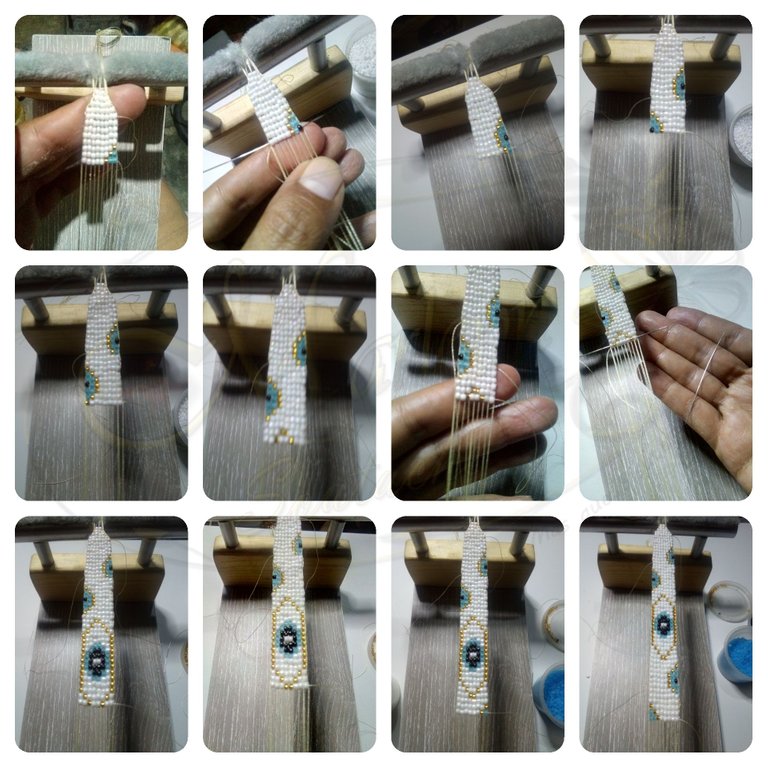
PASO 3: Siempre sera repetitivo nuestro proceso, las mostacillas entran en la aguja, pasan por abajo de los hilos, las encajamos entre los hilos, sostenemos con el dedo, pasamos la aguja por completo y luego esta se vuelve a introducir en las mostacillas esta vez por la parte de arriba de los hilos hasta sacarla al otro lado y vuelve a comenzar el proceso nuevamente debes estar pendiente siempre del patrón que realizamos para no equivocarnos.
STEP 3: Our process will always be repetitive, the beads enter the needle, go under the threads, we fit them between the threads, we hold them with our finger, we pass the needle completely and then this is reintroduced into the beads, this time from the top of the threads until it is removed to the other side and the process begins again. You must always be aware of the pattern that we make so as not to make mistakes.

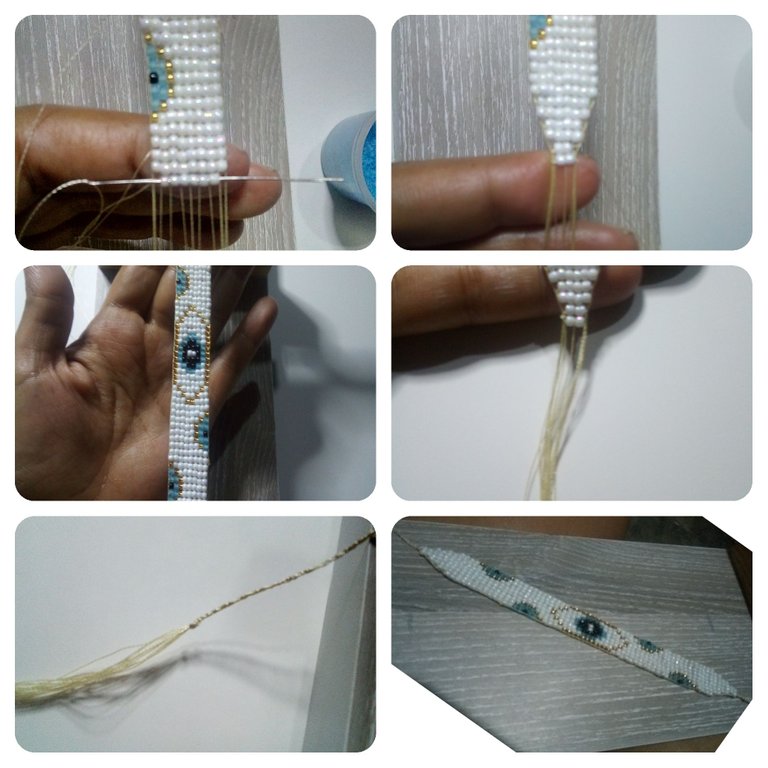
PASO 4: Al terminar nuestro patrón que vamos en la parte final, colocamos 5 filas de 8 mostacillas y ahora vamos en reversa de como empezamos, es decir, luego 2 filas de 6, luego 2 filas de 4 para culminar con las 2 filas de 2 mostacillas, en esta ultima parte vamos a pasar el hilo varias veces entre las 2 ultimas y amarramos con un nudo triple, luego del amarre vuelve a introducir la aguja entre las mostacillas para ocultar el nudo, cortamos el hilo sobrante con cuidado.
STEP 4: At the end of our pattern that we are going to the final part, we place 5 rows of 8 beads and now we go in reverse of how we started, that is, then 2 rows of 6, then 2 rows of 4 to finish with the 2 rows of 2 beads, in this last part we are going to pass the thread several times between the last 2 and tie with a triple knot, after tying reinsert the needle between the beads to hide the knot , we cut the excess thread carefully.

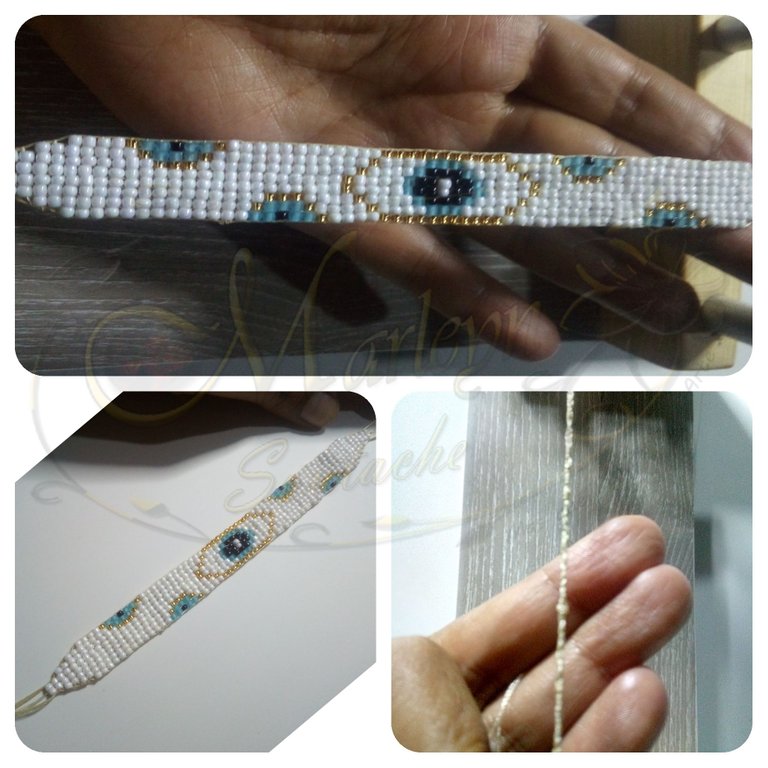
PASO 5: Como ves hemos terminado esta espectacular pulsera, con los hilos que le quedan vamos a realizar una crineja, igual a las que les hacemos las niñas en el cabello yo la realice de 10 centímetros de largo les hice un nudo sencillo y corte, tu puedes realizarlo del largo que necesites dependerá del tamaño de tu muñeca, para cerrar la pulsera utilice el nudo de macrame plano. Y así hemos terminado de verdad el resultado final me encanta, super hermosa...
STEP 5: As you can see we have finished this spectacular bracelet, with the remaining threads we are going to make a crineja, just like the ones we girls make in their hair, I made it 10 centimeters long I made a simple knot and cut them, you can make it as long as you need depending on the size of your wrist, to close the bracelet use the flat macrame knot. And so we have really finished the final result I love it, super beautiful...

Estaré realizando muchísimas mas pulseras, diferentes patrones siempre todo sera el mismo proceso en el tejido pero depende del color y lugar de las mostacillas le daremos figuras diferentes, me encantaría encontrar las Miyuki para que el resultado sea perfecto todo del mismo tamaño y posición, pero doy lo mejor de mi cada día y espero te guste! Nos leemos pronto con otro patrón de estas pulseras!
I will be making many more bracelets, different patterns, everything will always be the same process in the fabric but depending on the color and place of the beads we will give you different figures, I would love to find the Miyuki so that the result be perfect all the same size and position, but I do my best every day and I hope you like it! See you soon with another pattern for these bracelets!
El patrón lo realice con una app que se llama 8 bit Painter...Gracias, Por ser, Por estar, Por leerme,Sigue creciendo, sigue brillando, Siempre se tu mejor Versión, y nunca olvides que eres especial por ser quien Eres!
I made the pattern with an app called 8 bit Painter... Thank you, For being, For being, For reading me,Keep growing, keep shining, Always be your best Version, and never forget that you are special because of who you are!
Si tienes una duda escríbeme un comentario, estaré feliz de ayudarte con cualquier detalle, Espero que mis diseños les gusten tanto como a mí me gusta, aprendan con placer ...!

Nunca olvides que el Poder es Querer y si quieres Puedes...
Eres Luz eres Energía, TU PUEDES ... Que el universo infinito Conspire para que todo siempre sea mejor ... Se les quiere ...

Venezuela FE
Somos Seres Abundantes! Qué las energías del universo vibren en sintonía con las de cada uno de nosotros en armonía! Cuidemos nuestras palabras, acciones y pensamientos!
If you have a question, write me a comment, I will be happy to help you with any details, I hope you like my designs as much as I like, learn with pleasure ...!

Never forget that Power is Wanting and if you want you can ...
You are Light, you are Energy, YOU CAN ... May the infinite universe Conspire so that everything is always better ... They are loved ...

Venezuela FAITH
We are Abundant Beings! May the energies of the universe vibrate in tune with those of each of us in harmony! Let's take care of our words, actions and thoughts!

Autoría del texto y todas las imágenes: @Marleyn , La edición de las imágenes las realicé yo misma, Por favor no Utilices mis fotos sin mi autorización, edites ni re-publiques mi material ¿Deseas ponerte en contacto conmigo? Escríbeme:
Correo electronico: Marleynl123@gmail.con
Discord #Marleyn#7821
Twitter: @marleynleal1
Imstagran: @MarleynSoutache
YouTube: https://youtube.com/c/marleynlealramos
Authorship of the text and all the images: @Marleyn, I did the editing of the images myself, Please do not use my photos without my authorization, edit or republish my material Do you want to contact me? Write me:
Email: Marleynl123@gmail.con
Discord #Marleyn#7821
Twitter: @marleynleal1
Imstagran: @MarleynSoutache
YouTube: https://youtube.com/c/marleynlealramos



Mi trabajo es mi pasión y cuando tu trabajo es tu pasión nada es imposible / My work is my passion and when your work is your passion nothing is impossible


Semplicemente meraviglioso!
Complimenti di cuore
Ti auguro una buona serata
@luba555
Grazie, @luba555 di tutti i tutorial questo è quello che mi è piaciuto di più, questo braccialetto mi assomiglia... lo adoro
È veramente spettacolare! Lo adoro!
Un trabajo de mucha paciencia y habilidad te quedó hermoso @marleyn
!discovery 35
Muchísimas gracias @mili2801 fueron 4 dias pegada esta hermosa pulsera, me encanto cada detalle... Ya comencé un nuevo modelo con esta misma técnica que pronto se los comparto por acá!
This post was shared and voted inside the discord by the curators team of discovery-it
Join our community! hive-193212
Discovery-it is also a Witness, vote for us here
Delegate to us for passive income. Check our 80% fee-back Program
Your content has been voted as a part of Encouragement program. Keep up the good work!
Use Ecency daily to boost your growth on platform!
Support Ecency
Vote for new Proposal
Delegate HP and earn more
The rewards earned on this comment will go directly to the person sharing the post on Twitter as long as they are registered with @poshtoken. Sign up at https://hiveposh.com.
Muy hermoso el resultado un buen tutorial amiga, lo explicas excelente 👌
Gracias, @yolimarag me alegro que te guste 😁🤗