
Bienvenidos mis queridos amigos amantes del arte y artista.
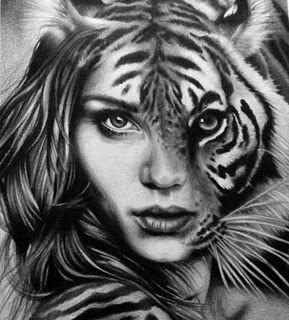
Amigos, el día de hoy les vengo a presentar un dibujo que he realizado con lápices de grafito 2B y 6B, puesto que el dibujo de hoy se trata de una mezcla de un ser humano con un animal, en este caso es una mujer y un tigre de bengala.
Trabajar en este dibujo no ha sido fácil, puesto que tuve algunas complicaciones a la hora de realizar el boceto, pero lo importante es que no me rendí y acomode todo lo que pude para que el dibujo me quedara perfecto, para ser el primer dibujo que hago de una mezcla de un ser humano con un animal me quedo bien, pero fue muy difícil hacer el tigre de bengala, con lo que termine con una pequeña molestia en la palma de mi mano derecha, son molestias normales de un dibujante.
Al igual que en la mayoría de mis dibujos, las imágenes que utilizo en referencia son sacados de una gran página de ideas y diseños llamada Pinterest.
Welcome my dear art lovers and artist friends.
Friends, today I come to present a drawing that I have done with graphite pencils 2B and 6B, since today's drawing is a mixture of a human being with an animal, in this case it is a woman and a Bengal tiger.
Working on this drawing has not been easy, since I had some complications at the time of making the sketch, but the important thing is that I did not give up and I arranged everything I could to make the drawing perfect, for the first drawing I do of a mixture of a human being with an animal it was good, but it was very difficult to make the Bengal tiger, so I ended up with a little discomfort in the palm of my right hand, these are normal discomforts of a draftsman.
As in most of my drawings, the images I use in reference are taken from a great page of ideas and designs called Pinterest.


Los materiales que vamos a necesitar para elaborar nuestro dibujo son los siguientes:
*Un bloc de dibujo marca Caribe.
*Lápiz de grafito 2B.
*Sacapuntas con depósito.
*Borrador.
*Pañuelo.
*Regla.
*Algodón.
Antes de comenzar, como en la gran mayoría de mis dibujos, comencé primero en trabajar con el efecto cuadricula, el cual me ayuda mucho en la estructura de todos los dibujos, esto hace que todo lo que yo dibuje dentro de estos cuadros me queden proporcionados, cada cuadro tiene 3 centímetros de ancho por 3 centímetros de alto.
The materials that we are going to need to elaborate our drawing are the following:
*A Caribe sketch pad.
*Graphite pencil 2B.
*Pencil sharpener with reservoir.
*Pencil eraser.
*Handkerchief.
*Ruler.
*Cotton.
Before starting, as in most of my drawings, I began first to work with the grid effect, which helps me a lot in the structure of all the drawings, this makes that everything I draw inside these squares are proportionate, each square is 3 centimeters wide by 3 centimeters high.


Luego en cada uno de los cuadros comencé a dibujar cada parte de los dos rostros, esto se convierte en el boceto, podemos notar que tan buena es la proporción de cada una de las partes de este dibujo.
Posteriormente, comencé a borrar todas las líneas de las cuadrículas que use como guía, esto lo hice para que al momento de valorizar mi dibujo no se noten esas líneas y haga que mi dibujo se vea extraño.
Then in each of the squares I started to draw each part of the two faces, this becomes the sketch, we can notice how good is the proportion of each of the parts of this drawing.
Later, I began to erase all the lines of the grids that I used as a guide, I did this so that at the moment of valuing my drawing those lines are not noticed and it makes my drawing look strange.


Más adelante comencé a valorizar las manchas del pelaje del tigre de bengala, lo cual me tomo mucho tiempo hacerlo, este fue la parte que más hizo que me doliera un poco la mano, pero poco a poco fui rellenando cada espacio del pelaje de este animal.
Luego comencé a darle la primera capa de valorizado en la parte donde está el rostro del tigre de bengala, esto lo hice con la ayuda del lápiz de grafito 2B, para los lunares del tigre usé el lápiz de grafito 6B.
La marca de lápiz de grafito que use para hacer este dibujo son los Prismacolor, tienen una textura bastante buena y nos ayuda mucho en el difuminado para darle más efecto de realismo en los dibujos.
Later I began to valorize the spots of the Bengal tiger's fur, which took me a long time to do, this was the part that made my hand hurt a little bit, but little by little I was filling each space of the fur of this animal.
Then I began to give the first layer of valorized in the part where the face of the Bengal tiger is, this I did with the help of the graphite pencil 2B, for the moles of the tiger I used the graphite pencil 6B.
The brand of graphite pencil that I used to make this drawing are the Prismacolor, they have a pretty good texture and it helps us a lot in the blurring to give more realism effect in the drawings.


Posteriormente, con la ayuda de un pincel, comencé a difumar cada una de las partes que anteriormente había trazado con el lápiz de dibujo, incluso lo pase en cada uno de los lunares del tigre, creando un difuminado mucho más intenso, la verdad nada más con este paso comencé a notar rápidamente como terminara este dibujo.
Como en algunas partes de los lunares del tigre todavía quedaban poros sin rellenar, le agregue otra capa más de valorizado en cada una de las partes donde se encuentran los lunares, haciendo que se puedan apreciar mucho mejor, después con la ayuda de un borrador, comencé a darle detalles y a darle efecto de brillo en el pelaje del tigre de bengala, honestamente no fue fácil, ya que con borrador grande nos costara borrar, esto se debe a que podemos borrar lo que nosotros no queremos que se borre, así que tuve que picar un pedazo un poco más pequeño del borrador para poder hacer estos efectos de iluminación y pelajes blancos que el tigre de bengala posee.
Later, with the help of a brush, I began to blur each of the parts that I had previously traced with the drawing pencil, I even passed it in each of the tiger's polka dots, creating a much more intense blurring, the truth is that with this step I began to notice quickly how this drawing would end.
As in some parts of the tiger's polka dots there were still some unfilled pores, I added another layer of valorized in each of the parts where the polka dots are, making them much better appreciated, then with the help of an eraser, I started to give details and a shiny effect on the Bengal tiger's fur, honestly it was not easy, since with a big eraser it will be difficult to erase, this is because we can erase what we don't want to erase, so I had to chop a little bit smaller piece of the eraser to be able to make these effects of illumination and white fur that the Bengal tiger has.


Al terminar con el rostro del tigre, comencé a valorizar el rostro de la mujer, por lo que comencé dándole la primera capa de valorizado.
Después agregue una capa más oscura por las orillas del rostro, valorice al máximo el ojo de la mujer y lo difumine con la ayuda de un algodón, poco a poco fui haciendo este proceso hasta lograr la profundidad que quería que tuviera mi dibujo.
Luego comencé a trabajar con el cabello de la mujer, así que con la ayuda del lápiz 6B, comencé a rellenar toda la parte del cabello de la mujer, más adelante comencé a difuminarlo con la ayuda de un pincel y por último usé el borrador para hacer trazos y mechones de cabello.
Aún tengo que aprender un poco en la elaboración del cabello de mis dibujos, así que poco a poco iré perfeccionando más mi técnica de dibujo, y por último trabaje en los hombros de la mujer.
Honestamente, ustedes podrán notar que el dibujo me quedo grande, pero en realidad no es así, cometí una equivocación al momento de hacer el efecto cuadrícula, ya que al momento de hacer los ojos me quedo muy a la orilla de la hoja con el que comencé a trabajar en mi dibujo, pero este tipo de cosas sirven como aprendizaje, para cuando vuelva a hacer un dibujo no cometa el mismo error una vez más.
Recuerden esta frase, no es necesario ser un gran maestro para lograr ser un gran artista, palabras sabias de un buen amigo que quizás muchos conozcamos.
Las fotos fueron tomadas con la ayuda de mi teléfono Bison X Designed By Umidigi.
La imagen de referencia se encuentra en la parte inferior de este texto, debajo de ella podrán encontrar la fuente de la misma, el cual los llevara a la página que utilizo para encontrar las imágenes en referencia que uso para dibujar.
Y Así finaliza la publicación de hoy amigos, espero les sea de su agrado y que hayan aprendido algo nuevo el día de hoy con mi publicación, hasta la próxima.
When I finished with the tiger's face, I began to enhance the woman's face, so I started by giving her the first layer of enhancement.
Then I added a darker layer around the edges of the face, I enhanced the woman's eye to the maximum and blurred it with the help of a cotton ball, little by little I did this process until I achieved the depth I wanted my drawing to have.
Then I started to work with the woman's hair, so with the help of the 6B pencil, I began to fill in the whole part of the woman's hair, later I began to blur it with the help of a brush and finally I used the eraser to make strokes and strands of hair.
I still have to learn a little bit in the elaboration of the hair of my drawings, so little by little I will perfect my drawing technique, and finally I worked on the shoulders of the woman.
Honestly, you may notice that the drawing was too big for me, but in reality it is not like that, I made a mistake at the moment of making the grid effect, since at the moment of making the eyes I was very close to the edge of the sheet with which I started to work on my drawing, but this kind of things serve as a learning experience, so when I make a drawing again I will not make the same mistake once more.
Remember this phrase, it is not necessary to be a great teacher to be a great artist, wise words of a good friend that perhaps many of us know.
The photos were taken with the help of my Bison X Designed By Umidigi phone.
The reference image is at the bottom of this text, below it you can find the source of it, which will take you to the page I use to find the reference images I use to draw.
And so ends today's publication friends, I hope you like it and that you have learned something new today with my publication, until next time.


Source / Fuente Castle of Castlevania
Source / Fuente Terra Blade of Terraria
Los separadores son de mi autoría, las fotos fueron tomadas con la ayuda de mi tlf BisonX 10, las ediciones del GIF son creados por mí.
The separators are of my authorship, the photos were taken with the help of my BisonX 10 phone, the GIF editions are created by me.
Programas que utilicé para crear mi diseño es este:
This is the program I used to create my design:
Gif y portada cortesía de Canva
Gif and cover courtesy of Canva
Traducido por Deepl


El dibujo lleva más trabajo de lo que se ve a simple vista, eso si con su técnica y cuidado, como lo aprecio es un buen trabajo. Siga esforzándose.
Gracias amigo, gracias por tu apoyo y comentario, saludos.
Muy buen trabajo amigo
gracias hermano
Congratulations @lionsaturbix! You have completed the following achievement on the Hive blockchain and have been rewarded with new badge(s):
You can view your badges on your board and compare yourself to others in the Ranking
If you no longer want to receive notifications, reply to this comment with the word
STOPSupport the HiveBuzz project. Vote for our proposal!