(ENG)
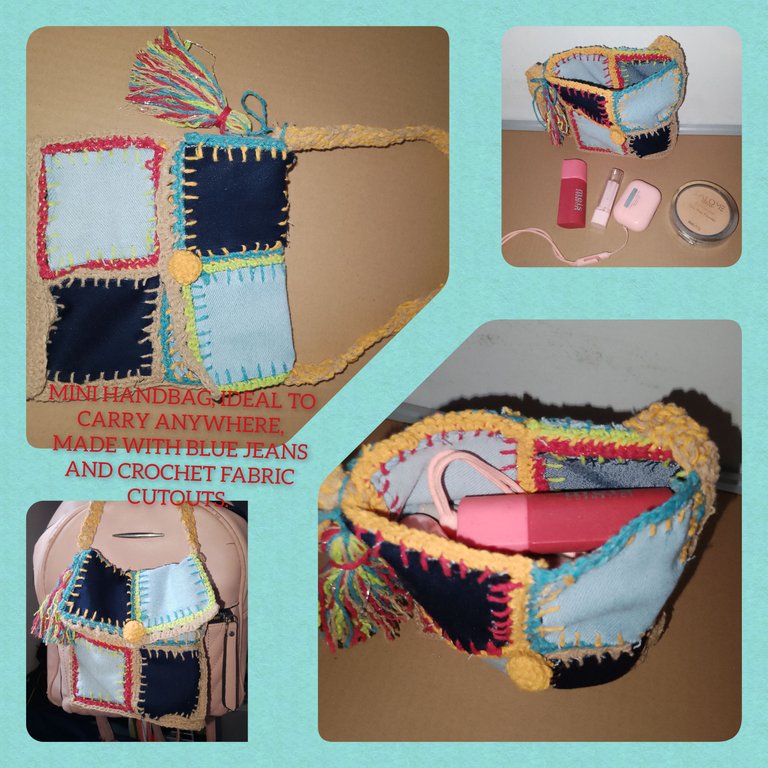
Hello everyone, I hope this is a great day, full of much benefit. I am pleased to be once again with all of you in this beautiful Community, full of so much talent, who share new and innovative ideas with us every day. I come to show you a very easy and beautiful project, where I made a beautiful handbag, which we can carry anywhere and at any time, allowing us to protect the most necessary things when going out. To do this, I used small squares of blue jeans fabric in two shades of blue, crochet technique and hand embroidery. obtaining a great result. Where to use basic crochet steps.

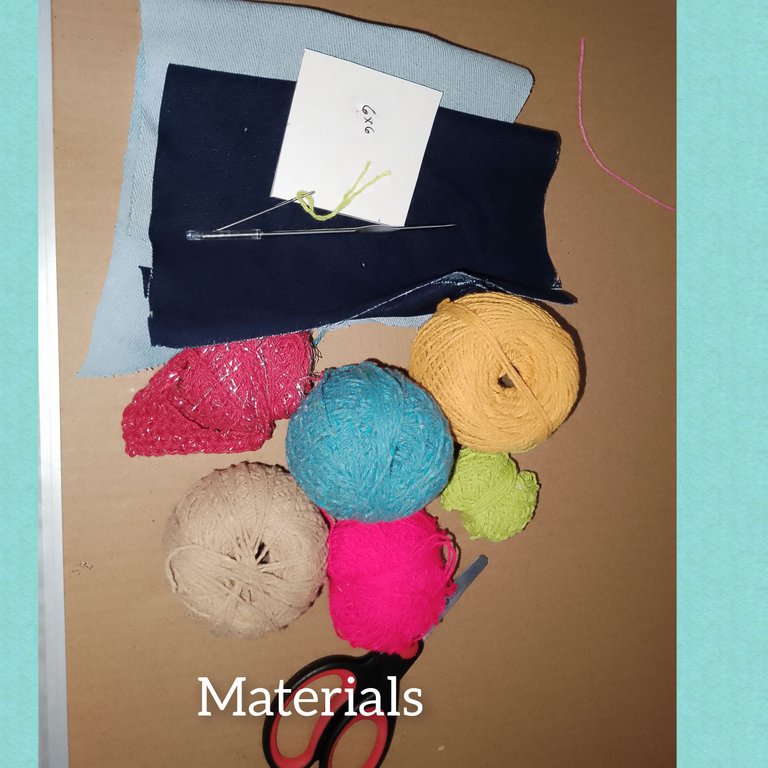
Materials used:
. Threads for knitting, colors, green, brown, pink and yellow.
. Knitting needle.
. Wool needle.
. 6x6 cardboard boxes.
. Scissors.
. Marking pencil.
. Pieces of blue jeans fabric, two shades of blue
Steps.
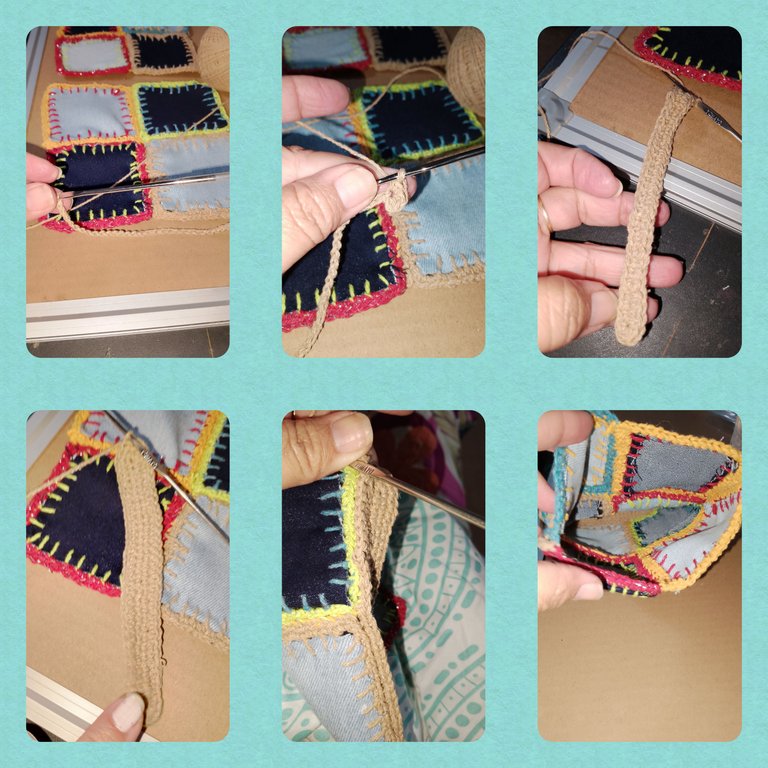
1.) Start by marking five squares on the scraps of fabric, guiding me, from the already marked and cut cardboard. I will mark five squares on each shade of blue jeans fabric, after having marked, cut out with the scissors.

2.) I will embroider the edge of each of the squares, with feston stitch, commonly used, in edge finishes on handkerchiefs and sheets, among others. Using the wool needle, I will embroider two squares with the same color of thread.
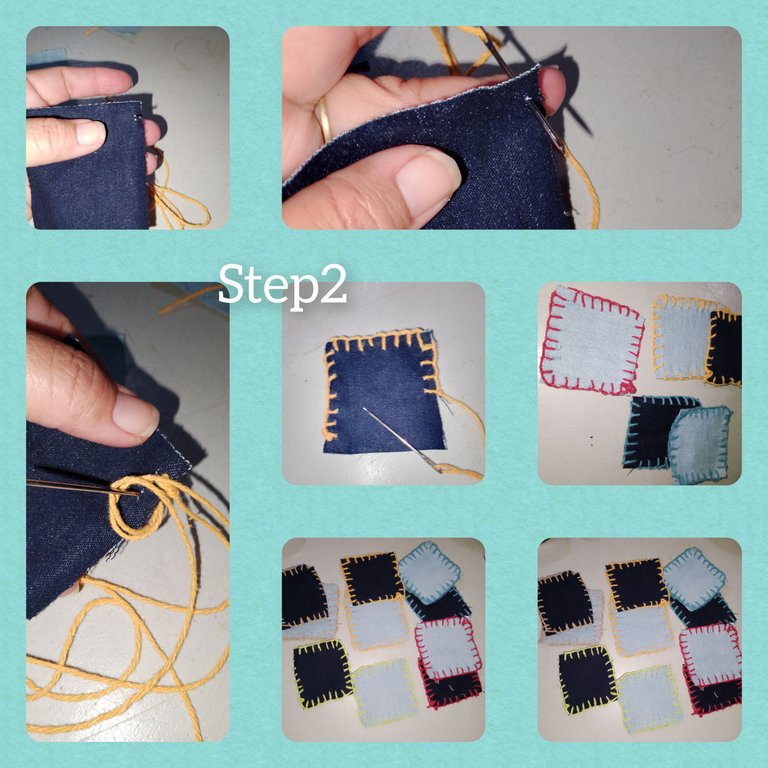
3.) After completing the previous step, with needle and thread, I will knit two single crochets in each festoon stitch space, and on the edges of each square, I will knit two single crochets, two chain stitches and two single crochets. This will only occur at each end of the frames. Alternate colors in the knitting thread. In this way I will weave the edge of each of the squares, already embroidered.
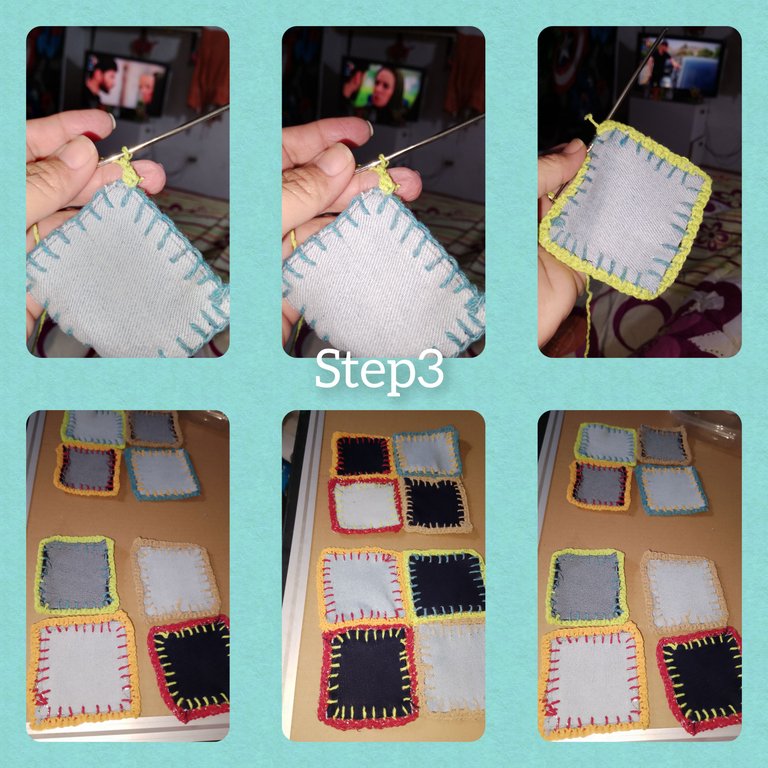
4.) with the needle, sew two groups of four squares, to do this I must sew on the inside, and this way this thread will be hidden.
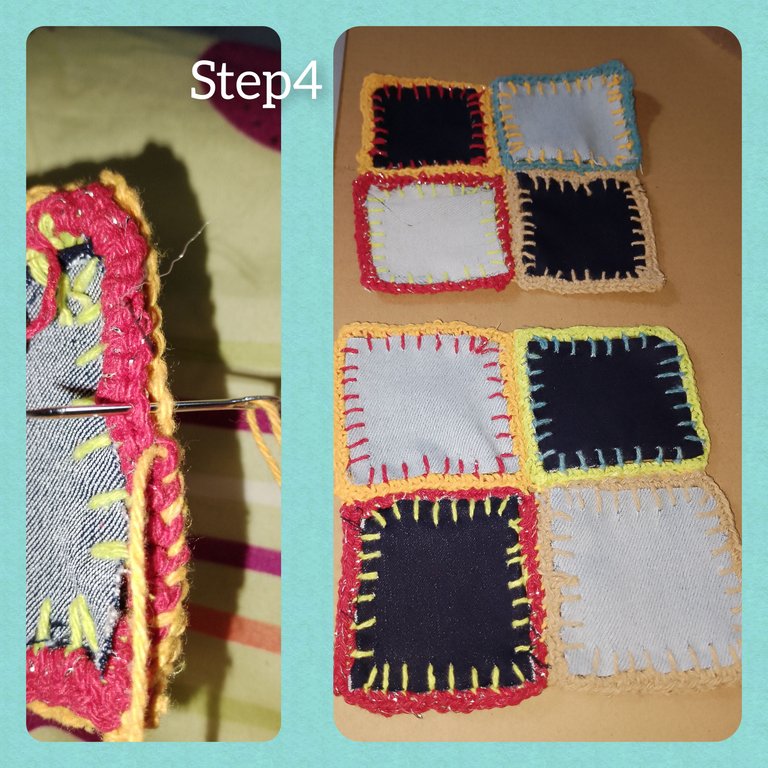
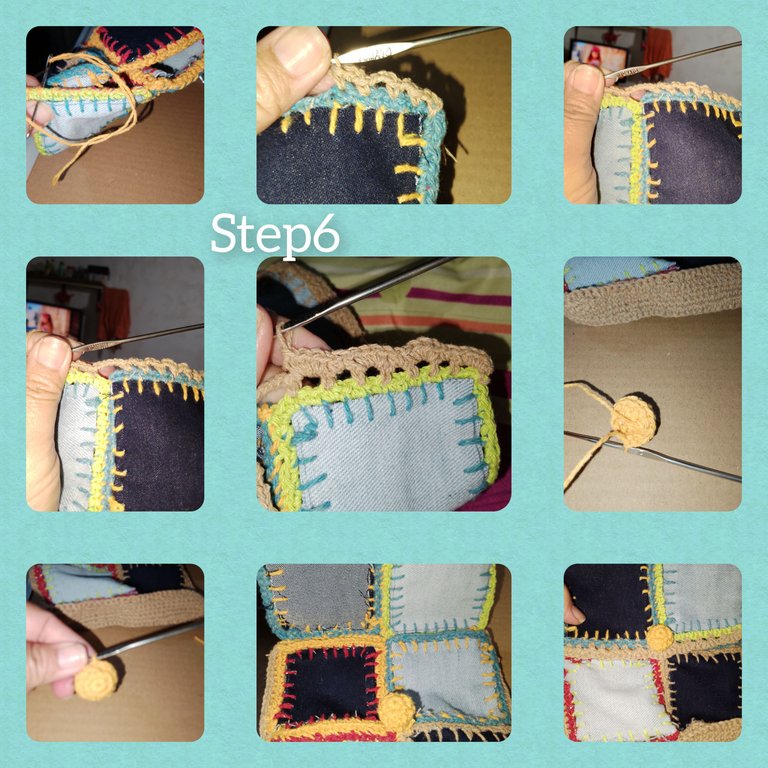
5.) The next thing will be to knit with the brown thread, thirty chain stitches, I knit four single increasing stitches at each end and one in each chain stitch, completing the entire route of the thirty chains, I make a second pass and in the ends, I will knit an increase by cd increase of the previous row. With slipped stitches, I glue the groups of squares, one on each side of the brown oval, and in the same way, knitting running stitches, I glue the sides.
6.) I glue the two remaining squares together and then, on one of the sides of the upper part of the mini bag, I glue them, to form the lid of the bag, which will go from the back to the front, After sewing with the needle, I knit the edge of the cover, with three chain stitches and one slip stitch, leaving two single crochet spaces. In the center I will knit six chain stitches. I return and knit four single crochets in each space of three chains and six in the center. He completed the course, cut the thread and finished off. Next, in a magic ring I knit six half stitches. I continue knitting with the yellow thread and knit two rounds of six half stitches and close on the next round, knitting six decreases. I leave a long strand of yellow thread, place the needle and glue the small sphere. Which will be attached, with the five chains, in the center of itbag.
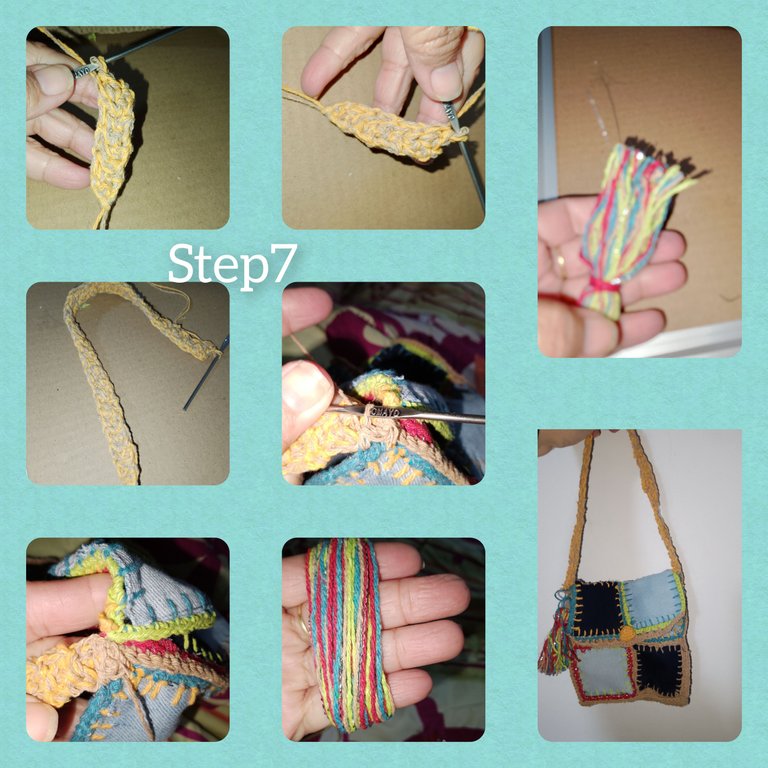
7.) I knit a cord, three-point chains and a total of 60 Laps. The cord is ready, I glue it on both sides of the bag. Using my fingers and the strands of each thread used in the project, I make twenty turns and make a small pendant that I tie to one of the sides of the bag, making it more eye-catching.
In this way I have concluded with today's project.
. Use incollage to show the steps.
. Use gif videos to show as a presentation of the project.
. Use language translator.
Grateful for your visit to my blog. It will be until a next opportunity.
Hola a todos, espero este sea un gran di, lleno de mucho provecho. Me complace estar una vez más con todos ustedes en esta hermosa, Comunidad, llena de tanto talento, que día a día, nos comparten, nuevas y novedosas ideas. Les vengo a mostrar un muy facil y bonito, proyecto, dónde, realice un hermoso bolsito de mano, que podemos llevar a cualquier lado y momento, permitiéndonos resguardar, las cosas más necesarias al momento de salir. Para ello utilice, pequeños cuadro de tela de blue jeans en dos tonalidades de azul , la técnica de crochet y bordados a mano. obteniendo un gran resultado. Dónde use pasos básicos de crochet.
Materiales usados:
. Hilos para tejer, colores, verde, marrón, rosa y amarillo.
. Aguja para tejer.
. Aguja lanera.
. Cuadros de 6x6 de cartón.
. Tijeras.
. Lápiz para marcar.
. Trozos de tela de blue jeans, dos tonalidades de azul
Pasos.
1.) Inicio marcando sobre los retazos de tela, cinco cuadros, guiando me, de el cartón ya marcado y recortado. Marcare cinco cuadros en cada tono de tela de blue jeans, seguidamente de haber marcado, recortó con las tijeras.
2.) Bordare el borde de cada uno de los cuadros, con punto feston, comúnmente utilizado, en acabados para borde en pañuelos y sabanas entre otros. Usando la aguja lanera, Bordare dos cuadros con mismo color de hilo.
3.) luego de realizado el paso, anterior, con aguja e hilo, tejere en cada espacio de punto feston, dos puntos bajos, y en los bordes de cada cuadro, tejere dos puntos bajos, dos puntos cadenas y dos puntos bajos. Esto solo ocurrirá en cada punta de los cuadros. Alterna, los colores en el hilo de tejer. De esta manera tejere el borde de cada uno de los cuadros, ya bordados.
4.) con la aguja, coser dos grupos de cuatro cuadros, para ello debo hacer la costura por la parte de dentro, y así quedará este hilo oculto.
5.) Lo siguiente, será tejer con el hilo de color marrón, treinta puntos cadenas, tejo cuatro puntos bajos de aumento en cada extremo y uno en cada puntos cadenas, completando todo el recorrido de las treinta cadenas, doy una segunda pasada y en los extremos, tejere un aumento por cd aumento de la vuelta anterior. Con puntos deslizados, pego los grupos de cuadros uno en cada lado de el óvalo de color marrón y de misma manera, tejiendo puntos corridos pego los lados.
6.) los dos cuadros restantes los pego entre sí y luego, en uno de los lados de la parte superior de el mini bolso, las pego, para formar, la tapa de el bolso, que irá desde la parte tracera a la delantera, luego de coser con la aguja, tejo el borde de la tapa, con tres puntos cadenas y un punto deslizado, dejando dos espacios de puntos bajos. En el centro tejere seis puntos cadenas.me devuelvo y tejo en cada espacio de tres cadenas cuatro puntos bajos y en el centro seis. Completo el recorrido, recortó el hilo y remato. Seguidamente en un anillo mágico tejo seis medios puntos. Continuo tejiendo con el hilo de color amarillo y tejo dos vueltas de seis medios puntos y cierro en la siguiente vuelta, tejiendo seis disminuciones. Dejo una hebra larga de hilo amarillo, coloco la aguja y pego la pequeña esfera. Que irá sujeta, con las cinco cadenas, en el centro de el bolso.
7.) tejo un cordón, de tres puntos cadenas y un total de 60 Vueltas. Listo el cordón, pego en ambos lados de el bolso. Usando mis dedos y las hebras de cada hilo usado en el proyecto, doy veinte vueltas y hago un pequeño colgante que amarro en uno de los lados de el bolso haciéndolo más llamativo.
De esta manera he concluido, con el proyecto de el día de hoy.
. Use incollage para mostrar los pasos.
. Use videos gif para mostrar como presentación de el proyecto.
. Use traductor lenguaje.
Agradecida por su visita a mí blog. Será hasta una próxima oportunidad.
You can check out this post and your own profile on the map. Be part of the Worldmappin Community and join our Discord Channel to get in touch with other travelers, ask questions or just be updated on our latest features.
Hola. Está muy bonito el bolsito.
Recordé que tengo pendiente un proyecto algo similar al tuyo.
Me gusta como te quedó. Que lo disfrutes. 🙋🏽♀️🇻🇪🙏🏽