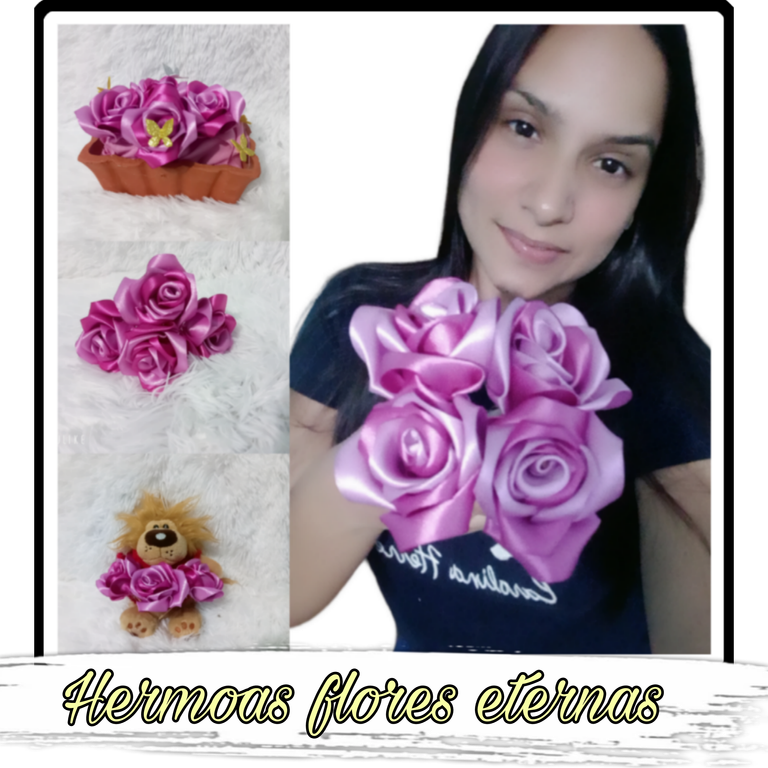
Hola, hola mi linda y creativa colmena de artesanos y manualistas, tengan un feliz y bendecido resto del día; Deseo que hoy hayan tenido un día lleno de éxitos y de Victorias. Hoy Les traigo un fabuloso tutorial, un proyecto Craft que se verá mucho en los obsequios para el día del amor y la amistad. Se trata de las famosas o muy conocidas "Flores eternas", la verdad que a mí, me han gustado mucho porque quedan muy hermosas y obtienes este resultado utilizando muy poco material. Para realizar estas flores se usan varias técnicas, en este caso yo voy a utilizar la técnica de cadena o tipo gusanito. Asi que, ¡Manos a la obra!.
Hello, hello my beautiful and creative hive of crafters and artisans, have a happy and blessed rest of the day; I wish that today you had a day full of successes and victories. Today I bring you a fabulous tutorial, a Craft project that will be seen a lot in the gifts for the day of love and friendship. This is the famous or well known "Eternal flowers ", the truth is that I really liked them because they are very beautiful and you get this result using very little material. To make these flowers several techniques are used, in this case I am going to use the chain technique or worm type. So, let's get to work!.

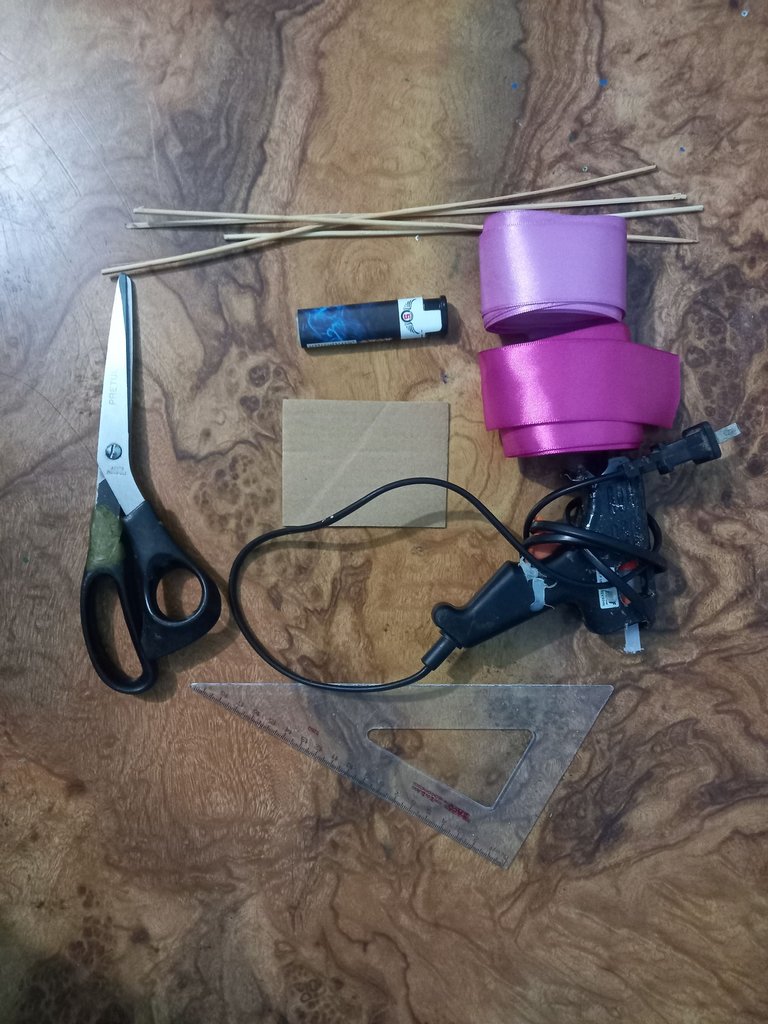
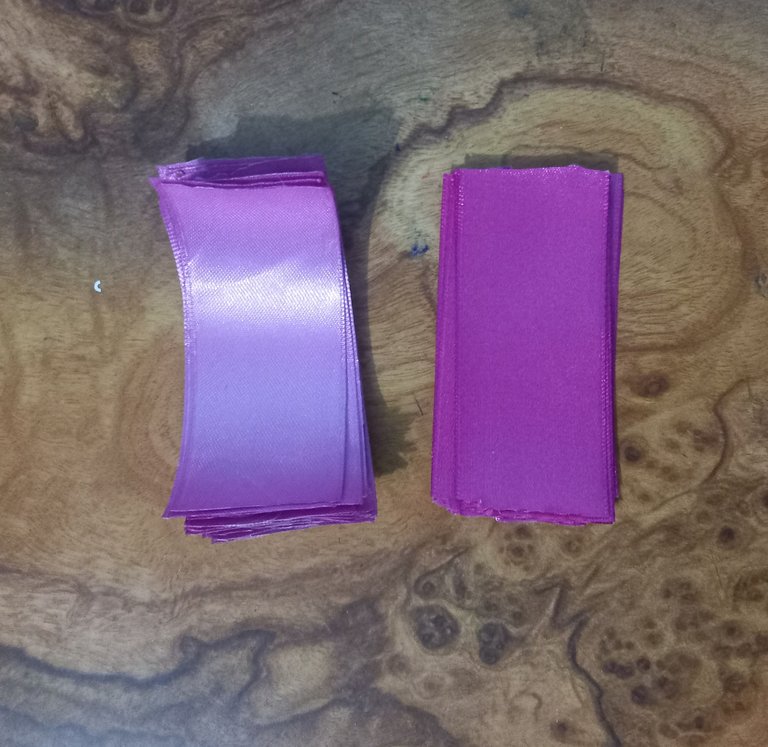
- 2 metros de cinta raso fucsia y 2 metros de cinta raso rosada.
- Palillos de altura.
- Un encendedo o yesquero.
- Pistola de silicón en barra.
- Un pequeño cartón de 10×6.
- Tijeras.
- Regla.
- 2 meters of fuchsia satin ribbon and 2 meters of pink satin ribbon.
- Sticks of height.
- A lighter or tinderbox.
- Silicone gun stick.
- A small 10×6 cardboard.
- Scissors.
- Ruler.
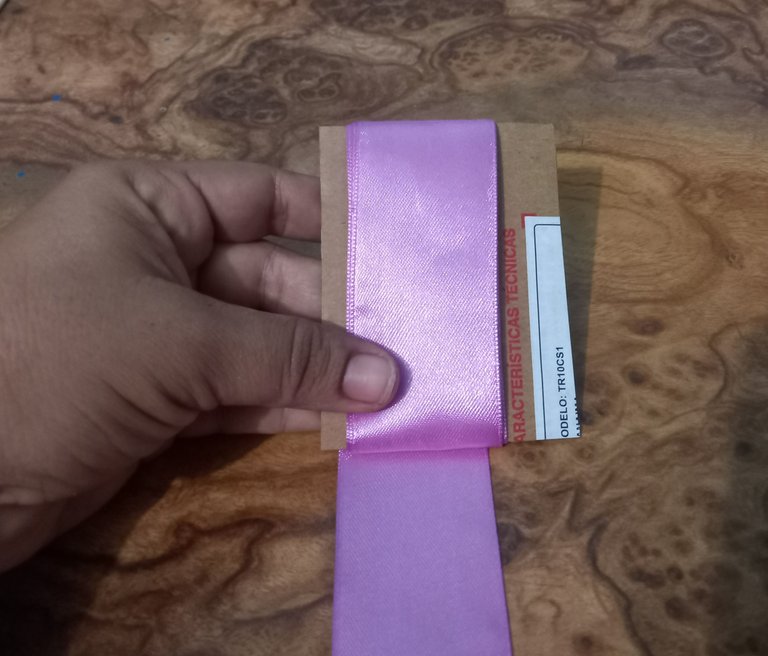
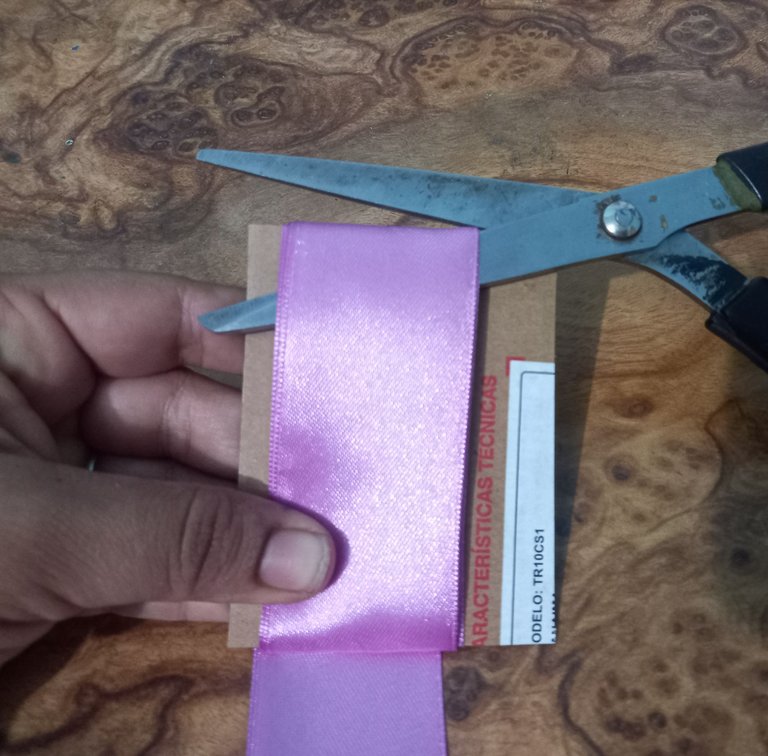
Para comenzar con la creación de estas flores, lo primero que hice fue utilizar mi cartón de 10×6 y enrollé la cinta en éste, dándole solamente seis vueltas, Porque si enrollamos toda la cinta Al momento de cortar las Mitades en la parte superior e inferior se va a distorsionar los tamaños es decir no van a salir iguales.
To begin with the creation of these flowers, the first thing I did was to use my 10×6 cardboard and I rolled the ribbon on it, giving it only six turns, because if we roll all the ribbon when cutting the halves at the top and bottom, the sizes will be distorted, that is to say, they will not be the same.
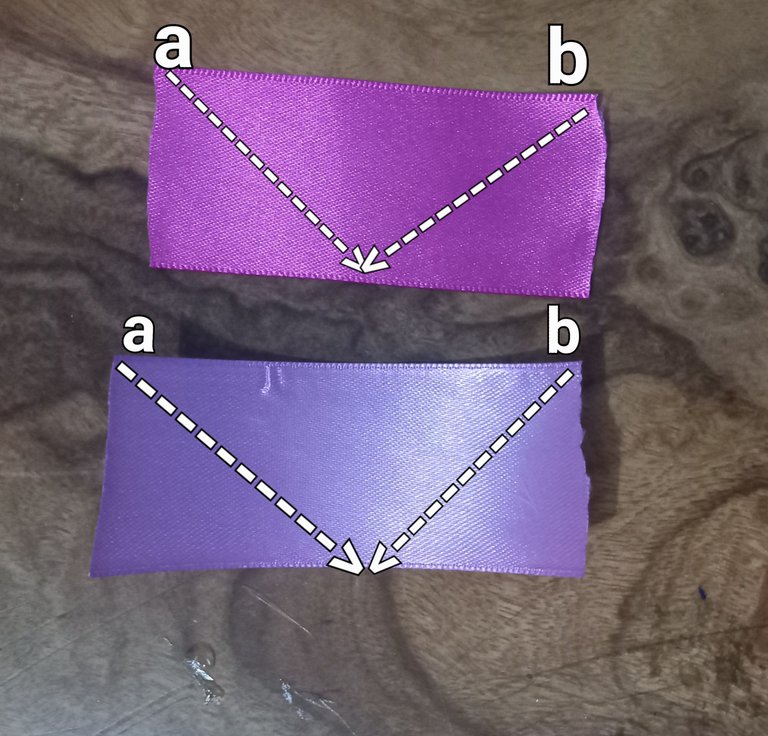
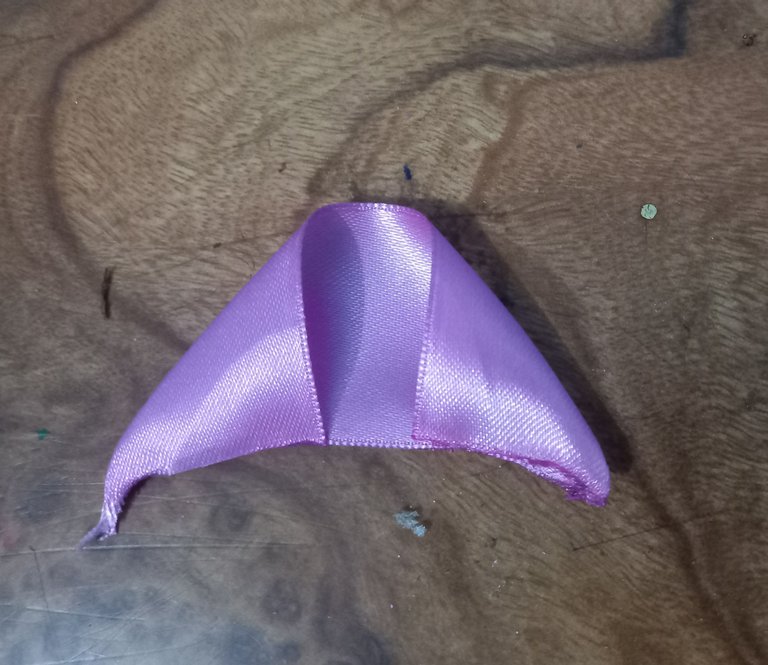
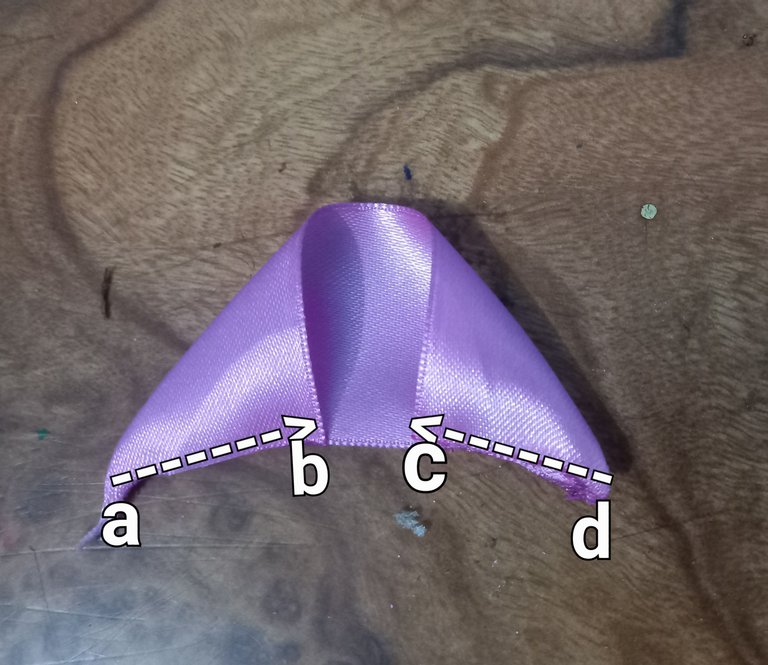
Cuando terminé de sacar todos los cortes de las dos cintas, procedí a armar los pétalos de la flor, para esto, identifiqué las dos esquinas superiores de cada pieza, señalándolas con la letra a y b, estas esquinas las llevé hacia el centro de la cinta, en la parte inferior, es decir, la esquina "a" la llevé hacia el centro de la cinta en la parte de abajo y la esquina "b" la llevé hacia el mismo centro, y para pegar las esquinas, pase el yesquero encendido por las orillas.
When I finished removing all the cuts of the two ribbons, I proceeded to assemble the petals of the flower, for this, I identified the two upper corners of each piece, marking them with the letter a and b, these corners I took them towards the center of the tape, at the bottom, that is, the corner "a" I took it towards the center of the tape at the bottom and the corner "b" I took it towards the same center, and to glue the corners, pass the lit tinder along the edges.
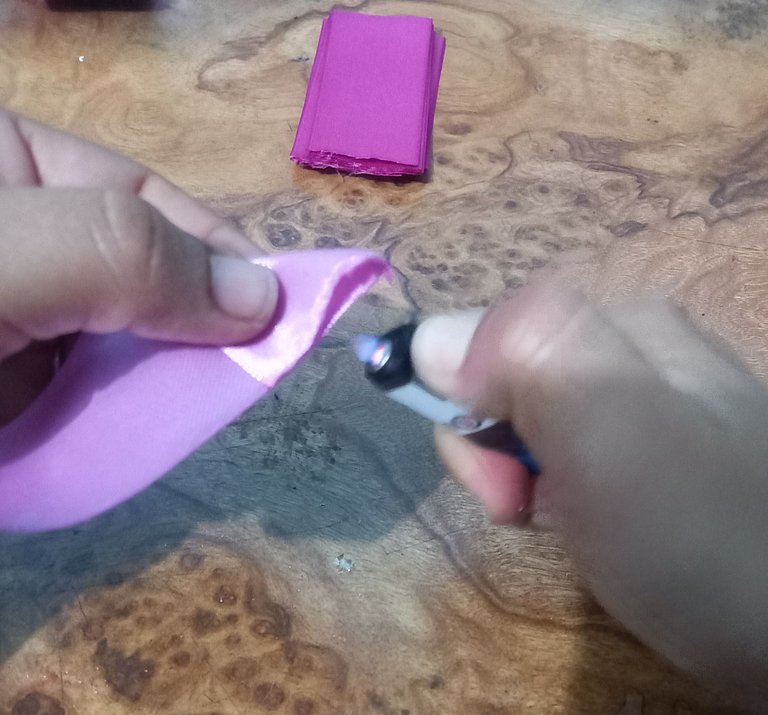
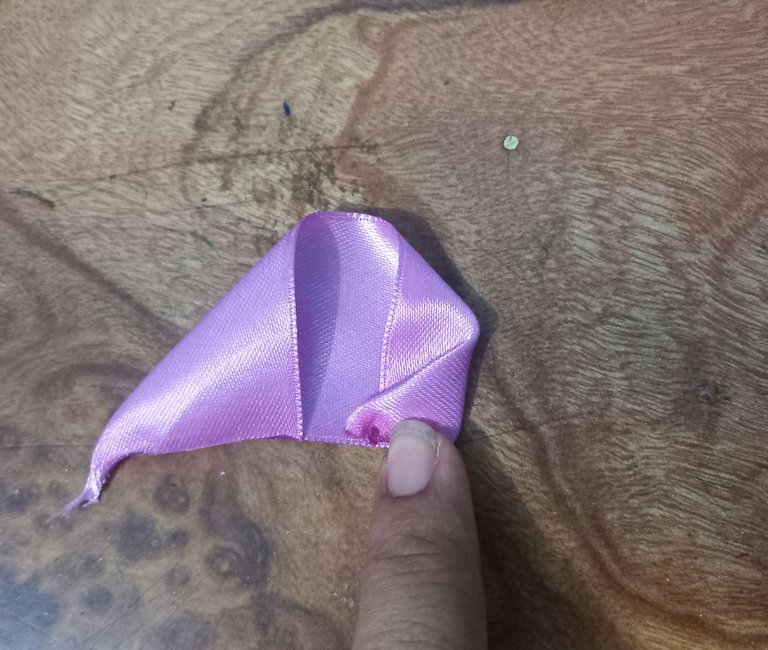
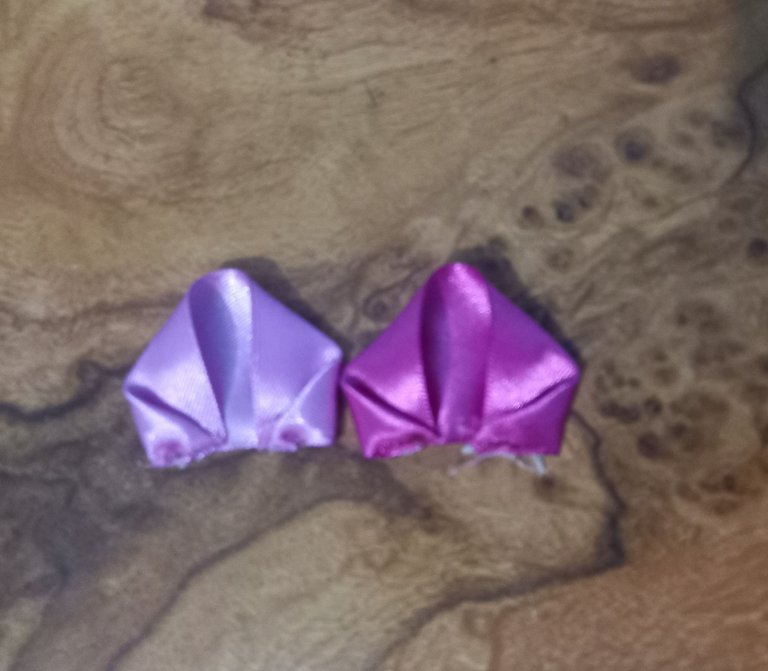
El mismo método que utilicé en el paso anterior, lo apliqué en este siguiente paso, es decir, identifiqué mi cinta con letras en las esquinas y en el centro, a,b,c y d, en dónde el punto a lo llevé hacia el punto b y el punto de lo llevé hacia el punto, en esta ocasión Sí utilicé el silicón para pegar estos puntos. De esta manera realicé todos los pétalos que me salieron de los dos metros de cinta fucsia y los dos metros de cinta rosada.
The same method I used in the previous step, I applied it in this next step, that is, I identified my ribbon with letters in the corners and in the center, a,b,c and d, where the point a I took it towards the point b and the point de I took it towards the point, this time I did use the silicone to glue these points. In this way I made all the petals that came out of the two meters of fuchsia ribbon and the two meters of pink ribbon.
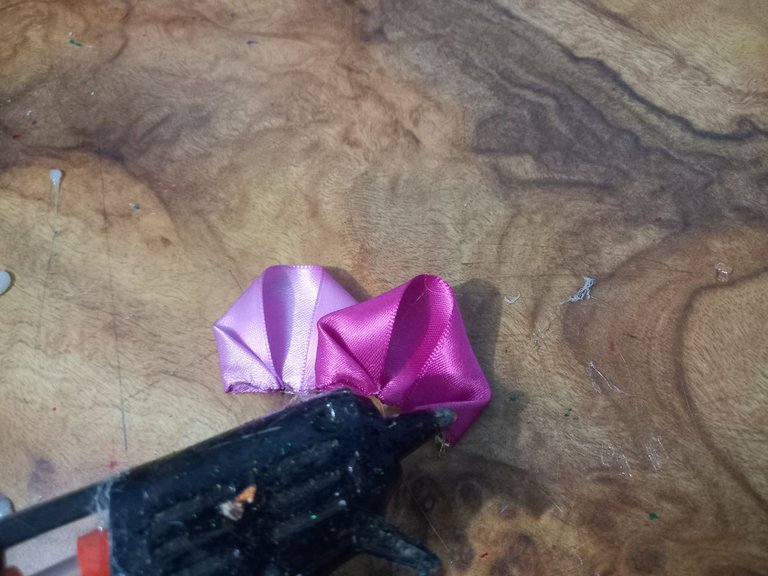
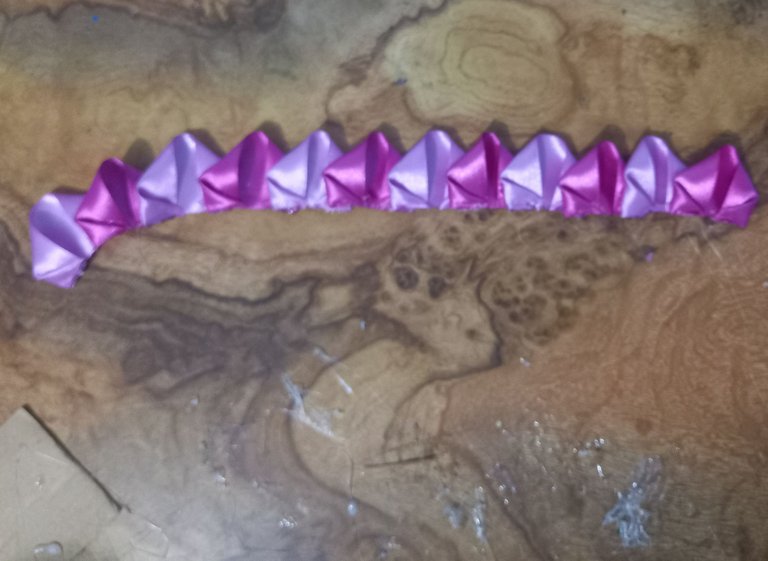
Para armar la flor, utilicé 12 pétalos los cuales pegué de forma intercalada, uno al lado del otro, hasta formar una cadena o un gusanito.
To assemble the flower, I used 12 petals, which I glued side by side to form a chain or worm.
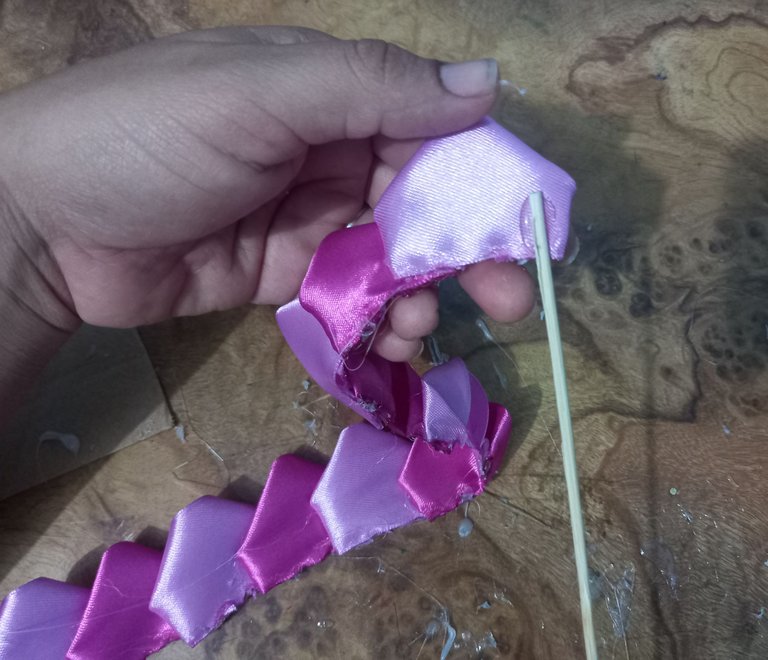
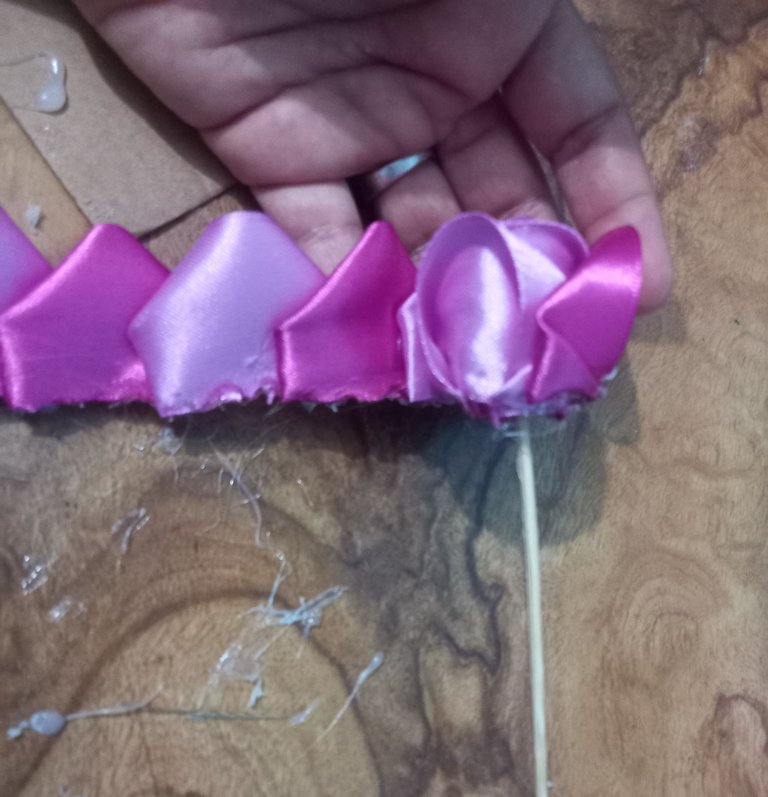
Una vez que terminé de pegar los pétalos, tomé un palillo de altura y lo pegué con silicón, al inicio del primer pétalo, por la parte lisa de éste y Así fui enrollando toda esta cadena de pétalos en la punta del palillo, a medida que iba enrollando, iba aplicando silicón en el borde inferior de la cadena.
Once I finished gluing the petals, I took a tall toothpick and glued it with silicone, at the beginning of the first petal, on the smooth side of it and so I rolled this whole chain of petals on the tip of the toothpick, as I was rolling, I was applying silicone on the bottom edge of the chain.
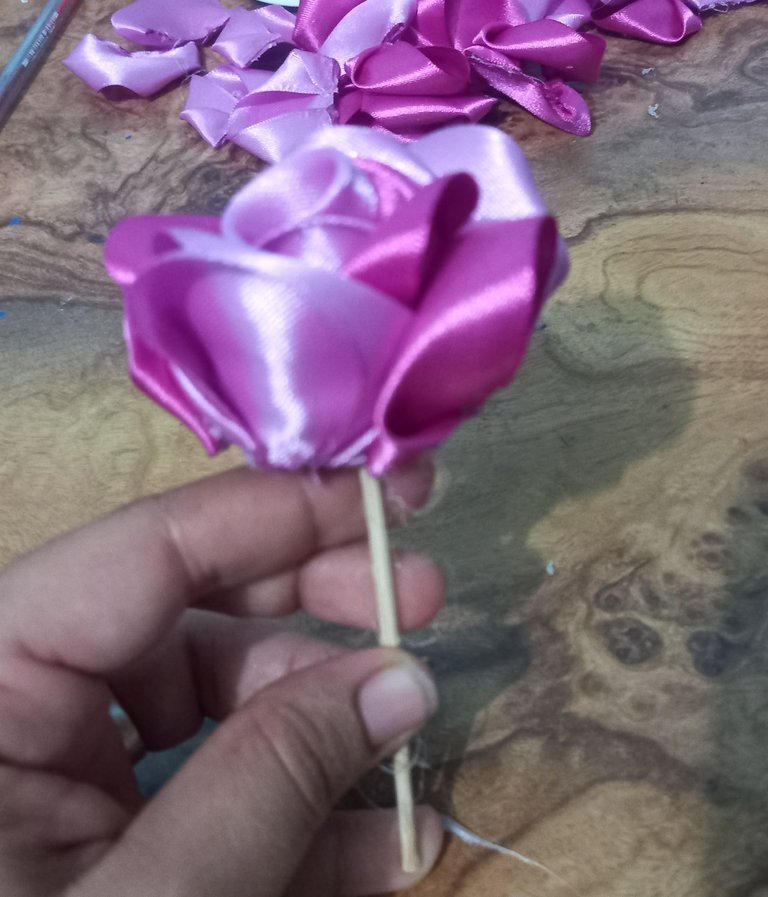
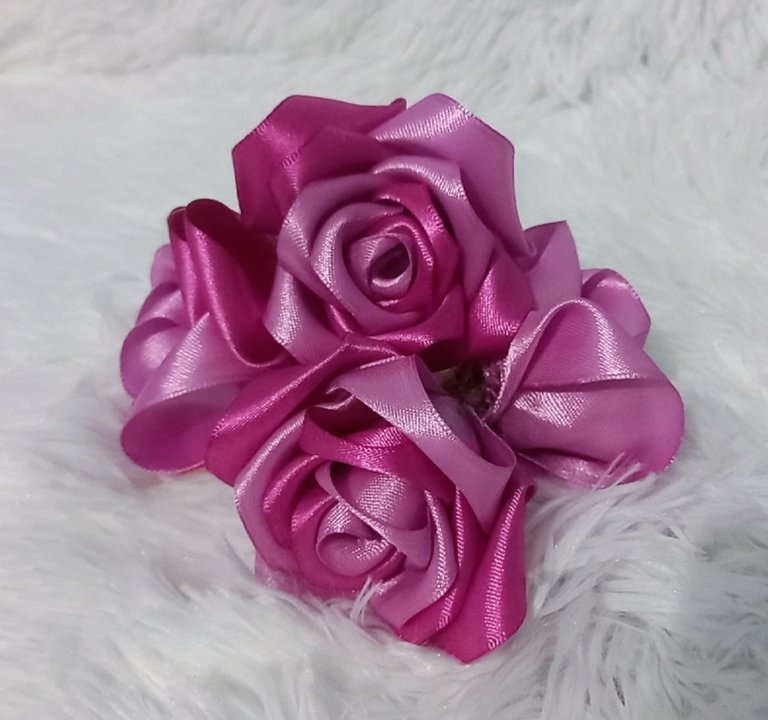
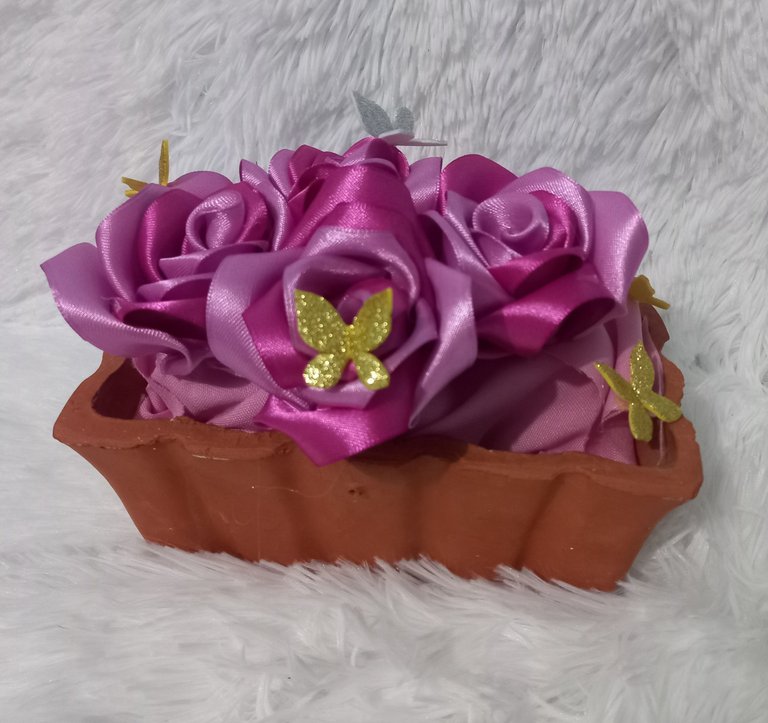
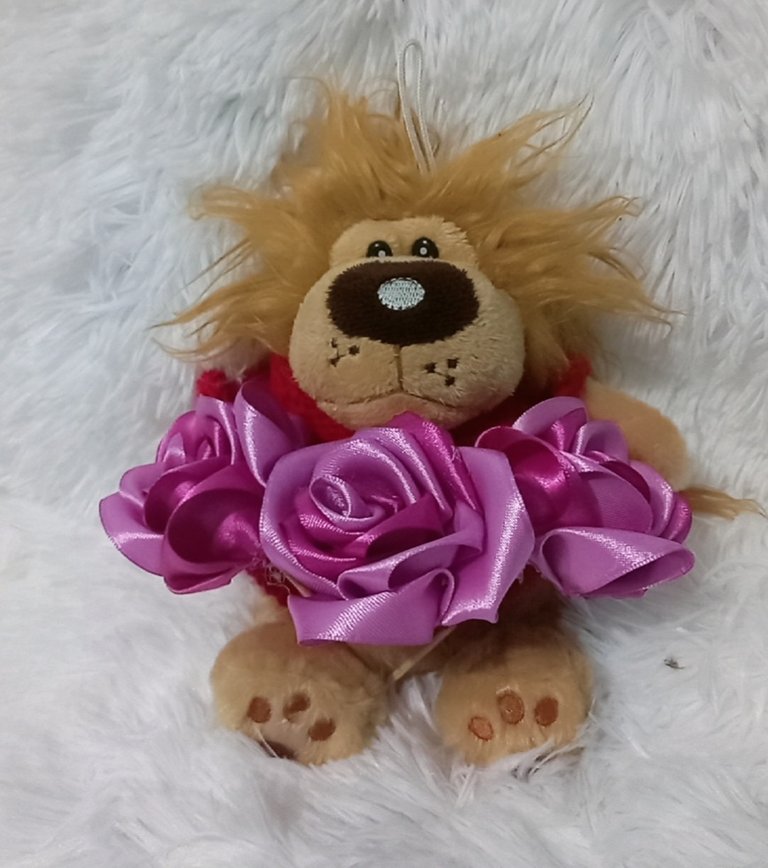
Y aplicando estos sencillos pasos lograremos obtener estas hermosas flores eternas las cuales podemos usar para adornar nuestras casas o para obsequiarlas con cualquier otro presente. Espero que este tutorial haya sido de gran utilidad, para tus próximos proyectos. Será hasta otra oportunidad, muchas bendiciones apreciados amigos.
And applying these simple steps we will obtain these beautiful eternal flowers which we can use to decorate our homes or to give them as a gift with any other present. I hope this tutorial has been very useful for your next projects. Until another opportunity, many blessings dear friends.
Fotos de mi autoria.
Ediciones y barras: Picsar.
Photos of my authorship.
Editions and bars: Picsar.
Hola amiga, no tenía idea de cómo se hacían estás lindas flores eternas , gracias por este paso a paso tan detallado, seguramente podré usar esta técnica para crear lindas flores y obsequiar este San Valentín.
Hola amiga @nakaryr, me parece una bonita idea, me alegra que haya sido comprensible el paso a paso. Gracias por comentar, muchas bendiciones 🙏🏻😊
Que lindas, me encantaron voy hacer unas para mi, se ven que son fáciles de hacer. Saludos.
Si amiga @coromoto20, son muy fáciles de hace y el resultado es hermoso, anímate a hacerlas. Saludos y bendiciones 🙏🏻😊
Quedan hermosas 💖
Exacto, demasiado hermosas amiga @yolimarag, y son fáciles de hacer. Gracias por comentar, muchas bendiciones 🙏🏻🤗
Muy hermosas estás rosas eternas, hiciste un trabajo genial, me gustó la combinación de colores se ven muy naturales y frescas, es un tutorial muy bien esplicado, excelente paso a paso de cada detalle, amo las rosas y me gustaría hacer unas así de lindas. ❤️
Quedaron muy hermosas, me encantan. Gracias por compartir.
Gravias a ti estimada @josief27 por comentar. Ten un gran día.
Que preciosas te quedaron esas flores eternas 🥰 A mi me encantan porque se ven hermosas y lo mejor es que no se marchitan, es un detalle perfecto para estas fechas ❤️
https://reddit.com/r/blogs/comments/1ahempx/espeng_tutorial_cómo_hacer_las_famosas_flores/
The rewards earned on this comment will go directly to the people( @yolimarag ) sharing the post on Reddit as long as they are registered with @poshtoken. Sign up at https://hiveposh.com.