Hola mis hermosos amigos creativos de @hivediy.!!
Hello my beautiful creative friends from @hivediy.!!
Espero mis amores que se encuentren muy bien, aqui estoy yo jajaja una vez más en @Hivediy compartiendo con todos ustedes mis manualidades que dia a dia hago con mucho amor.
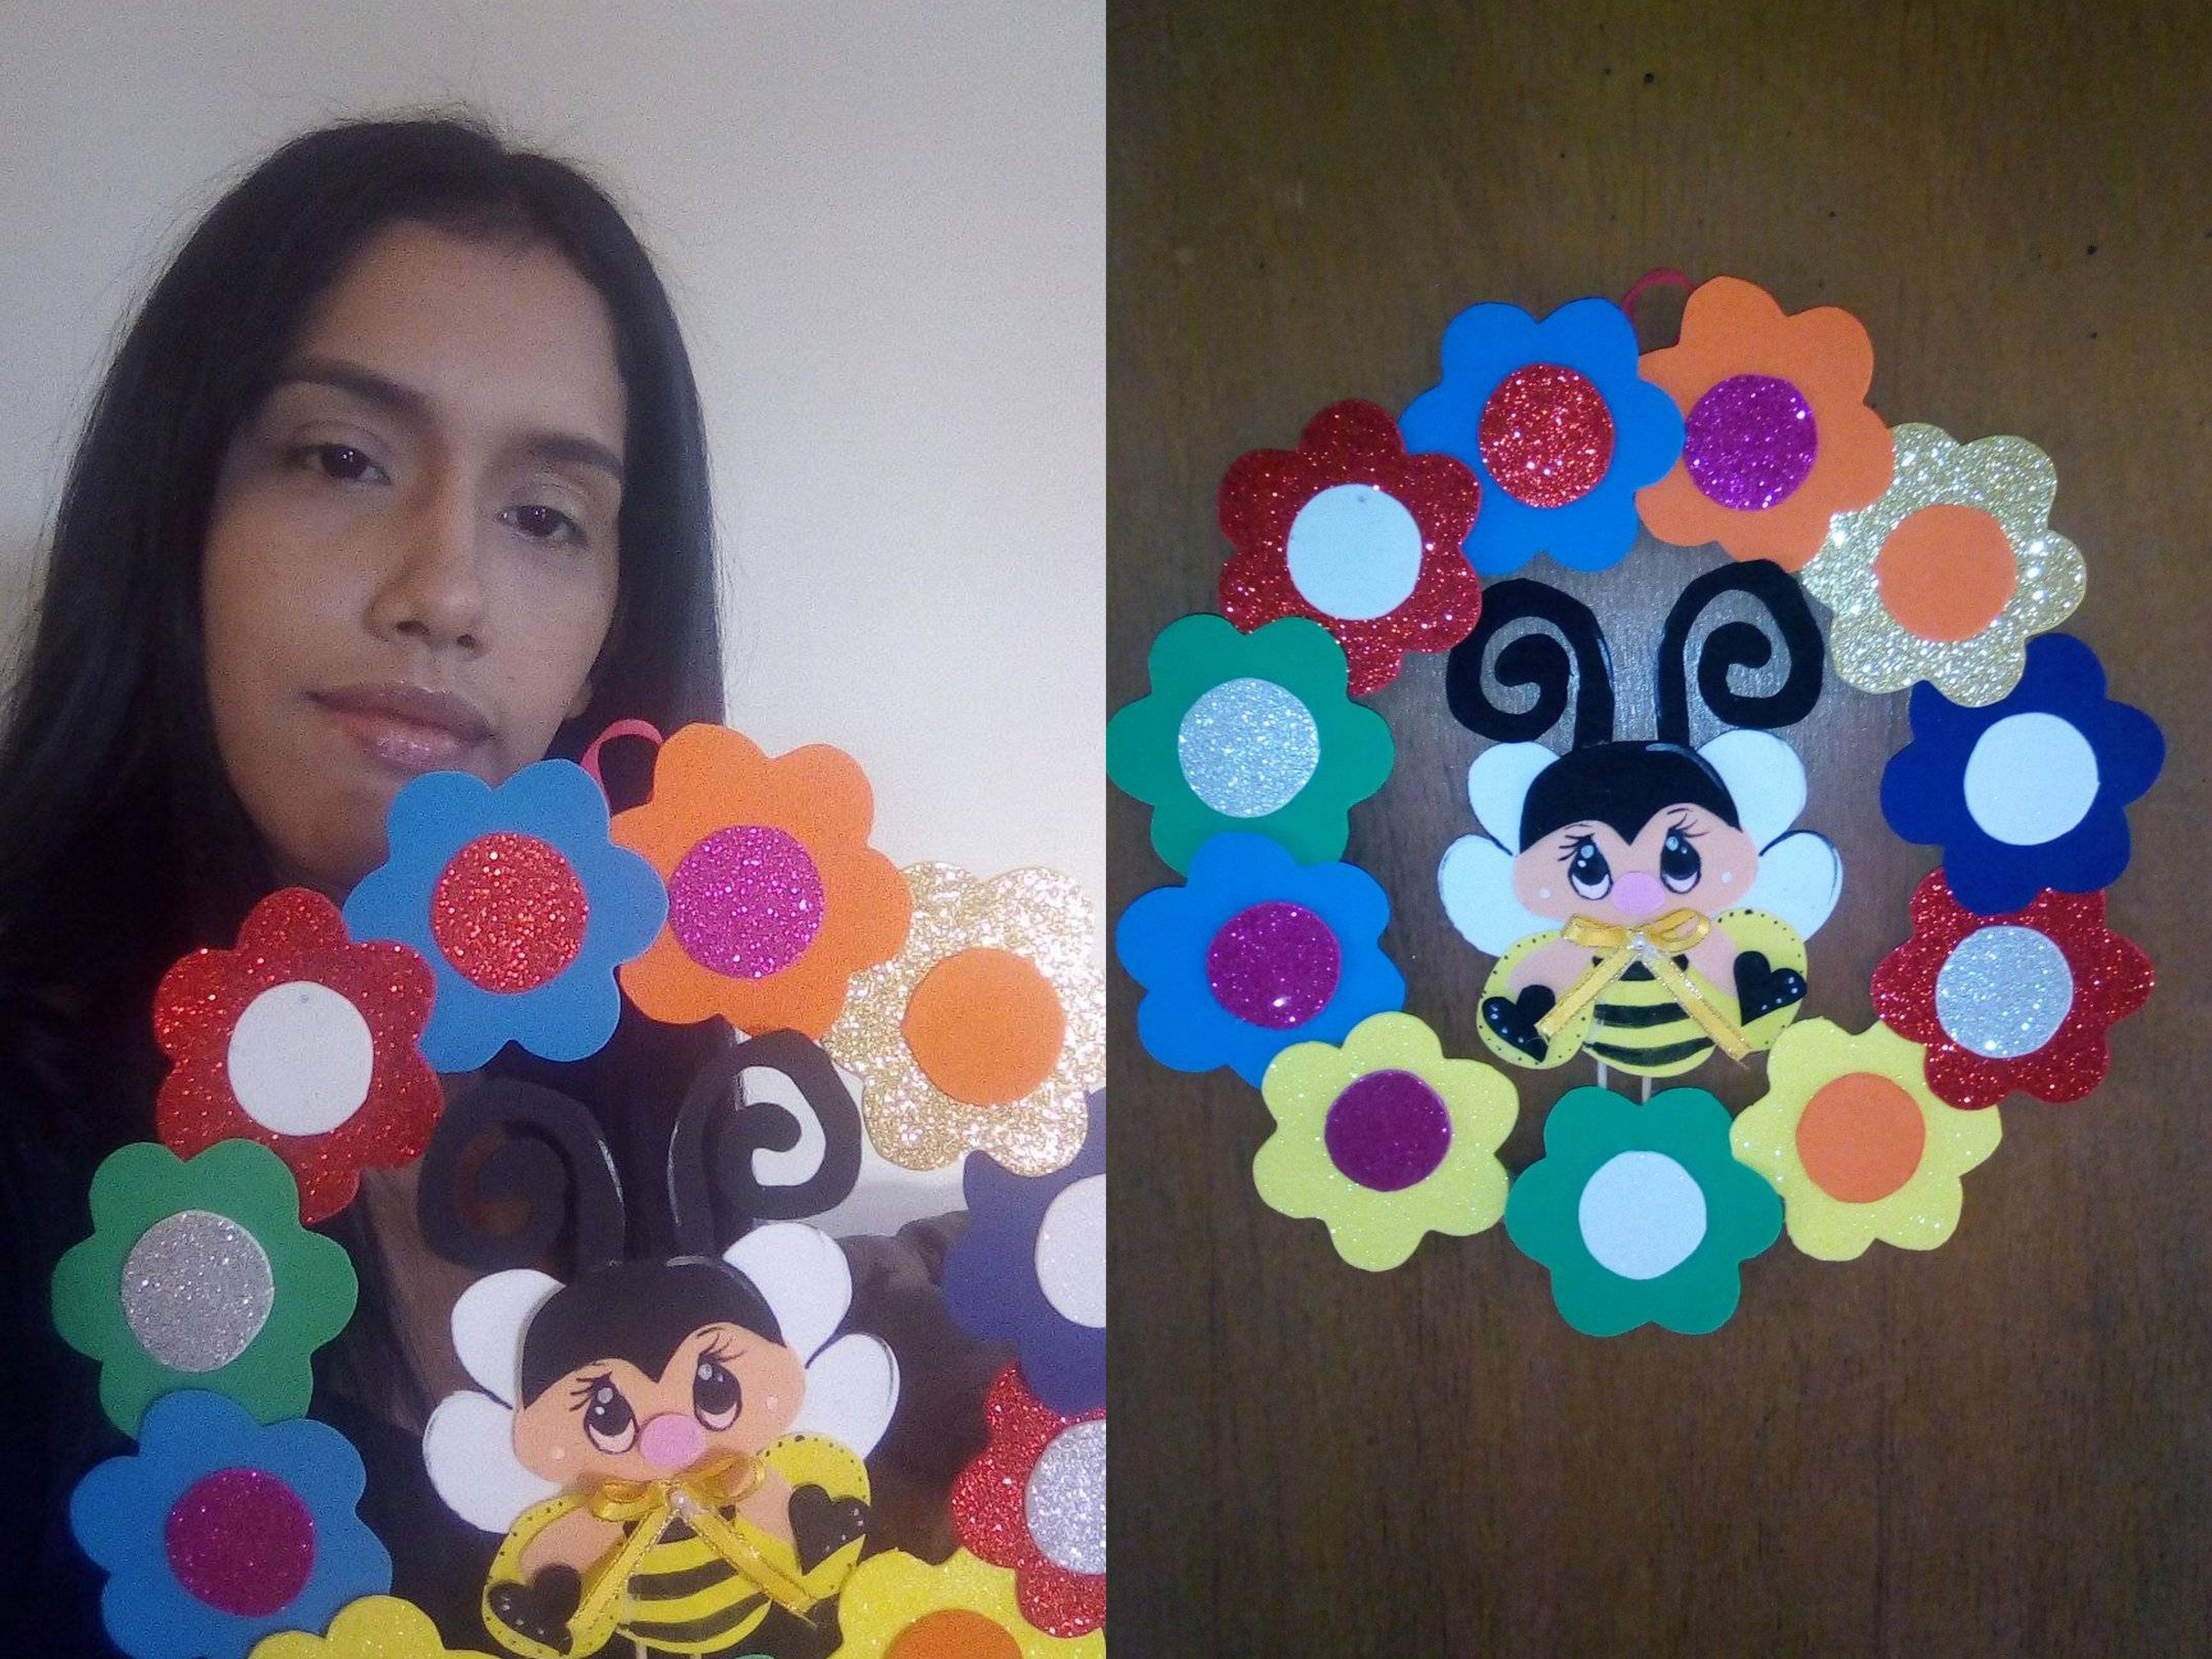
Como sabemos mis amigos, la manualidad es un trabajo o proyecto creativo que realizamos a mano el cual puede ser decorativo o funcional, en esta oportunidad mis Hivers quiero que aprendan conmigo hacer hermoso adorno decorativo para guindar en la puerta principal de nuestros hogares, es super facil de hacer. Los invito a que vean el paso a paso de mi publicación.
I hope my loves are very well, here I am hahaha once again at @Hivediy sharing with all of you my crafts that I do every day with a lot of love.
As we know my friends, the craft is a creative work or project that we carry out by hand which can be decorative or functional, this time my Hivers I want you to learn with me how to make a beautiful decorative ornament to hang on the front door of our homes, it is super easy to do. I invite you to see the step by step of my publication.
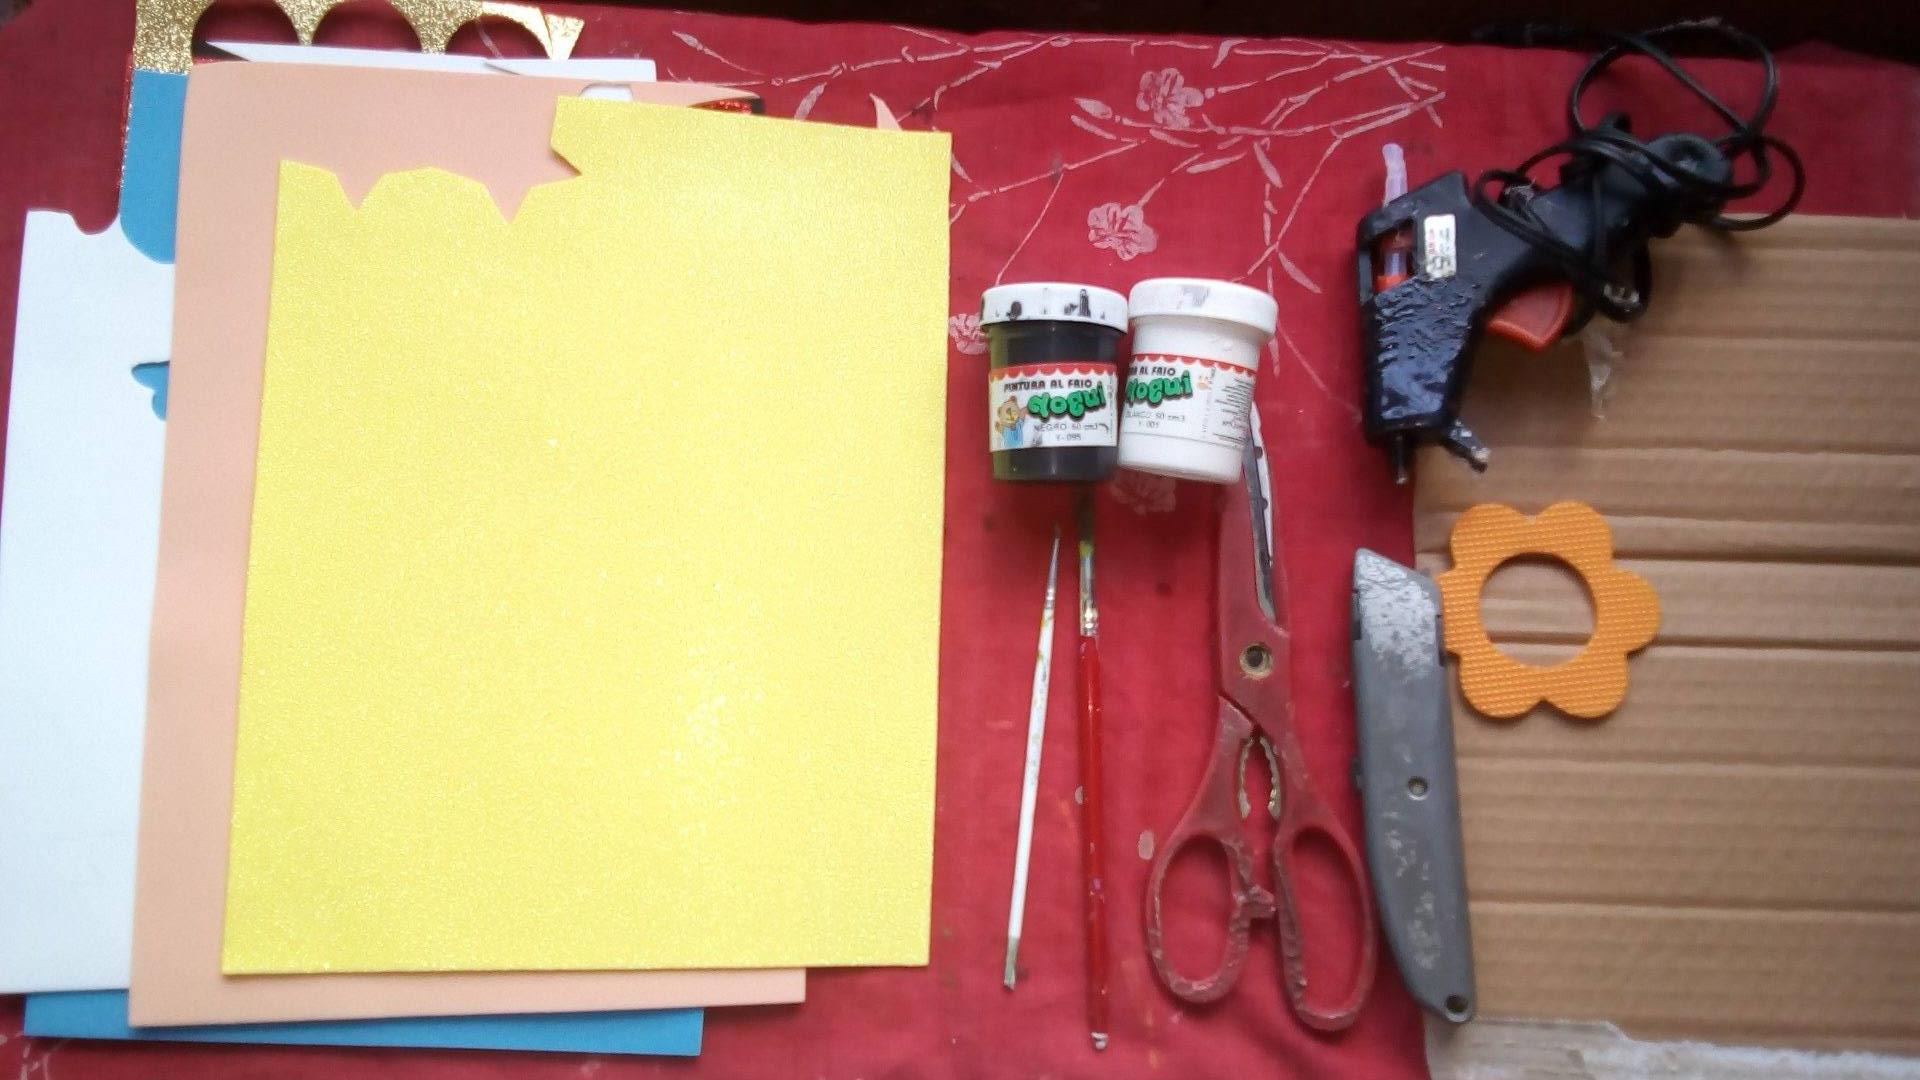
Materiales utilizados:
- Foamis normales y brillantes de colores llamativos.
- Cartón reciclado.
- Pinturas de color blanco y negro.
- Palito de madera.
- Silicón caliente.
- tijera y cutter.
- pincel punta finita.
Used materials:
- Normal and bright foamis in bright colors.
- Recycled carton.
- Black and white paints.
- Wooden stick.
- Hot silicone.
- scissors and cutter.
- fine tip brush.
Paso a Paso:
Step by Step:
Paso 1:
Step 1:
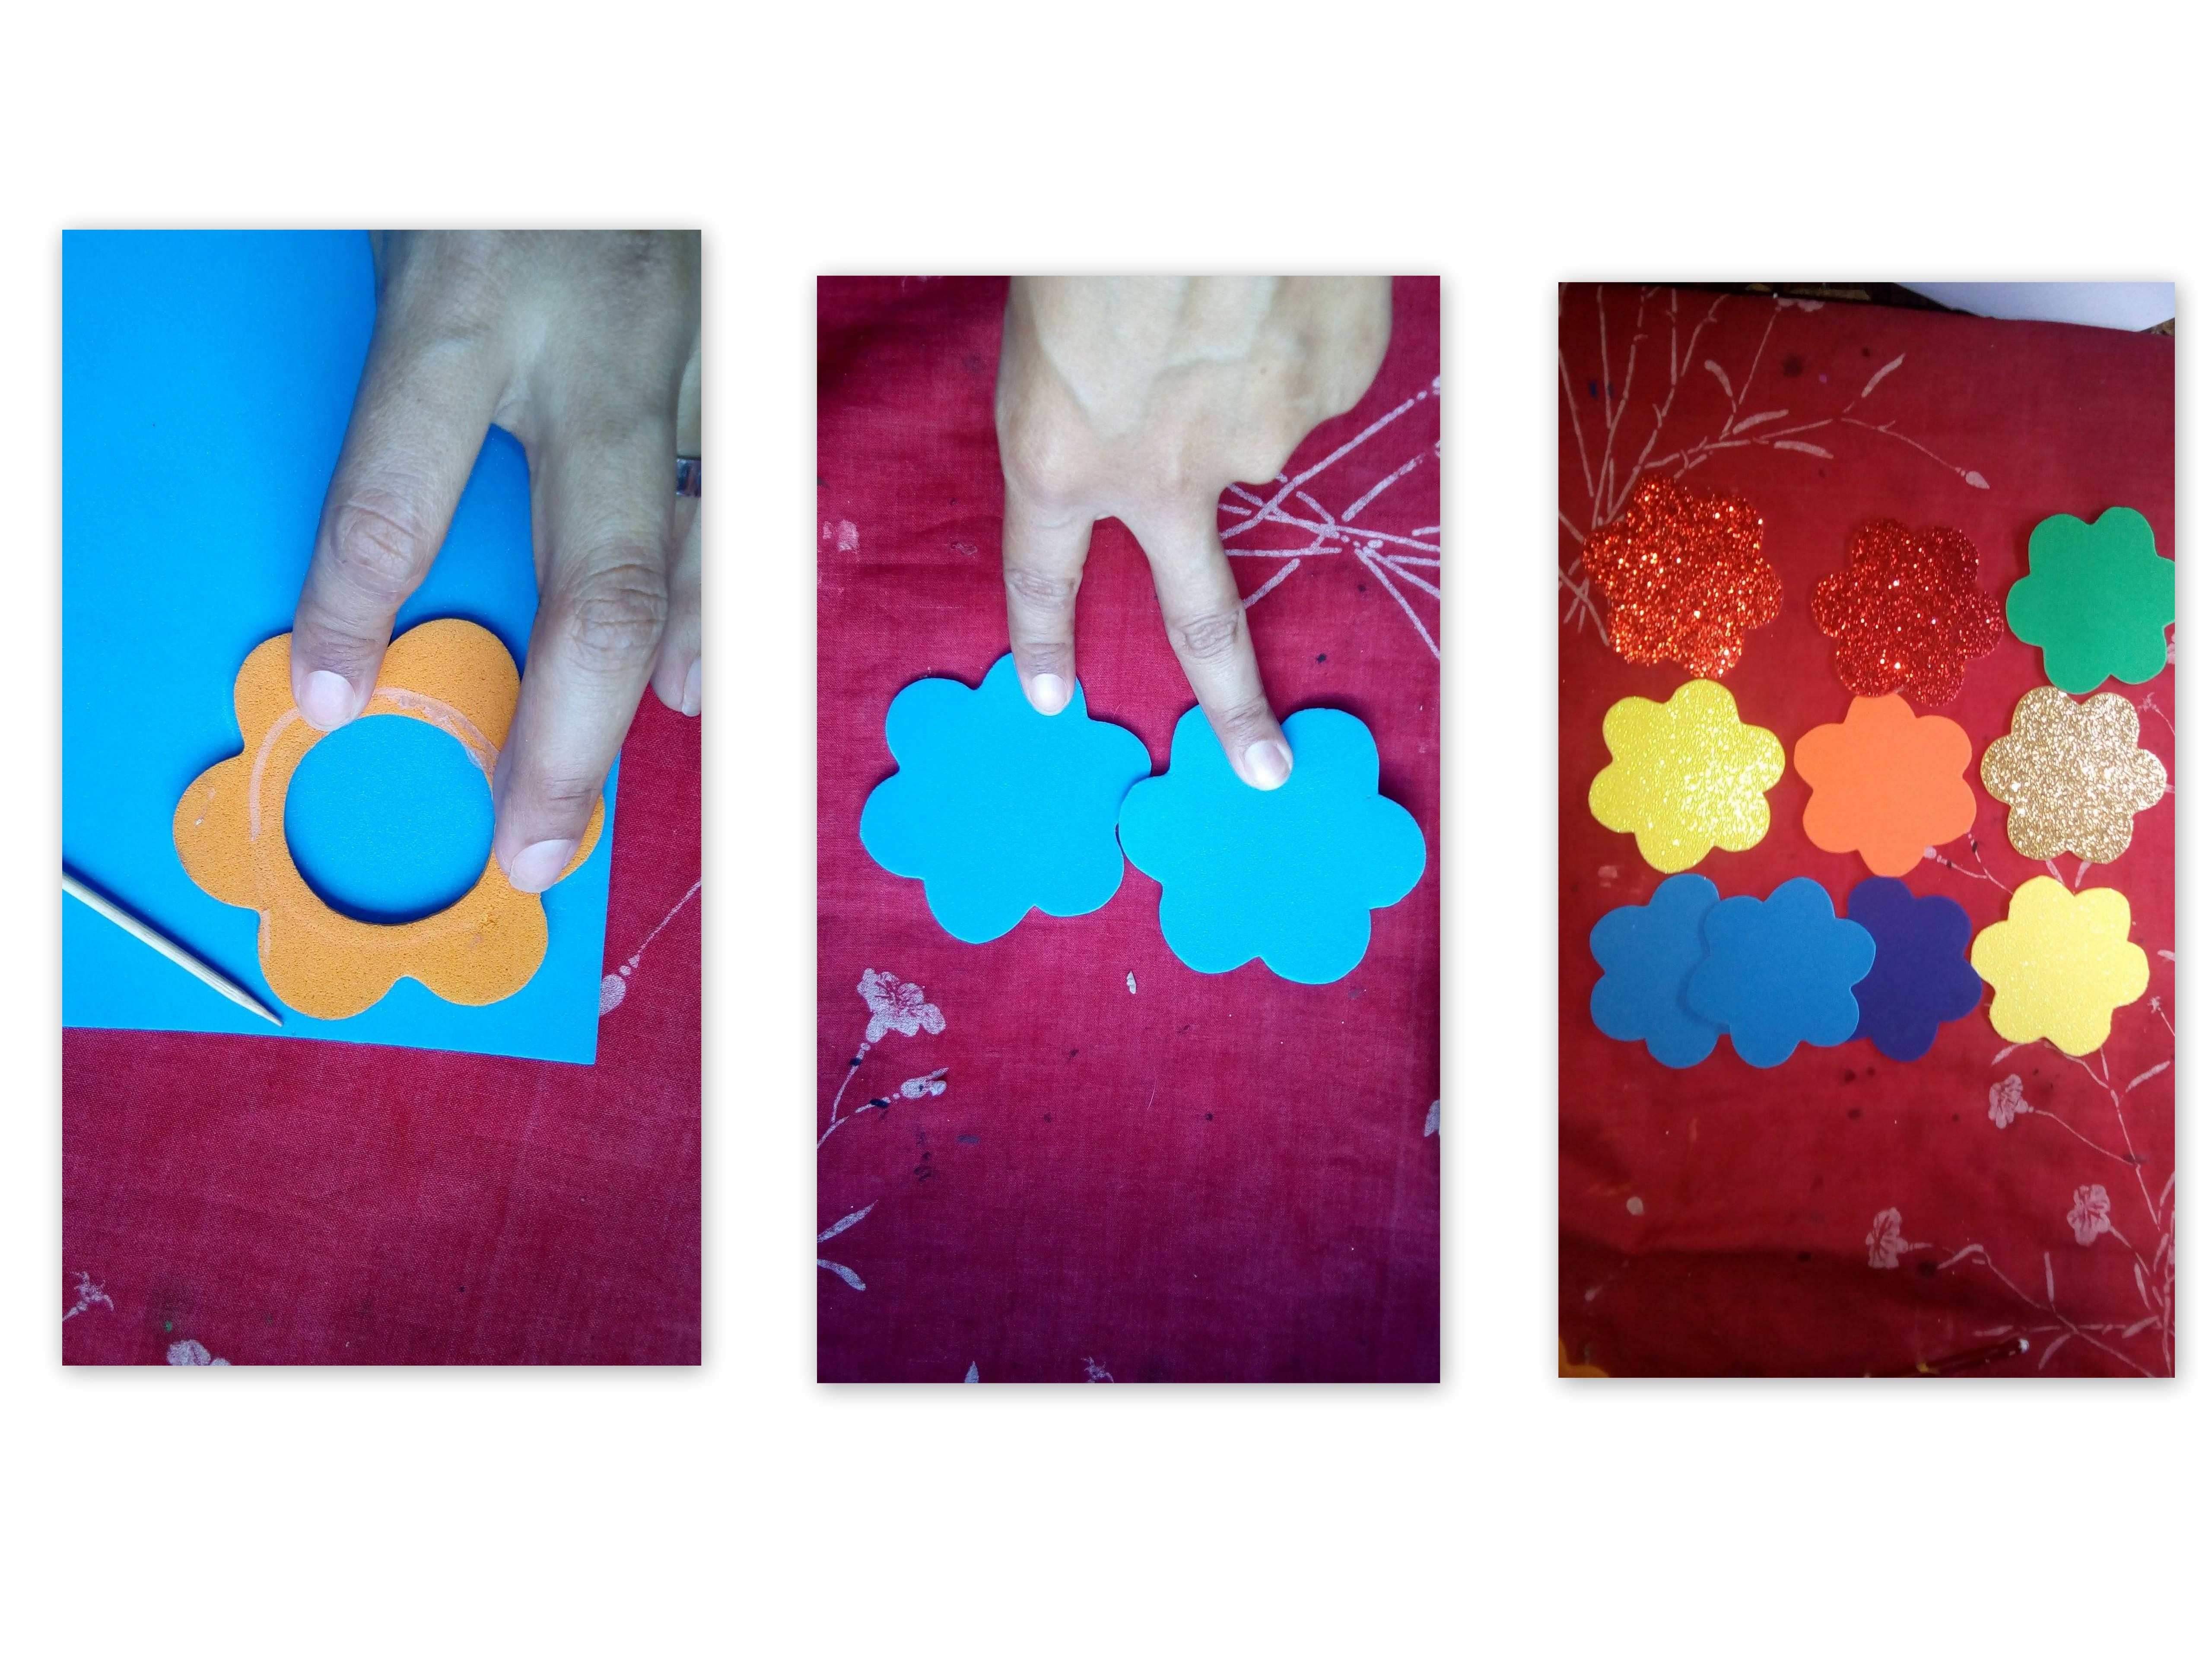
Para iniciar, vamos a tomar un patrón o simplemente dibujamos sobre el foami un flor de seis pétalos, para marcar o dibujar la flor les recomiendo usar un palito madera de esta manera no se dañara ni ensuciamos el foami, este paso lo debemos hacer once veces sobre los foamis que hayamos seleccionado para este trabajo yo utilice colores muy llamativos como rojo, azul, anaranjado, amarillo, verde, debemos cortar 11 flores.
To start, we are going to take a pattern or we will simply draw a six-petal flower on the foami, to mark or draw the flower I recommend using a wooden stick so that the foami will not be damaged or dirty, we must do this step eleven times On the foamis that we have selected for this work, I used very striking colors such as red, blue, orange, yellow, green, we must cut 11 flowers.
Paso 2:
Step 2:

Y seguimos utilizando foami de distintos colores, pero en esta ocasión los utilizaremos para hacer los centros de las flores, a cada flor le pondremos un centro de color diferente y con silicon caliente los pegamos.
And we continue using foami of different colors, but this time we will use them to make the centers of the flowers, to each flower we will put a center of a different color and with hot silicone we glue them.
Paso 3:
Step 3:
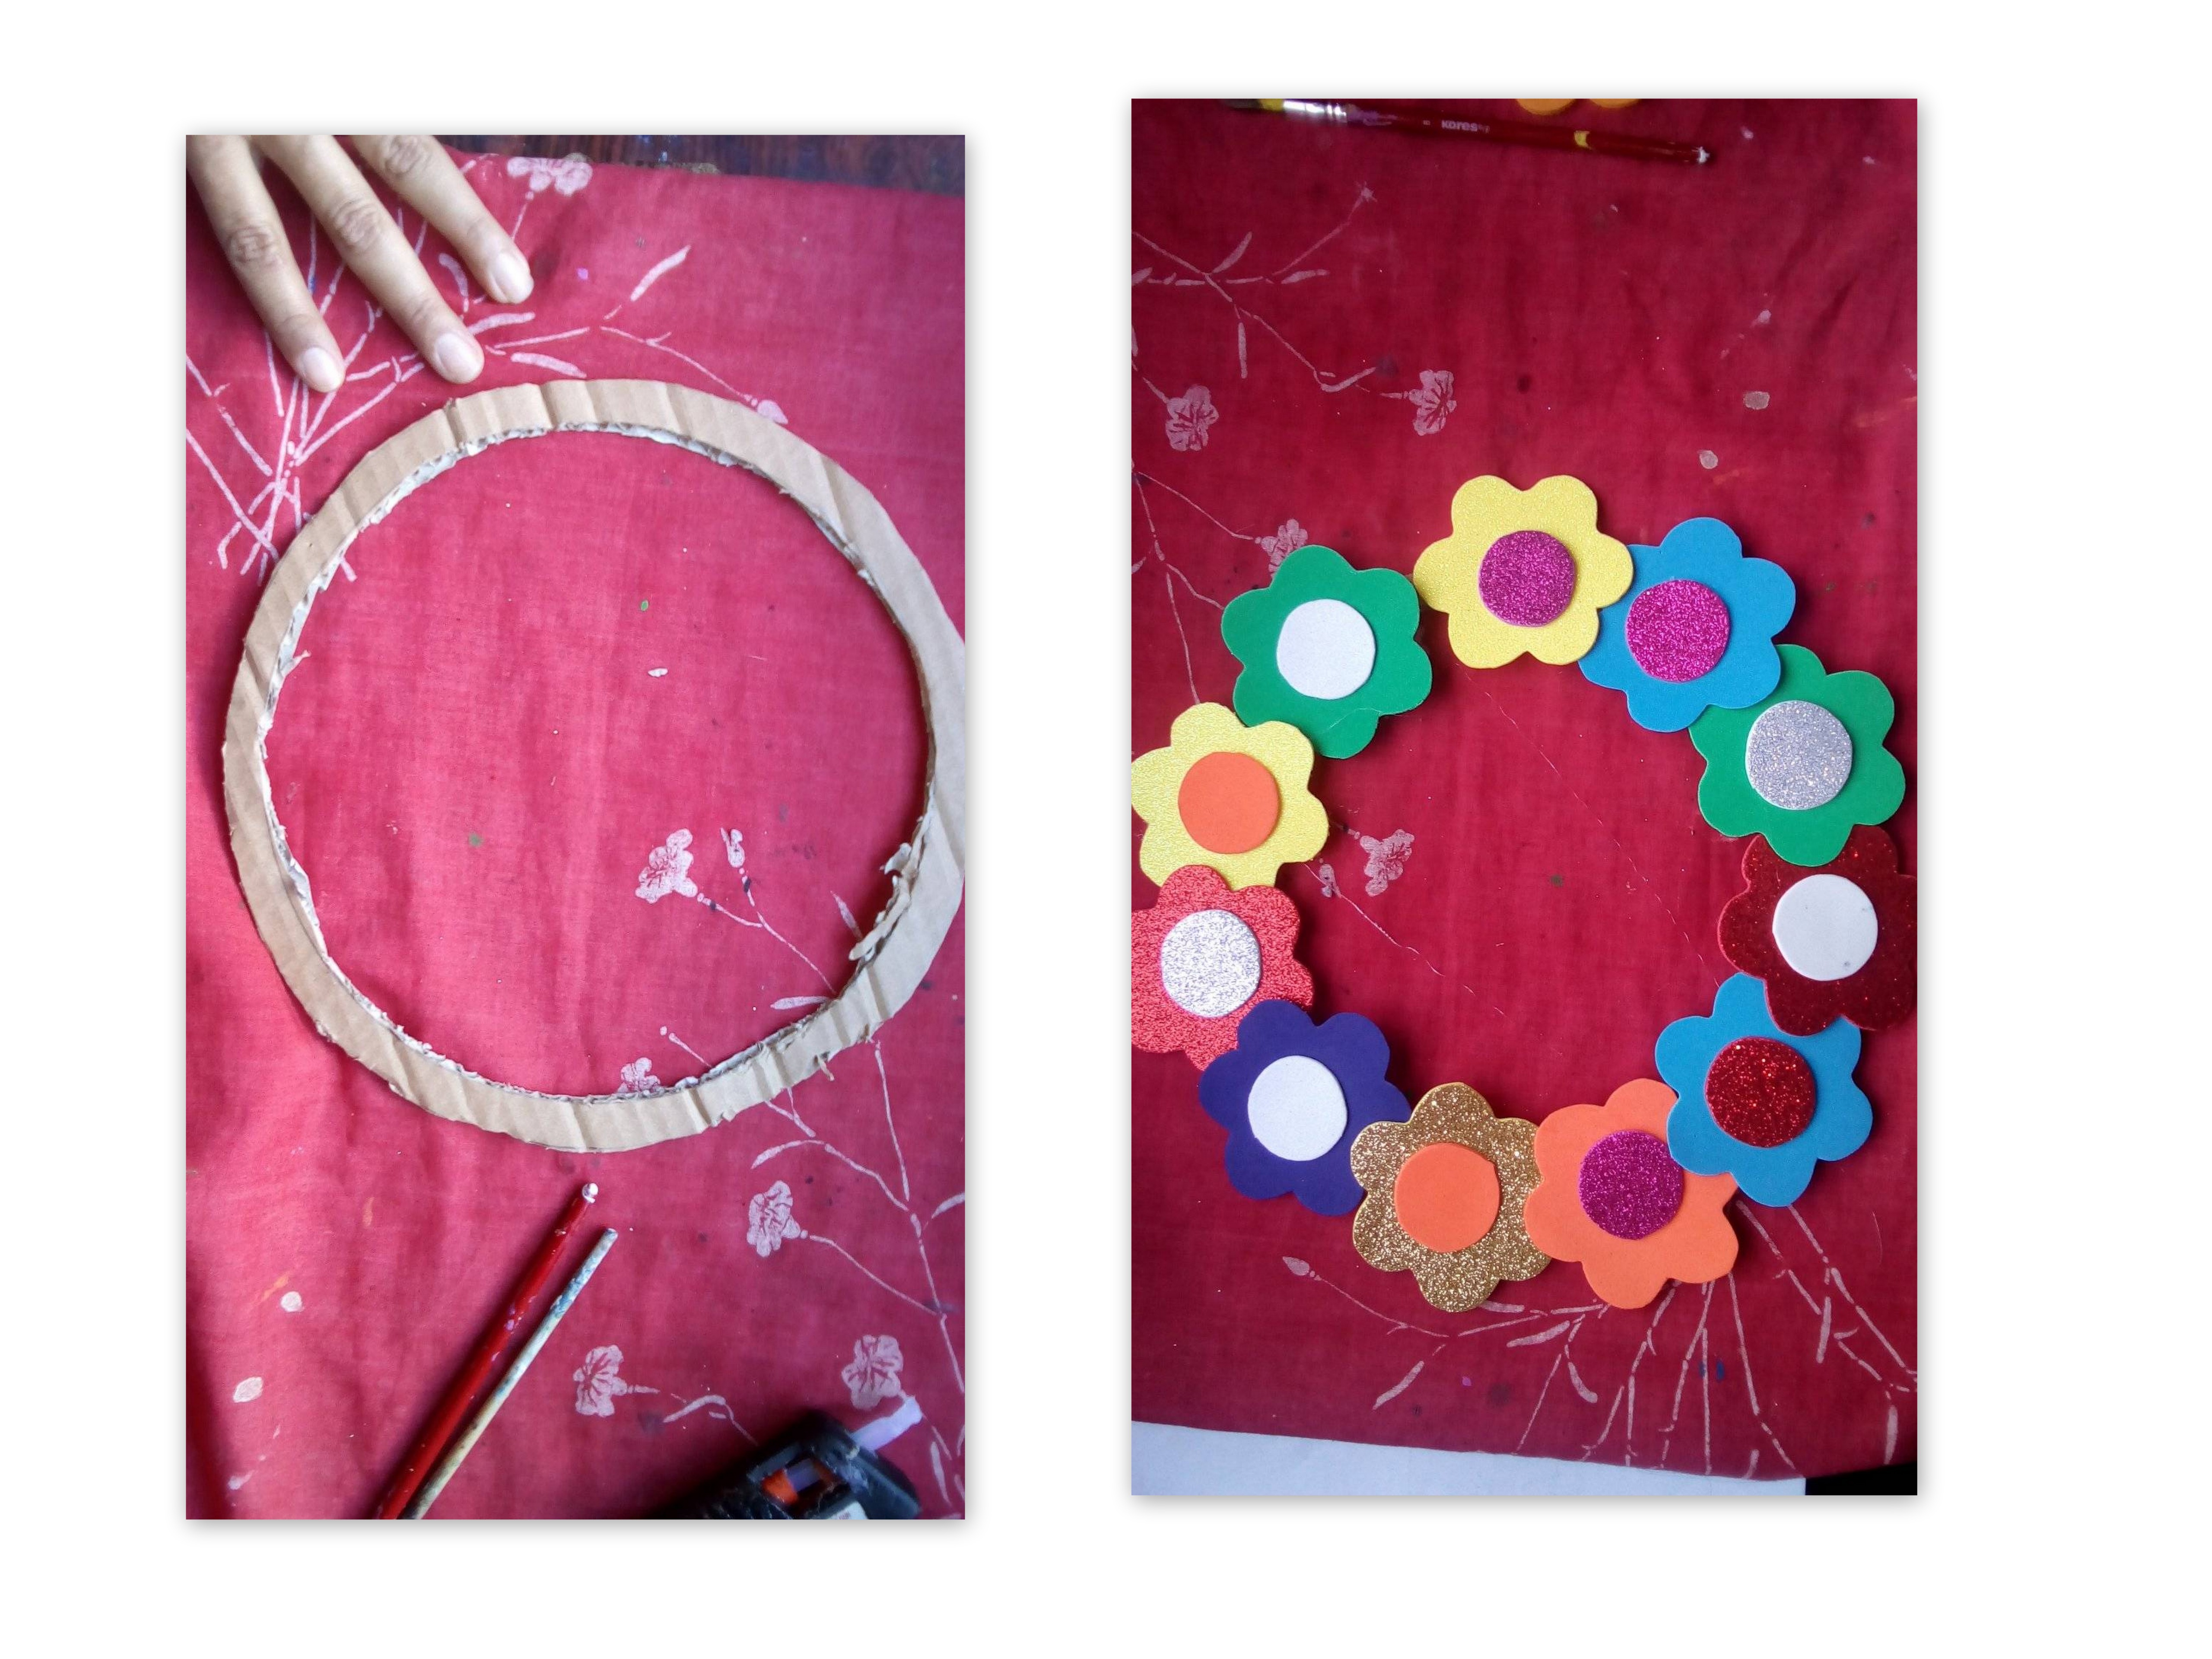
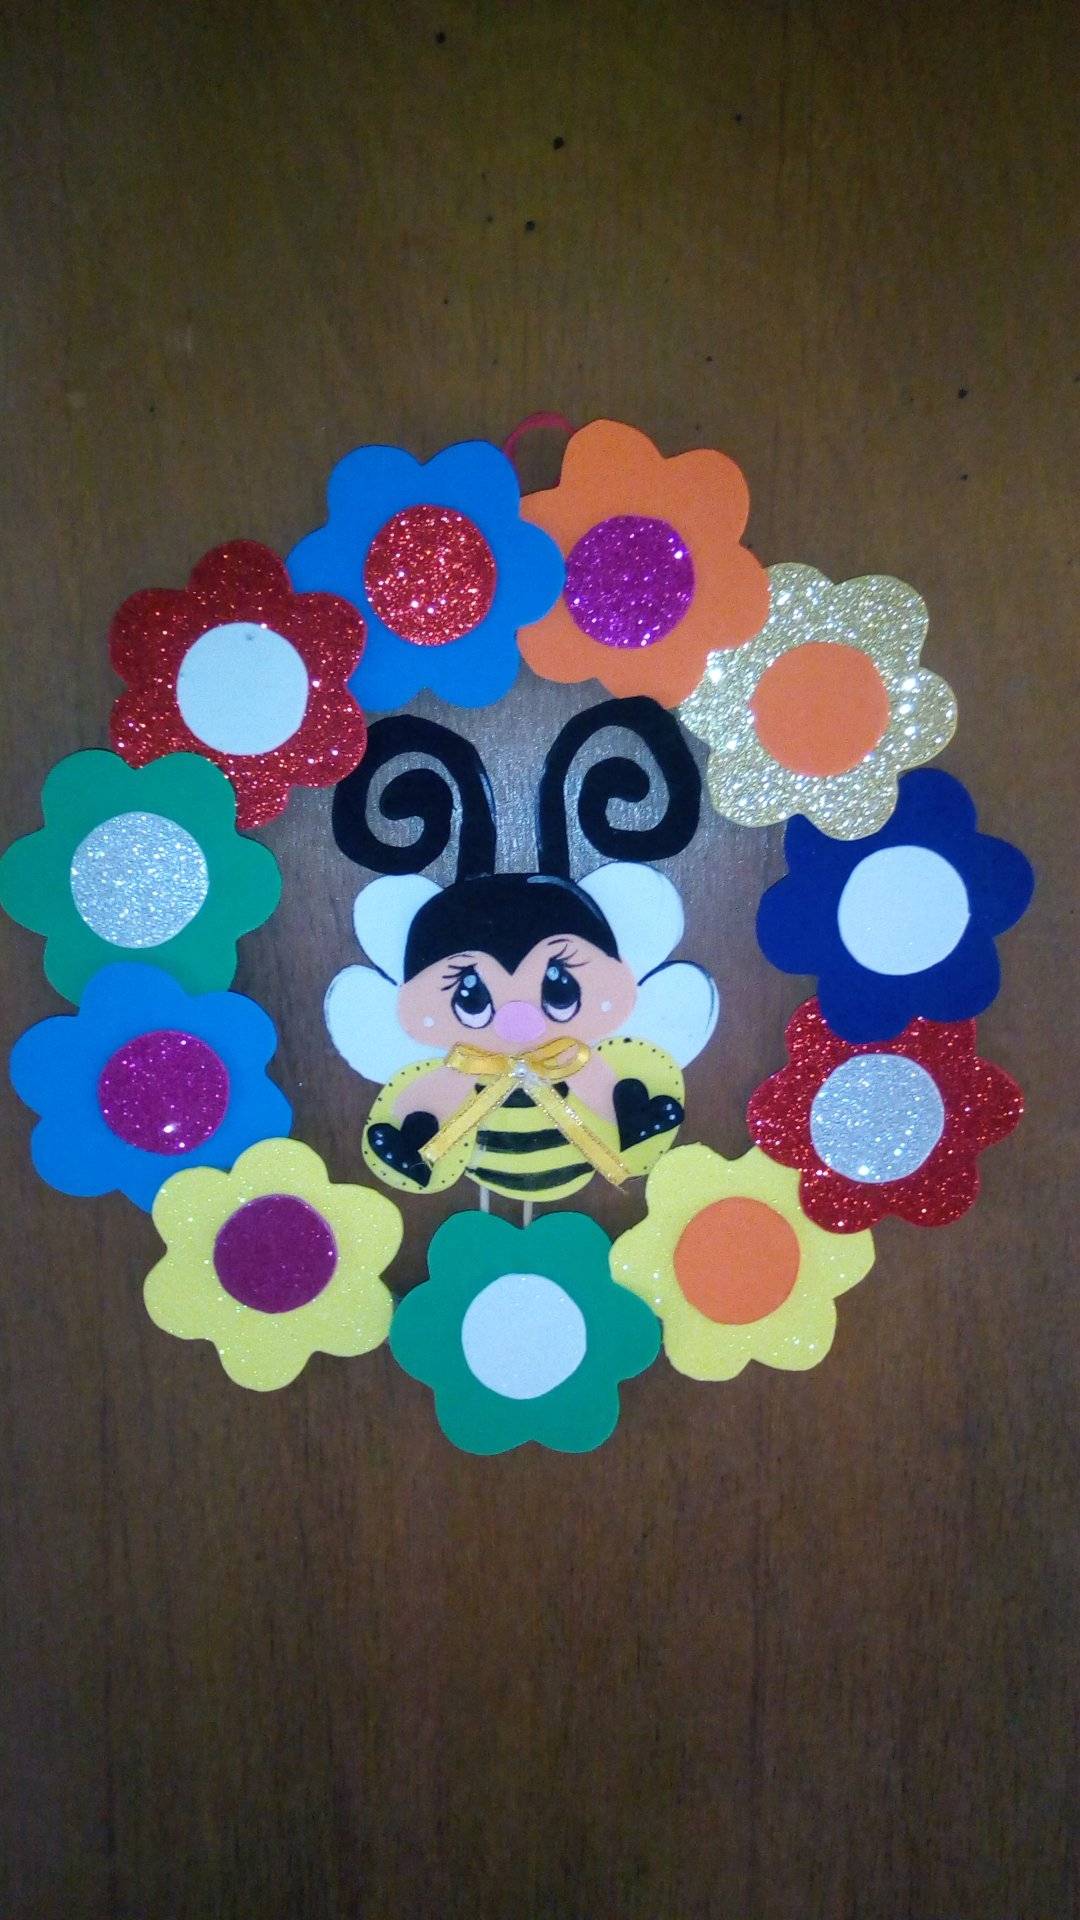
Luego sobre un cartón resistente, recortamos la forma de un aro, las medidas varían según tan grande quieran ustedes el adorno para su puerta, Seguidamente comenzamos a cubrir este aro con las flores que anteriormente habíamos hecho. Pegamos una a una cada flor con silicon caliente.
Then on a resistant cardboard, we cut out the shape of a ring, the measurements vary depending on how big you want the decoration for your door, then we begin to cover this ring with the flowers that we had previously made. We stick each flower one by one with hot silicone.
PAso 4:
Step 4:
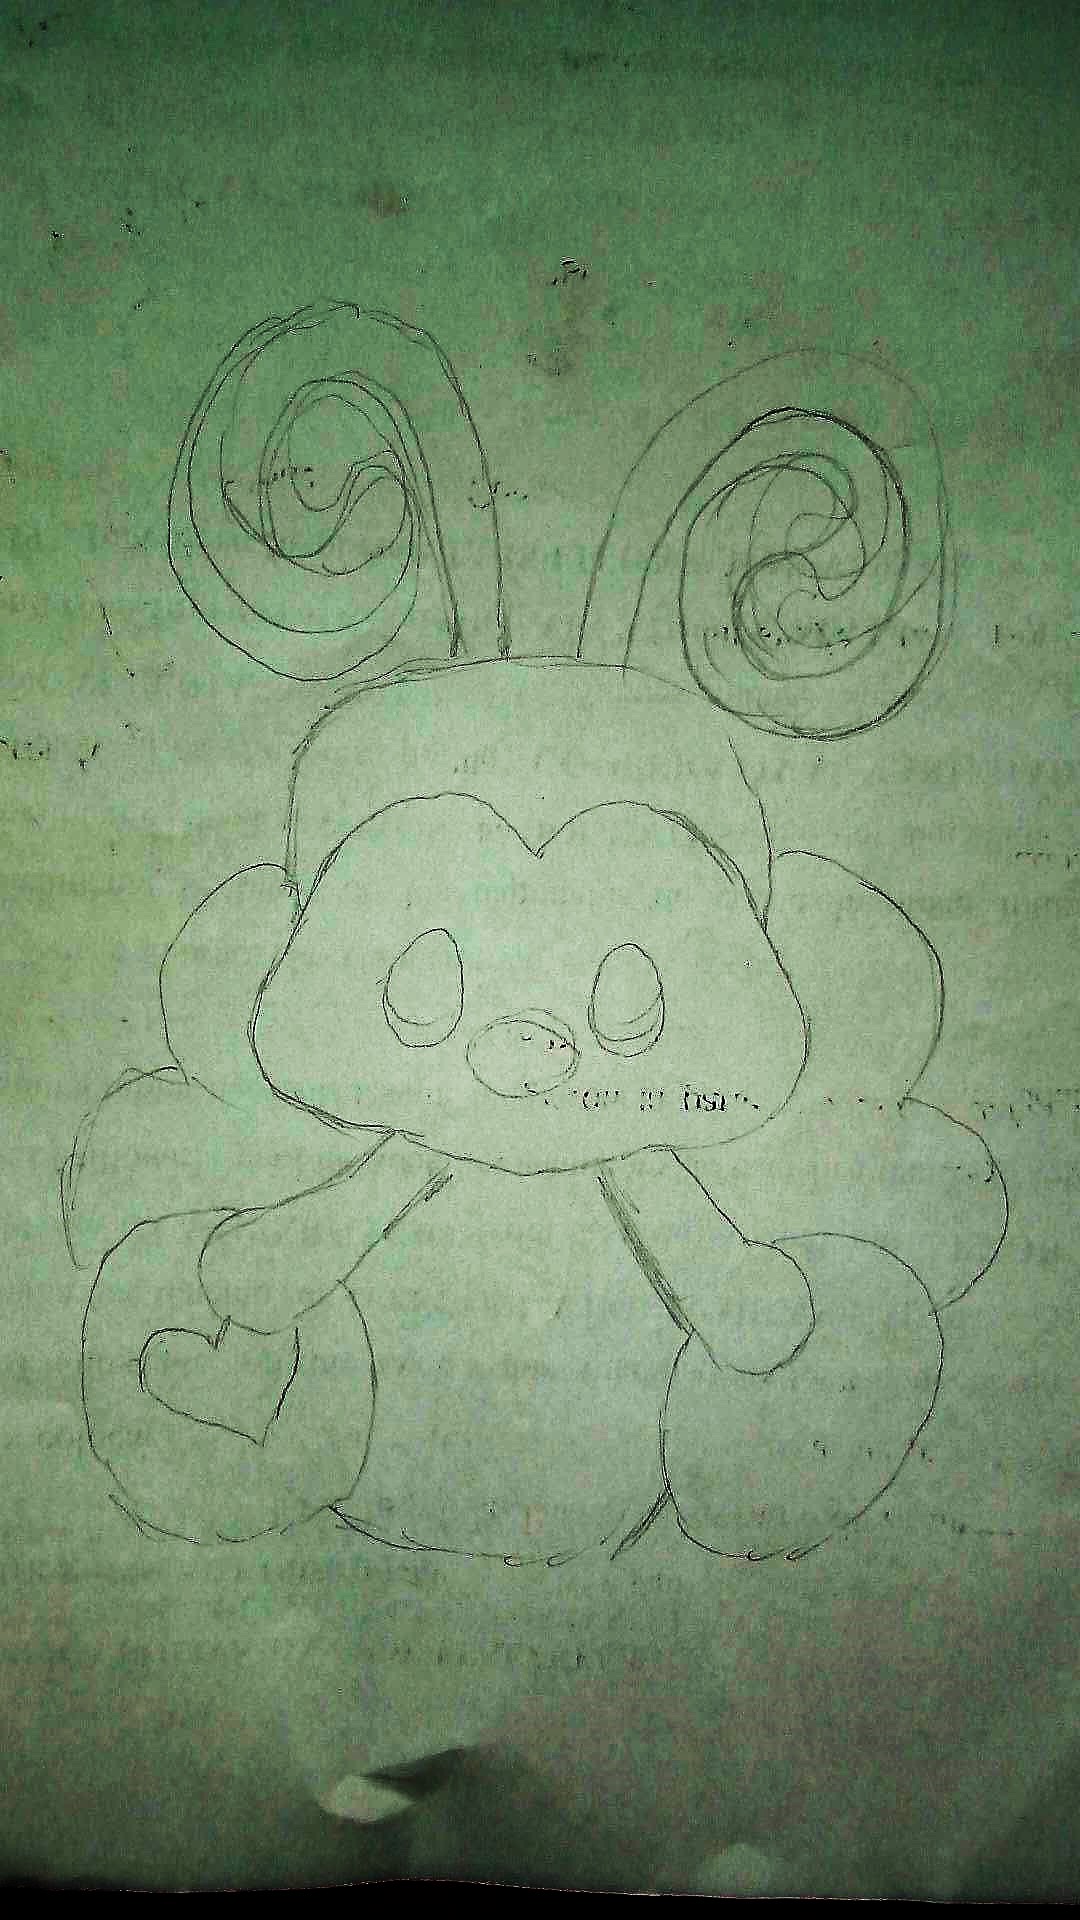
Ya que el aro esté listo, comenzamos hacer una avispita la cual irá en el medio del aro, para ello lo primero que debemos hacer es dibujar sobre una hoja de papel el boceto de la avispa.
Once the hoop is ready, we begin to make a wasp which will go in the middle of the hoop, for this the first thing we must do is draw the sketch of the wasp on a sheet of paper.
Paso 5:
Step 5:
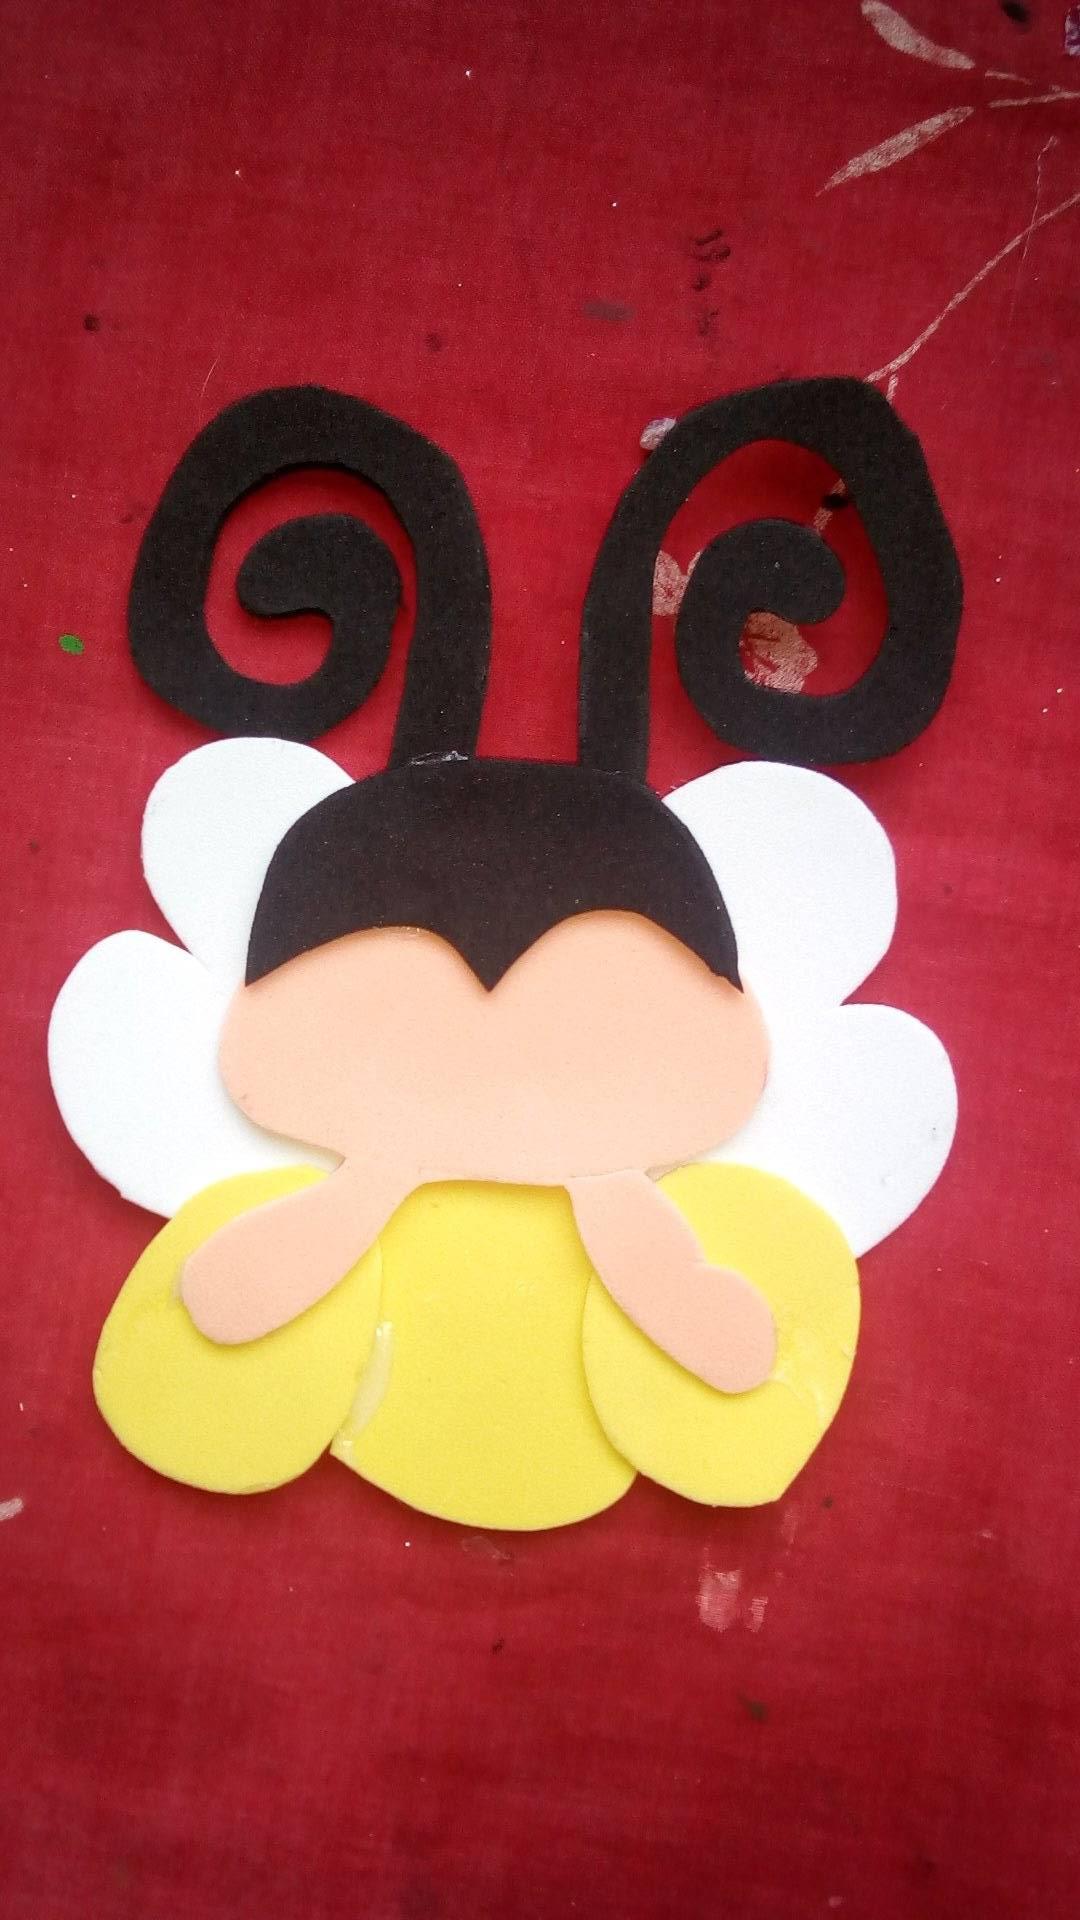
Luego transferimos cada pieza de la avispa al foami según el color correspondiente, por ejemplo las alas deben ir en color blanco, su cara en color piel, las antenas y cabello en color negro y el resto del cuerpo en foami de color amarillo y con silicon caliente pegamos cada una de las piezas y le damos forma a la avispa.
Then we transfer each piece of the wasp to the foami according to the corresponding color, for example the wings must be white, its face in skin color, the antennae and hair in black and the rest of the body in yellow foami and with silicone. Hot glue each of the pieces and shape the wasp.
Paso 6:
Step 6:
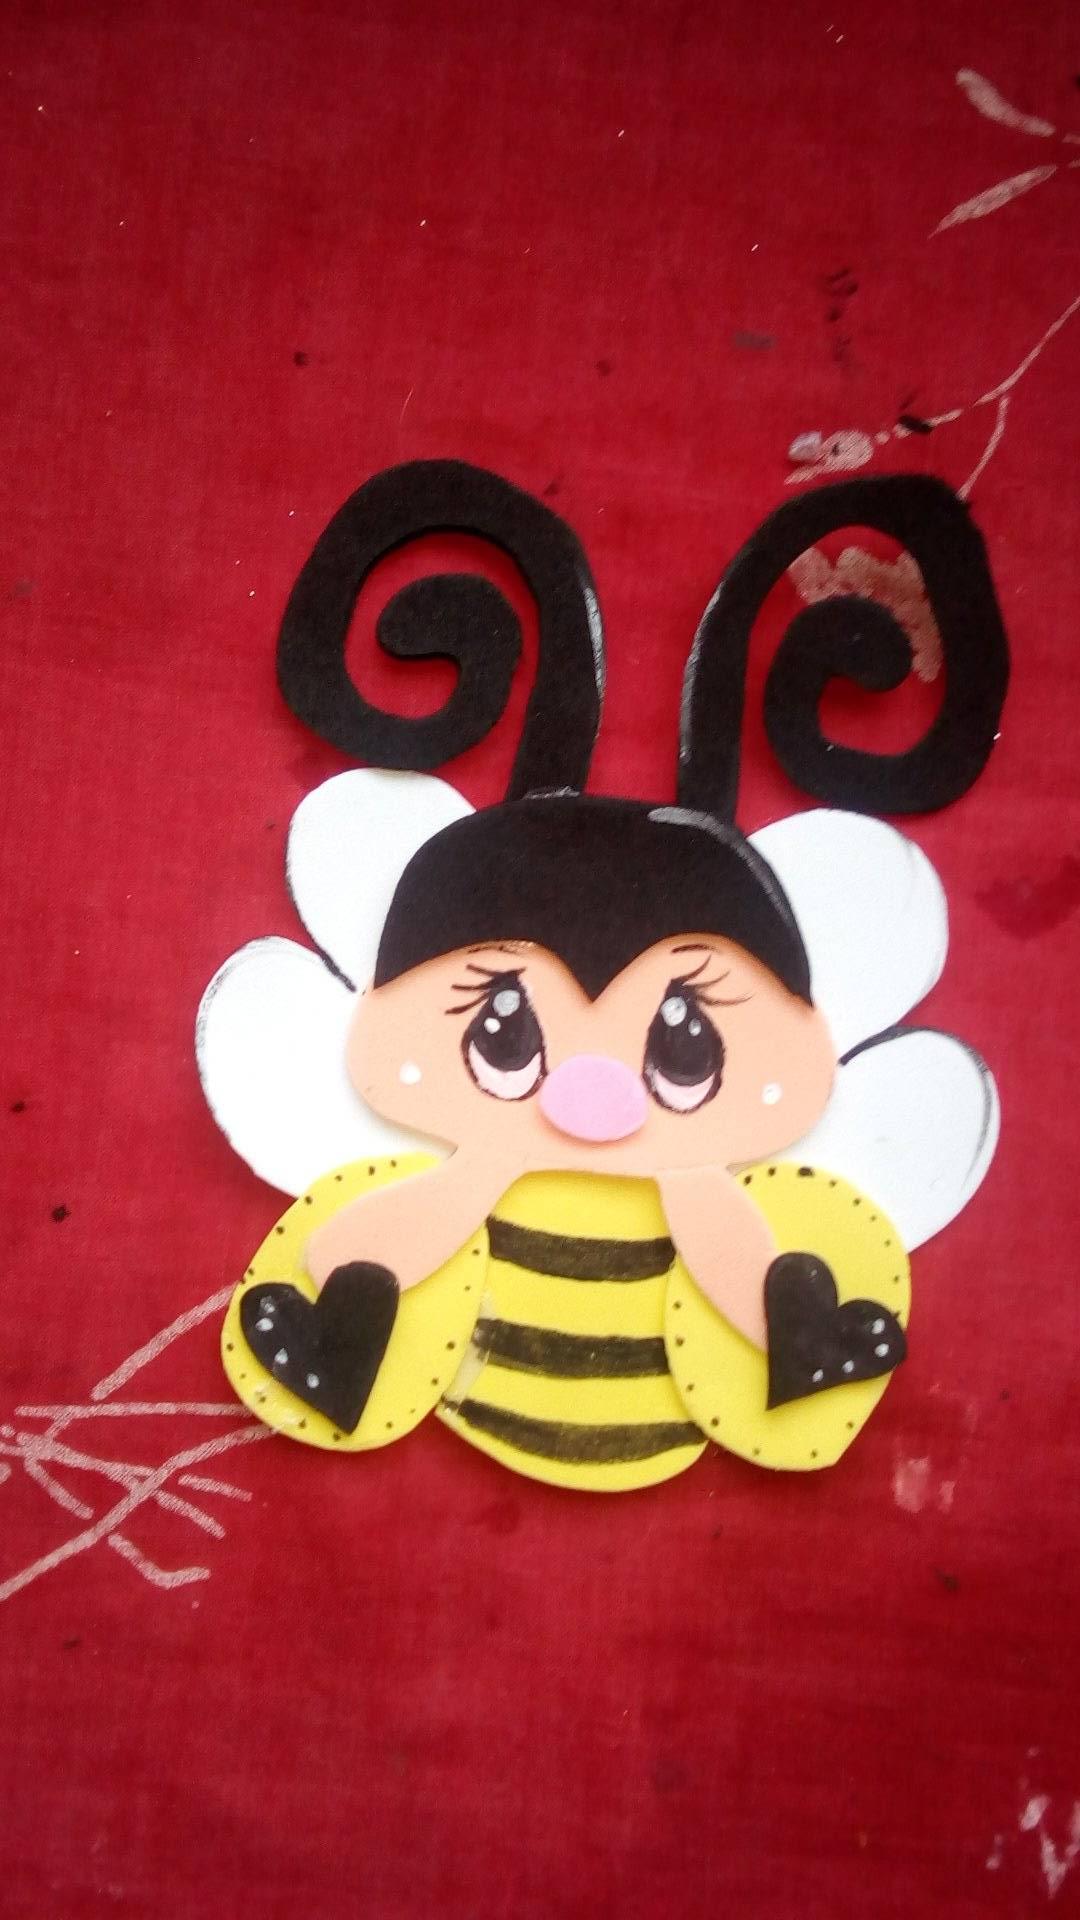
Con Pintura Blanca y negra y un pincel punta fina pintamos los ojos de la avispa, en las zonas oscuras hacemos unas pinceladas blancas para darle claridad, y con la pintura negra le hacemos las características rayas negras que conforman a las avispas.
With white and black paint and a fine tip brush we paint the eyes of the wasp, in the dark areas we make some white brushstrokes to give it clarity, and with the black paint we make the characteristic black stripes that make up the wasps.
Paso 7:
Step 7:
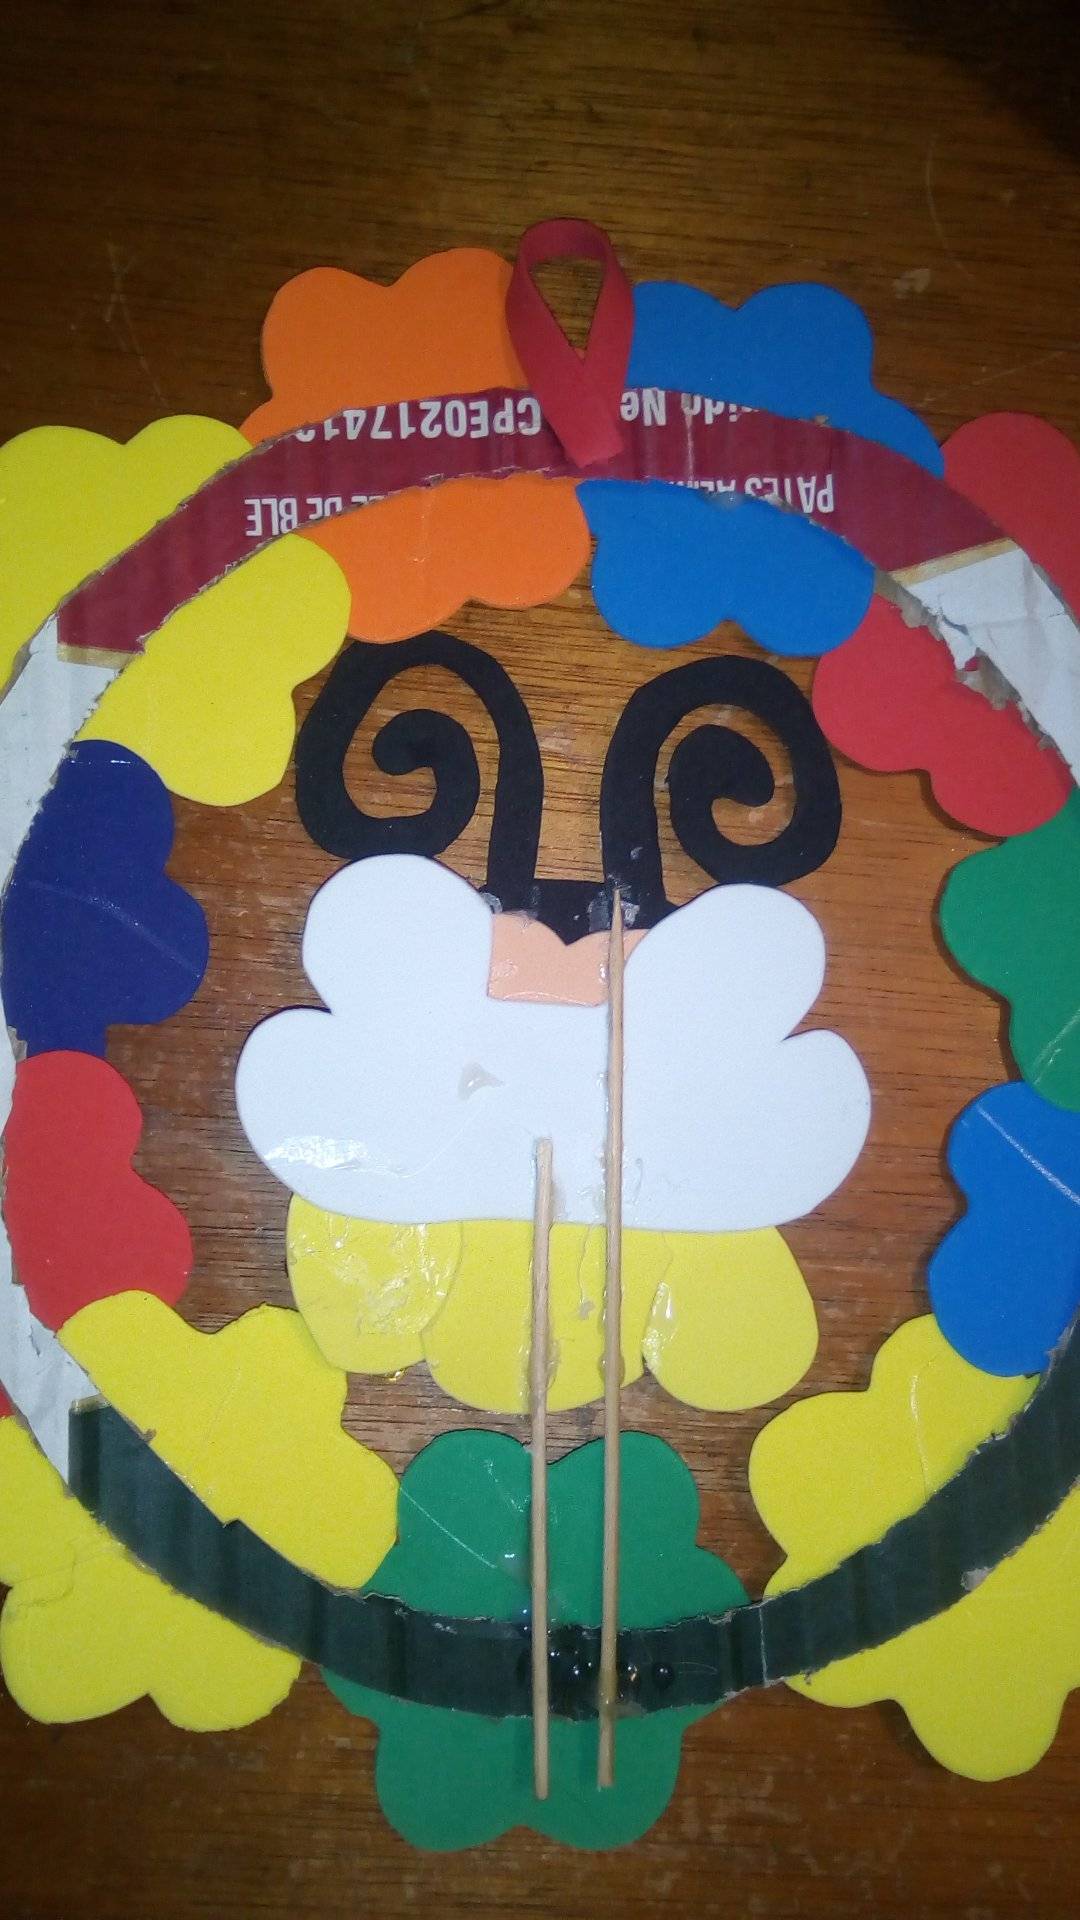
Utilizaremos un palito de altura para unir el aro con la avispa, este palito de altura se lo pegaremos por la parte de atrás, de manera que la avispa quede en el medio del aro.
We will use a height stick to join the ring with the wasp, we will stick this height stick on the back, so that the wasp is in the middle of the ring.
Resultado:
Result:
Finalmente amigos terminamos el adorno, listo para adornar nuestra puerta principal.
Finally friends we finished the ornament, ready to decorate our front door.

Espero les haya gustado mi idea creativa del dia de hoy, si te gusto no te olvides darle like y si tienes una sugerencia o una crítica constructiva que me ayude a crecer, no dudes en comentar, mil gracias por visitar mi publicacion. Hasta mañana.
I hope you liked my creative idea today, if you liked it don't forget to give it a like and if you have a suggestion or constructive criticism that helps me grow, don't hesitate to comment, thank you very much for visiting my publication. Until tomorrow.
Todas las fotos fueron tomadas por mi desde la cámara de mi telefono celular BLU ADVANCE A6 y editadas en mi computadora con la aplicación Picasa 3.
All the photos were taken by me from the camera of my BLU ADVANCE A6 cell phone and edited on my computer with the Picasa 3 application.
Congratulations @karolrodriguez! You have completed the following achievement on the Hive blockchain and have been rewarded with new badge(s):
Your next target is to reach 3500 upvotes.
You can view your badges on your board and compare yourself to others in the Ranking
If you no longer want to receive notifications, reply to this comment with the word
STOPCheck out the last post from @hivebuzz:
Support the HiveBuzz project. Vote for our proposal!
Hola amiga, te quedó precioso, gracias por compartir.
Te quedo muy lindo, buen trabajo.
Hola amiga!
Este es un lindo adorno, ademas es muy colorido llamara la atención de niños y adultos!
Saludos!