¡Bienvenido a mi blog!

Buenas noches apreciados amigos que hacen vida en esta linda comunidad #hivediy, deseo que todos estén bien, Dios les bendiga a todos.
Hoy quiero mostrar un tutorial : como transformar unas sandalias viejas en unas elegantes , coquetas y pega con todo tipo de ropa.
Ayer en la tarde revisando mis zapato y sandalias encontré una que casi no me ponía ya que era de color anaranjado , aunque en su tiempo la usé bastante y me gustaba ya que su color era muy llamativo, al cabo de cierto tiempo me di cuenta que era un color que ya no me llamaba la atención y ahorita como están las cosas decidí cambiarlas de color y de diseño. Pasé horas pensando que color era el me convenía o me servía para usarla con cualquier color de ropa, decidí enseguida , el color negro pega y combina con todo, fui a comprar los accesorios y la tela para hacerla. En la tarde de hoy procedí a transformarla. ¡Veamos como me quedó de hermosa!
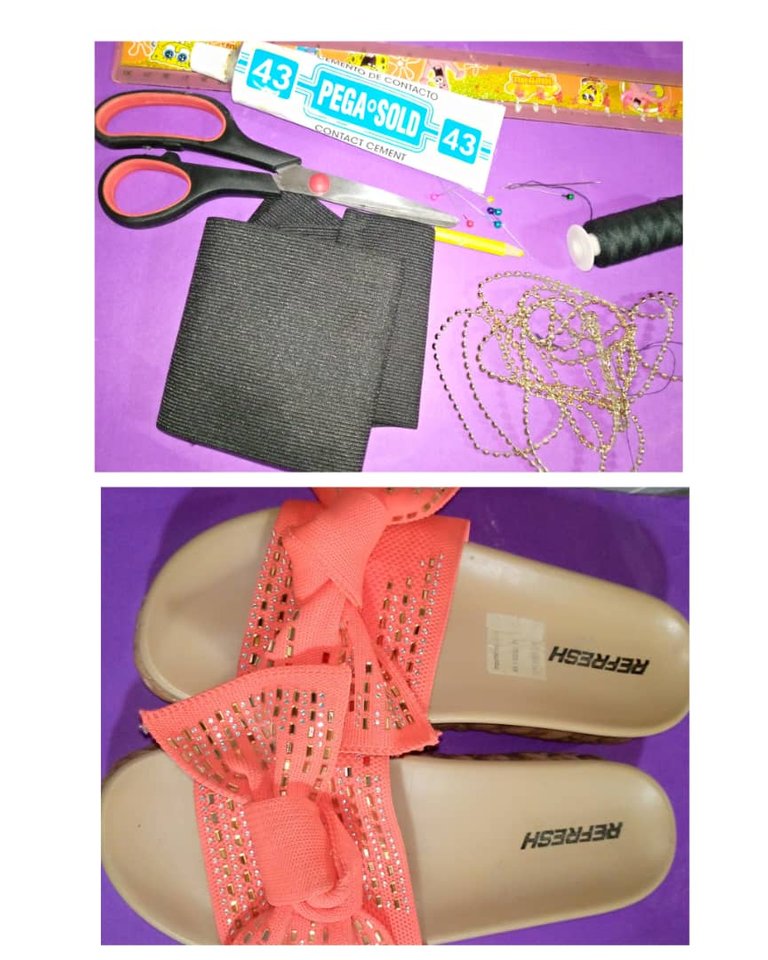
Materiales que se necesitan para la transformación de las sandalias:
- Tela elástica, color negro de 10 centímetros.
- Tijera.
- Pega sold.
- Lápiz.
- Sujetadores.
- Regla.
- 2 metros de Cadena , color dorado.
- Hilo negro con su aguja.
Paso a paso para realizar la transformación de la s sandalias:
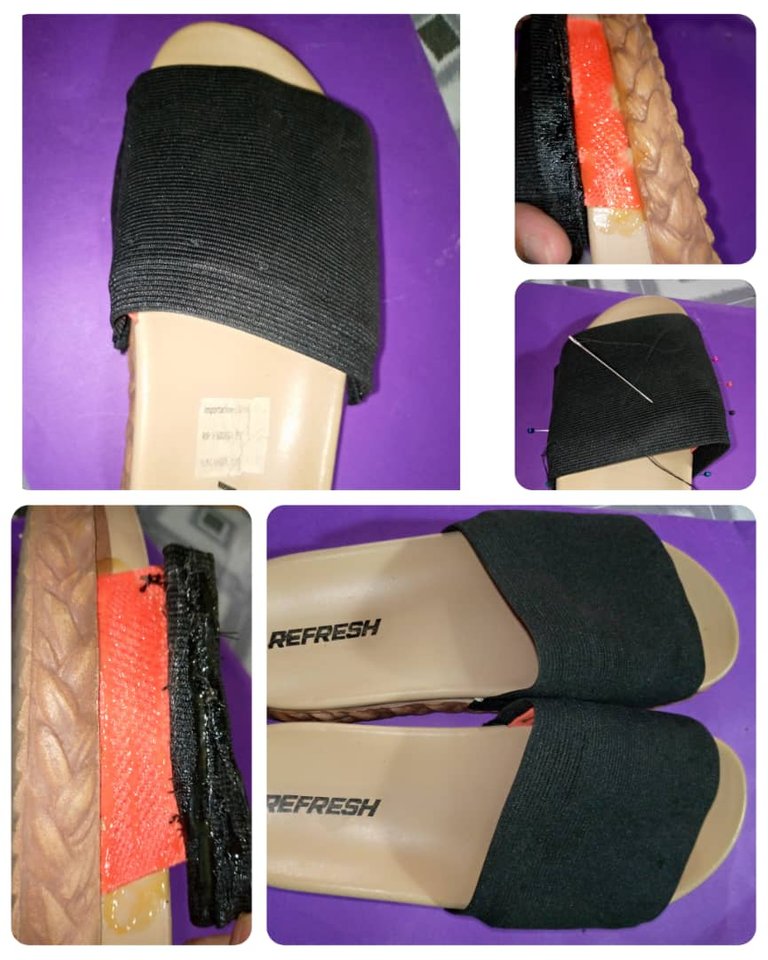
Lo primero que tenemos que hacer es despegar con una tijera el lazo que tiene la sandalia, luego con una regla medimos 25 centímetros y marcamos con un lápiz la tela elástica para recortarla con la tijera, debes cortar dos pedazos del mismo tamaño.
-Ensartar el hilo dentro de la aguja .Ahora agarrarle un ruedo a cada lado, dejándole lo que va para la punta más pequeño que lo que va para la parte de atrás.
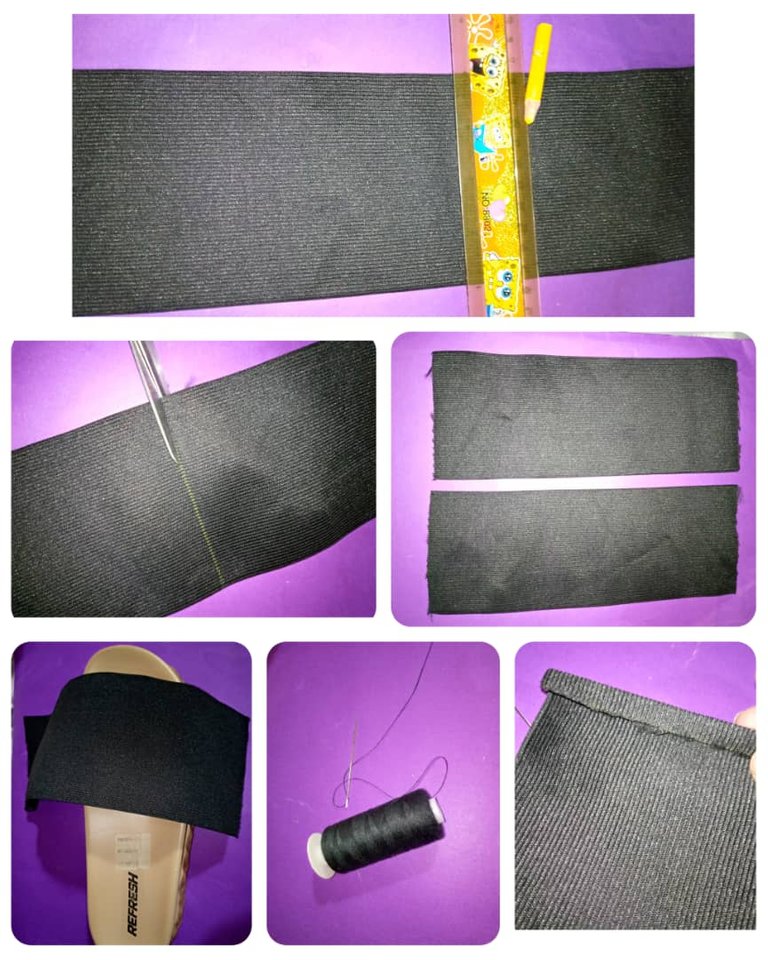
Después de agarrar el ruedo a las dos telas elástica para ponerla sobre las sandalias.
Coloca los sujetadores por los lados para aguantar la tela elástica.
Preparas la aguja con el hilo y comienzas a coser desde los lados primero, luego la parte de adelante , seguido el otro lado y la parte de atrás.
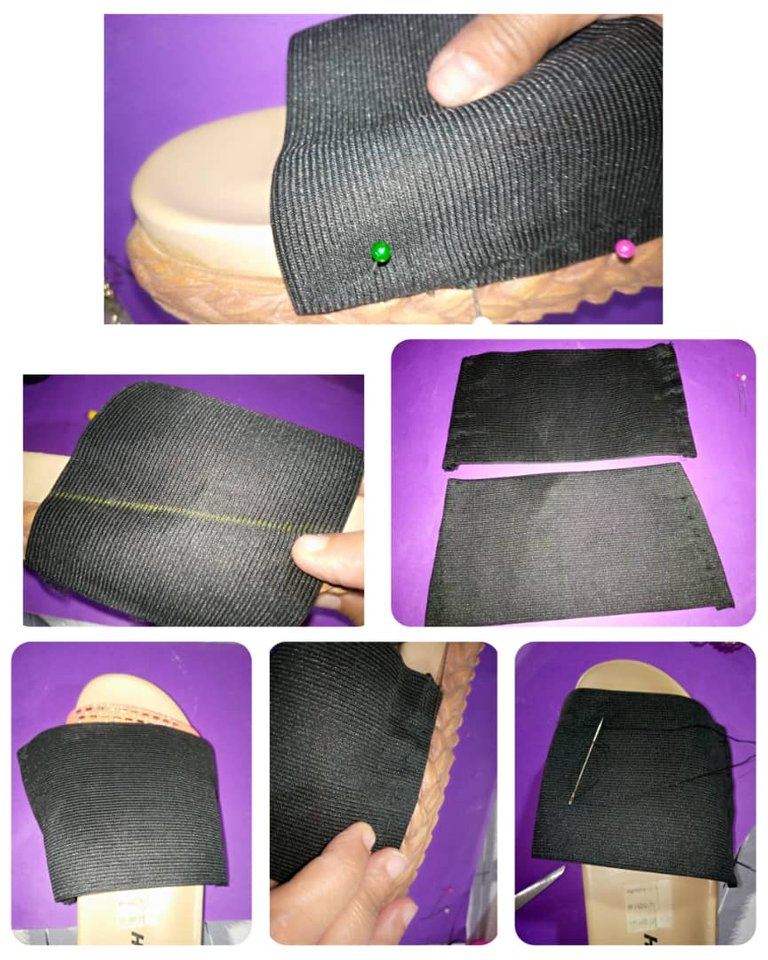
- Por los bordes o los lados agregamos pega que no se levante la tela elástica, eso lo hacemos por los lados de las sandalias.Esperamos un rato para seguir cociendo hasta que pegue bien.
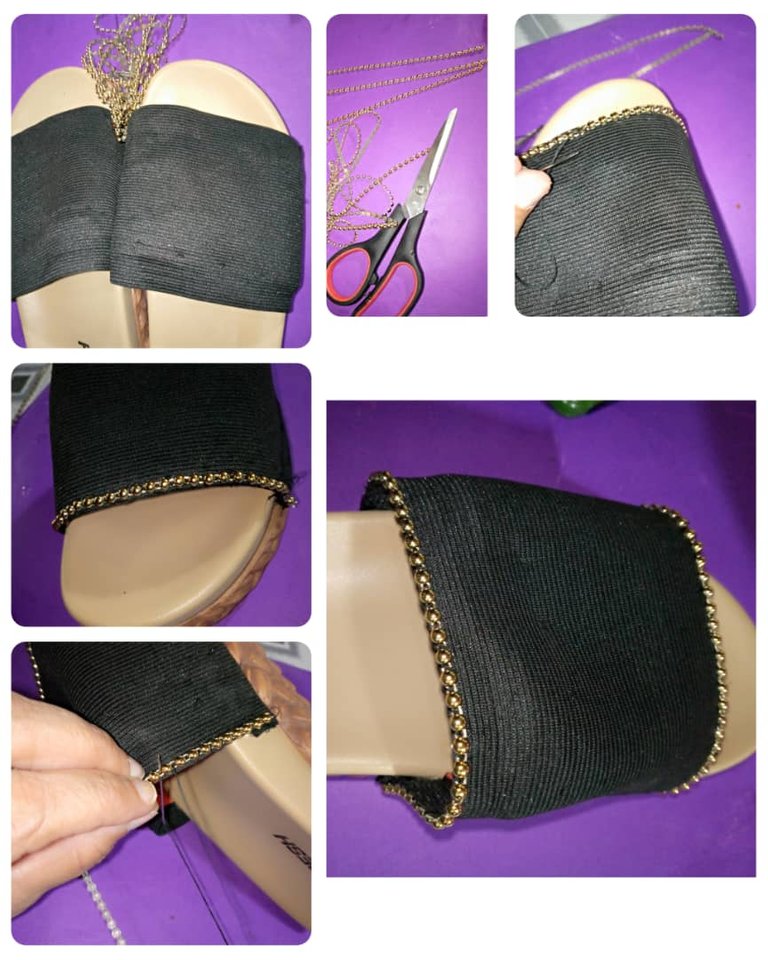
- Medimos de cuantos centimetros debe ser las cadenas que le colocaremos en la parte de arriba de la sandalia.Son 4 pedazos: 2 de 12 cm, 4 de 14 cm, 2 de 16 cm.
- Continuando con la transformación de las sandalias procedemos a coser la cadena por todo el borde de adelante de la sandalia, dando puntada una por una de cada parte de la cadena, tratando de que no se vea el hilo y que quede derecha.
- Ahora cosemos la cadena de la parte de atrás, igual que la de adelante , por todo el borde, si sobra algo lo recortamos con la tijera.
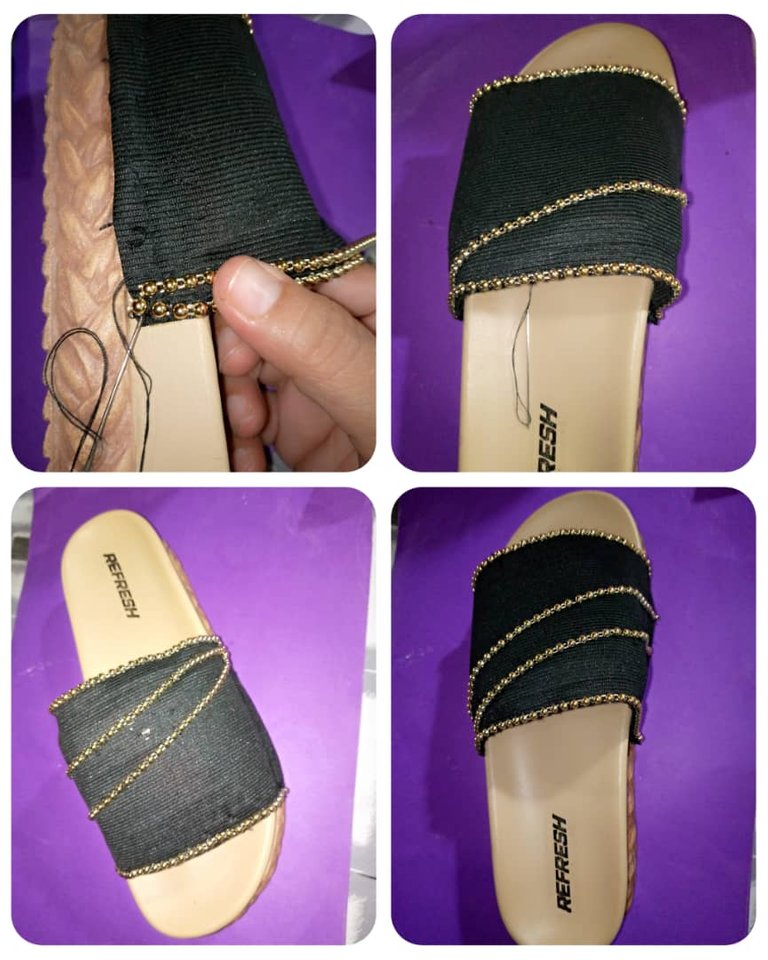
- Luego cosemos la cadena de 14 cm , que va desde pegada a la parte del lado izquierdo hasta la parte izquierda y termina casi por la mitad de la tela que se colocó .
- De la misma manera se coloca otra cuerda de 14 cm, comienza del lado izquierdo hasta el lado derecho pero más cerca de la parte final de la sandalia, pueden guiarse con la imagen.
- De la misma manera van a realizar la otra sandalia, pero al contrario lo que se hizo del lado derecho ahora es para el lado izquierdo y viceversa.
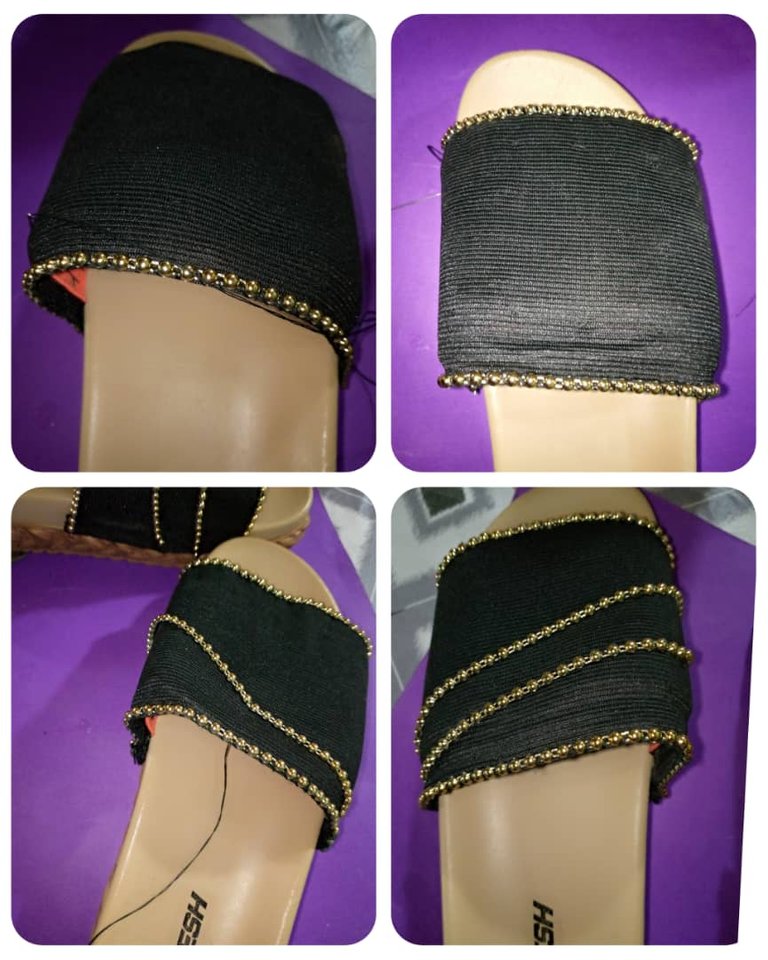
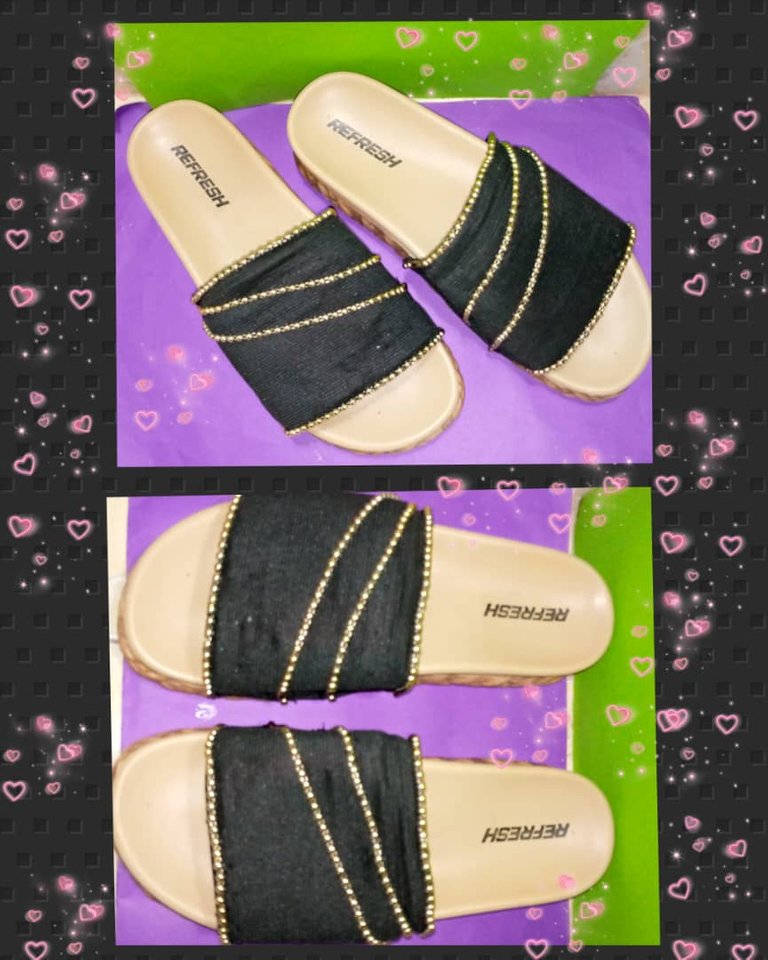
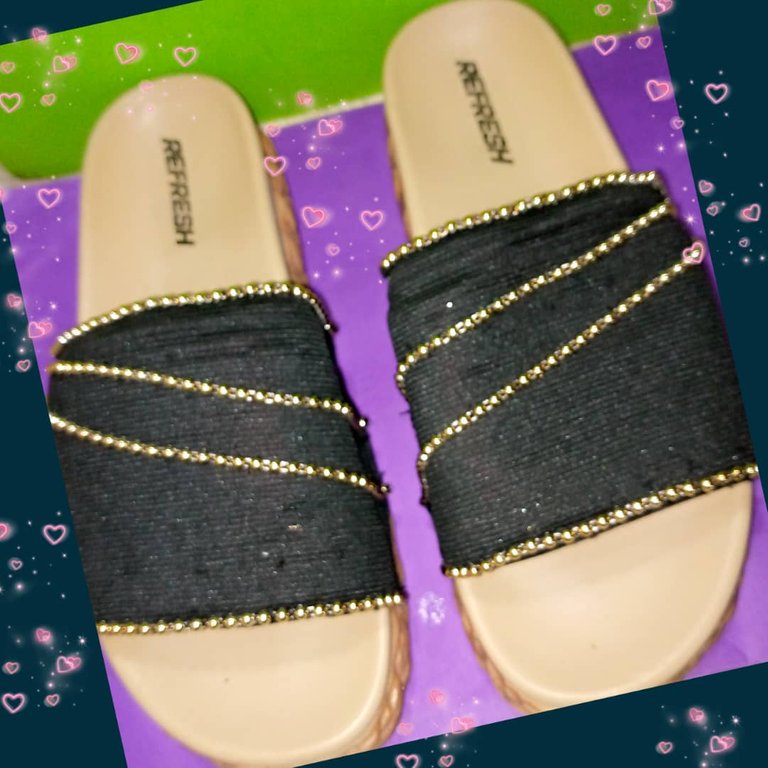
Aquí Podemos observar el resultado final de la transformación de la sandalia de color anaranjada a color negra. ¡Quedó hermosa!
Espero que le haya gustado, hasta la próxima, muchas bendiciones.

Las fotos son mías, tomadas con teléfono Infinix, editadas con incollage y traducida con DEEPL.
ESPAÑOL
Welcome to my blog!

Good evening dear friends who make life in this nice community #hivediy, I wish you all well, God bless you all.
Today I want to show you a tutorial: how to transform old sandals in a stylish, flirty and sticks with all kinds of clothes.
Yesterday afternoon going through my shoes and sandals I found one that I almost did not wear because it was orange, although at the time I used it a lot and I liked it because its color was very striking, after some time I realized that it was a color that no longer called my attention and now as things are I decided to change the color and design. I spent hours thinking about which color was the right one for me to use with any color of clothing, I decided right away, the black color fits and combines with everything, I went to buy the accessories and fabric to make it. This afternoon I proceeded to transform it. Let's see how beautiful it is!

Materials needed for the transformation of the sandals:
- Elastic fabric, black color 10 centimeters.
- Scissors.
- Glue solder.
- Pencil.
- Fasteners.
- Ruler.
- 2 meters of gold-colored chain.
- Black thread with needle.

Step by step to make the transformation of the sandals:
The first thing we have to do is to take off with a scissors the loop that has the sandal, then with a ruler we measure 25 centimeters and mark with a pencil the elastic fabric to cut it with the scissors, you must cut two pieces of the same size.
-Thread the thread inside the needle.Now grab him a roll on each side, leaving him what goes for the tip smaller than what goes for the back.

After grabbing the ruffle to the two elastic fabrics to put it over the sandals.
Place the fasteners on the sides to hold the elastic fabric.
Prepare the needle with the thread and start sewing from the sides first, then the front, then the other side and the back.

- By the edges or sides we add glue that does not lift the elastic fabric, that we do on the sides of the sandals.We wait a while to continue cooking until it sticks well.

- We measure how many centimeters should be the chains that we will place on the top of the sandal.There are 4 pieces: 2 of 12 cm, 4 of 14 cm, 2 of 16 cm.
- Continuing with the transformation of the sandals we proceed to sew the chain all along the front edge of the sandal, stitching one by one of each part of the chain, trying not to see the thread and that it is straight.
- Now we sew the chain of the back part, the same as the front part, all along the edge, if there is any left over we cut it with the scissors.

- Then we sew the chain of 14 cm , which goes from attached to the part of the left side to the left side and ends almost in the middle of the fabric that was placed .
- In the same way we place another string of 14 cm, it starts from the left side to the right side but closer to the end part of the sandal, you can be guided with the image.

- In the same way you are going to make the other sandal, but on the contrary what was done on the right side is now for the left side and vice versa.

Here We can see the final result of the transformation of the sandal from orange to black. It turned out beautiful!

Hope you liked it, until next time, many blessings.

The photos are mine, taken with Infinix phone, edited with incollage and translated with DEEPL.
The rewards earned on this comment will go directly to the people( @lacochinaensalsa ) sharing the post on Twitter as long as they are registered with @poshtoken. Sign up at https://hiveposh.com.
Gracias @poshtoken por compartir mi post.
Es un hermoso trabajo y muy creativo, te felicito... 🤗
Gracias amiga @kathelopez77 me hace feliz que te guste. Bendiciones.
🤗🙏🏻
Thank you for sharing this post on HIVE!
Your content got selected by our fellow curator priyanarc & you just received a little thank you upvote from us for your great work! Your post will be featured in one of our recurring compilations which are aiming to offer you a stage to widen your audience within the DIY scene of Hive. Stay creative & HIVE ON!
Please vote for our hive witness <3