


[Esp]
¡Saludos comunidad!
Una de las técnicas que estudié en decoupage que son las mas sencillas, también pueden aplicarse en pintura al frio, es algo tan simple que quizá por su simpleza y economía pase desapercibida, sin embargo, he visto algunas nuevas aplicaciones en las que han usado silicón con alcohol y una mezcla que no entiendo bien, al parecer funciona, pero, hay que estudiarla y saber aplicarla.
Para esta técnica solo seguirás unos pasos muy sencillos, nada complicados ni costosos, pueden ser el paliativo cuando no tengas super brillo, cuando no puedas trabajar con él dado a su olor fuerte o cuando quieras economizar, en muchas ocasiones no se nota la diferencia entre el usar un producto y otro, protege la pieza de igual manera y hasta en mi criterio personal, cuando la pieza tiene muchos detalles, es mejor usar pegamento blanco, pues el brillo, laca, barniz, cuando son de mala calidad, tienden a poner amarilla la pieza con el tiempo.
Con la cola blanca también puedes correr riesgos que la pieza se oscurezca, eso solo ocurrirá si no la dejas secar bien, si no la limpias con paños limpios de vez en cuando y si el paño está demasiado húmedo al limpiar.
Dicho esto te presento mi gallinita que la amé desde que la vi en bizcocho frío, pues la persona que lo hizo, se le ocurrió ponerle un Snoopy encima. Super original.
La pinté monocromática, para que combinara con Snoopy y sus colores, un estilo country, lo hará divertido y alegre.
Espero les guste.
English version
Greetings, community!
One of the simplest techniques I studied in decoupage can also be applied to cold painting. It is so simple that perhaps its simplicity and affordability make it go unnoticed. However, I have seen some new applications in which silicone with alcohol and a mixture that I do not fully understand have been used. Apparently, it works, but you have to study it and know how to apply it.
For this technique, you just follow a few very simple steps that are neither complicated nor expensive. It can be a good alternative when you don't have super gloss, when you can't work with it because of its strong smell, or when you want to save money. In many cases, you can't tell the difference between using one product and another. It protects the piece in the same way, and in my personal opinion, when the piece has a lot of detail, it is better to use white glue. as glitter, lacquer, and varnish, when they are of poor quality, tend to yellow the piece over time.
With white glue, you also run the risk of the piece darkening, but that will only happen if you don't let it dry properly, if you don't clean it with clean cloths from time to time, and if the cloth is too damp when cleaning.
That said, I present to you my little hen, which I loved from the moment I saw it on a cold cake, because the person who made it had the idea of putting Snoopy on top. Super original.
I painted it monochromatic to match Snoopy and his colours, a country style, which makes it fun and cheerful.
I hope you like it.

Materiales / Materials

| Spanish | English | |
| Bizcocho de cerámica | Ceramic biscuit | |
| Pinturas al frío distintos colores | Cold paints in different colours | |
| Pinceles | Brushes | |
| Pega blanca escolar | White school glue | |
| Recipiente con agua | Container with water | |
| Paño para secar los pinceles | Cloth for drying brushes |
Paso a paso / Step by Step
Step 1️⃣/ Paso 1️⃣
 |  | |
 |  |
[Esp]
Recuerden mis recomendaciones anteriores acerca de los bizcochos de cerámica.
Si es necesario lijen la pieza, esta pieza tenía mucha porosidad por lo cual tuve que pasarle una lija suave antes.
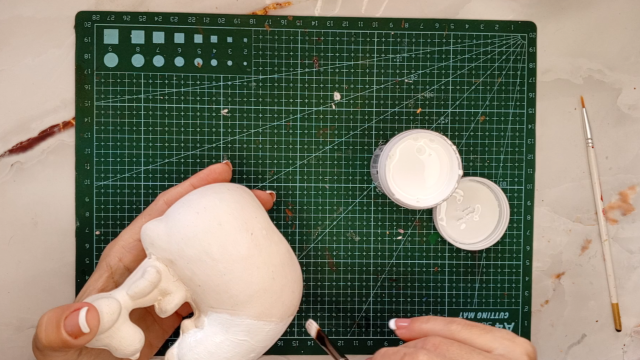
Aplica la primera capa de pintura, en este caso comencé con la blanca porque las oscuras son algo dificultosas para cubrir.
Luego agregué los detalles como pintar la cresta de tojo y algunos detalles en Snoopy como pintar su nariz.
English version
Remember my previous recommendations about ceramic biscuits.
If necessary, sand the piece. This piece was very porous, so I had to sand it with fine sandpaper first.
Apply the first coat of paint. In this case, I started with white because dark colours are somewhat difficult to cover.
Then I added the details, such as painting the gorse crest and some details on Snoopy, such as his nose.
Step 2️⃣/ paso 2️⃣
 |  | |
 |  |
[Esp]
Momento de aplicar detalles en las orejas y pintar los ojos de ambos animalitos, estos ojitos son muy sencillos, me di cuenta que ambos pinceles que uso se han deteriorado muy rápido las cerdas por mucho que lo he cuidado, también mi pulso estaba desastroso hoy dificultándome hacer las líneas delgadas y prolijas.
Preferí hacer las curva su ondas luego de aplicar la pintura negra, apliqué entonces el blanco encima, para cubrir este color, tuve que dar varias capas.
Luego hice un corazón como cola de la gallina y esperé un rato a que secara bien la pintura, ya que estaba manchando el blanco y mi área de trabajo no sé cómo.
English version
Time to add details to the ears and paint the eyes of both animals. These eyes are very simple. I realised that the bristles on both brushes I use have deteriorated very quickly, even though I have taken good care of them. Also, my hand was shaking today, making it difficult for me to draw thin, neat lines.
I preferred to make the curves and waves after applying the black paint, then I applied the white on top. To cover this colour, I had to apply several coats.
Then I made a heart as the hen's tail and waited a while for the paint to dry properly, as it was smudging the white and my work area, I don't know how.
Step 3️⃣/ paso 3️⃣
 |  | |
 |  |

[Esp]
Estos últimos pasos se ponen interesantes...
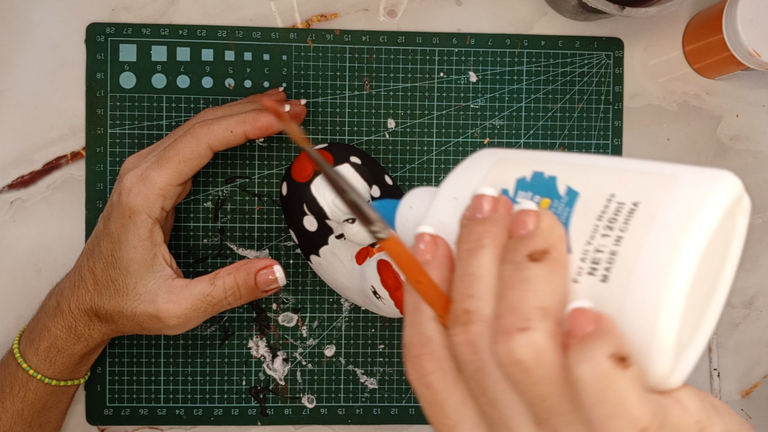
Luego que seque bien la pieza, harás unos lunares con el extremo contrario al pincel, es decir la parte redonda, tomas un poco de pintura en la punta y luego estampa un círculo en la pieza.
Hacer los círculos de esta manera hace que tomes una capa generosa de pintura, por lo cual debes dejar que seque muy bien para poder hacer el siguiente paso.
Luego de unas horas (recomendable) tan solo aplica el pegamento blanco sobre la pieza y da pinceladas en la misma dirección, evita dejar partes gruesas y que la aplicación sea uniforme, si la pega es de buena calidad, solo una capa de ella bastará.
Luego de aplicar una capa de pega, deja secar muy bien en un lugar donde no entre polvo y no sea tocado hasta que seque bien.
Como aprecian el la foto, al cabo de una hora y media aproximadamente ya la pieza esta completamente seca y brillante.
Espero les guste.
English version
These last steps are interesting...
Once the piece is completely dry, you will make some dots with the opposite end of the brush, i.e. the round part. Take a little paint on the tip and then stamp a circle on the piece.
Making circles this way means you'll use a generous amount of paint, so you must let it dry thoroughly before moving on to the next step.
After a few hours (recommended), simply apply white glue to the piece and brush in the same direction, avoiding thick areas and ensuring even coverage. If the glue is of good quality, one coat will suffice.
After applying a coat of glue, leave it to dry thoroughly in a dust-free place and do not touch it until it is completely dry.
As you can see in the photo, after about an hour and a half, the piece is completely dry and shiny.
I hope you like it.


Créditos / Credits


💜💜💜
![]() 👉
👉  👉
👉 ![]() 👉
👉 ![]() 👉
👉 
Here / Bríndame un café

This post has been manually curated by @steemflow from Indiaunited community. Join us on our Discord Server.
Do you know that you can earn a passive income by delegating to @indiaunited. We share more than 100 % of the curation rewards with the delegators in the form of IUC tokens.
Here are some handy links for delegations: 100HP, 250HP, 500HP, 1000HP.
100% of the rewards from this comment goes to the curator for their manual curation efforts. Please encourage the curator @steemflow by upvoting this comment and support the community by voting the posts made by @indiaunited.
Amo a Snoopy y este quedó muy bello. Te felicito
@equipodelta Saludos mi vida, feliz año, bellisimo te quedo el Snoopy con el pollito, esa tècnica la use mucho en mis dias de estudiante en los liceos, muy sencilla, espectacular trabajo, como siempre...Un fuerte abrazo mi reina.
Fantastico amiga, es una buena opción, me encantó este dato se ve muy practico de hacer
Hermoso trabajo, gracias por compartir el paso a paso, es fácil de hacer y queda súper lindo.
Aww que cosita mas adorable, me encanta Snoopy y eso que nunca vi su serie jaja pero como personaje me parece muy adorable 😂 que lindos los dos! ❤️
We love the result of your work, it is so beautiful and well-crafted. Thanks for sharing.
selected by @ibbtammy
El proyecto se ve muy lindo excelente trabajo, la pega blanca la usaste directamente del envase o le colocas algún aditivo extra ?
Saludos @equipodelta, la gallina te quedó muy bien, la técnica de usar pegamento para dar brillo me la han recomendado, se puede usar también en masa flexible, tu trabajo se ve impecable y brillante, espero en mi próxima escultura usar pegamento para darle brillo, gracias por compartir.
Feliz fin de semana!
This is really nice 😊
Happy new year 😍😍😀