🐾🐾🐾
Hola a todos... 🐱🐾💕
Hola a mis queridos Hiver, y a la querida comunidad de artistas #HiveDiy, primordialmente deseándoles de corazón que tengan un día lleno de muchísimas bendiciones, muy productivos, y sobre todo lleno de grandiosas ideas. Como siempre me encuentro por acá, muy complacida y emocionada, para mostrarles mi trabajo, que está hecho con mucho amor, y especialmente para ustedes.
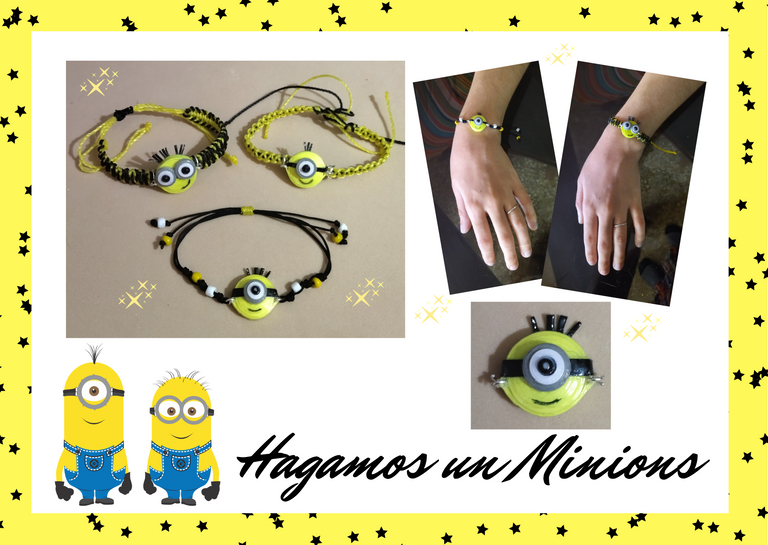
Para los amantes de esas pequeñas criaturas amarillas que a muchos nos han sacado sonrisas por sus gestos y acciones tan graciosas, que vienen de una producción realizada digitalmente en 3D y que derivan en varias secuencias de películas llamadas "Los Minions", les traigo un bonito dije en 3D, elaborado con la técnica de quilling art, que pueden colocar en la pulsera de su preferencia y hasta convertirlos en un collar, zarcillos, o souvenir si así lo desean. Espero sea de su gusto, y que con ello puedan realizar un obsequio a una personita especial o llevarlos a cabo para la venta.

Hello everyone... 🐱🐾💕
Hello to my dear Hiver, and to the dear community of artists #HiveDiy, first of all wishing you a day full of many blessings, very productive, and above all full of great ideas. As always I am here, very pleased and excited to show you my work, which is made with love, and especially for you.
For the lovers of those little yellow creatures that have made many of us smile with their funny gestures and actions, which come from a production made digitally in 3D and that derive in several sequences of movies called "The Minions", I bring you a nice 3D pendant, made with the quilling art technique, that you can place on the bracelet of your choice and even turn them into a necklace, earrings, or souvenir if you wish. I hope you like it, and that with it you can make a gift to a special person or take them out for sale.
🐾🐾🐾
Comencemos:😃
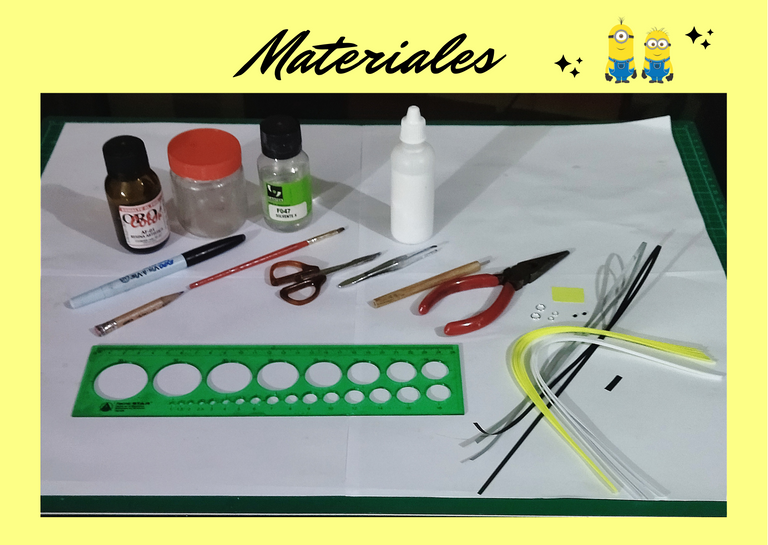
Materiales:📏✏️✂️
• Cintas de quilling de 3mm de ancho, amarillo fluorescente, negra, blanca, plateada.
• Aguja para quilling.
• Pega blanca.
• Tijera.
• Regla con diversas medidas de circunferencia.
• Alicate punta fina.
• Argollas pequeñas y medianas de bisutería.
• Mostacilla negra.
• Lápiz y marcador negro punta fina.
• Pinza punta fina.
• Solvente X.
• Resina Artística.
• Frasco de vidrio.
• Pincel.

Let's get started: 😃
Materials:📏✏️✂️
- Quilling ribbons 3mm wide, fluorescent yellow, black, white, silver.
- Quilling needle.
- White glue.
- Scissors.
- Ruler with different circumference measures.
- Fine-nosed pliers.
- Small and medium-sized costume jewelry rings.
- Black clay.
- Pencil and black fine tip marker.
- Fine tip tweezers.
- Solvent X.
- Artistic resin.
- Glass bottle.
- Paintbrush.
🐾🐾🐾
🐾🐾🐾
Paso a paso:💖
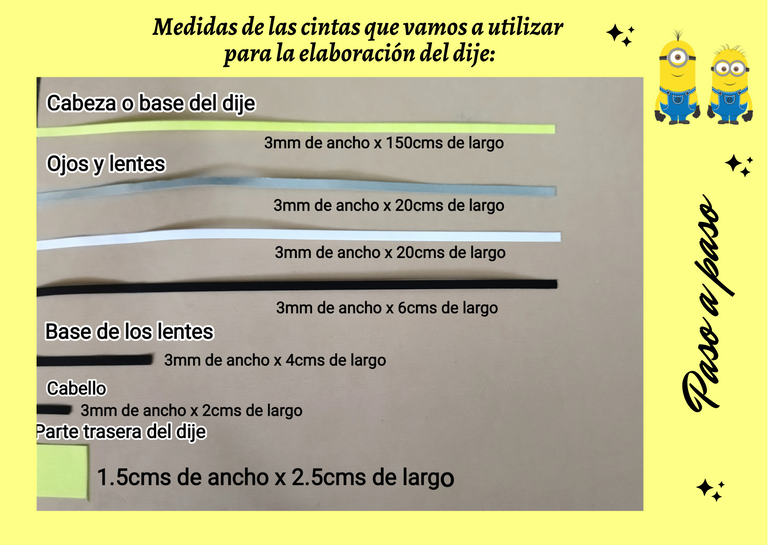
• Medidas de las cintas que vamos a utilizar para la elaboración del dije:

Step by step:💖
- Measurements of the ribbons that we are going to use for the elaboration of the pendant:
🐾🐾🐾
🐾🐾🐾
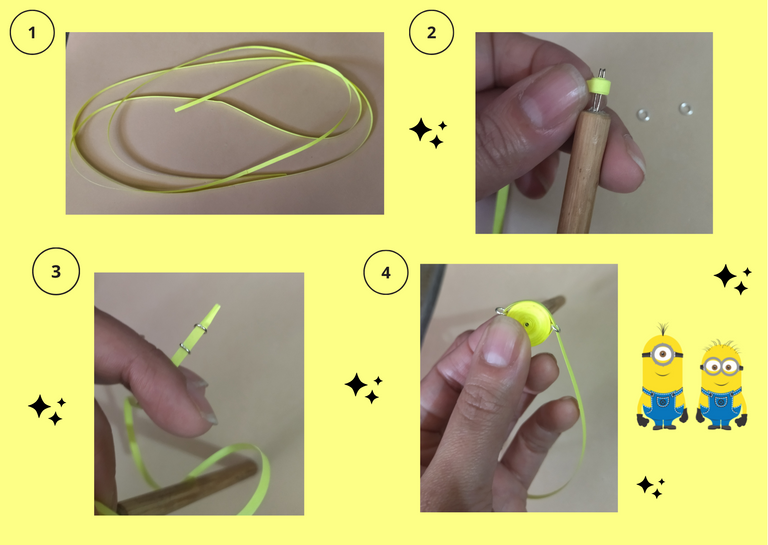
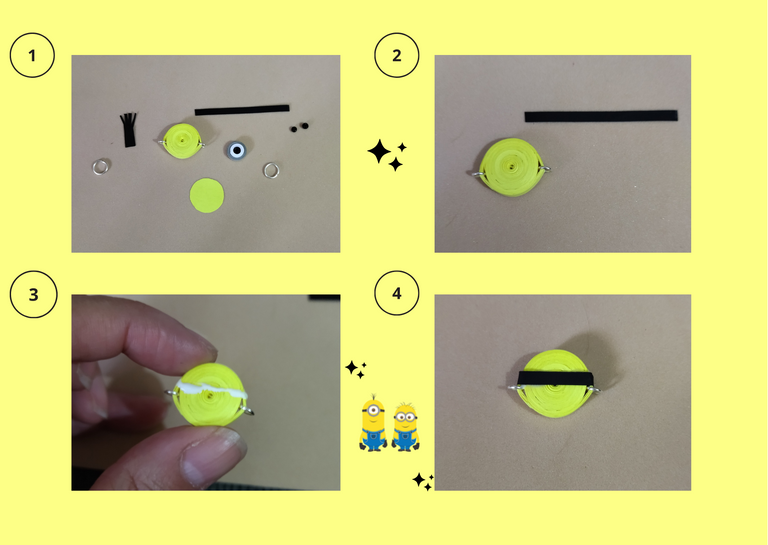
• Para comenzar vamos a necesitar una cinta amarilla fluorescente de 3mm de ancho x 150cms de largo, como no vamos a conseguir una cinta de esa longitud, previamente las unimos con pega, hasta alcanzar el largo requerido.
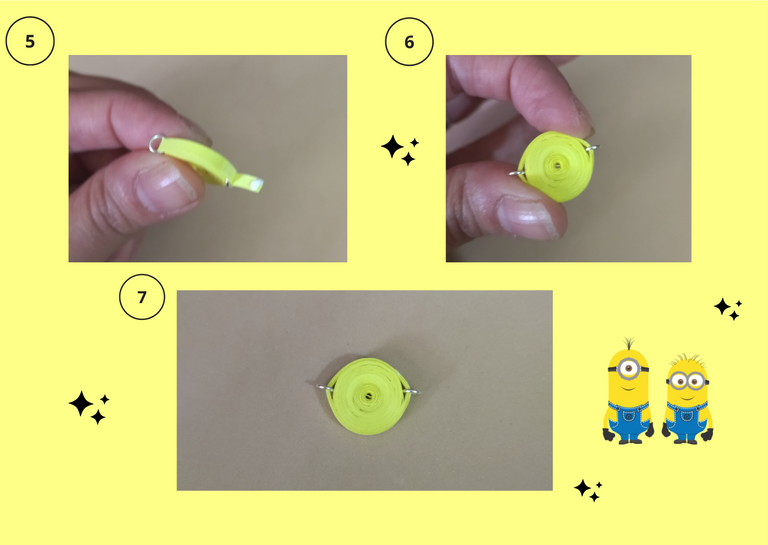
• Una vez unidas nuestras cintas, tomamos la aguja para quilling, (tengamos las dos argollas pequeñas de bisutería a la mano ya que las vamos a necesitar), procedemos a enrollar nuestra cinta, faltando unas tres vueltas para finalizar introducimos las argollas de bisutería en nuestra cinta, (centramos que queden de lado y lado), terminamos de enrollar nuestra cinta y sellamos con pega. Vamos a obtener un círculo cerrado, que será la cabeza o base de nuestro dije.

To start we will need a 3mm wide x 150cms long fluorescent yellow ribbon, as we are not going to get a ribbon of that length, we previously join them with glue, until we reach the required length.
Once our ribbons are joined, we take the quilling needle, (we have the two small costume jewelry rings at hand because we are going to need them), we proceed to roll our ribbon, missing about three turns to finish we introduce the costume jewelry rings in our ribbon, (we center that they are side and side), we finish rolling our ribbon and seal with glue. We will obtain a closed circle, which will be the head or base of our pendant.
🐾🐾🐾
🐾🐾🐾
🐾🐾🐾
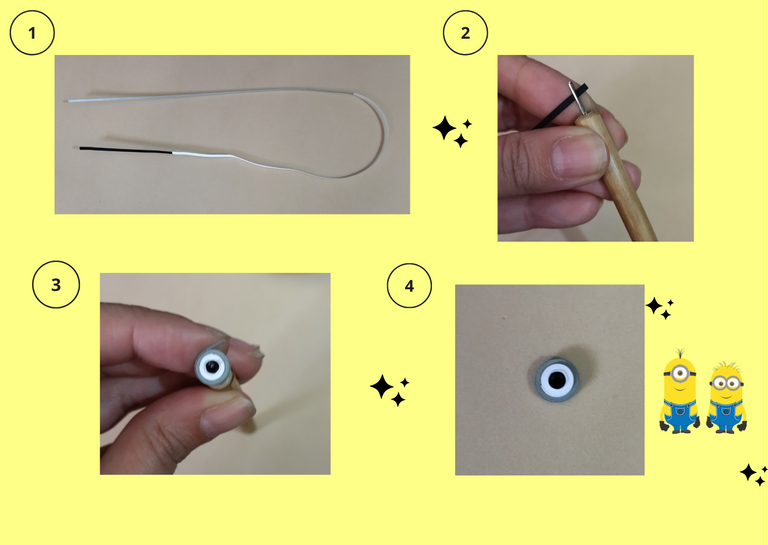
• Vamos ahora con el ojo y lente, para este necesitaremos una cinta negra de 3mm de ancho por 6cms de largo, una blanca de 3mm de ancho x 20cms de largo, y una plateada de 3mm de ancho por 20cms de largo, teniendo nuestras cintas procedemos a pegarlas con pega blanca en el siguiente orden negra, blanca y plateada, yo las uní previamente. Al tener nuestras cintas unidas tomamos la aguja para quilling, empezamos enrollando por la parte negra hasta llegar al final que es la plateada, al terminar sellamos con pega, de esta manera estaremos formando un círculo cerrado que será el ojo y lente de nuestro Minions.

- Let's go now with the eye and lens, for this we will need a black ribbon 3mm wide by 6cms long, a white ribbon 3mm wide x 20cms long, and a silver ribbon 3mm wide by 20cms long, having our ribbons we proceed to glue them with white glue in the following order black, white and silver, I joined them previously. When we have our ribbons together we take the quilling needle, we start rolling the black part until we reach the end which is the silver one, when we finish we seal with glue, in this way we will be forming a closed circle that will be the eye and lens of our Minions.
🐾🐾🐾
🐾🐾🐾
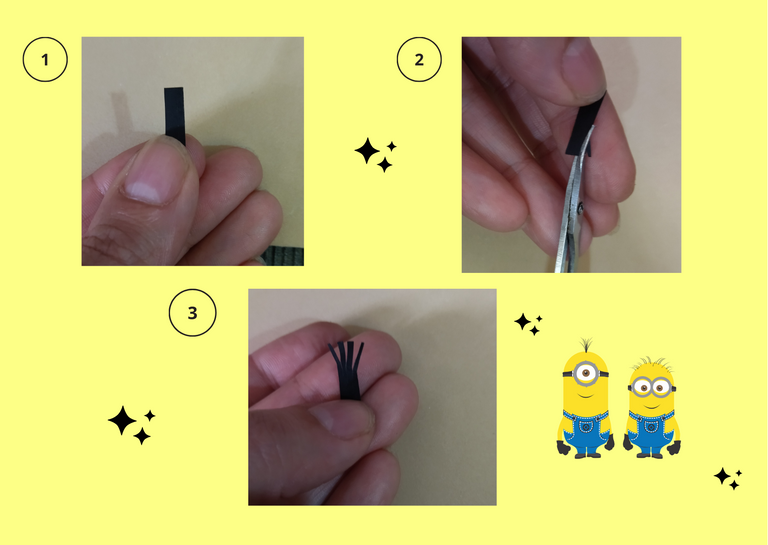
• Para el cabello, tomaremos un pedacito de cinta negra de 3mm de ancho x 2cms de largo, tomamos una tijera y picamos en 3 o 4 partes sin llegar al final de la cinta, para formar el cabellito de nuestro Minions.

- For the hair, we will take a piece of black ribbon 3mm wide x 2cms long, take a scissors and cut in 3 or 4 parts without reaching the end of the ribbon, to form the hair of our Minions.
🐾🐾🐾
🐾🐾🐾
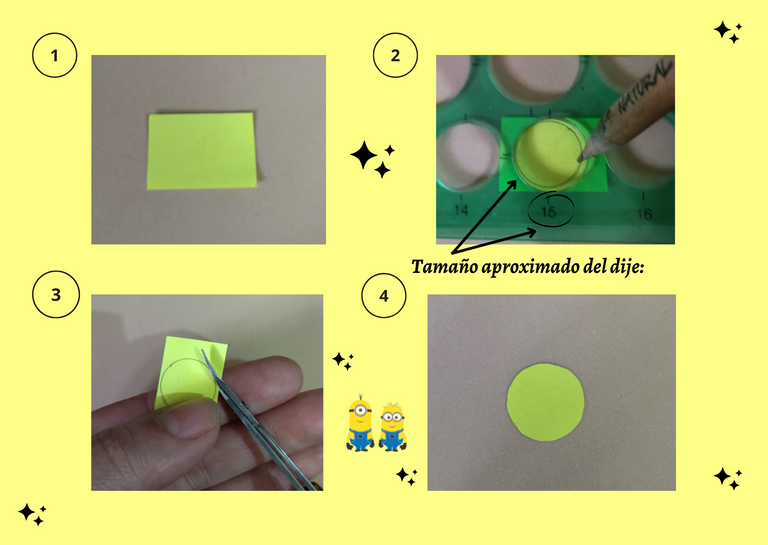
• Para la parte trasera del dije decidí hacer un círculo del mismo tamaño de la pieza, ya que al pegar el cabello y la base de los lentes nos van a quedar imperfecciones, y de esta manera las tapamos. Tomamos un trozo de hoja del mismo color del dije, con la regla para circunferencia marcamos con un lápiz más o menos el tamaño de nuestro dije, recortamos y reservamos.

- For the back of the pendant I decided to make a circle of the same size as the piece, because when we glue the hair and the base of the glasses we will have imperfections, and this way we cover them. We take a piece of paper of the same color as the pendant, with the ruler for circumference we mark with a pencil more or less the size of our pendant, cut it out and set it aside.
🐾🐾🐾
🐾🐾🐾
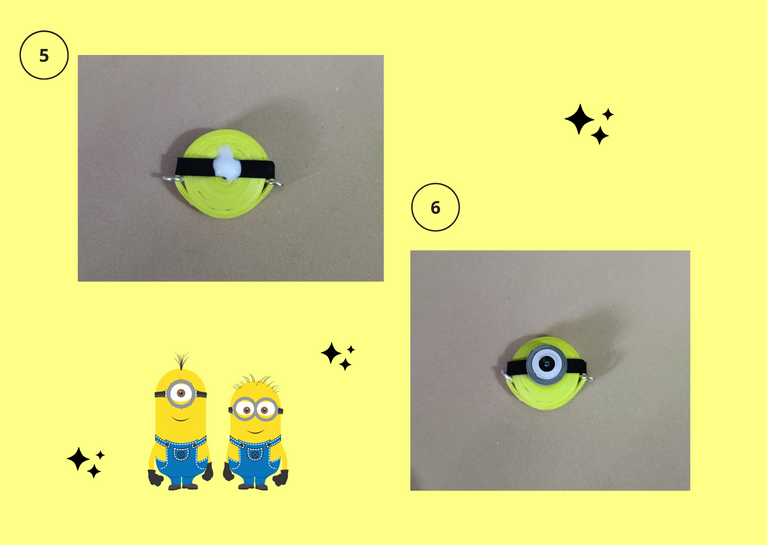
• Ahora vamos a unir nuestras piezas para elaborar nuestro dije de Minions, tomaremos nuestro círculo cerrado amarillo fluorescente, y le vamos a pegar la base de los lentes la cual será una cinta negra de 3mm de ancho por 4cms de largo, colocaremos pega en el medio del circulo por la parte delantera, trasera, y pondremos la cinta alrededor de la pieza. Luego justo en el medio de la cinta negra que acabamos de colocar, ponemos un punto de pega y procedemos a pegar el ojo.

- Now we are going to join our pieces to make our Minions charm, we will take our fluorescent yellow closed circle, and we will glue the base of the glasses which will be a black ribbon of 3mm wide by 4cms long, we will place glue in the middle of the circle in the front, back, and we will put the ribbon around the piece. Then right in the middle of the black tape that we just placed, we put a point of glue and proceed to glue the eye.
🐾🐾🐾
🐾🐾🐾
🐾🐾🐾
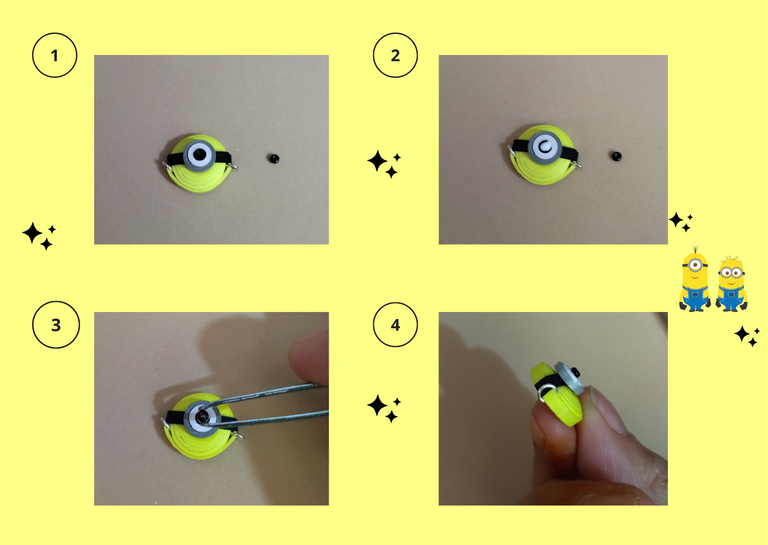
• Ahora vamos a darle al ojito de nuestro Minions un efecto aún más 3d, coloquemos con la ayuda de la pinza punta fina, y un punto de pega blanca, la mostacilla que teníamos reservada en la parte central negra del ojo.

- Now let's give the eye of our Minions an even more 3d effect, let's place with the help of the fine tip tweezers, and a point of white glue, the mustard that we had reserved in the central black part of the eye.
🐾🐾🐾
🐾🐾🐾
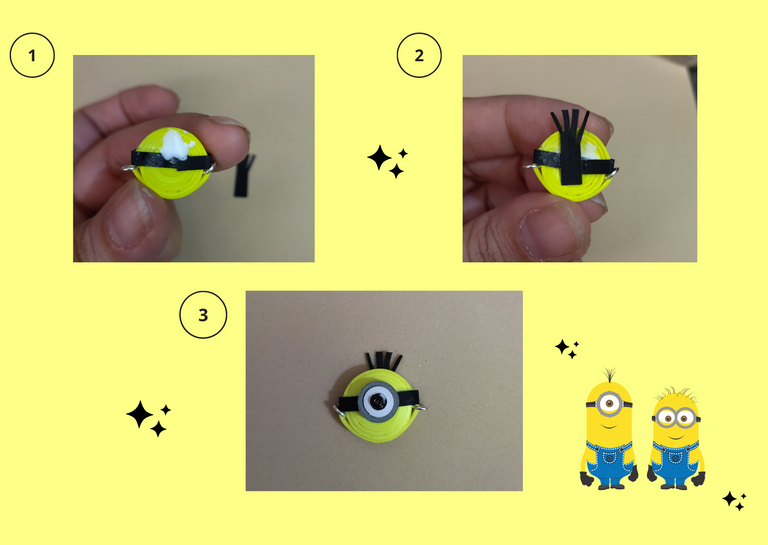
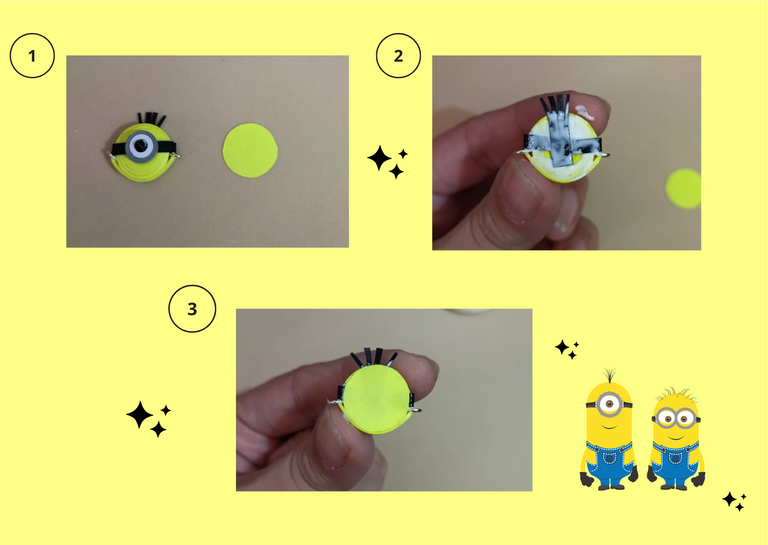
• Coloquemos el cabello, tomemos la cinta negra que previamente habíamos picado en 4 partes, coloquemos pega por la parte de atrás en el centro de la pieza y peguemos, separemos un poco los cabellos.

- Let's place the hair, take the black ribbon that we had previously cut into 4 parts, place the glue on the back in the center of the piece and glue, separate the hair a little bit.
🐾🐾🐾
🐾🐾🐾
• Ahora tapemos las imperfecciones, tomemos el circulo amarillo que previamente habíamos realizado y lo pegamos en la parte trasera de la pieza.

- Now let's cover the imperfections, take the yellow circle that we had previously made and glue it on the back of the piece.
🐾🐾🐾
🐾🐾🐾
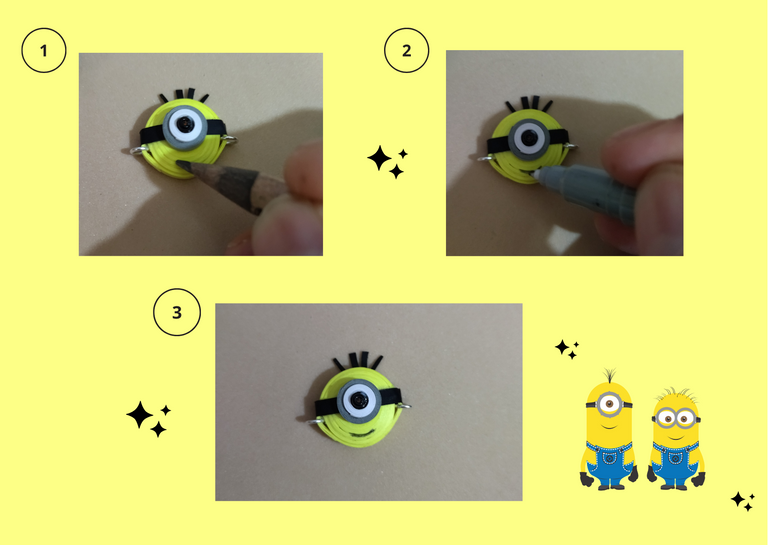
• Pintemos la boca al Minions, tomamos el lápiz, y haremos la forma que más nos guste luego la repasaremos con el marcador negro punta fina.

- Let's paint the mouth of the Minions, take the pencil, and make the shape we like the most, then we will go over it with the black fine tip marker.
🐾🐾🐾
🐾🐾🐾
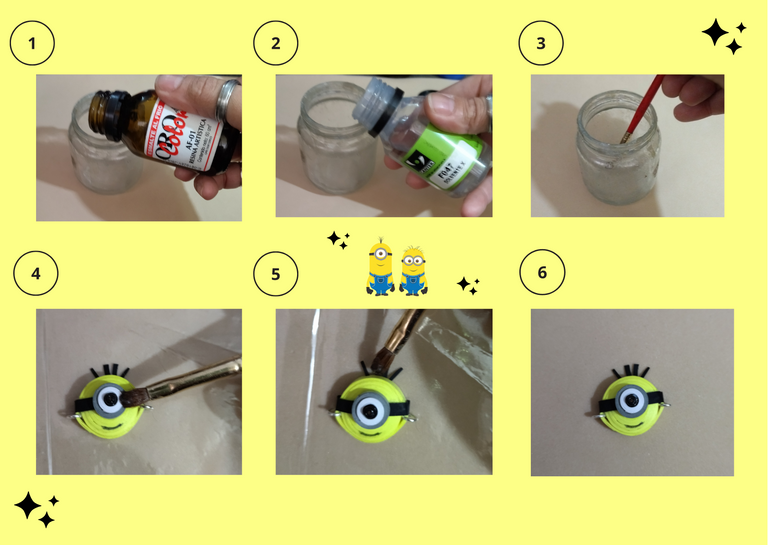
• Para finalizar vamos a colocarle la protección liquida a nuestro dije, tomamos una parte de resina artística, una parte de solvente x, la vertemos en el frasco de vidrio, revolvemos y tomamos con el pincel y añadiremos en todas las partes de nuestro dije, esperamos que seque y repetimos la operación, vamos a enfocarnos en darle varias manos a los cabellos para que queden totalmente plastificadas y no se rompan, dejamos secar de un día para otro.
• De esta manera ya tenemos nuestro dije para pulsera de Minions en 3D listo para colocar en la pulsera de nuestra preferencia.

- Finally we are going to put the liquid protection to our pendant, we take one part of artistic resin, one part of solvent x, we pour it in the glass bottle, stir and take it with the brush and add it in all parts of our pendant, we wait for it to dry and repeat the operation, we will focus on giving several hands to the hair so that they are fully plasticized and do not break, let dry overnight.
- This way we have our 3D Minions bracelet charm ready to place on the bracelet of our preference.
🐾🐾🐾
🐾🐾🐾
Resultado Final:💕

Final Result:💕
🐾🐾🐾
Tips 💡
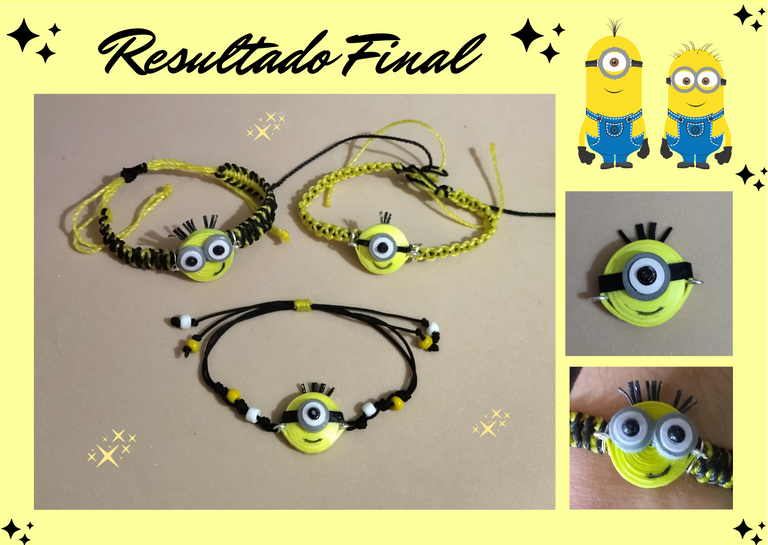
• En mi caso realice tres dijes de minions, el que le mostré el paso a paso de un solo ojo, lo monte en una sencilla pulsera de hilo chino, a la cual le añadí algunas perlitas blancas y amarillas a los lados del dije y en las puntas de la pulsera, para darle un detalle bonito, y para cerrar le coloque un nudo corredizo amarillo para darle mayor vistosidad.
• Realice dos Minions mas, uno con dos ojitos y otro de un solo ojo, los cuales coloque en unas bonitas pulseras de macramé que ya tenía tejidas, recuerden que estos dijes son elaborados para colocarlos en la pulsera de su preferencia, has la que más te guste. 😃
• Como les mencione anteriormente realice varios dijes, para llevar a cabo el de dos ojos sencillamente tienes que seguir los pasos que te mencione en el tutorial, elaboras otro ojo y simplemente lo añades a la pieza, al igual que el cabello, picas otras tiras de cinta negra y añades más cabellitos a tu Minions, puedes hacerlo como mejor lo prefieras, deja volar tu imaginación.
¿Que les pareció, les gustó?
Espero que sí, que les haya gustado mi explicación, procedimiento y fotos, los hice con mucho cariño por y para ustedes.
"Deja salir esa musa que te inspira, y deja volar tu imaginación".
Gracias a todos, nos vemos en la próxima. 🐾🐱💕

Tips 💡
In my case I made three minions charms, the one I showed you the step by step of a single eye, I mounted it on a simple Chinese thread bracelet, to which I added some white and yellow beads on the sides of the charm and at the ends of the bracelet, to give it a nice detail, and to close it I placed a yellow slip knot to give it more showiness.
I made two more Minions, one with two eyes and one with only one eye, which I placed on some pretty macrame bracelets that I already had woven, remember that these charms are made to be placed on the bracelet of your choice, do the one you like the most. 😃
As I mentioned before I made several charms, to make the one with two eyes you simply have to follow the steps I mentioned in the tutorial, make another eye and simply add it to the piece, just like the hair, chop other strips of black ribbon and add more hair to your Minions, you can do it as you prefer, let your imagination run wild.
What did you think, did you like it?
I hope you did, I hope you liked my explanation, procedure and photos, I made them with love for you.
"Let out that muse that inspires you, and let your imagination fly".
Thank you all, see you next time. 🐾🐱💕
🐾🐾🐾

All photos used in this post are of my authorship and have been taken on my personal cell phone a Redmi 9T and edited in Canva Dividers and banner made by me in Paint Tool Sai Translated with the help of DeepL


Has sido votado por
PROYECTO ENLACE
'Conectando Ideas y Comunidades'
PROYECTO ENLACE es un proyecto de curación de habla hispana enfocado en recompensar contenido de calidad y apoyar autores en su proceso de crecimiento en HIVE.
Creemos y apostamos por el futuro de esta gran plataforma, y estamos muy emocionados de poder hacerla crecer junto a esta comunidad. Así que te invitamos a usar nuestra etiqueta ENLACE y estar atento a todas las actividades que tenemos preparadas y que estaremos publicando en breve.
¿QUIERES AUTOMATIZAR TUS GANANCIAS DE CURACIÓN? SE PARTE DEL PROYECTO ENLACE APOYANDO A NUESTRO TRAIL EN HIVE.VOTE INGRESA AQUÍ PARA CONOCER LOS DETALLES.
¿QUIERES INVERTIR ENLACE? DESCUBRE COMO HACERLO Y GENERAR INGRESOS DE FORMA SEMANAL MEDIANTE TU DELEGACIÓN DE HP AQUÍ TE EXPLICAMOS COMO.
Te invitamos a participar en nuestro servidor de Discord: https://discord.gg/3S9y7BbWfS
Atentamente
EQUIPO ENLACE 2022
Gracias por el apoyo💖😃
Que bello dije para un juego de accesorios para las niñas te aseguro que les encantaran❤👍. Bueno a nosotras también😍. Excelente trabajo amiga; como siempre realizando trabajos de calidad. Mil bendiciones y un abrazo fuerte querida amiga 🤗❤
Gracias amiga, por siempre pasar por aquí, y por tus bellos comentarios. Me alegra que te haya gustado. Y pues claro, es para todos los gustos hasta para nosotras mismas. Yo me los pongo jajajaja. Bendiciones, que tengas bello dia.💕
Esto está muy bonito @dayadam sin duda los más pequeños de la casa lo amaran que versátil la técnica que usas creas tantas cosas hermosas.
!discovery 25
Gracias amiga, por tus palabras de tanto valor, y por el gran apoyo. Muy agradecida. Besos y mil bendiciones. Que tengas hermoso día.💖
This post was shared and voted inside the discord by the curators team of discovery-it
Join our community! hive-193212
Discovery-it is also a Witness, vote for us here
Delegate to us for passive income. Check our 80% fee-back Program
Thank you for your support💖
The rewards earned on this comment will go directly to the person sharing the post on Twitter as long as they are registered with @poshtoken. Sign up at https://hiveposh.com.
Your content has been voted as a part of Encouragement program. Keep up the good work!
Use Ecency daily to boost your growth on platform!
Support Ecency
Vote for new Proposal
Delegate HP and earn more
Thank you for your support💞
Congratulations @dayadam! You have completed the following achievement on the Hive blockchain and have been rewarded with new badge(s):
Your next target is to reach 2000 upvotes.
You can view your badges on your board and compare yourself to others in the Ranking
If you no longer want to receive notifications, reply to this comment with the word
STOPCheck out the last post from @hivebuzz:
Support the HiveBuzz project. Vote for our proposal!
Me encantan! Dios te bendiga esas manos amiga
Amen, Amen. Mil gracias amiga por visitarme. Me alegra tanto que te gusten. Besotes. Te me cuidas mucho, que tengas un maravilloso día...🌹🌈💖
Hola amiga, te quedaron super bellos, se ven muy tiernos.
Holaaaa. Gracias amiga. Que linda. Estoy a la espera de que traes esta semana. Porque te cuento, que tenemos transmisión de pensamientos. Ya esos Minions los tenía pensado hace tiempo y tú hiciste un Minions, cuando pensé en las patas de gato me hiciste la tarjeta de gatito jajajaja, siempre te me adelantas. Pero bueno de igual manera como te lo he dicho nuestro trabajo es diferente, yo trabajo bisutería, decoración, y la parte más minimalista del quilling, me gusta hacer todo pequeñito jajajajja. Saludos... 💕🥰
Holaaaa, que dijes tan preciosos ¡Wow! Eres muy buena en esa técnica. Saludoss 💕😘
Holaaa mi niña. Gracias corazón. Alagada por tu cumplido. Saluditos y bendiciones.😘💖
quedo bellisimo
Gracias cariño💗🌺