retoHola amigos de #hivediy 🙋 Feliz día para todos. Estoy encantada con todos los post publicados para este concurso. Como siempre el llamado a la participación ha tenido gran receptividad. No me animo a entrar en el pero si tengo el deseo de aprender. Agradezco a @dayadam por sus lindas palabras y elogios. Apenas estoy retomando las actividades manuales, tengo muchísimo que aprender de ustedes, en #hive he conseguido el espacio ideal para recibir mucha información sobre manualidades, especialmente esta comunidad que a buena hora fue creada.
En esta oportunidad quiero presentar mis cajitas forradas con tela, antes había leído y observado varios artículos decorativos realizados con la técnica de decougage, es asombroso el resultado que puede lograrse aplicándola. Vengo de leer una entrada que me encantó ❤️ de manera muy minuciosa y paciente ella logró realizar una hermosa decoración. Espero pronto conseguir algunas telas para practicar siguiendo su tutorial.
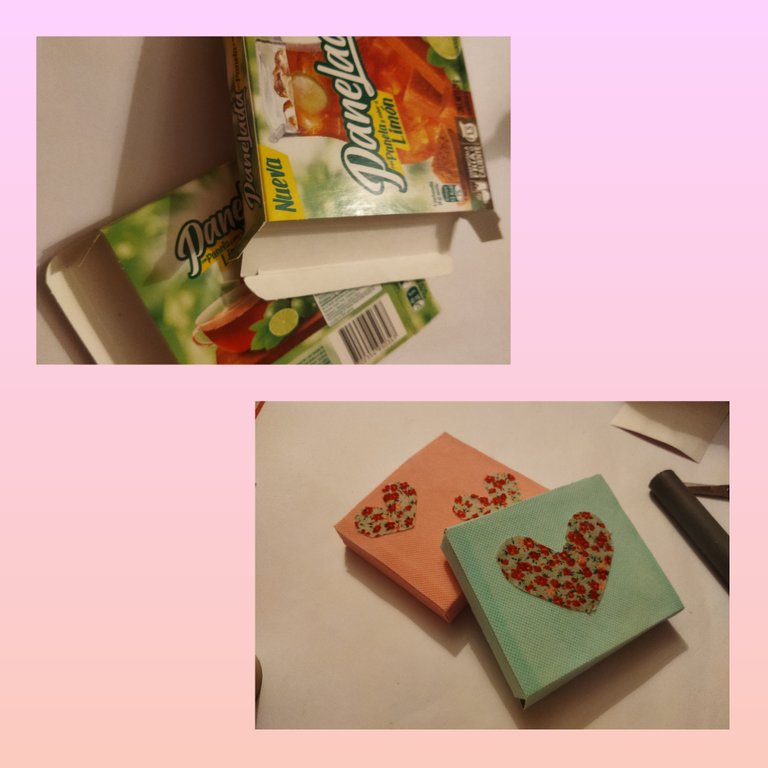
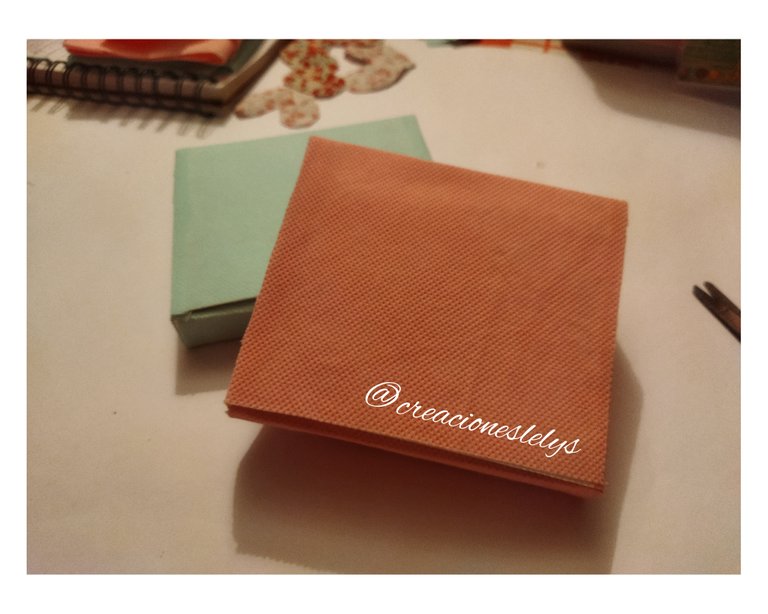
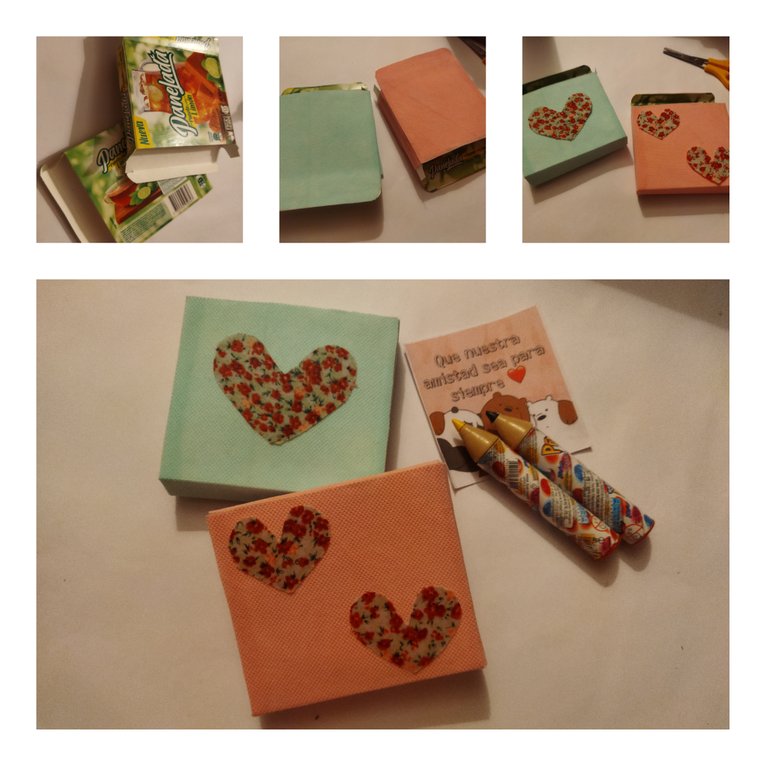
Hace unos días empezamos a comprar sobres de una bebida refrescante nueva en el mercado, como siempre, yo le pedí a mis hijos que no me botaran las cajas que estuvieran en buen estado. Estas cajitas me sirvieron para realizar mi proyecto. ¡Les muestro!
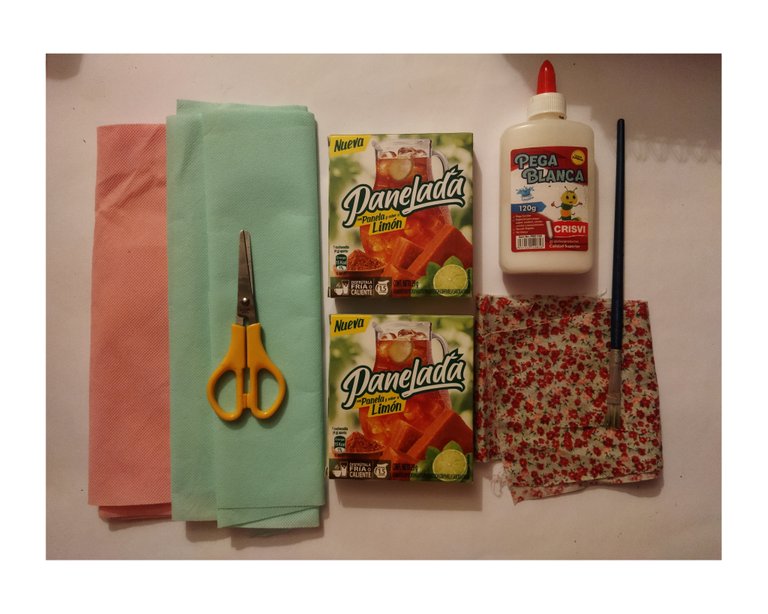
Para realizar este proyecto utilicé muy pocos materiales:
- Cajas de cartón vacías, limpias y secas.
- Retazo de tela estampada.
- Retazos de tela pop colores rosado y verde agua.
- Tijeras.
- Pegamento.
- Tubo plástico.
- Pincel.
- Lápiz de grafito.
Realizar esta decoración ameritó de tiempo para el secado. Trabajar con pegamento blanco no es costumbre para mí por lo que ahora entiendo porqué hay que ser paciente al aplicar la técnica.
Paso 1.
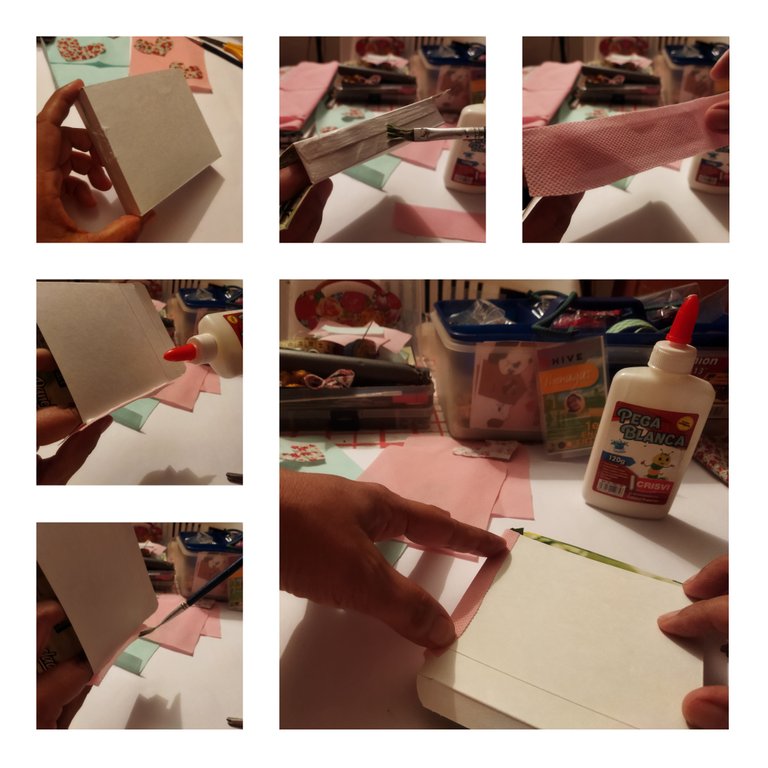
Empecé abriendo con sumo cuidado cada cajita. La finalidad es usarla por el lado interior que es de color blanco. Lo que hice fue despegarla un poco, darle la vuelta y volverla a pegar. Para ello usé pegamento blanco. Ajusté con unos ganchos de madera mientras se secaban.
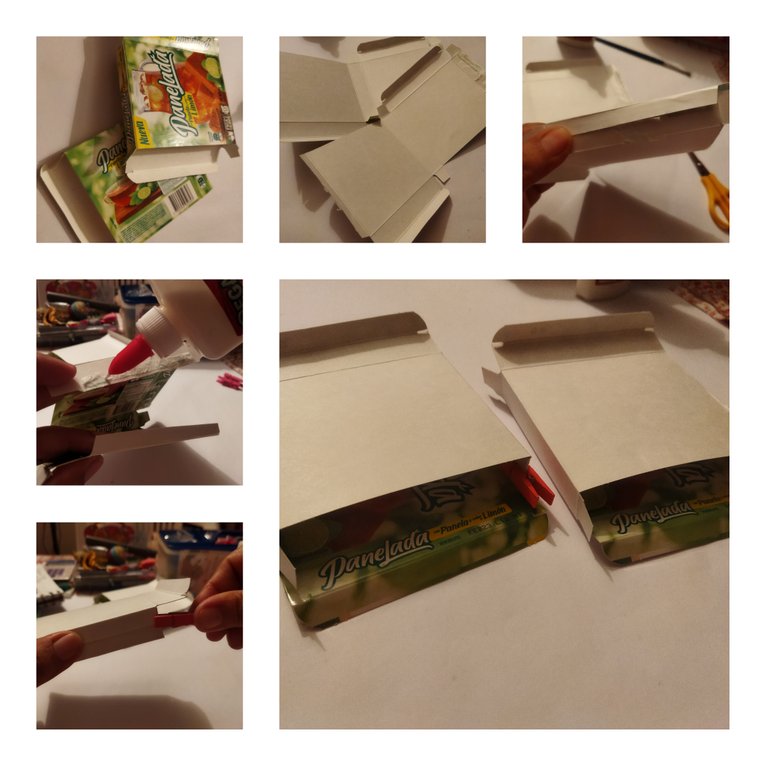
Paso 2.
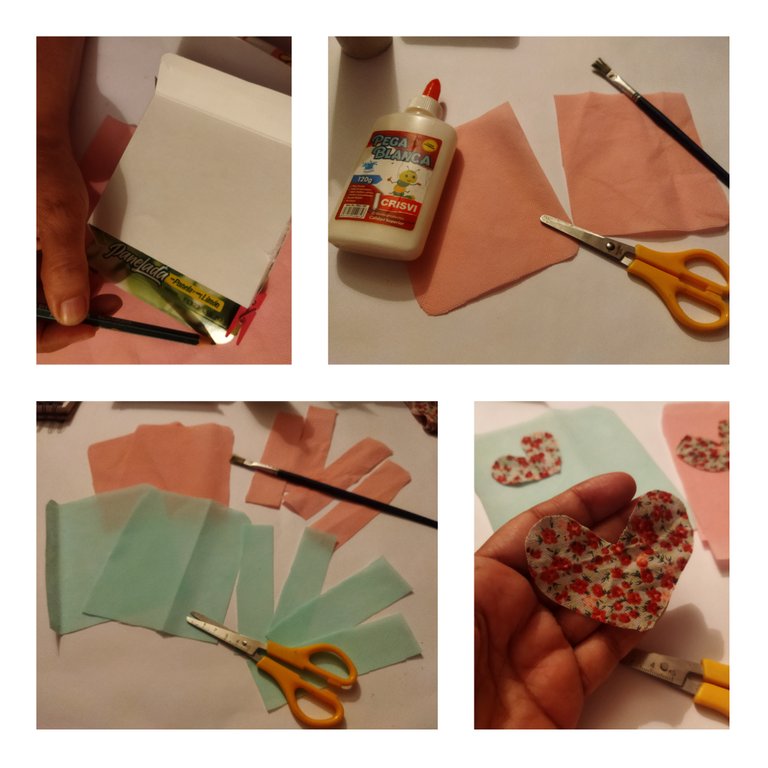
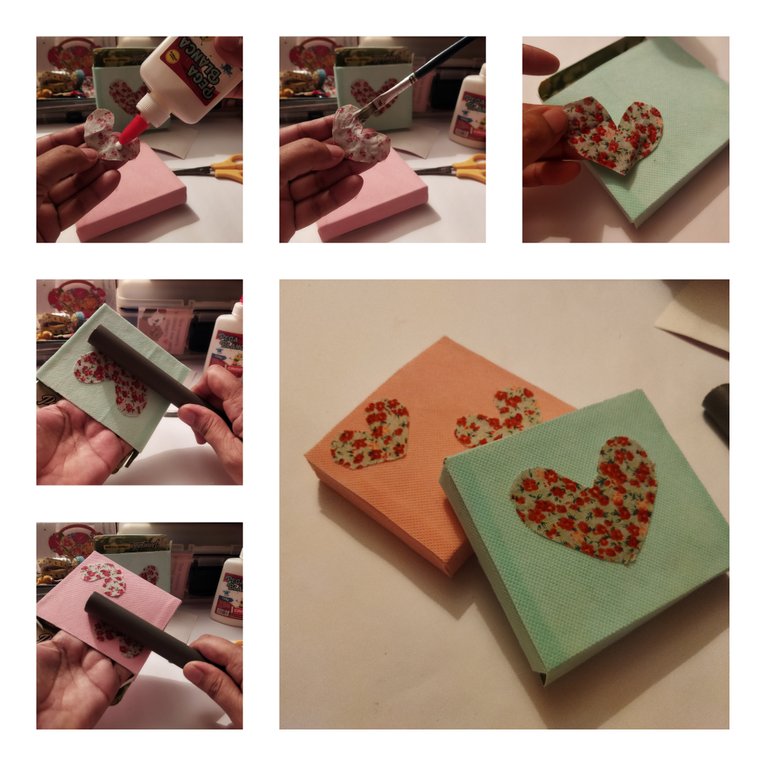
Al estar secas las cajitas tomé una de ellas y la usé como molde para cortar las telas. Marqué con un lápiz de grafito en cada tela pop. Corté dos cuadros con solapa en cada una de las telas. Igualmente corté dos laterales de 3 cm de ancho cada uno en ambos colores de tela. Además en la tela estampada recorté figuras en forma de corazón de diferentes tamaños.
Paso 3.
Empecé el forrado de las cajas por los laterales. Coloqué con el pincel una capa uniforme de pega blanca y luego monté la tela, pegando las orillas encima del cartón.
Paso 4.
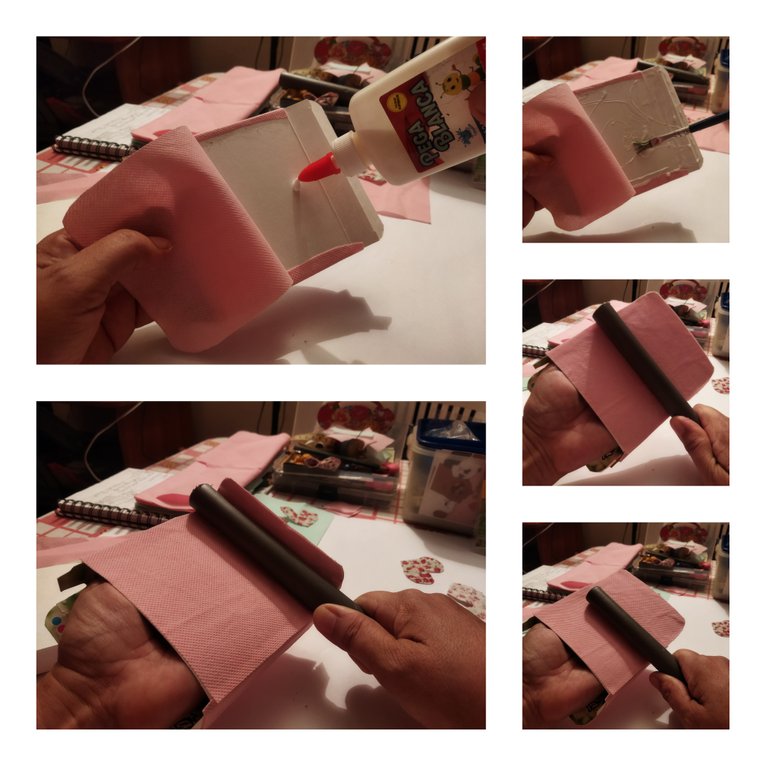
Forré el cuerpo de las cajitas. Igualmente coloqué una base de pegamento extendido con el pincel. Sosteniendo un poco mientras se quedaba pegado a la caja. Me ayudé con el tubo plástico para evitar que quedaran bolsas de aire y procurar el mayor alisado posible.
Paso 5.
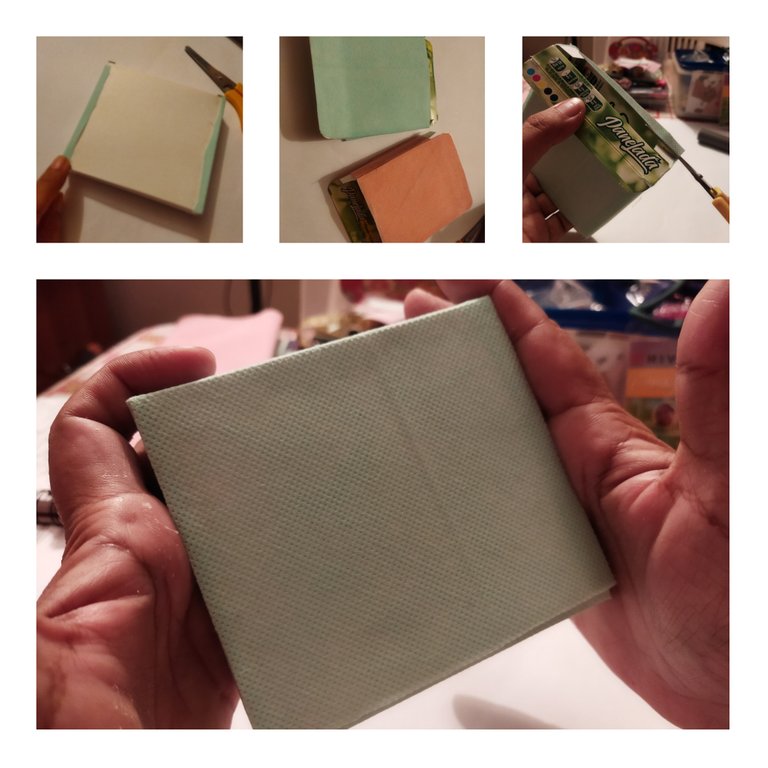
Una vez bien seco procedí a recortar los excesos de telas y hacer el doblés en las tapas de las cajas.

Paso 6.
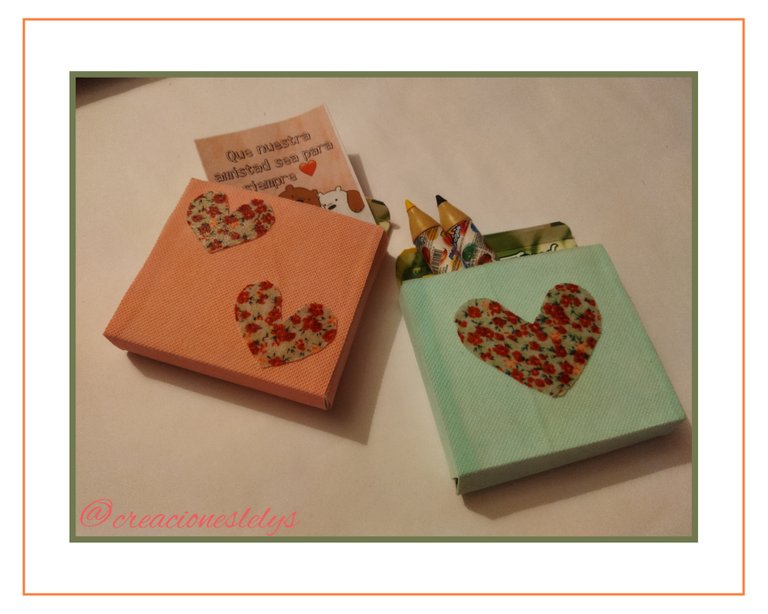
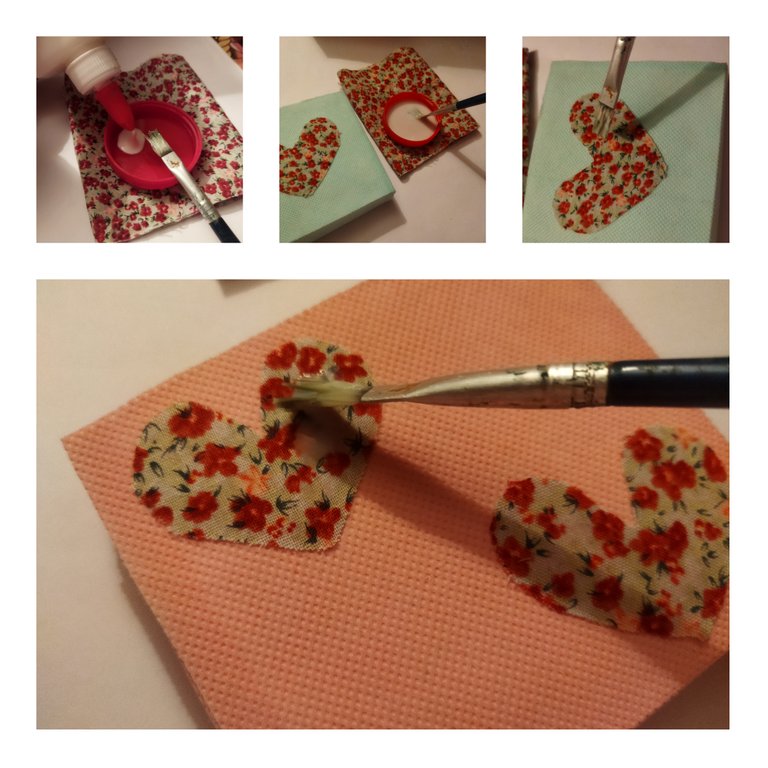
Coloqué los corazones de tela estampada en cada una de las cajitas. Usé pegamento blanco para adherirlas y luego mezclé un poco de pega blanca con agua para barnizar los corazones. Me encantó el efecto que le dió el barniz.
Realmente se ven muy lindas las cajitas. La transformación me gustó mucho. Ahora tengo dos cajas para llenar de obsequios y regalar a los niños en su día. ¡Muchas gracias por leer! Espero mejorar el uso de esta técnica porque me parece fascinante. Los animo a realizar las suyas.
Todas las fotos son de mi propiedad. Edité con Polish. Usé el traductor de DeepL. Hasta la próxima. Bendiciones.
English.
challengeHi #hivediy friends 🙋 Happy day to all. I am thrilled with all the posts published for this contest. As always the call for entries has been very well received. I am not encouraged to enter the but I do have the desire to learn. I thank @dayadam for his nice words and compliments. I'm just getting back to crafting, I have so much to learn from you, in #hive I've found the ideal space to receive a lot of information about crafts, especially this community that was created in good time.
In this opportunity I want to present my little boxes lined with fabric, before I had read and observed several decorative items made with the decoupage technique, it is amazing the result that can be achieved by applying it. I just came from reading a post that I loved ❤️ in a very thorough and patient way she managed to make a beautiful decoration. I hope soon to get some fabrics to practice following her tutorial.
A few days ago we started buying sachets of a new soft drink in the market, as always, I asked my kids not to throw away the boxes that were in good condition. I used these boxes to make my project, I show you!
I used very few materials to make this project:
- Empty cardboard boxes, clean and dry.
- Piece of printed fabric.
- Pieces of pop fabric in pink and aqua green colors.
- Scissors.
- Glue.
- Plastic tube.
- Paintbrush.
- Graphite pencil.
This decoration took some time to dry. Working with white glue is not a habit for me so now I understand why you have to be patient when applying the technique.
Step 1.
I started by carefully opening each box. The purpose is to use the inside side which is white. What I did was to peel it off a little, turn it upside down and glue it back together. For this I used white glue. I adjusted with some wooden hooks while they dried.
Step 2.
When the boxes were dry, I took one of them and used it as a mold to cut the fabrics. I marked with a graphite pencil on each pop fabric. I cut two squares with flaps on each of the fabrics. I also cut two 3 cm wide sides in both fabric colors. I also cut out heart-shaped shapes of different sizes on the printed fabric.
Step 3.
I started lining the boxes on the sides. I applied an even layer of white glue with the brush and then mounted the fabric, gluing the edges on top of the cardboard.
Step 4.
I lined the body of the boxes. I also placed a base of glue spread with the brush. Holding a little while it stuck to the box. I helped myself with the plastic tube to avoid air pockets and to make sure it was as smooth as possible.
Step 5.
Once dry, I proceeded to trim the excess fabric and make the folds on the box lids.
Step 6.
I placed the printed fabric hearts on each of the boxes. I used white glue to adhere them and then mixed some white glue with water to varnish the hearts. I loved the effect the varnish gave.
The boxes look really nice. I really liked the transformation. Now I have two boxes to fill with gifts and give to the children on their day. Thank you very much for reading! I hope to get better at using this technique because I find it fascinating. I encourage you to make your own.
All photos are my property. I edited with Polish. I used the translator of DeepL. See you next time. Blessings.
The rewards earned on this comment will go directly to the people sharing the post on Twitter as long as they are registered with @poshtoken. Sign up at https://hiveposh.com.
Te quedaron muy lindas...!!! ☺️
Muchas gracias.
Amiga te quedaron bien lindas tus cajas, yo dije en estos días que esas cajitas debían servir para algo, me encantó el toque que les diste y como te quedaron, felicidades 👏 💕
Hola. Si. lalamoarte interna es muy bknaca y limpia. igual a la de las cajas de cereales. Se les puede sacar provecho. Gracias 🙋😁🤫
Hola amiga @creacioneslelys , que linda eres gracias por la mención, siempre mis palabras estarán llenas de amor y motivación para mis compañeras de arte. Las cajitas te quedaron muy lindas. Las hubieses colocado como parte de la entrada al concurso ya que aplicaste la técnica. No es fácil trabajar con goma blanca para ciertas superficies, pero decidiste usar tela, y es una buena combinación.
Gracias por motivarte a realizarlas, y compartir tu bello trabajo. Bendiciones 🤗😘✨🥰🌹
Hola. Espero participar en próximos concursos. Muchas gracias por el apoyo. 🥳❤️🙋
Tenía pendiente benir a comentar. Quedó muy bonita. En mas de una ocasión todos hemos tenido estas cajitas en casa y es genial poder darles un uso más que simplemente desecharlas, porque como siempre digo el reciclaje es una muy buena opción.
De nuevo, cuidado con el uso de etiquetas de ballenas.
Gracias por compartir este trabajo con nosotros.
Thank you for sharing this amazing post on HIVE!
non-profit curation initiative!Your content got selected by our fellow curator @rezoanulvibes & you just received a little thank you via an upvote from our
You will be featured in one of our recurring curation compilations and on our pinterest boards! Both are aiming to offer you a stage to widen your audience within and outside of the DIY scene of hive.
Join the official DIYHub community on HIVE and show us more of your amazing work and feel free to connect with us and other DIYers via our discord server: https://discord.gg/mY5uCfQ !
If you want to support our goal to motivate other DIY/art/music/homesteading/... creators just delegate to us and earn 100% of your curation rewards!
Stay creative & hive on!