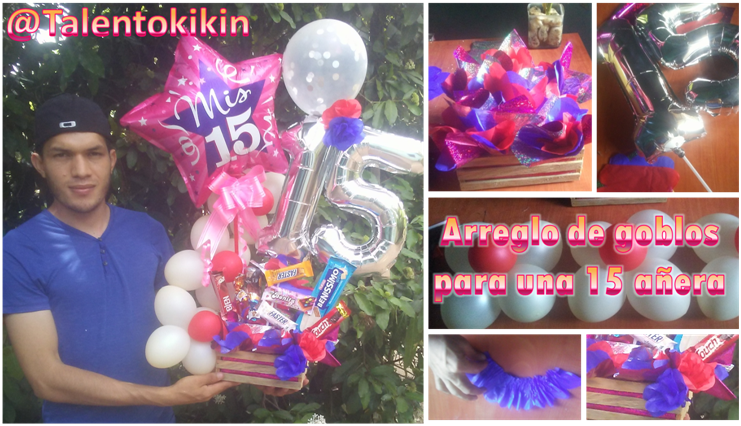
Hola a la hermosa y creativa familia de HIVE, cada día mas feliz de pertenecer a este prestigiosa comunidad, hoy quiero compartir la elaboración de un arreglo de globos que lo realice con mucho cariño para una amiga, que su mama me pidió el favor de elaborarlo para obsequiarlo de cumpleaños, y en especial porque son 15 años, la verdad tenia mucho tiempo que no realizaba un arreglo mas todavía cuando la situación país nos limita, se hizo el esfuerzo porque se lo merecía por ser buena hija, estudiosa y bella persona.
Las técnicas son fáciles de aplicar solo es de seguir paso a paso como se realiza, a pesar que algunos materiales son comprados hay que saberlo utilizar para aprovecharlos al máximo, comencemos.
Hello to the beautiful and creative family of HIVE, every day more happy to belong to this prestigious community, today I want to share the development of a balloon arrangement that I made with love for a friend, her mother asked me the favor of making it to give it as a birthday gift, and especially because it is 15 years, the truth was a long time that I did not make an arrangement even more when the country situation limits us, the effort was made because she deserved it for being a good daughter, studious and beautiful person.
The techniques are easy to apply, you just have to follow step by step how it is done, although some materials are purchased, you have to know how to use them to make the most of them, let's start.
*Una base de madera 25x25cm
*Anime reciclado
*Papel de regalo metalizado, seda azul y rojo
*4 varillas para globos
*2 globo de números 1 y 5
*1 globo grande forma de estrella
*1 lazo de cinta platica rosado
*12 globos pequeños color perlas y 3 rojos
*Dulce según sus gustos
*2 barras de silicona, pistola de silicona y tijeras
*Wooden base 25x25cm
*Recycled anime
*Metallic gift paper, blue and red silk
*4 balloon sticks
*2 balloon numbers 1 and 5
*1 large star-shaped balloon
*1 pink plastic ribbon ribbon bow
*12 small pearl colored balloons and 3 red balloons
*Candy according to your taste
*2 silicone sticks, silicone gun and scissors.
.png)
Lo primero que aremos es rellenar la base de madera con anime debe de pegarse con silicona caliente de toda la base, así evitar que se mueva el anime.
Comencemos cortando el papel de regalo metalizado en cuadro de 20x20cm, se debe doblar el papel, apoyarlo sobre la mesa, empujando la tijera hacia al lado y cortamos, como lo muestra el paso 1, luego con el papel de seda realizamos los mismo corte con un tamaño de 15x20cm, luego se dobla en tres parte para realizar un pequeño corte en forma de arco, como lo muestra la figura 2, seguidamente se coloca un papel de regalo de base dejando del color que desea que se vea hacia abajo, coloca una hoja azula y luego el rojo pegando cada una en centro, colocamos una punta del pincel en centro, doblamos para colocar silicona y pagamos al anime presionando con el pincel para presionar de modo que quedes introducido al anime, no presionar mucho porque serraría mucho la forma que se quiere lograr, colócalas desde el frente de la base colocando 3 en el frente 3 en el centro y 3 atrás.
The first thing we will do is to fill the wooden base with anime should be glued with hot silicone all over the base, to prevent the anime from moving.
Let's start by cutting the metallic wrapping paper in 20x20cm square, you must fold the paper, put it on the table, pushing the scissors to the side and cut, as shown in step 1, then with the tissue paper we make the same cut with a size of 15x20cm, then fold it in three parts to make a small cut in the shape of an arc, as shown in figure 2, then place a base wrapping paper leaving the color you want it to look down, place a sheet azula and then the red sticking each one in the center, place a tip of the brush in the center, bend to place silicone and pay the anime pressing with the brush to press so that you are introduced to the anime, do not press much because it would saw much the way you want to achieve, place them from the front of the base by placing 3 in the front 3 in the center and 3 behind.
.png)
Continuamos con el llenado de el globo decortico y números con delicadeza utilizando un pitillo fino para que no se dañe, pegamos con silicona caliente el 5 al número 1 como lo muestra el paso 2, luego se sujeta con la varilla de globo y recomiendo pegarlo con silicona para evitar que se suerte, con el globo de estrella y se le coloca un varilla de globo larga, armamos el lazo jalando las cinta pequeñas del centro y lo pegamos en la unión del globo con la varilla. Colocamos los globos por el centro de la base los números a tu lado derecho y la estrella a la izquierda.
We continue with the filling of the decortic balloon and numbers with delicacy using a thin straw so that it is not damaged, we glue with hot silicone the 5 to the number 1 as shown in step 2, then hold it with the balloon rod and I recommend to glue it with silicone to prevent it from getting lucky, with the star balloon and place a long balloon rod, we assemble the ribbon pulling the small ribbon in the center and glue it at the junction of the balloon with the rod. Place the balloons in the center of the base, the numbers on your right side and the star on the left.
.png)
Luego llenando 2 globos beige pequeños y se amarran juntos, se repite el procedimiento y unimos dos pares como lo muestra la figura 2. Inflamos 1 rojo más pequeño y se amarra a los 4 unidos, repetimos todo el proceso para firmar 3 flores de globos, las pegamos con silicona, es importante aplicar la silicona colocando la pistola, 15cm de alto para evitar que se rompa, pegamos los globos de la estrella por la parte de atrás y el palillo, y la parte inferior se pega a la base de madera.
Then filling 2 small beige balloons and tie them together, we repeat the procedure and join two pairs as shown in figure 2. We inflate 1 smaller red one and tie it to the 4 joined, we repeat the whole process to sign 3 balloon flowers, we glue them with silicone, it is important to apply the silicone placing the gun, 15cm high to avoid breaking, we glue the star balloons on the back and the stick, and the lower part is glued to the wood.
.png)
Continuamos con el pegado de los dulces es recomendable presentarlos en la mesas en el orden que lo desean pero tomen en cuenta que los mas grande deben llenar los vacíos, para lograr un equilibrio, par los dulces del palillo se debe aplicar suficiente que cubra el palillo, se corta en diagonal la punta de la varillas que se va introducir al anime.
We continue with the gluing of the candies, it is advisable to present them on the tables in the order you want them, but keep in mind that the larger ones should fill the gaps, to achieve a balance, for the candies on the toothpick you should apply enough to cover the toothpick, cut diagonally the tip of the sticks that will be introduced to the anime.
.png)
Con el papel de ceda restante cortamos tiras de 40cm de largo por 10cm, luego lo doblamos en espacios de 2cm, para cortar la punta en forma de arco, con los dedos lo arruchamos como lo muestra la figura 2, y luego lo enrollamos para pegar la punta al final abrimos en centro para formar una pequeñas flor que complementara el arreglo.
With the remaining paper we cut strips of 40cm long by 10cm, then we fold it in spaces of 2cm, to cut the tip in the form of an arc, with the fingers we crumple it as shown in figure 2, and then we roll it to glue the tip at the end we open the center to form a small flower that will complement the arrangement.
.png)
Los arreglos elaborados con dedicación logran un resultado bonito solo debes aplicar técnicas y estar atentos a los pequeños detalles que hacen la diferencia, deseo que le guste mi publicación y la descripción de cómo lo puedes elaborar.
The arrangements elaborated with dedication achieve a beautiful result, you just have to apply techniques and be attentive to the small details that make the difference, I hope you like my publication and the description of how you can elaborate it.
.png)
Congratulations @talentokikin! You have completed the following achievement on the Hive blockchain and have been rewarded with new badge(s) :
Your next target is to reach 300 upvotes.
You can view your badges on your board and compare yourself to others in the Ranking
If you no longer want to receive notifications, reply to this comment with the word
STOPCheck out the last post from @hivebuzz:
Support the HiveBuzz project. Vote for our proposal!