Hello my dear friends of Hive, today I am very happy and motivated although I was a little lost by this platform, days without writing a post for you my friends, well you know my reason I was a little busy making this beautiful unicorn piñata for the first birthday of my daughter, for that reason I decided to make her first piñata myself to share the process of how I made it, without further ado I will begin with my step by step:
.png)
Amigos los materiales que utilice los fui obteniendo poco a poco, ya que esos materiales en mi país Venezuela son un poco costoso y también por la cantidad que se utiliza, pero se los mencionare:
- Papel bond blanco grande.
- Marcador.
- Tijera.
- Papel grape blanco 5 unidades.
- Papel grape, azul, rosado, fucsia, morado y amarillo, una unidad de cada color.
- Foami escarchado de color dorado 3 unidades.
- Foami de color negro negro.
- Casabe o Maizena .
- Papel resistente, para sellar la piñata.
- Pega blanca.
- Silicon en barra transparente delgada o gruesa.
- Cola de ratón 4.0 metros.
- Cinta gruesa.
- Cajas de cartón grande.
- Pistola de silicon.
Friends, the materials that I used were obtained little by little, since those materials in my country Venezuela are a little expensive and also because of the quantity that is used, but I will mention them to you:
- Large white bond paper.
- Marker.
- Scissors.
- White grape paper 5 units.
- Grape paper, blue, pink, fuchsia, purple and yellow, one unit of each color.
- Gold colored frosted foami 3 units.
- Black colored black foami.
- Cassava or cornstarch.
- Resistant paper to seal the piñata.
- White glue.
- Silicon in thin or thick transparent bar.
- Mouse glue 4.0 meters.
- Thick tape.
- Large cardboard boxes.
- Silicone gun.
.png)

Paso 1: Lo primero que debemos hacer para comenzar a realizar la piñata es dibujar en el papel bond el unicornio, en mi caso tuve que pegar algunas hojas de reciclaje porque el tamaño que yo quería era mas grande que el papel bond, recortamos la figura del unicornio y de esta manera tenemos listo el molde de la piñata.
Step 1: The first thing to do to start making the piñata is to draw on the bond paper the unicorn, in my case I had to paste some recycling sheets because the size I wanted was bigger than the bond paper, cut out the figure of the unicorn and thus we have ready the mold of the piñata.
.png)
.png)
Paso 2: Con el marcador marcamos en el cartón el molde de unicornio, en este caso necesitamos dos figuras una para la parte de atrás y la otra para la parte de adelante, luego recortamos varias columna de 15.0 centímetros de ancho, y la pegamos en una de las figura con silicon por todo el borde del unicornio, así como lo muestro en el Collage.
Step 2: With the marker we mark on the cardboard the unicorn mold, in this case we need two figures, one for the back and the other for the front, then we cut out several 15.0 centimeters wide columns, and we glue them on one of the figures with silicone around the edge of the unicorn, as shown in the Collage.
.png)

Paso 3: Vamos a empezar a reforzar la piñata de manera que pueda soportar el pesa a la hora de rellenarla, de esta manera nos iremos a la cabeza del unicornio y empezaremos desde hay, haciendo el enganche con la cinta gruesa, luego por todo el área del unicornio por donde queremos que pase la cola de ratón, vamos abriendo orificios dejando un espacio, de esta manera la piñata tendrá mas resistencia.
Step 3: We will begin to reinforce the piñata so that it can support the weight at the time of filling it, in this way we will go to the head of the unicorn and start from there, making the hook with the thick tape, then throughout the area of the unicorn where we want to pass the mouse tail, we will open holes leaving a space, in this way the piñata will have more resistance.
.png)

Paso 4: Con silicon pegamos la otra cara que sera la parte de atrás, en la cabeza le vamos abrir una ventana que sera por donde pasaran los dulces a la hora de rellenarla.
Step 4: With silicone we glue the other side which will be the back side, in the head we are going to open a window that will be where the candy will go through when it is time to fill it.
.png)
.png)
Paso 5: Ahora vamos a empezar a darle mas refuerzo a la piñata, para cuando los niños estén disfrutando de ella no se rompa tan rápido, yo hice pega de casabe y utilice hojas de reciclaje y el papel del bulto de harina pan la pique en tiras y la cubrí por completo. Al terminar es obligatorio dejarla secar muy bien hasta que este completamente dura.
- Manera de preparar la pega de casabe, aunque también sirve la de Maizena, las dos hacen la misma funcion. Ponemos al fuego una olla con suficiente agua, cuando este hirviendo le agregamos la mitad de una torta de casabe en pequeños pedazos, la vamos mezclando hasta que se disuelva todo el casabe, de esta manera tenemos lista ya la pega.
Step 5: Now we are going to start giving more reinforcement to the piñata, so when the kids are enjoying it, it won't break so fast, I made cassava glue and used recycled leaves and the paper from the bread flour bundle, I cut it into strips and covered it completely. When finished, it is mandatory to let it dry very well until it is completely hard.
- How to prepare the cassava paste, although the cornstarch paste is also useful, both do the same function. We put to the fire a pot with enough water, when it is boiling we add half of a cassava cake in small pieces, we are mixing it until all the cassava is dissolved, in this way we have ready the paste.
.png)
.png)

Paso 6: picamos varias tiras de papel grape del mismo tamaño, luego hacemos varios recorte finos como lo muestro en el collage, luego la vamos a cubrir por completo pegando el papel grape con la pega blanca, empezando por las patas formando así el pelaje del unicornio.
Step 6: we cut several strips of grape paper of the same size, then we make several fine cuts as shown in the collage, then we will cover it completely by gluing the grape paper with the white glue, starting with the legs, thus forming the fur of the unicorn.
.png)

Paso 7: Con el foami escarchado de color dorado realizaremos las orejas, cuerno y el casco de las patas de la piñata unicornio.
Step 7: With the gold colored frosted foami we will make the ears, horn and the helmet of the legs of the unicorn piñata.
.png)

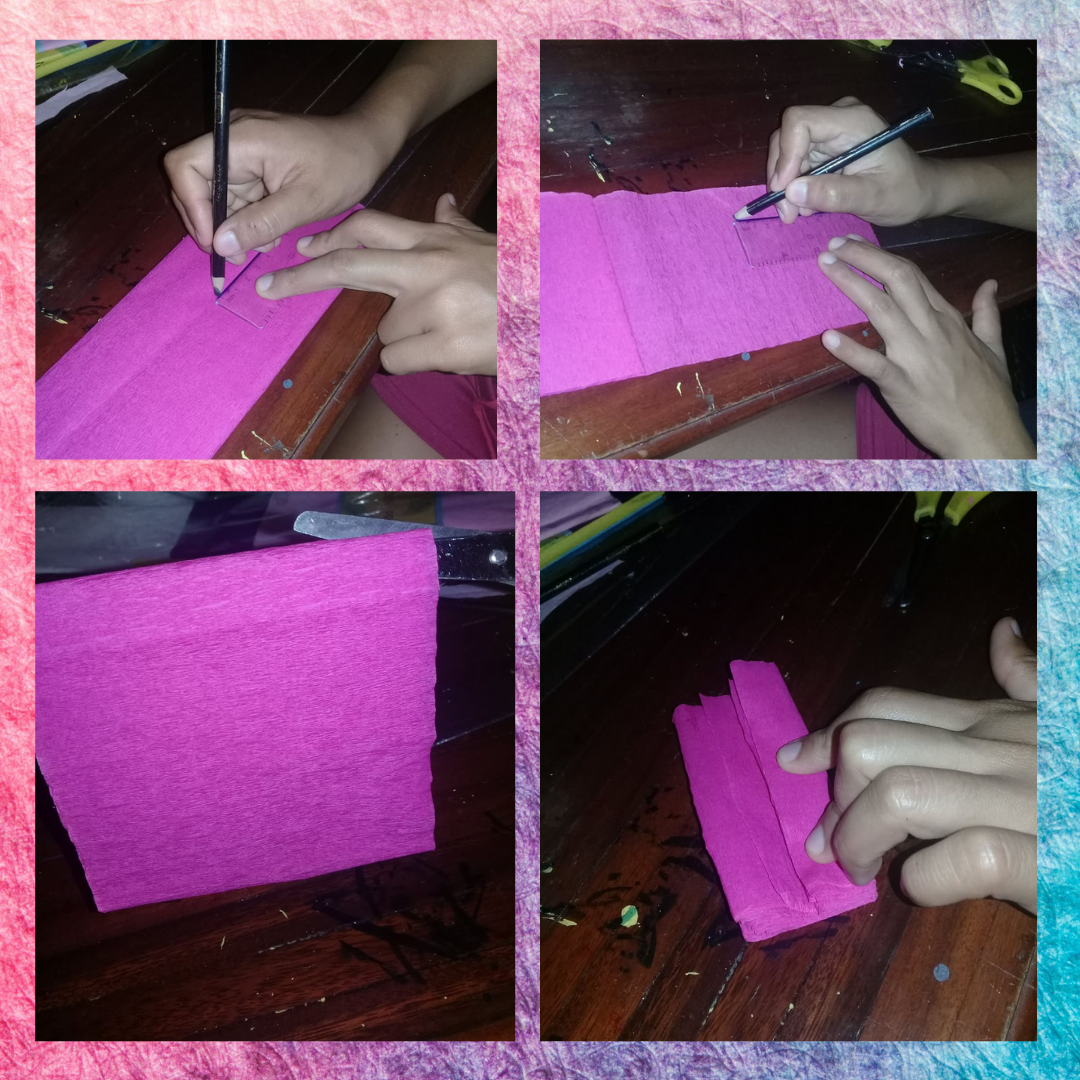
Paso 8: Recortamos varios rectángulos de 10.0 centímetros de ancho y 10.0 centímetros de largo, de papel grape, amarillo, azul. morado, rosado y fucsia, hacemos un círculos y vamos recortando en forma de espiral, de esta manera formaremos la cabellera y la cola de el unicornio.
Step 8: Cut out several rectangles of 10.0 centimeters wide and 10.0 centimeters long, of graphite, yellow, blue, purple, pink and fuchsia paper, make a circle and cut out in a spiral shape, in this way we will form the hair and tail of the unicorn.
.png)
.png)

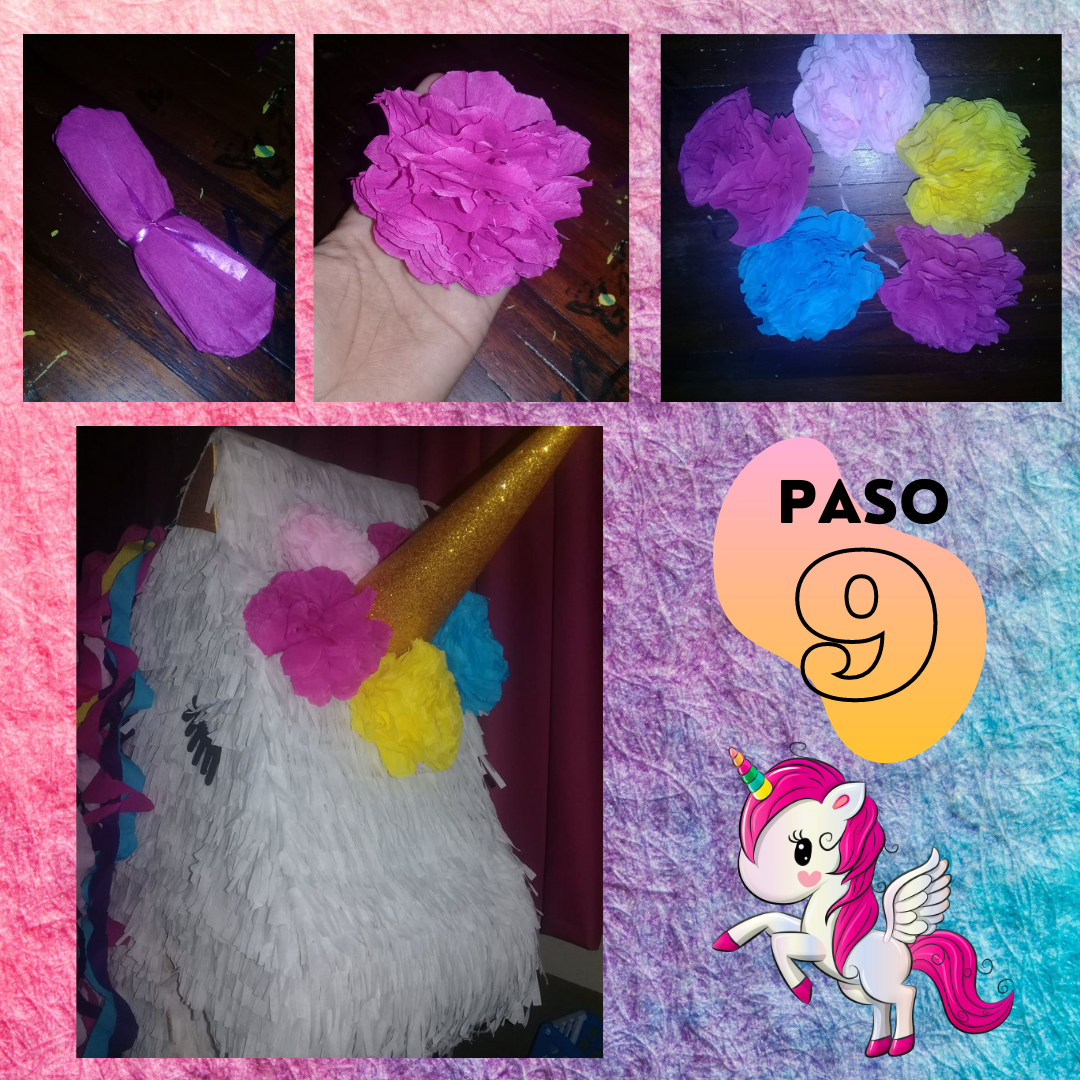
Paso 9: Vamos a medir el papel grape 11.0 centímetros y recortamos, luego abrimos y medimos 15.0 centímetros y vamos a ir doblando, al terminar recortamos y vamos a ir doblando en forma de abanico, amarrándole una cinta en el medio y dejando los picos en forma circular, después vamos a ir despegando el papel grape y formando las flores. Al tener ya lista varias rosas de diferentes colores la pegamos al rededor del cuerno con silicon caliente.
Step 9: We are going to measure the 11.0 centimeters and cut the paper, then open and measure 15.0 centimeters and we are going to fold it, when we finish we cut it and we are going to fold it in a fan shape, tying a ribbon in the middle and leaving the peaks in a circular shape, then we are going to peel off the paper and form the flowers. Once we have several roses of different colors ready, we glue them around the horn with hot silicon.
.png)

Friends, although it is the first piñata that I make the result was satisfactory, this is the beautiful unicorn piñata that I made for my daughter for her birthday, greetings and blessings until a next publication.
.png)

Hola @mariadiaz, te felicito porque esta piñata te ha quedado realmente hermosa, da como dolor tumbarla jejeje. Hacer piñatas es adorable, a mi me encanta y lo mejor me desestreso haciéndolas jejeje.
Saludos, bendiciones y éxitos
Estoy de acuerdo contigo da un dolor tumbarla @keco a pesar del trabajo el resultado me encanto
!discovery 20
This post was shared and voted inside the discord by the curators team of discovery-it
Join our community! hive-193212
Discovery-it is also a Witness, vote for us here
Delegate to us for passive income. Check our 80% fee-back Program
Woow!! Que gran trabajo 👏👏 te felicito esta todo detallado y ha quedado hermosa espero la disfrutarán al máximo 🦄🦄🌈🌈
Si amiga @dojeda un gran trabajo, muchas gracias.
Un abrazo
Congratulations @mariadiaz! You have completed the following achievement on the Hive blockchain and have been rewarded with new badge(s) :
Your next target is to reach 1750 upvotes.
You can view your badges on your board and compare yourself to others in the Ranking
If you no longer want to receive notifications, reply to this comment with the word
STOPQuedo muy lindo, un trabajo largo pero provechoso, sigue así. Me gusto la dedicación que tuviste.
Gracias amiga @nubra11
Your content has been voted as a part of Encouragement program. Keep up the good work!
Use Ecency daily to boost your growth on platform!
Support Ecency
Vote for Proposal
Delegate HP and earn more
Felicidades! ha quedado hermosa tu piñata, tanto que entristece que vaya a ser destruida! Gracias por compartir y mucho exito! <3
Gracias amiga @yetsimar