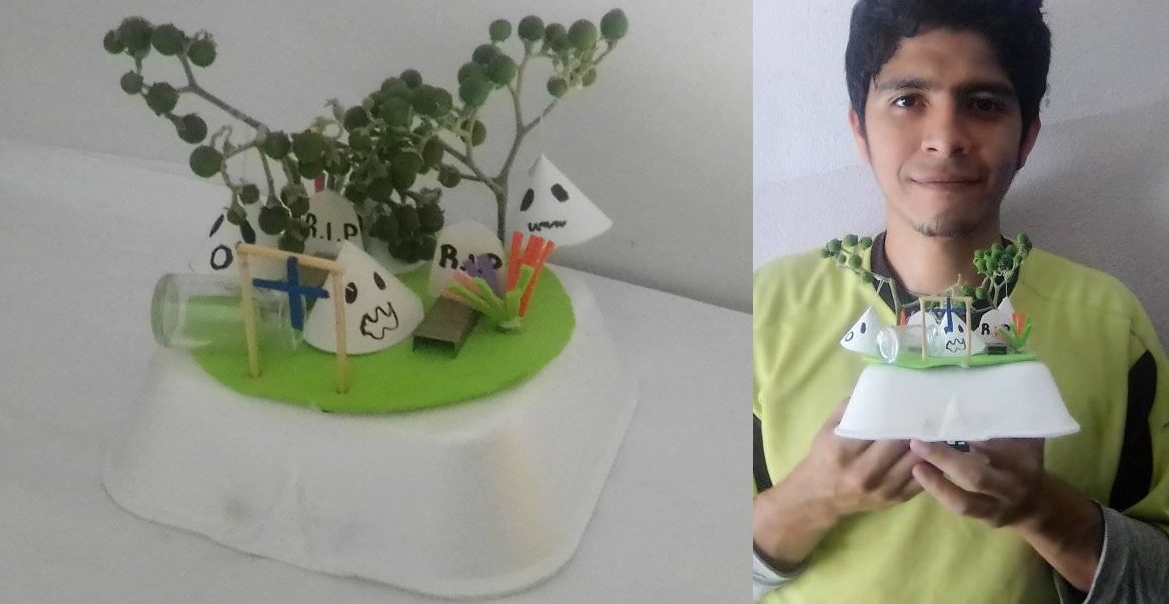
Today I am going to share a cemetery made with useful material, I hope you like it.
Saludos otra vez mi gente, mis buenos deseos para todos ustedes, feliz jueves.
Hoy voy a compartir un cementerio realizada con material de provecho, espero sea de su agrado.


•Disposable box for anime fast food.
•2 small branches of any tree.
•Scissors.
•High chopstick.
•Silicone.
•Crayon pencil.
•Black marker.
•Foami color: green, purple, orange, pink, blue.
•Recyclable blank sheet.
•White cardboard.
•Miniature glass jar.
•2 strips of staples.
•thread and needle.
•Caja desechable para comida rápida de anime.
•2 ramas pequeñas de cualquier árbol.
•Tijera.
•Palillo de altura.
•silicón.
•Lápiz crayón.
•Marcador negro.
•Foami color: verde, morado, naranja, rosa, azul.
•Hoja en blanco reciclable.
•cartón blanco.
•Frasco de vidrio miniatura.
•2 tiras de grapas.
•Hilo y aguja.


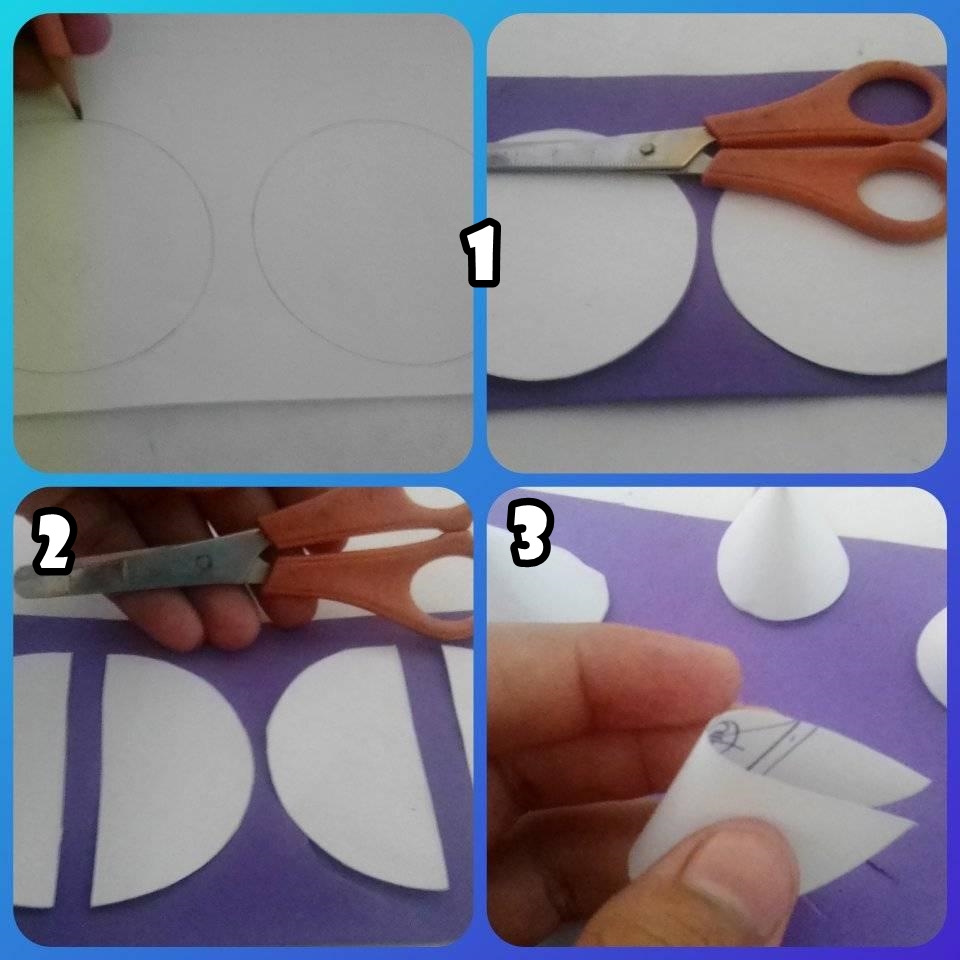
•-STEP 1: Draw 2 small circles on the blank sheet, then cut them out.
•STEP 2: Cut the 2 circles in half (use the scissors).
•STEP 3: Fold half of the circles we just cut in half.
•PASO 1: Dibujamos en la hoja en blanco 2 círculos pequeños, luego recortamos.
•PASO 2: Recortamos los 2 círculos a la mitad (usar la tijera).
•PASO 3: Doblamos la mitad de los círculos que acabamos de cortar a la mitad.

•STEP 4: Now we glue with the silicone half of the circles we cut out giving it a cone shape (do this with the 4 parts).
•STEP 5: We use the black marker and draw eyes and mouth to our liking on each cone, creating ghosts.
•PASO 4: Ahora pegamos con el silicón la mitad de los círculos que cortamos dándole forma de cono (hacer esto con las 4 partes).
•PASO 5: Usamos el marcado negro y dibujamos ojos y boca a nuestro gusto a cada cono, creando unos fantasmas.

•STEP 6: Insert the needle with thread through the bottom of the ghost creating a pendant (do this with 2 of the 4 ghosts), then secure the 2 hanging ghosts to the tree branches.
•PASO 6: Introducimos la aguja con hilo por la parte de debajo del fantasma creando un colgante (hacer esto con 2 de los 4 fantasmas), luego aseguramos los 2 fantasmas colgantes a las ramas de los árboles.

•STEP 7: On the white cardboard we draw with the pencil a small oval, then we cut the oval in half creating the tombstones, then we glue 1 piece to 1 staple strip (repeat the process with the other one), we draw the word R.I.P. with the black marker on each tombstone.
•STEP 8: We cut miniature strips in all the foami, creating flowers (1 for each grave), we join them using thread.
•PASO 7: En el cartón blanco dibujamos con el lápiz un ovalo pequeño, luego cortamos el ovalo a la mitad creando las lapidas de las tumbas, seguidamente pegamos 1 pieza a 1 tira de grapas (repetir el proceso con el otro), dibujamos la palabra R.I.P con el marcador negro en cada lapida.
•PASO 8: Recortamos tiras miniaturas en todos los foami, creando flores (1 para cada tumba), las unimos usando hilo.

•STEP 9: Separate the disposable container with the scissors (we will use one of the 2 pieces).
•STEP 10: Draw and cut a circle the size of the disposable container piece, then glue it to the center of the flat part of the container, creating a floor, and finally add all the objects to this piece, creating a cemetery.
•PASO 9: Separamos el envase desechable con la tijera (usaremos una de las 2 piezas).
•PASO 10: Dibujar y cortar un círculo del tamaño de la pieza del envase desechable, luego la pegamos al centro de la parte plana del envase, creando un suelo, por ultimo agregamos todos los objetos a esta pieza, creando un cementerio.


All photos are my own, edited in PhotoScape, translator used: DeepL.
