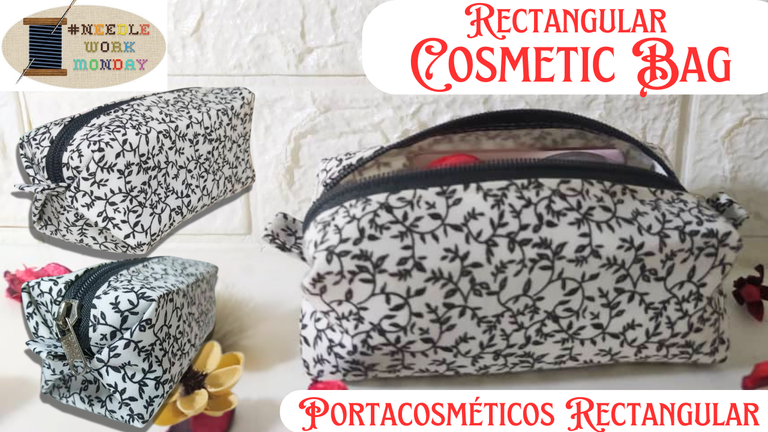
A cosmetic bag or multifunctional bag is an indispensable accessory that is never too much in our feminine arsenal. It is practical, versatile and helps us keep our belongings organized and within reach when we need them.
This cosmetic bag design is rectangular and I love its shape, how it maintains its structure with its well-drawn corners, which allows the objects you put in it to stay in their place, I like it. Of course, it is necessary to use the correct materials and carry out the making with care, and it is not complicated to make, you just have to pay attention to the steps and today I am going to show you how.
Un bolsito porta cosméticos o multifuncional es un accesorio indispensable que nunca está de sobra en nuestro arsenal femenino. Es práctico, versátil y nos ayuda a mantener nuestras pertenencias organizadas y al alcance cuando las necesitamos.
Este diseño de porta cosmético es rectangular y me encanta por su forma, como mantiene su estructura con sus esquinas bien sacadas, que permite que los objetos que colocas se mantengan en su lugar, es me gusta. Claro, que es necesario usar materiales correctos y realizar la confección con cuidado, y es que no es complicada de elaborar, solo hay que prestar atención a los pasos y hoy te los voy a enseñar.

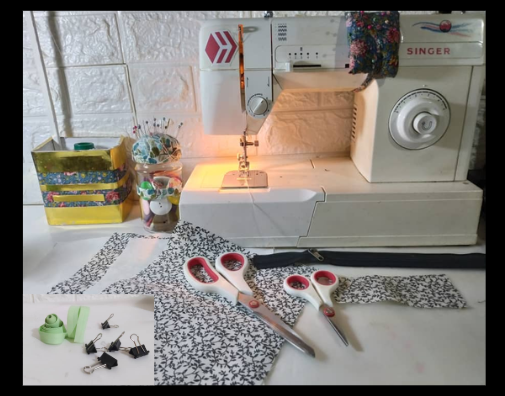
- Printed fabric 24cms by 20cms
- Thick interfacing 24cms by 20cms
- Printed fabric 12cms by 6cms
- Bias to cover seams
- Zipper and slider
- Sewing machine, thread and scissors
- Pins, pressure clips
- Tela estampada 24cms por 20 cms
- Entretela gruesa 24cms por 20 cms
- Tela estampada 12cms por 6cms
- Sesgo para tapar costura
- Cierre y deslizador
- Máquina de coser, hilo y tijera
- Alfileres, clips de presión

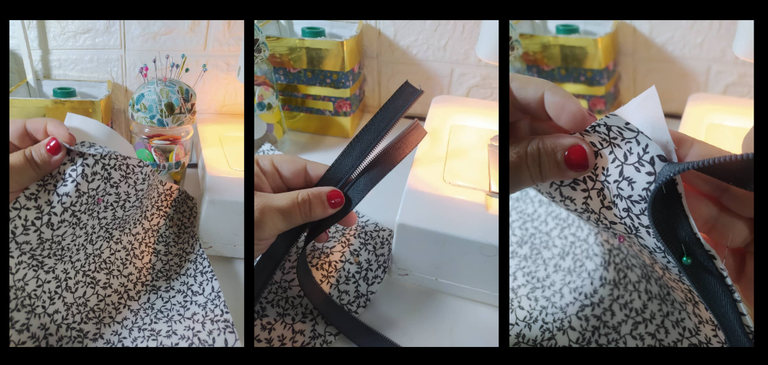
Square up the patterned fabric and the interfacing,(👀 read the materials) you can pin them together to make sure it is square.
Separate the zipper so that it is in two pieces.
Place the zipper facing its right side with the right side of the patterned fabric, secure it well so that now the zipper, fabric and interfacing are together.
Cuadra bien la tela estampada y la entretela,(👀 lee los materiales) puedes unirla con alfileres para garantizar que esté bien cuadrada.
Separa el cierre para tenerlo en sus dos piezas.
Ubica el cierre enfrentando su derecho con el derecho de la tela estampada, fija bien para que ahora cierre, tela y entretela estén juntas.
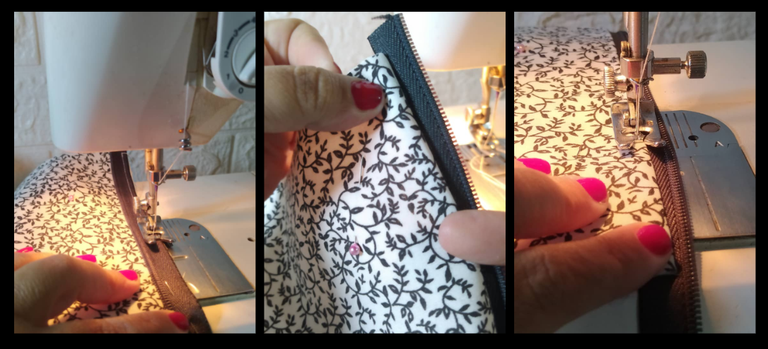
Sew a straight stitch.
Open the piece so that the zipper is right side out, and sew a topstitch stitch. This will secure everything and is also decorative.
Pasa costura recta.
Abre la pieza para que el cierre quede al derecho expuesto, y pasa una costura de pespunte, esto fijará todo y además es decorativa.
This is what the stitching looks like, it's really beautiful this finish 😍
Repeat this process on the other end of the fabric.
Now bring the zippers together to place the slider.
Take it out and put it back in, so that the slider is in the center of the zipper. With this you will achieve that the zipper is completely closed at both ends.
Así luce el pespunte, es realmente hermoso este acabado 😍
Repite este proceso en el otro extremo de la tela.
Ahora junta los cierres para colocar el deslizador.
Sácalo y vuelve a meterlo, para que quede el deslizador en el centro del cierre. Con este vas a lograr que el cierre este totalmente cerrado en ambos extremos.
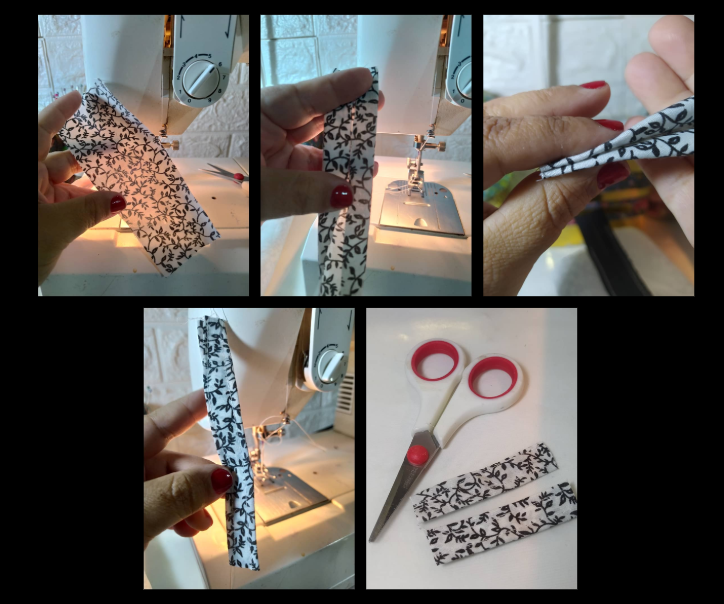
Let's prepare this little piece. Take the small printed fabric (👀 read the materials) and bring the lengths to the center, then fold again.
Sew a straight stitch around it.
Cut it in half to have two equal pieces.
Vamos a preparar esta piecita. La tela estampada pequeña ( 👀 lee los materiales) llevas los largos hacia el centro, luego doblas nuevamente.
Pasa costura recta alrededor.
Corta por la mitad para tener dos piezas iguales.
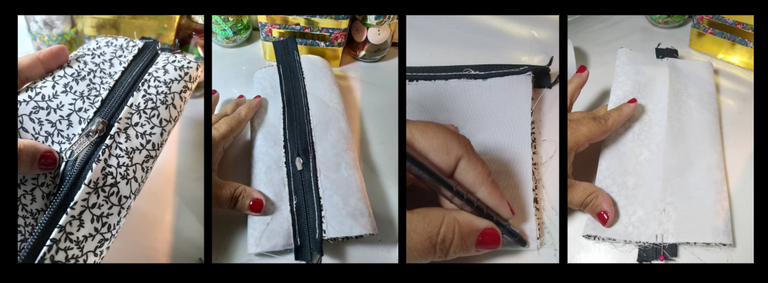
We return to the body of the cosmetic bag.
We turn it over.
We mark the center and then open it.
We match the previous mark with the center of the closure.
We secure it with pins.
Volvemos con el cuerpo del porta cosmético.
Lo volteamos.
Marcamos el centro y luego abrimos.
Hacemos coincidir la marca anterior con el centro del cierre.
Fijamos con alfileres.
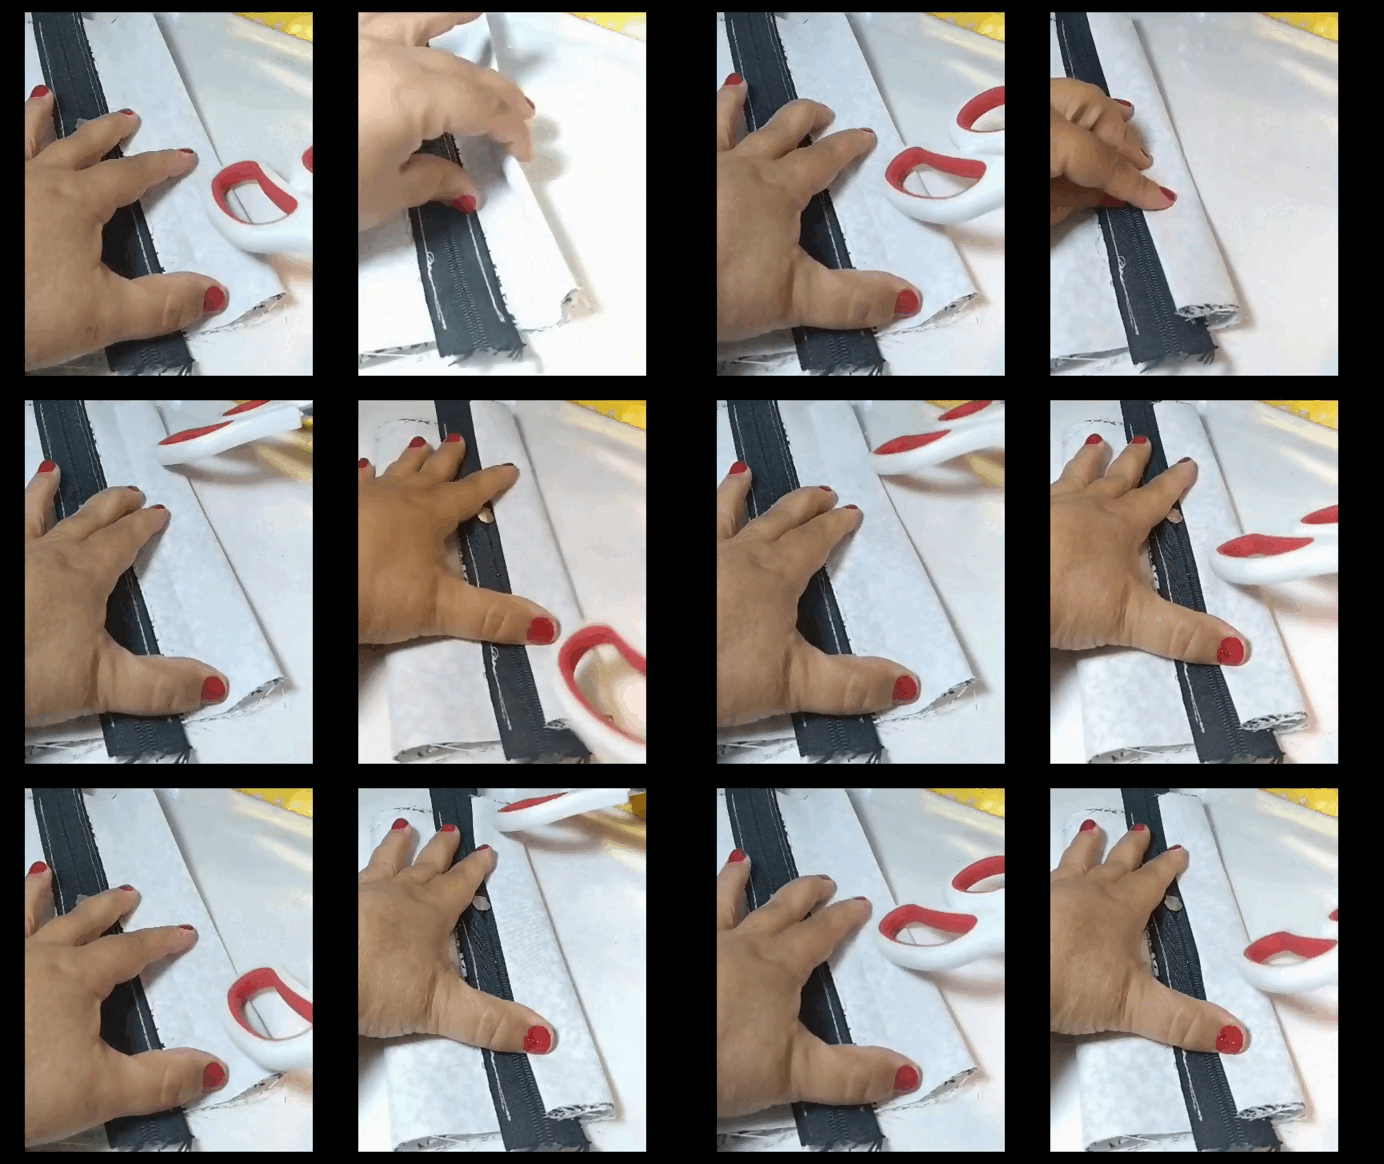
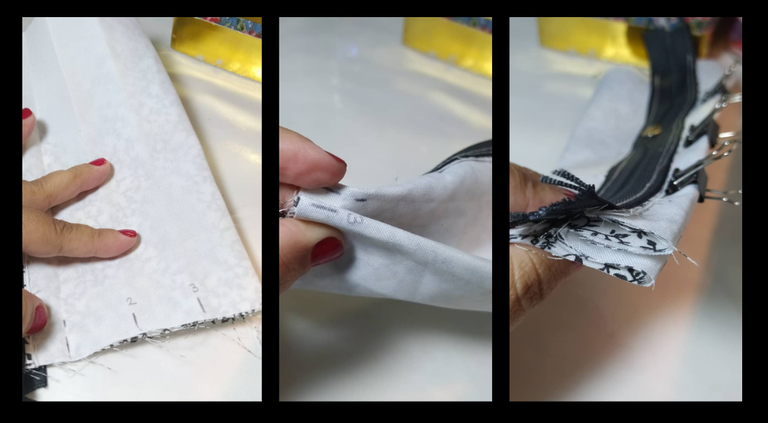
📢📢This step is the most important, I'll show you in two gifs so you can see it clearly. We will mark the following folds of fabric, using the back of the scissors or any other element, it's like ironing with pressure, in the following way:
1- We mark the sides well
2- We take the fold of the side to just next to the teeth of the zipper and iron again with the back of the scissors.
📢📢Este paso es el más importante, te lo mostraré en dos gifs para que notes bien. Marcaremos los siguientes doblez de tela, usando el reverso de la tijera o cualquier otro elemento, es como si planchamos con la presión, de la siguiente forma:
1- Marcamos los laterales bien
2- Llevamos el doblez del lateral hacia justamente al lado de los dientes del cierre y planchamos de nuevo con el reverso de la tijera.
When opening the previous fold, we will have 3 marks that we have made. I numbered them so that it is clear:
They would be 1, 2 and 3 marks.
We are going to match marks 1 and 3. In this way, leaving mark 2 inside.
We secure this fold that we have formed with pressure clips.
We repeat the same on the other side.
These folds that we have made are what will give the characteristic shape of today's design, and we are almost done...
Al abrir los doblez anterior, tendremos 3 marcar que hemos hecho. Las enumeré para que se entienda bien:
Sería 1, 2 y 3 marcas.
Vamos a hacer coincidir las marcas 1 y 3. Dejando de esta forma la marca 2 por dentro.Este pliegue que hemos formado lo fijamos con clips de presión.
Repetimos igual del otro lado.Estos pliegue que hemos realizado son lo que darán la forma característica del diseño de hoy, y ya casi terminamos...
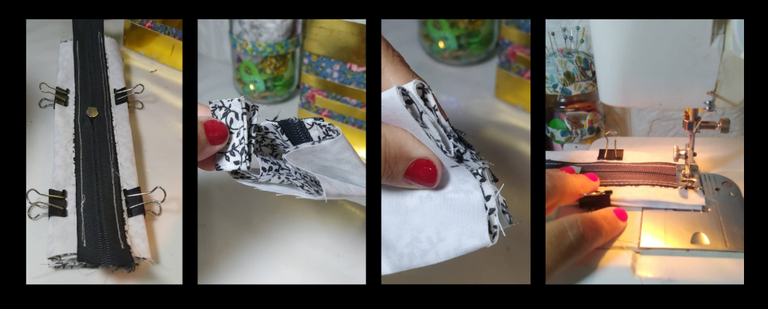
We cut off the excess of the zipper that sticks out on each side.
We place the two small strips that we had made previously, at the beginning of the zipper on each side.
We sew with a straight seam each end that we have made with the well-formed folds and the strip in the middle.
Cortamos el excedente del cierre que sobresale en cada lado.
Colocamos las dos tiras pequeñas que habíamos hecho anteriormente, en el inicio del cierre de cada lado.Cosemos con costura recta cada extremo que hemos armado con los pliegues bien formados y la tirita en el medio.
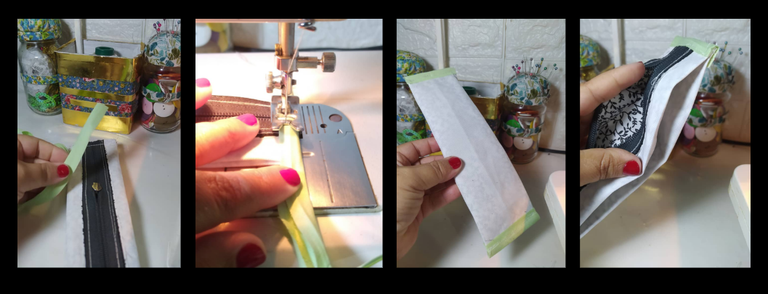
For a better quality finish, we can make a seam cover with a bias, or any strip of fabric. We clean off the excess.
We turn the piece over because we are done 😍😍😍
Para un mejor acabado de calidad, podemos realizar un tapa costura con un sesgo, o cualquier tira de tela. Limpiamos excedente.
Volteamos la pieza porque hemos terminado 😍😍😍
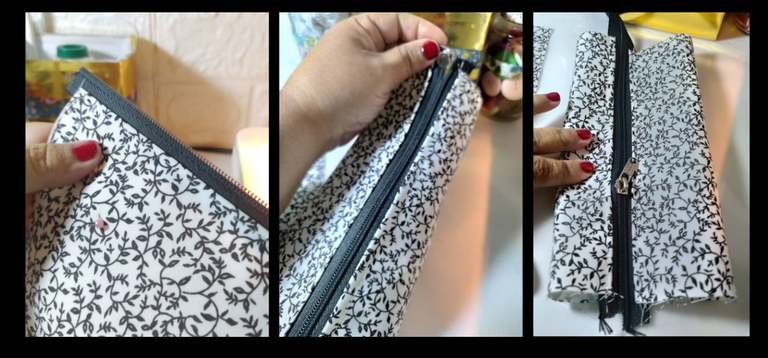
Look how beautiful the inside of the cosmetic bag looks, with its seam-sealed lid, which hides the scabs and won't let them fray when you want to wash it later.
The folds, which we devoted just a little attention to, made this beautiful finish on the corners, which allow it to have a symmetrical and well-formed structure.
Ve lo hermoso que se ve el interior del porta cosmético, con su tapa costura, que oculta las costras y no dejará que se deshilachen cuando quieras lavarlo posteriormente.
Los pliegues a los que les dedicamos solo un poco de atención, hicieron este acabado hermoso en las esquinas, que permiten darle una estructura simétrica y bien formada.
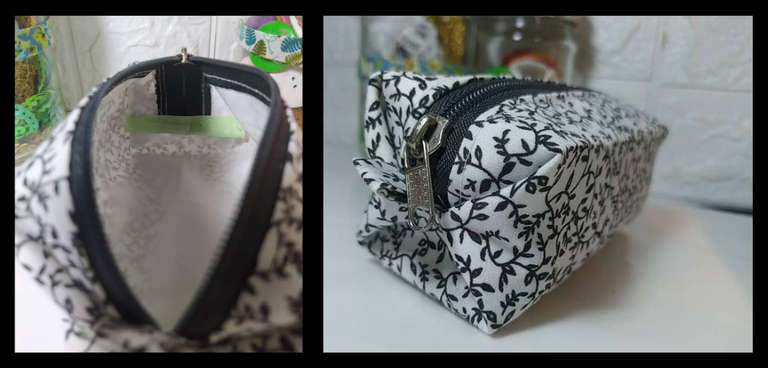
The strips we put on it are a plus, they are ideal for making it easier to open and close the cosmetic bag, and I put them on each side for this purpose.
The thick interfacing is essential to give it structure, it doesn't matter if it was glued or not, she will be able to do it very well.
Las tiritas que le colocamos son un plus, son ideales para facilitar abrir y cerrar el porta cosmético, y se las puse a cada lado para este fin.
La entretela gruesa es fundamental para darle la estructura, no importa si tenía pega o no, ella logrará hacerlo muy bien.
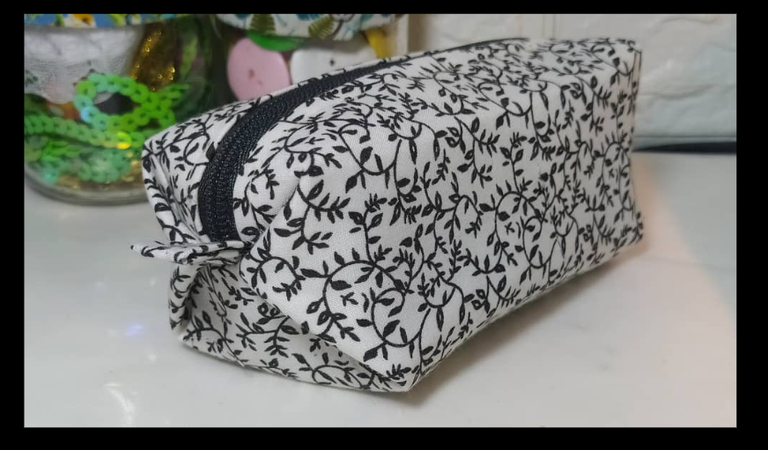
Go ahead and make this design, remember that everything was very simple: Glue the closure on each end, turn it over, make the folds and sew... basically it was just that.
The measurements are whatever you want, you will always achieve the shape just by following the steps, you don't need specific patterns or measurements.
I hope you liked it... We'll read each other as always on Hive...
Anímate a hacer este diseño, recuerda que todo fue muy simple: Pegar el cierre en cada extremo, voltear, hacer los pliegues y coser... básicamente fue solo eso.
Las medidas son las que quieras, siempre lograrás la forma solo con los pasos, no necesitas patrones o medidas específicas.
Deseo que te haya gustado... Nos leemos como siempre en Hive...
I took the photos with my phone Redmi Note 8
Apps I used:
Canva Pro for Cover, Collage and Banners
Thankful to @coinbelly for allowing us to use their Community logo
I used Deepl Translator
My social networks:
Discord: YennysYaneth#0189
Twitter: @yennysferm
Instagram: @yennysyaneth
Las fotos las tomé con mi teléfono Redmi Note 8
Apps que utilicé:
Canva Pro para la Portada, Collage y Banners
Agradecida con @coinbelly por permitirnos utilizar su logo de la Comunidad
Utilicé el Traductor Deepl
Mi redes sociales:
Discord: YennysYaneth#0189
Twitter: @yennysferm
Instagram: @yennysyaneth
Has sido votado por
PROYECTO ENLACE
'Conectando Ideas y Comunidades'
PROYECTO ENLACE es un proyecto de curación de habla hispana enfocado en recompensar contenido de calidad y apoyar autores en su proceso de crecimiento en HIVE.
Creemos y apostamos por el futuro de esta gran plataforma, y estamos muy emocionados de poder hacerla crecer junto a esta comunidad. Así que te invitamos a publicar en nuestra COMUNIDAD y estar atento a todas las actividades que tenemos preparadas y que estaremos publicando en breve.
¿QUIERES AUTOMATIZAR TUS GANANCIAS DE CURACIÓN? SE PARTE DEL PROYECTO ENLACE APOYANDO A NUESTRO TRAIL EN HIVE.VOTE INGRESA AQUÍ PARA CONOCER LOS DETALLES.
¿QUIERES INVERTIR ENLACE? DESCUBRE COMO HACERLO Y GENERAR INGRESOS DE FORMA SEMANAL MEDIANTE TU DELEGACIÓN DE HP AQUÍ TE EXPLICAMOS COMO.
Te invitamos a participar en nuestro servidor de Discord: https://discord.gg/3S9y7BbWfS
Atentamente
EQUIPO ENLACE 2024
Gracias... muy amables 🤗
Muy bien explicado amiga, esta bello. Un día de esto, realizare uno.
Esas tiritas son de gran ayuda.
Sí amiga esas tiritas son un detallazo, incluso en los morrales de nuestros hijos, si no lo tiene es muy difícil abrir el bolso, así que es un detalle que no debemos dejar pasar.
Gracias por pasar por aquí
Una muy buena idea de tomar en cuenta en estos proyectos amiga.
The final result is pretty good. It is stylish and beautiful. Love the design of this cosmetic holder. Thank you for sharing this. Keep up the good work!
I am very glad that you liked it, and I appreciate your rating and comment.
Te quedo muy lindo, excelente tutorial, parece sencillo de hacer, es un accesorio que nunca está de sobra porque siempre lo vamos a necesitar.
Sí amiga es muy sencillo de hacer, solo hay que estar pendiente de los pliegues y hacerlos iguales, para que el efecto de los lados quede simétrico.
Gracias amiga, lo tendré en mis apuntes, para que todo quede bien prolijo.🤗❤️