This time I wanted to look for flower patterns to make a headband. So I started to explore on Facebook and YouTube, in groups and channels specialized in weaving.
I saw several models, but few of them caught my attention. So I had to search several times.
En esta ocasión quise buscar modelos de flores para elaborar un cintillo. Así que empecé a explorar en Facebook y en YouTube, en grupos y canales especializados en tejidos.
Vi diversos modelos, pero pocos me llamaban la atención. Así que la búsqueda tuve que hacerla durante varias oportunidades.
I don't really remember in which account I got an image that illustrates the details for the elaboration of a 3D rose and although it had no explanatory text it seemed to me that it would be feasible to try it, it seemed to me that I understood the sequence of the stitches of the fabric used for its realization.
So, I made the fabric for the first rose, although at the moment of shaping and joining it I felt that I couldn't do it the way I wanted. So I chose to insert a needle with thread through the lower part, marking long stitches and then gathering the fabric. That is to say, to pull the thread to the point of being able to roll up the woven strip and prevent it from losing the rose shape. That's how I did it. I liked the result.
I hope to learn how to weave leaves soon /
Espero aprender a tejer pronto las hojas Fuente: propia / Source: own
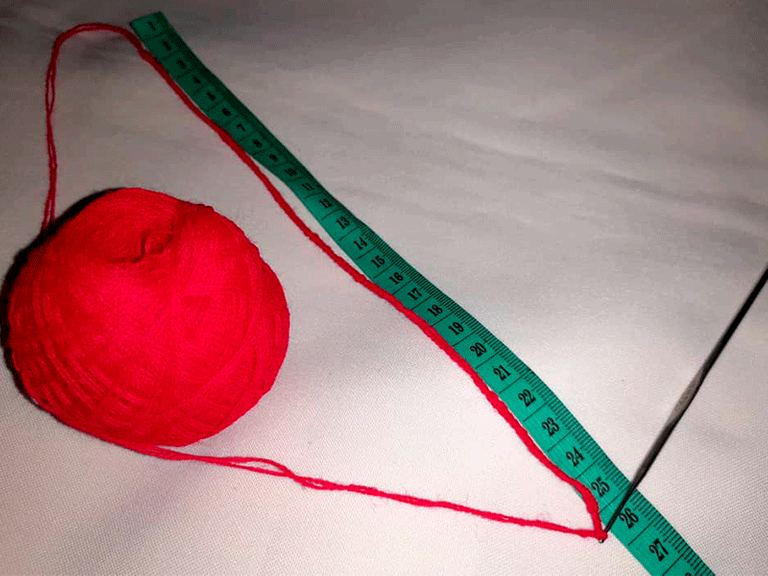
The strip of chains should measure about 25 cm. / La tira de cadenas debe medir unos 25 cm Fuente: propia / Source: own
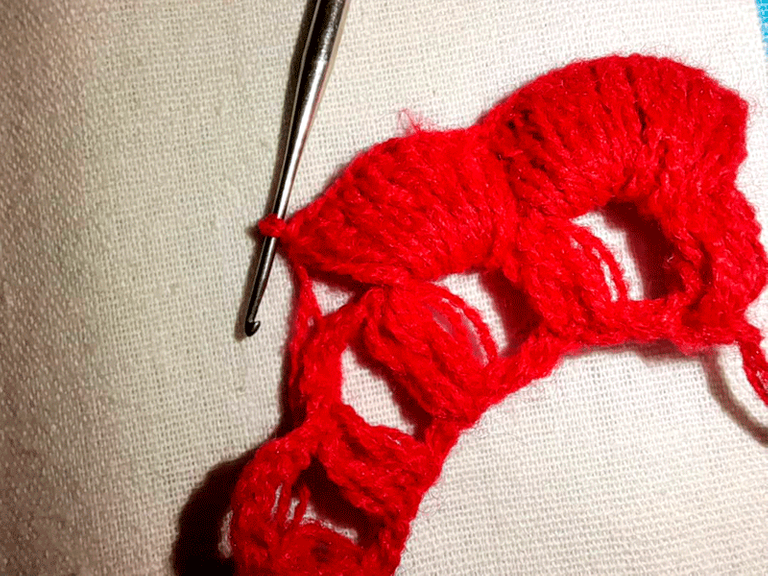
Spaces remain in the form of / Van quedando espacios en forma de cuadros
Fuente: propia / Source: own
Note the difference in the first image with the low point / Nótese la diferencia en la primera imagen con el punto bajo Fuente: propia / Source: own
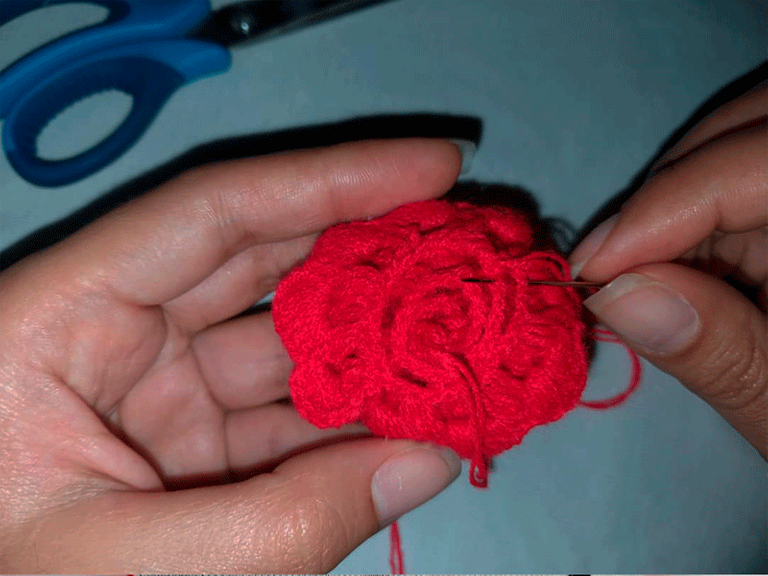
Join the edges with thread to hold the flower / Una los bordes con hilo para sujetar la flor Fuente: propia / Source: own
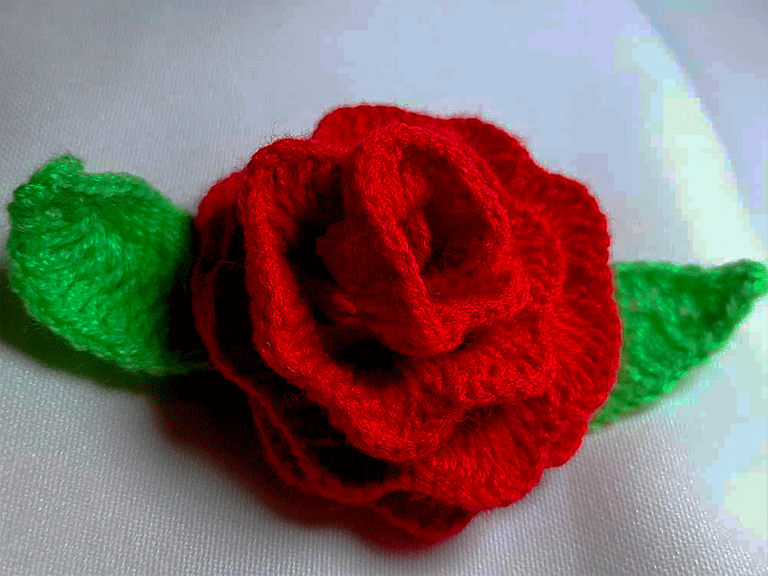
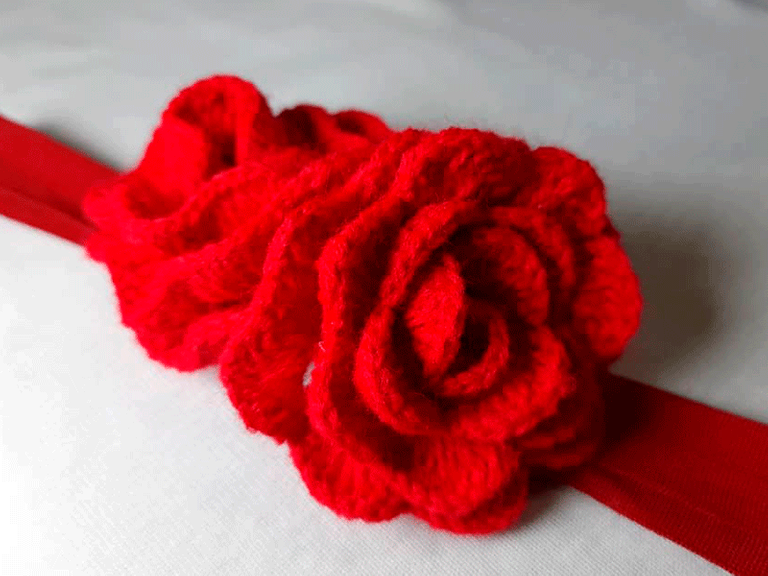
This is how the bouquet for the baby's headband turned out / Así quedó el ramo para el cintillo de la bebé Fuente: propia / Source: own
Texto original en español // Original text in Spanish
Traducido al inglés con Deepl // Translated to English with Deepl
Fotografías: fuente propia // Photography: source own
Edición de fotografías: Photoshop // Photo editing: Photoshop
Realmente no recuerdo en qué cuenta conseguí una imagen que ilustra los detalles para la elaboración de una rosita en 3D y aunque no tenía texto explicativo me pareció que sería factible intentarlo, me pareció que entendía la secuencia de los puntos del tejido empleado para su realización.
Así que, realicé el tejido para la primera rosa, aunque al momento de darle forma y unirla sentía que no lograba hacerlo como quería. Así que opté por insertar una aguja con hilo por la parte inferior marcando puntadas largas para enseguida fruncir el tejido. Es decir halar el hilo hasta el punto de poder enrollar la tira tejida y evitar que perdiera la forma de rosa. Así lo hice. Me gustó el resultado.
Espero aprender a tejer pronto las hojas
Because I wanted to add two roses to the headband, I started knitting the second one. But there was a detail that my mother-in-law corrected me. I will tell you why later on. First I want to show you the process to make these beautiful roses:
Debido a que quería agregarle al cintillo dos rositas empecé a tejer la segunda. Pero hubo un detalle que me corrigió mi suegra. Más adelante les comento por qué. Antes quiero enseñarles el proceso para realizar estás lindas rosas:
1.- Make a strip of approximately 115 chains. (Measure about 25 centimeters).
1.- Elabora una tira de 115 cadenas aproximadamente (Que mida unos 25 centímetros).
2.- At the end of the strip add three additional chains to go up and start the second round of knitting. (this will correspond to a high stitch) next to the three chains make a high stitch.
3.- Make four separating chains and proceed to make two high stitches, taking as a base the third and fourth chain of the previous row, respectively.
2.- Al finalizar la tira agrega tres cadenas adicionales para subir e iniciar la segunda vuelta del tejido. (esto corresponderá a un punto alto) junto a las tres cadenas haz un punto alto.
3.- Haz cuatro cadenas de separación y procede a hacer dos puntos altos, tomando como base la tercera y la cuarta cadena de la vuelta anterior, respectivamente.
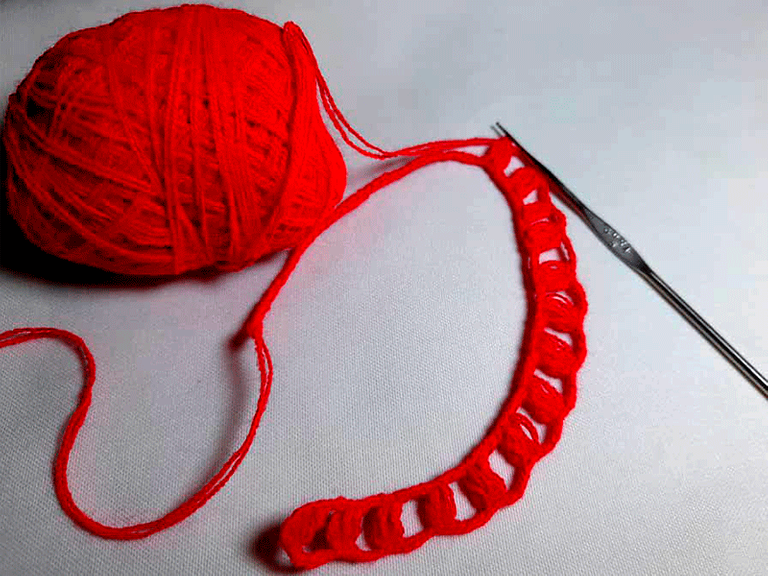
4.- Leave four chains again and in the third and fourth chains after the last double crochet, knit the following two double crochet stitches. Repeat the formula until the end of the row (At the end of the row there will be squares between the knitted fabric. As shown below).
4.- Vuelve a dejar cuatro cadenas de separación y en la tercera y cuarta cadenas después de los últimos puntos altos realiza los siguientes dos puntos altos. Repite la fórmula hasta terminar la vuelta. (Al finalizar habrán quedado cuadros entre el tejido. Como se muestra a continuación).
5.- Go up three chains to start the next row. In the space of the small square make eight double crochet stitches.
6.- At the end of the eight double crochet stitches add a single crochet that will be in the chain where the double crochet stitches of the previous row are. (That was the correction, I knitted the other rose without the single crochet. That is why the wave of the fan is less noticeable).
5.- Sube tres cadenas para iniciar la siguiente vuelta. En el espacio del cuadrito hacer ocho puntos altos.
6.- Al finalizar los ocho puntos altos agregar un punto bajo que quedará en la cadeneta donde están los puntos altos de la vuelta anterior. (Esa fue la corrección, el tejido de la otra rosa lo realicé sin el punto bajo. Por eso se nota menos la onda del abanico).

7.- Continue with the sequence of the eight high stitches inside the space and separate with the low stitch, so that the fans are well formed. Continue in this way until the end of the row.
7.- Continuar con la secuencia de los ocho puntos altos dentro del espacio y separar con el punto bajo, de manera que queden bien formados los abanicos. Continuar así hasta finalizar la vuelta.
You have now completed the weaving. Leave a portion of thread to sew the base with the help of a needle. Now it remains to roll up the fabric to form the rose. Sew and secure the base until it is firm and the flower is ready.
Ya habrás culminado el tejido. Deja una porción de hilo para coser la base con la ayuda de una aguja. Ahora queda enrollar el tejido para formar la rosa. Cose y asegura la base hasta que quede firme y ya estará lista la flor.
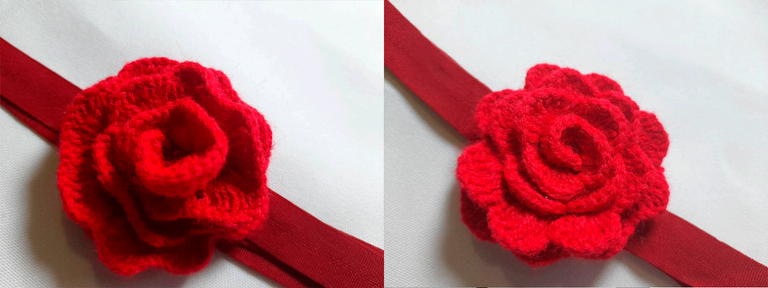
For the headband I used a red elastic bias binding. I measured 40 centimeters and joined the ends with polyester thread and needle. Then I proceeded to sew the flowers on the union of the ends of the bias binding to achieve a better finish. And this is the result. Due to the mistake I made in the first one, it is possible that they look a little different.
Para el cintillo utilicé un sesgo elástico también de color rojo. Medí 40 centímetros y uní los extremos con hilo de poliéster y aguja. Luego procedí a coser las flores sobre la unión de los extremos del sesgo para lograr un mejor acabado. Y así quedó el resultado. Debido al error que cometí en la primera es posible que se vean un poquito diferente.
I hope you find this post useful and that you liked the result. I remain attentive to your comments and suggestions. Fraternal greetings
Espero que les sea útil este post y que les haya gustado el resultado. Quedo atenta a sus comentarios y sugerencias. Un saludo fraterno.
Traducido al inglés con Deepl // Translated to English with Deepl
Fotografías: fuente propia // Photography: source own
Edición de fotografías: Photoshop // Photo editing: Photoshop
They're so intricate and beautiful, I love them!
!PIZZA
Te quedó preciosa 🌹
Gracias!🌹
Your content has been voted as a part of Encouragement program. Keep up the good work!
Use Ecency daily to boost your growth on platform!
Support Ecency
Vote for new Proposal
Delegate HP and earn more
Thank you for sharing this amazing post on HIVE!
Your content got selected by our fellow curator @kaerpediem & you just received a little thank you via an upvote from our non-profit curation initiative!
You will be featured in one of our recurring curation compilations and on our pinterest boards! Both are aiming to offer you a stage to widen your audience within and outside of the DIY scene of hive.
Join the official DIYHub community on HIVE and show us more of your amazing work and feel free to connect with us and other DIYers via our discord server: https://discord.gg/mY5uCfQ !
If you want to support our goal to motivate other DIY/art/music/homesteading/... creators just delegate to us and earn 100% of your curation rewards!
Stay creative & hive on!
Wow this really looks amazing so beautiful thanks for sharing
Hola @mariavargas,
Quedó muy linda la flor 3D, y el color está precioso, y queda perfecta para el cintillo. Una vez hice una flor muy parecida a la que hiciste y la usé para decorar la caja de un regalo.
Saludos
Hola @jicrochet, gracias. Gracias por compartir su experiencia... Saludos también para ti.
PIZZA Holders sent $PIZZA tips in this post's comments:
@sharklize(4/14) tipped @mariavargas (x1)
Please vote for pizza.witness!
thanks greetings
Muy lindo proyecto, me gusto mucho los resultados amiga, la voy hacer, gracias
Un placer compartir lo que he aprendido y lograr que se inspiren a aprender y hacer. Gracias a ti por leer... Saludos
Hermoso Cintillo! es un bello trabajo, siempre quise rejer para realizar mis propias camisas, pero solo llegue a la técnica mas sencilla, lo básico; Te felicito, es un trabajo de memoria, creatividad y concentración. Saludos.
Gracias por su apreciación.
Así es, además que permite desconectarse de lo cotidiano... espero que pueda retomar la práctica, poco a poco se puede avanzar..
Saludos✨
Super linda te quedó la flor, el color es espectacular.
Este patrón es mi favorito para tejer rosas ya que es muy fácil y rápido de llevar a cabo. Recuerdo que hacía muchas para el día de la madre y repartirlas en la iglesia o en mi trabajo. Gracias por traer a mi mente esos recuerdos. Saludos.
Que grato saber que a través de mi texto ha podido rememorar ese momento. Sii, Me pareció sencilla de hacer y a la vez un bonito diseño y de una vez me animé a intentarlo. Saludos 🌻
Que hermoso te quedo señorita.
te felicidades ,felicidades.
Graciasss! Un saludo