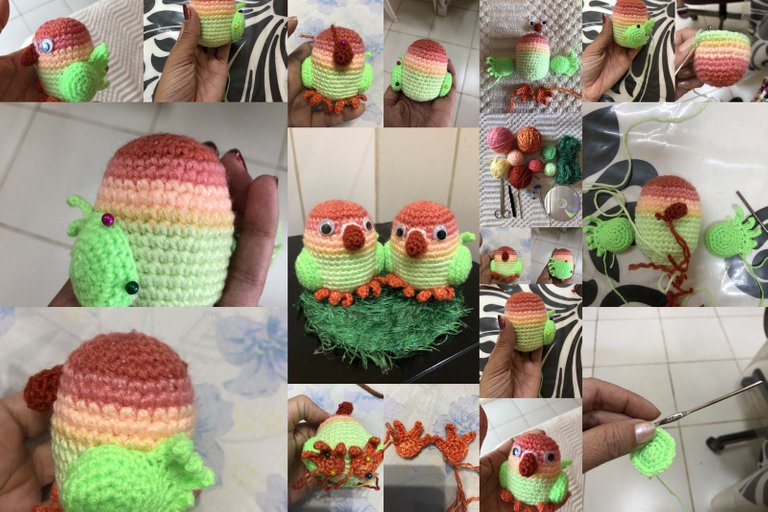
Do you like birds? And the amigurumi? Then you are in the right place. Today we want to introduce you to our latest creation: some beautiful bird amigurumis. These little hand-knitted animals have become very popular in recent years, and it's not hard to see why. Not only are they cute and adorable, but they are also very versatile and can be accessorized in a thousand different ways. In this post, I'll show you how we made ours, from choosing materials to final assembly. Get ready to fly high with these fun and creative knitting projects!
¿Te gustan los aves? ¿Y los amigurumis? Entonces, estás en el lugar adecuado. Hoy queremos presentarte nuestra última creación: unos preciosos amigurumis de pajaritos. Estos pequeños animalitos tejidos a mano se han vuelto muy populares en los últimos años, y no es difícil entender por qué. No solo son lindos y adorables, sino que también son muy versátiles y se pueden personalizar de mil maneras diferentes. En esta publicación, te mostraré cómo hicimos los nuestros, desde la elección de los materiales hasta el ensamblado final. ¡Prepárate para volar alto con estos divertidos y creativos proyectos de tejido!
 All photos were taken with my mobile phone/Todas las fotos fueron tomadas con mi telefono movil
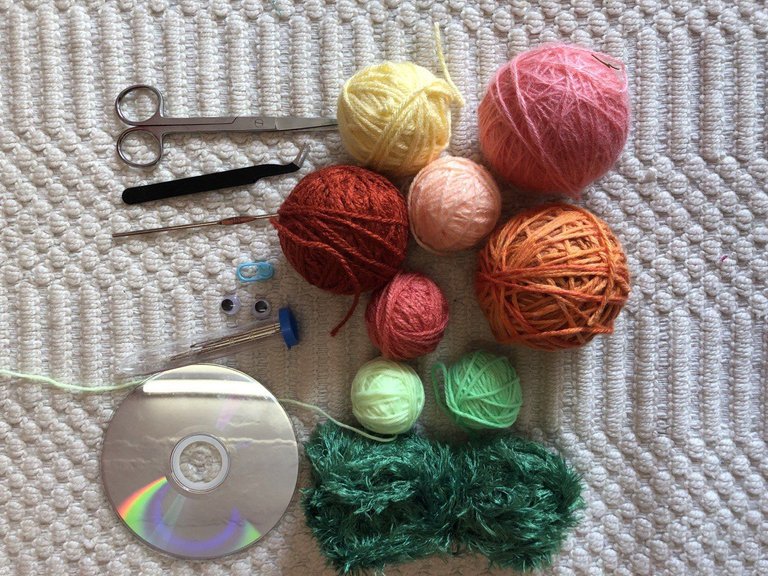
Beginning we will select the materials to use, in our case we use the following: We use a total of eight shades of stamens, among which are two shades of green, yellow, orange in two shades, pink, brown and one medium reddish, in addition to a hairy yarn, well that's what we call it 🤣😂, green for the base. We also use an old DVD and well the usual as you can see in the image.
Comenzando seleccionaremos los materiales a usar, en nuestro caso usamos los siguientes: Utilizamos un total de ocho tonos de estambres, entre los cuales están dos tonos de verde, amarillo, naranja en dos tonalidades, rosa, marrón y uno medio rojíso, además de un estambre peludo, bueno así le decimos 🤣😂, de color verde para la base. También usamo un viejo DVD y bueno lo de siempre como pueden apreciar en la imagen.
 All photos were taken with my mobile phone/Todas las fotos fueron tomadas con mi telefono movil
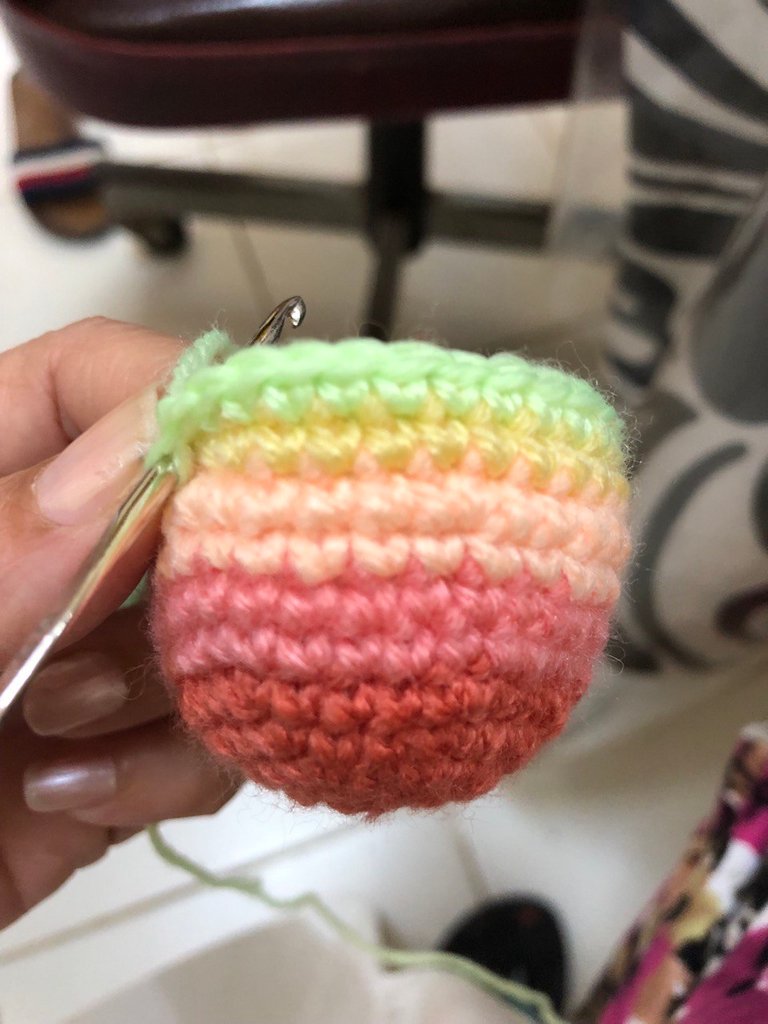
"Let's start": For aesthetic reasons we always start at the head, so that the decreases in the pattern are downwards. We start as usual with a magic ring of 6 stitches, then we increase for each stitch to reach 12 stitches, and we continue increasing on each fly to reach 30 stitches in the fifth round (it would be in the second 12, third 18, fourth 24 and fifth 30 points). From the fifth to the eighth round we maintain 30 points and thus we manage to make the bird's head remain. Within this range we mix the colors as we like, but on a general scale we did five reddish turns, two pink and the other light orange.
"Comencemos": Por cuestiones de estética siempre comenzamos por la cabeza, para que las disminuciones en el patrón queden hacia abajo. Empezamos como siempre con un anillo mágico de 6 puntos, luego hacemos un aumento por cada punto para llegar a 12 puntos,y seguimos aumentado en cada vuela para llegar a 30 puntos en la quinta vuelta(sería en la segunda 12, tercera 18, cuarta 24 y quinta 30 puntos). Desde la quinta hasta la octava vuelta mantenemos 30 puntos y así logramos que quede la cabeza del pajarito. Dentro de este rango mazclamos los colores como más nos gusten pero a escala general hicimos cinco vueltas color rojiso, dos rosadas y la otra naranja claro.
 All photos were taken with my mobile phone/Todas las fotos fueron tomadas con mi telefono movil
To finish the body is very simple, we just have to continue the pattern from round nine with 4 single crochet and an increase to reach 36 stitches and continue like this until round 15 and thus create a small difference between the body and the head of the doll even if it is an oval type pattern. Well, that's how the finished piece would look.
Para terminar el cuerpo es muy sencillo solo debemos continuar el patrón a partir de la vuelta nueve con 4 puntos bajos y un aumento para llegar a 36 puntos y continuar así hasta la vuelta 15 y así crear una pequeña diferencia entre el cuerpo y la cabeza del muñeco aunque sea un patron tipo ovalo. Bueno así quedaría el la pieza terminada.
 All photos were taken with my mobile phone/Todas las fotos fueron tomadas con mi telefono movil
Well, as you can see, making the body of the bird is very simple, but now it's time to play the other pieces, we'll make the wings first. For the wings it is also very simple, we start with a magic ring of 6 points, we continue with an increase in each point to reach 12 and we increase in each round until reaching 24 in round 4 and two more turns are given in that amount for a total of 6 laps. Then the feathers are made, which are 5 in total, the first with a chain of 6 points and returning with a single point for each point, in the same way we do with the rest until ending in the smallest one, which is two points. Remember that the other wing is done in reverse.
Bien como ven hacer el cuerpo del ave es bien sencillo pero ahora tocan las demás piezas haremos primero las alas. Para las alas también es muy sencillo comenzamos con un anillo mágico de 6 puntos, seguimos con un aumento en cada punto para llegar a 12 y aumentamos en cada vuelta hasta llegar a 24 en la vuelta 4 y se le dan dos vueltas más en esa cantidad para un total de 6 vueltas. Después se hacen las plumas que son 5 en total la primera con una cadeneta de 6 puntos y regresando con un punto bajo por cada punto, de igual manera hacemos con el resto hasta terminar en la más pequeña que es de dos puntos. Recordar que la otra ala se hace a la inversa.
 All photos were taken with my mobile phone/Todas las fotos fueron tomadas con mi telefono movil
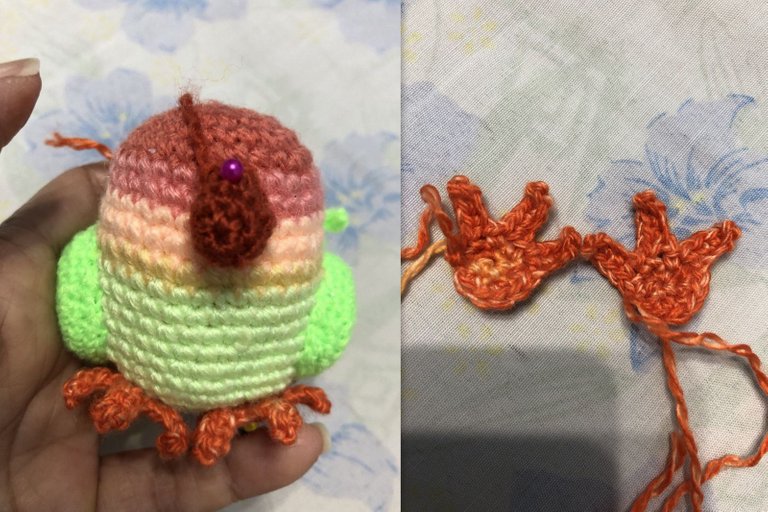
Now it's time to make the legs and the beak. For the beak we make a magic ring of 6 stitches and then in the second round a single crochet and an increase to reach 9 points and then we make two rounds in this quantity and we would have the beak. For the legs we make a magic ring of 6 stitches and 3 increases in a row, a single crochet, for the fingers we chain 6 and return with 5 single stitches, we repeat this process two more times to make the three fingers and we finish with a slip stitch. Remember that it has two legs.
Ahora toca hacer las patas y el pico. Para el pico hacemos un anillo mágico de 6 puntos y luego en la segunda vuelta un punto bajo y un aumento para llegar a 9 puntos y entonces hacemos dos vueltas en esta cantidad y ya tendríamos el pico. Para las patas hacemos un anillo mágico de 6 puntos y 3 aumentos seguidos, un punto bajo, para los dedos hacemos 6 cadenetas y regresamos con 5 puntos bajos, repetimos este proceso dos veces más para hacer los tres dedos y terminamos con un punto deslizado. Recordar que lleva dos patas.
 All photos were taken with my mobile phone/Todas las fotos fueron tomadas con mi telefono movil
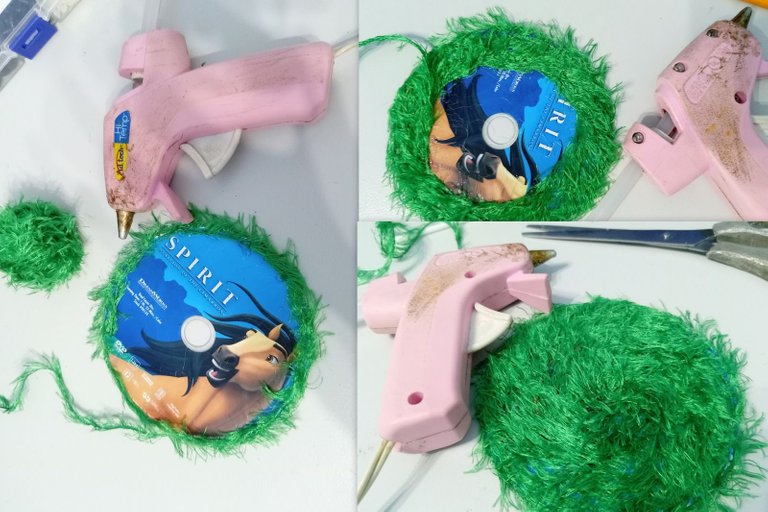
Finally, to finish all the pieces we will make the base. To do it we use an old DVD and with the fluffy yarn we cover it with the help of heat silicone as follows:
Por último para terminar todas las piezas haremos la base que para hacerla usamos un viejo DVD y con el estambre puludito lo forramos con la ayuda de silicona de calor de la siguiente manera:
 All photos were taken with my mobile phone/Todas las fotos fueron tomadas con mi telefono movil
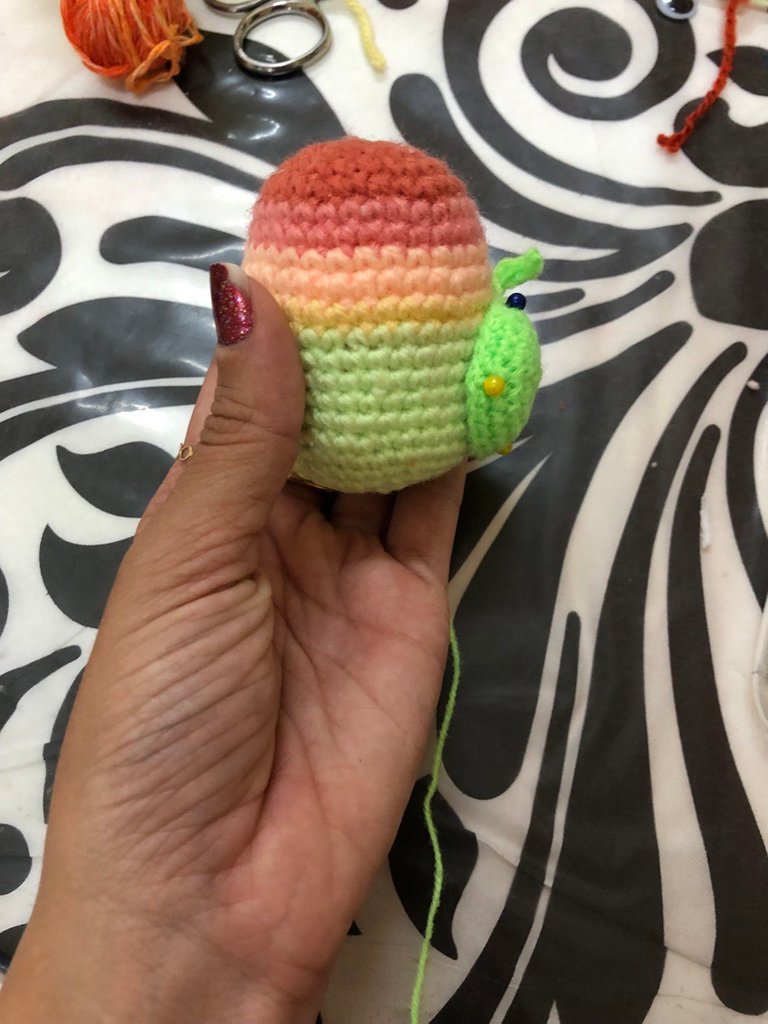
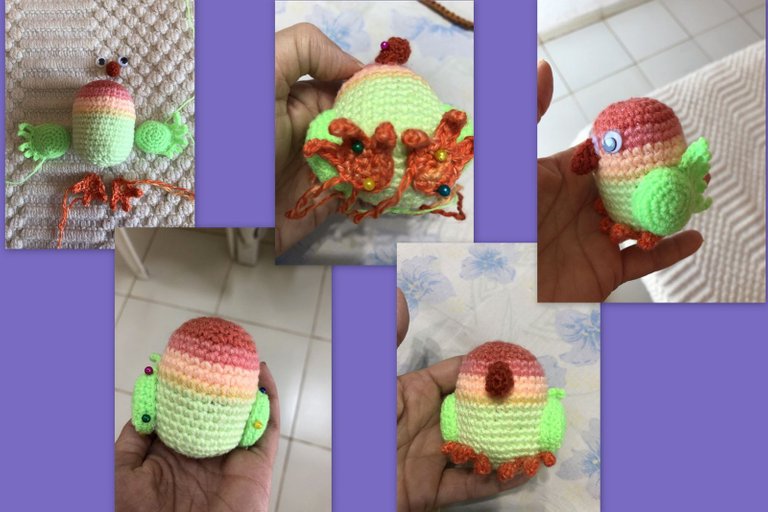
Well, having reached this point, only the assembly remains. In this case it is quite simple, since they have few details, it is just a matter of taking the needle in hand and getting to work! We will sew the wings, the legs and the beak always taking care of the symmetry of the body of the bird, also with a little white thread we will add a small detail in the beak to give it more realism. Then with a bit of hot silicone we will place the eyes, which in this case are crazy eyes of ten millimeters and that's it.
Bueno habiendo llegado este punto solo queda el ensamble. En este caso es bastante sencillo, pues poseen pocos detalles es solo cuestión de tomar aguja en mano y ¡manos a la obra!. Coseremos las alas, las patas y el pico siempre cuidando la simetría del cuerpo del pajarito, además con un poco de hilo blanco añadiremos un pequeño detalle en el pico para darle más realismo. Luego con un poco de silicona caliente colocaremos los ojos que en este caso son ojos locos de diez milímetros y listo.
 All photos were taken with my mobile phone/Todas las fotos fueron tomadas con mi telefono movil
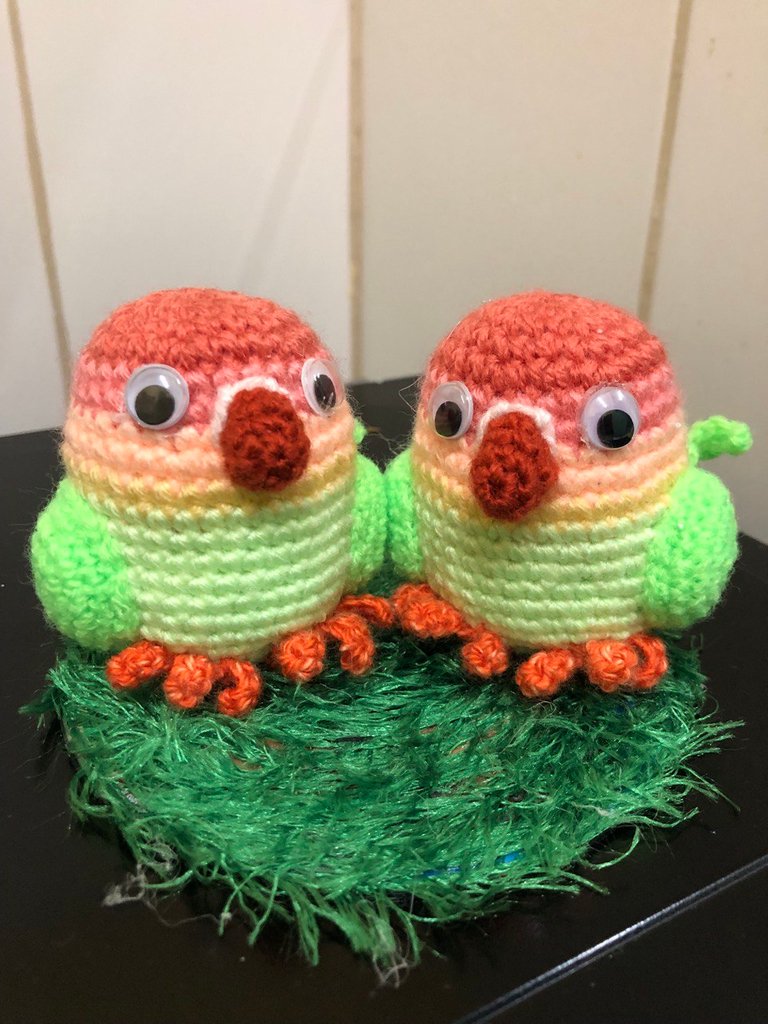
Now all that remains is to put them on their base, for this we glue them with hot silicone and they are ready to be packaged and delivered to their next owner. As you can see, it is a very simple detail, but its simplicity is proportional to its beauty.
Ya solo quedaría ponerlos en su base que para esto los pegamos con silicona caliente y ya están listos para empaquetarlos y entregarlos a su próximo dueño. Como ven es un detalle muy sencillo pero su sencillez es proporcional a su belleza.
 All photos were taken with my mobile phone/Todas las fotos fueron tomadas con mi telefono movil
Solo me queda agradecer a toda la comunidad de Hive en general y nuestra maravillosa comunidad de NeedleWorkMonday en particular. Espero que disfruten tanto como nosotros con este pequeño detallito y bueno los invito una vez más a formar parte de nuestro grupo de Whatsapp y nuestra página de Facebook para ver más de nuestros trabajos.
Hello @giselleayala! Welcome to Hive and to the NeedleWorkMonday Community! 😊
I have read your intro post and have seen your previous works. Let me say the work you and your family do is very beautiful. I particularly love the colors of these birds and they turned out so cute.
Thank you for sharing your work with the community.
I noticed in your last post you made a single comment thanking everyone for their support. One thing about Hive is those who have commented on your post may not see that single message. It’s really best to try to reply to each message so that those who have took the time to support your post will see that you have taken the time to personally respond. I know time is very valuable and you may not have the time to reply to every comment but making the effort to do so goes a very long way…especially to your supporters.
I made this post full of tips for those new to Hive to help them get a great start. I hope it could be of help to you. You can also check out the @newbies-guide as well. ☺️
I hope you enjoy yourself here and are able to meet and mingle with other artists who love doing the same as you. Looking forward to seeing more work from Weaving Dreams ~
Tienes razón y le agradezco mucho las sugerencias y aunque a veces no tenga tiempo para responder a todos si les estoy muy agradecida por todo el apoyo que brinda esta gran Comunidad y además es nuestra manera de mejorar cada día aceptando las sugerencias y trabajando para agradar cada vez más a la comunidad.No se preocupen tendrán Tejiendo Sueños para rato👌👍👍😃😃😃
Absolutely! We are all trying to help and support one another. I’ve been here for quite sometime yet I am still constantly growing and learning as well. Just thought I’d leave you with a bit of advice to help.
I’ll see you around ~ 😊😉
Excelente trabajo me encanta lo que hacen, ya me uní a sus grupos sigan así 👌👌👍👍😸
Que pájaros tan cuchis @giselleayala, el color del hilo está genial, quiero uno así.
Saludos!
Muchas gracias la verdad es que para nosotros es todo un placer y una gran alegría que les gusten nuestros trabajos.Muchas Gracias.
Que hermoso trabajo, me encanto como hiciste la base para los pajaritos, se ven muy tiernos, Saludos linda
Hola Giselle. Gran trabajo hiciste con estos amigurumi de pajaritos, me encantó la forma de hacer el nido. De paso reciclamos un poco :D ¡Te felicito ❤️!
Muchas gracias la verdad es que si tenemos que aprovechar todas las cosas que tenemos a mano y no le encontramos uso y así ayudamos un poco al planeta. Muchas Gracias
Congratulations @giselleayala! You have completed the following achievement on the Hive blockchain And have been rewarded with New badge(s)
Your next target is to reach 300 upvotes.
You can view your badges on your board and compare yourself to others in the Ranking
If you no longer want to receive notifications, reply to this comment with the word
STOPCheck out our last posts:
Support the HiveBuzz project. Vote for our proposal!
Me encantan estos amigurumis de pajaritos😍 está super linda la forma en que cambiaste los colores con un degradado muy prolijo!! Te felicito!!
que lindos se ven esos pájaros en su nido, un trabajo increíble y lleno de color.