Sometimes, when it comes to cooking, we tend to restrict ourselves out of fear or lack of desire. However, I bring you a super simple recipe to make and with ingredients so accessible that we can find in our own home. This recipe is more for brownie lovers, that chocolate cake that we all love.

There are varied opinions on how the brownie should be. Some say it should not be dry, others that it should not be spongy like a sponge cake, and some others that it should not be crunchy. If you allow me my opinion, this delight created by the gods themselves should be spongy, but not to the point of being dry, but on the contrary, so that when the bite occurs, the sweet and chocolatey flavor, along with the fudgy, permeates the entire palate. And at the same time, I think it should be crunchy on the surface, so that when we take the brownie portion to our mouth, these two textures are unified and that contrast that I know we all go crazy for occurs.
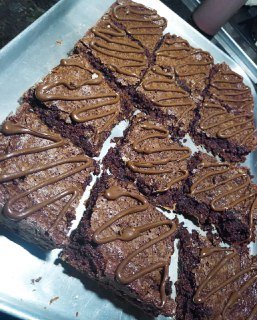
Well, I assure you that everyone will love the recipe I am about to present to you. Its texture is perfect, crunchy on the outside and fudgy on the inside. It is one of those dessert recipes perfect for brownie lovers but not so much to cook desserts.

Los ingredientes indispensables que necesitamos para preparar nuestro fabuloso brownie serán:
The essential ingredients we need to make our fabulous brownie are as follows:
INGREDIENTES
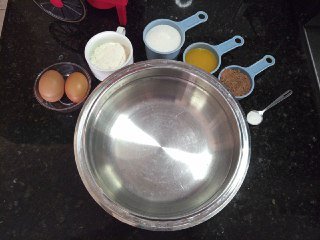
- 1/2 Taza de mantequilla
- 1/2 cup butter
- 1 Taza de azúcar
- 1 cup sugar
- 1/3 taza de cacao
- 1/3 cup cocoa
- 1 cucharita de vainilla
- 1 teaspoon vanilla
- 2 huevos
- 2 eggs
- 1 taza de harina de trigo
- 1 cup wheat flour
- 1 cucharita polvo para hornear
- teaspoon baking powder
Importante🔽. Important🔽
Antes de realizar el primer paso se debe precalentar el horno a unos 175°c (350°f). Esto es más importante si hornearemos nuestro brownie en un horno eléctrico, como el mío.
Before performing the first step we must preheat the oven to about 175°c (350°f). This is more important if we bake our brownie in an electric oven like mine.
PASO 1
Stepe 1
 )
)Our first step to take, little bees, is to melt the butter. When it is in a liquid state, we will pour it into a bowl with the sugar and with the help of a whisk (no matter if it is electric or manual, in this case I used a manual for convenience) we mix these two ingredients for about 40 seconds or until we get a creamy and somewhat whitish texture.
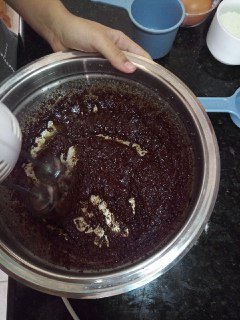
PASO 2
Stepe 2
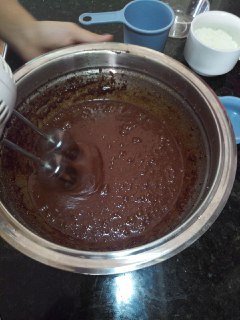
Once the creamy and whitish texture is obtained, it is time to add the cocoa, mix it with the mixer of your choice until you obtain a lumpy and somewhat chewy texture. Something like this:
 )
)
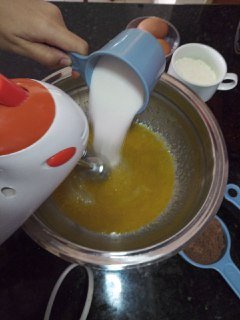
PASO 3
Stepe 3
Ahora es el momento de añadir los huevos y la cucharadita de vainilla. A continuación, batimos la mezcla hasta obtener una textura líquida. Si salen algunas burbujas en la mezcla, no te asustes. Lo estás haciendo bien.
It is time to add the eggs and the teaspoon of vanilla. Then, beat the mixture until you obtain a thick but liquid texture. If some bubbles come out in the mixture, don't panic. You are doing it right.
PASO 4
Stepe 4
Para nuestro siguiente paso requeriremos una paleta repostera, ya que proseguiremos a agregar la harina de trigo y la cucharadita de polvo para hornear. Les recomiendo mezclar en el sentido de las agujas del reloj hasta consegir una mezcla espesa.
For our next step we will need a pastry paddle, as we will proceed to add the wheat flour and the teaspoon of baking powder. I recommend mixing in a clockwise direction until a thick mixture is obtained.
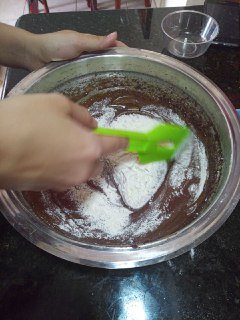
Un truquito que yo hago es tamizar la harina con un colador para evitar grumos.
A little trick I do is to sift the flour with a sieve to avoid lumps.
Si quieres agregarle maní, avellanas u otro ingrediente este es el momento.
If you want to add peanuts, hazelnuts or any other ingredient, now is the time.
PASO 4
Stepe 4
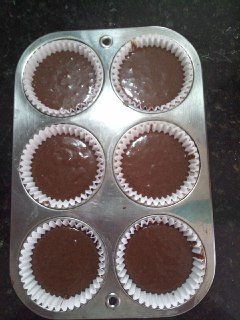
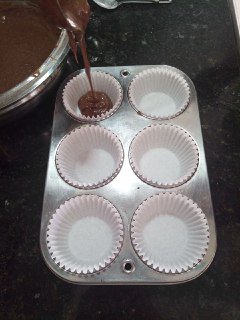
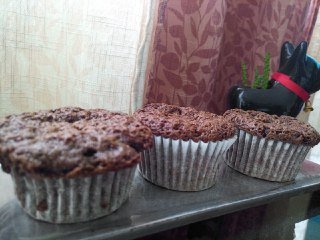
Bien, ya sólo nos quedan dos pasos por completar. Este, es verter la mezcla en el molde donde hornearemos nuestro brownie. En mi caso, quise hacerlo en forma de ponquesitos pero tu puedes hacerlo en el molde que mas te guste.
Well, there are only two steps left to complete. This one is to pour the mixture into the mold where we will bake our brownie. In my case, I wanted to make it in the shape of pancakes but you can do it in the mold that you like.
PASO 5
Stepe 5
Ya llegamos al final de los pasos con el siguiente. Con mucho cuidado introducimos el molde con la mexcla al horno ya precalentado. Esperamos aproximadamente 17 minutos y !listo! ya tenemos nuestras preciosuras.
Now we come to the end of the steps with the next one. with great care we introduce the mold with the mixture into the preheated oven. we wait approximately 17 minutes and that's it! we already have our precious ones.
Un truquito si no estas seguro si está listo es hacerle una pequeña incisión con un palito de altura o cuchillo. Si este sale un poco húmedo y con grumitos está listo. Manten en cuenta que el objetivo es crear una textura fudgy.
A little trick if you're not sure if it's ready is to make a small incision with a height stick or knife. If it comes out a little wet and lumpy, it is ready. Keep in mind that the goal is to create a fudgy texture..
Recuerda realizar todos los pasos al pie de la letra para poder obtener los resultados deseados.
Remember to follow all the steps to the letter in order to obtain the desired results.
¡Gracias por leer, espero que te haya gustado!
¡Thanks for reading, I hope you liked it!

Congratulations @albany01! You have completed the following achievement on the Hive blockchain and have been rewarded with new badge(s) :
Your next target is to reach 600 upvotes.
You can view your badges on your board and compare yourself to others in the Ranking
If you no longer want to receive notifications, reply to this comment with the word
STOPSo yummi, I love brownies 👏👏💯