Hola Hivers! Bienvenidos a mi blog | Hello Hivers! Welcome to my blog
Esta semana estuve aprendiendo a utilizar Blender, un programa gratuito de modelaje, renderización y animación en 3D. Hoy les mostraré mi primera creación, de la cual estoy muy orgulloso😄.
This week I was learning how to use Blender, a free 3D modeling, rendering and animation software. Today I will show you my first creation, of which I am very proud😄.
Hace algunos meses me despertó un fuerte interés por este mundo a partir de un video que vi acerca de las impresoras en 3D. El proceso de la impresión y el resultado final me produjo mucho entusiasmo y ganas de tener una máquina de imprimir propia. En mi país cuesta alrededor de $250, por lo que aún no he podido comprarla, pero es uno de mis objetivos. Mientras tanto, me propuse a aprender a modelar en 3D, para adquirir las mayores habilidades posibles en el uso de la herramienta y estar preparado para cuando me compre la impresora. Y además me fascina el arte digital, me encantaría poder crear mi propia colección de NFT. Pero bueno, debo calmar la ansiedad e ir de a poco, sin dejar de visualizar mis objetivos. Sin más preámbulos, les mostraré mi primera creación.
A few months ago I became very interested in this world after watching a video about 3D printers. The printing process and the final result made me very enthusiastic and eager to have my own printing machine. In my country it costs around $250, so I haven't been able to buy one yet, but it is one of my goals. In the meantime, I set out to learn how to model in 3D, to acquire the best possible skills in the use of the tool and be prepared for when I buy the printer. And I am also fascinated by digital art, I would love to be able to create my own NFT collection. But well, I have to calm my anxiety and go little by little, while still visualizing my goals. Without further ado, I'll show you my first creation.
Como habrán visto en una publicación anterior, me gusta dibujar rostros. Por lo tanto decidí recrear mi rostro en 3D.
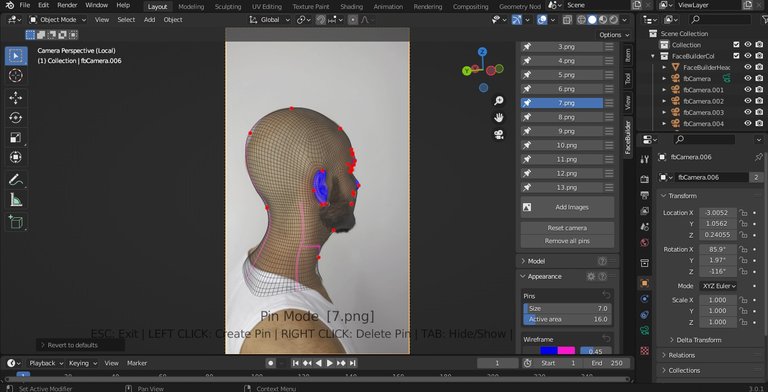
Para representar un rostro o cualquier objeto de la vida real en 3D, lo que se hace es obtener varias imágenes del objeto desde distintos puntos de vista. Cuántas más fotos, mayor realismo. He visto que, para películas que requieran de la representación de un rostro en 3D, la persona se introduce en una especie de "jaula" que posee 240 cámaras, cada una con su respectivo foco. En mi caso, por ser una simple prueba y experimento, para hacerlo me tomé tan sólo 13 fotos, capturando los puntos de vista principales, con una luz focal.
As you may have seen in a previous post, I like to draw faces. Therefore, I decided to recreate my face in 3D.
To represent a face or any real-life object in 3D, what is done is to obtain several images of the object from different points of view. The more pictures, the more realistic. I have seen that, for films that require the representation of a face in 3D, the person is introduced in a kind of "cage" that has 240 cameras, each one with its respective focus. In my case, as a simple test and experiment, I took only 13 photos, capturing the main points of view, with a focal light.
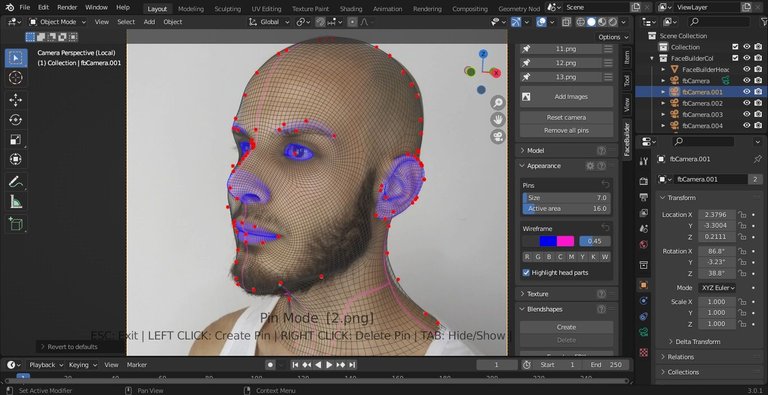
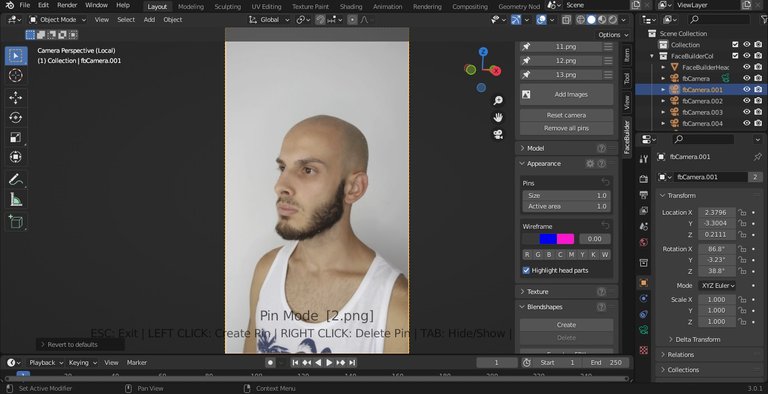
La técnica que usé es sencilla, se trata de hacer encajar los puntos en las partes del rostro correspondientes, para que el programa detecte la ubicación exacta de las facciones, y pueda reflejar una representación realista de la figura.
The technique I used is simple, it is to fit the dots in the corresponding parts of the face, so that the program detects the exact location of the features, and can reflect a realistic representation of the figure.
Comencé por ubicar el centro de la nariz, luego el centro del entrecejo, el centro del labio, el mentón y el extremo superior e inferior de la oreja. Una vez marcados estos puntos proseguí por acomodar los ojos, los bordes de la cabeza, el cuello, el pómulo, etc. A mayor precisión, mayor realismo en el resultado.
I started by locating the center of the nose, then the center of the eyebrow, the center of the lip, the chin and the top and bottom of the ear. Once these points were marked, I went on to place the eyes, the edges of the head, the neck, the cheekbone, etc. The greater the precision, the more realistic the result.
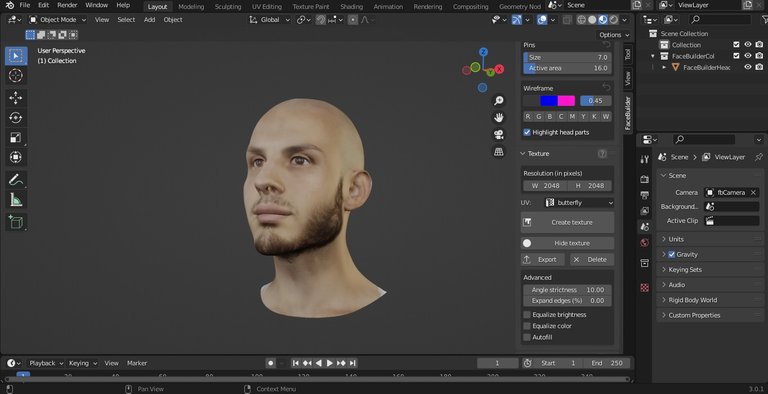
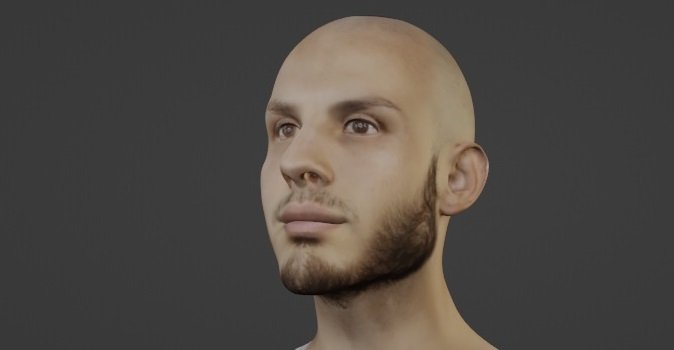
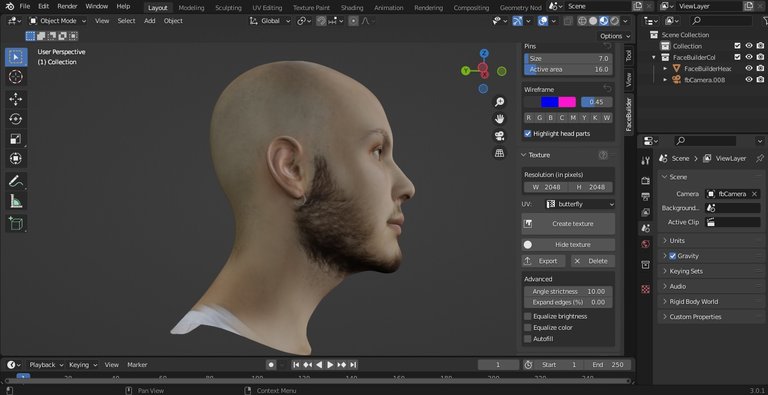
Luego de crear la textura, este es el resultado. Como se puede apreciar, le falta mucho realismo. Para poder mejorarlo, podría ajustar la malla que recubre el rostro, acomodando los puntos con mayor precisión en cada una de las 13 fotos. Y para darle un toque de realismo a la imagen podría aplicarle efectos de luz, materiales y suavizado, aunque es algo que aún no he aprendido.
After creating the texture, this is the result. As you can see, it lacks a lot of realism. In order to improve it, I could adjust the mesh that covers the face, arranging the points more accurately in each of the 13 photos. And to give a touch of realism to the image I could apply light effects, materials and smoothing, although it is something that I have not learned yet.
Al hacerlo, me di cuenta que realizar un rostro en 3D es más fácil de lo que imaginaba, el principal requisito es tiempo y paciencia. Y por supuesto que hay que saber utilizar las infinidades de herramientas que posee el programa.
Los invito a que, si les interesa el mundo 3D, aprendan lo básico de Blender o cualquier otro programa. Personalmente, lo hice a través de este video hecho por AURA PRODS. También les recomiendo que hagan el curso introductorio que Crehana ofrecerá de forma gratuita durante 24 hs, el día Sábado 12 de febrero (información que me comentó la genia de Kerit Roberts).
In doing so, I realized that making a 3D face is easier than I imagined, the main requirement is time and patience. And of course you have to know how to use the infinite number of tools that the program has.
I invite you, if you are interested in the 3D world, to learn the basics of Blender or any other program. Personally, I did it through this video made by AURA PRODS. I also recommend you to take the introductory course that Crehana will offer free of charge for 24 hours on Saturday, February 12th. (Information provided to me by the genius of Kerit Roberts).
¡Anímense! Me encantaría ver los resultados de su propio rostro en 3D😄.
Cheer up! I'd love to see the results of your own 3D face😄.

¡Gracias por leerme! | Thanks for reading me!
¡Gracias por leerme! | Thanks for reading me!
Separadores de texto | Text separators: Tutorialesteemit
Texto traducido en | Text translated in: DeepL
Congratulations @agustinezequiel! You have completed the following achievement on the Hive blockchain and have been rewarded with new badge(s):
Your next target is to reach 800 upvotes.
You can view your badges on your board and compare yourself to others in the Ranking
If you no longer want to receive notifications, reply to this comment with the word
STOPCheck out the last post from @hivebuzz:
Support the HiveBuzz project. Vote for our proposal!