MAQUILLAJE INSPIRADO EN LA MUJER MARAVILLA [ESP] [ENG] MAKEUP INSPIRED BY WONDERFUL WOMAN

in MakeUp Power • 3 years ago

PicsArt_05-05-01.02.07.jpg

🔆HOLA AMIGOS DE HIVE🔆

HELLO FRIENDS OF HIVE

Esta vez vuelvo con un maquillaje super divertido y creativo, espero se encuentren muy muy bien y que estén cumpliendo sus metas y sueños.

Como les digo esta vez quise realizar un maquillaje super divertido y colorido, lo tenía en mente y lo intenté, es sobre la MUJER MARAVILLA, me encanta porque yo creo que todas las mujeres del mundo somos maravillas, sin excepción.

Somos mujeres luchadoras, trabajadoras, valientes, poderosas, y entre muchas más, tenemos la capacidad de dar vida. Por eso digo que todas somos MUJERES MARAVILLOSAS.

This time I return with a super fun and creative makeup, I hope you are very, very well and that you are fulfilling your goals and dreams.

As I told you this time I wanted to make a super fun and colorful makeup, I had it in mind and I tried, it is about WONDERFUL WOMAN, I love it because I believe that all women in the world are wonders, without exception.

We are fighters, hardworking, brave, powerful women, and among many more, we have the ability to give life. That is why I say that we are all WONDERFUL WOMEN.

PicsArt_05-04-05.05.24.png

Está vez les explicaré el paso a paso de mi maquillaje, empezamos!!!!!

This time I will explain the step by step of my makeup, let's start !!!!!
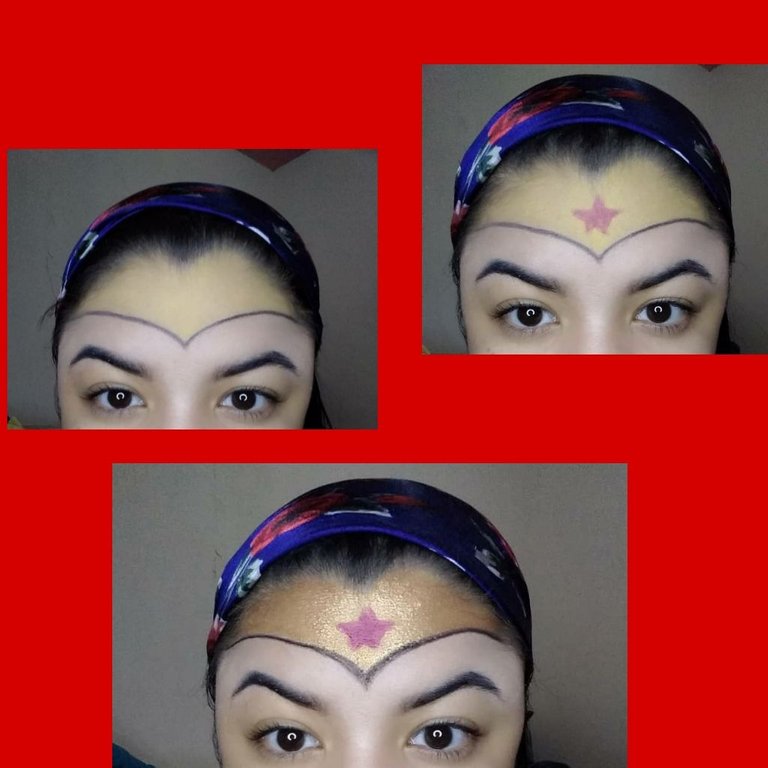
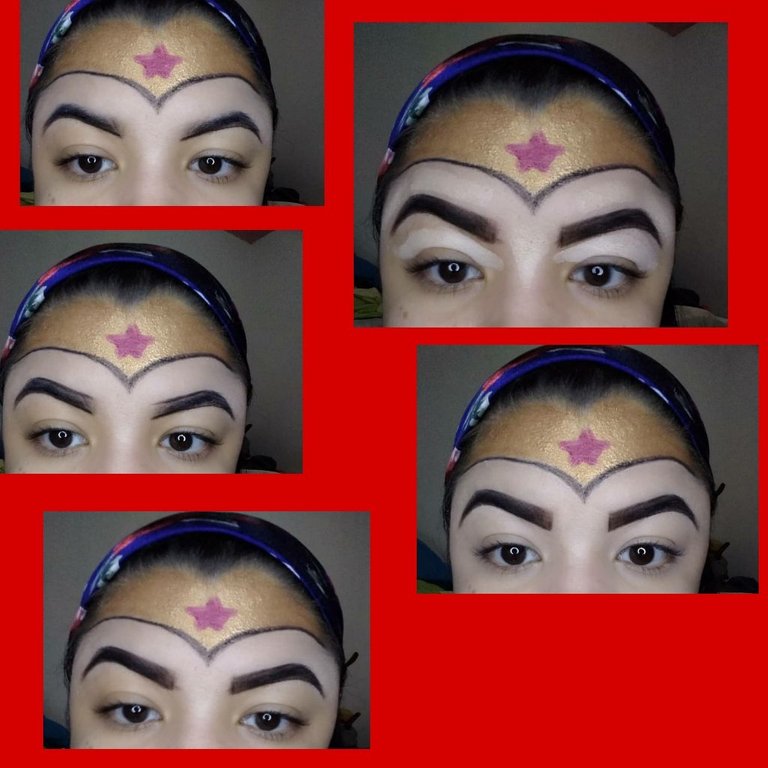
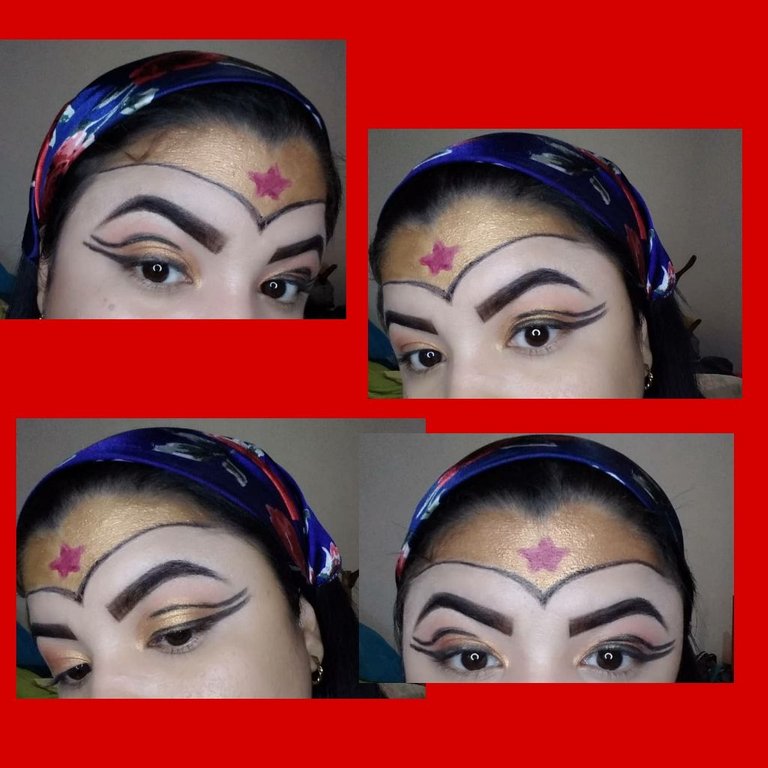
PASO #1 CORONA

Lo primero que hice fue realizar la corona con un delineador de ojos y hacer la figura completa, para luego así con sombra de color amarillo empecé a rellenar toda la corona con mucho cuidado, también utilice un glitter dorado y rellene toda la corona arriba del color amarillo, que que hice ese procedimiento con labial rojo hice una estrella en todo el medio de la corona, y para finalizar volví a remarcar la líneas con delineador para ojos.

STEP # 1 CROWN

The first thing I did was to make the crown with an eyeliner and make the complete figure, and then with yellow shadow I began to fill the entire crown very carefully, I also used a golden glitter and filled the entire crown Above the yellow color, that I did that procedure with red lipstick, I made a star in the entire middle of the crown, and finally I remarked the lines with eyeliner.
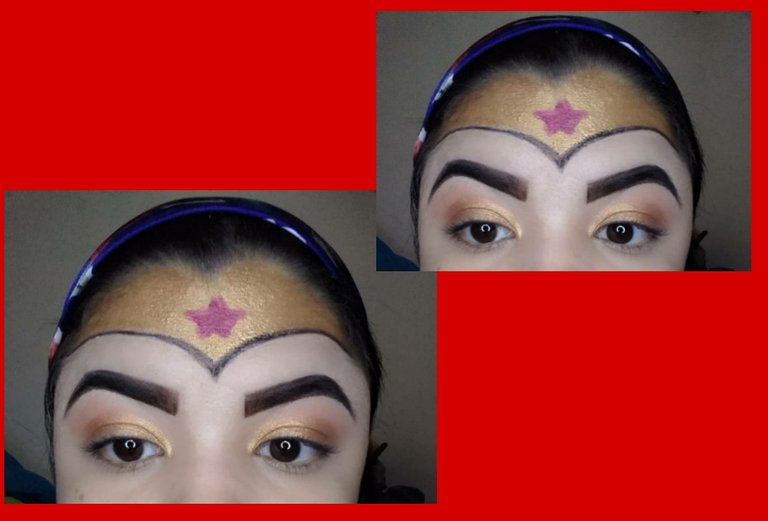
PicsArt_05-04-09.31.32.jpg

calligraphic-vintage-divider_10.png

PASO #2 CEJAS

Para las cejas, yo realizo una línea en la parte superior de la ceja y luego una línea en la parte inferior, luego trato de rellenar con mucho cuidado y en la parte donde empieza la ceja trato de dibujar unos rayas pequeñas como si fueran pelos para que se vean más real, y loo que hago para finalizar es difuminar con mucho cuidado para que no se salga de la línea realizada.
Después de eso, con una base corrector me la aplico en la parte del párpado y en la parte inferior de la ceja, para así con un pincel tratar de corregir y limpiar alguna línea. Y finamente así quedan las cejas.

STEP # 2 EYEBROWS

For the eyebrows, I make a line at the top of the eyebrow and then a line at the bottom, then I try to fill in very carefully and in the part where the eyebrow begins I try to draw some small stripes as if they were hairs to make them look more real, and what I do to finish is to blur very carefully so that it does not go out of the line made.
After that, with a concealer base I apply it on the part of the eyelid and on the lower part of the eyebrow, so with a brush I try to correct and clean some lines. And that's how the eyebrows look fine.

PicsArt_05-04-09.36.25.jpg

calligraphic-vintage-divider_10.png

PASO #3 SOMBRAS

En este paso solamente utilice 2 colores de sombra, para la base, en la parte del párpado primero utilice una sombra color marrón claro y trate de difuminar en todo el párpado y el siguiente fue un glitter dorado y solo lo coloque en la parte superior del párpado.

STEP # 3 SHADOWS

In this step only use 2 colors of shadow, for the base, on the part of the eyelid first use a light brown shadow and try to blend in the entire eyelid and the next was a golden glitter and only place it on the upper part of the eyelid.

PicsArt_05-04-09.39.12.jpg

calligraphic-vintage-divider_10.png

PASO #4 DELINEADO

Para el delineado lo que hice fue hacer el común que es conocido como el delineado de gato, luego en la tarde inferior del párpado también trae una línea hasta igualarse con la de abajo.

STEP # 4 OUTLINE

For the eyeliner what I did was make the common one that is known as the cat eyeliner, then in the lower afternoon of the eyelid it also brings a line until it is equal to the one below.

PicsArt_05-04-09.41.53.jpg

calligraphic-vintage-divider_10.png

PASO #5 DELINEADO Y BASE

En este paso, lo que hice fue aplicarme las bases, siempre uso 2, la primera es una base para corrector de ojeras y la segunda es la base para el rostro, me las aplico y las difumino con una esponja, y también lo que hice fue el acabado del delineado, primero realice una línea en la parte superior ojo, que sobre saliera de ambos lados, y también con un lápiz blanco delineo el ojo por la parte superior.

STEP # 5 OUTLINE AND BASE

In this step, what I did was apply the bases, I always use 2, the first is a base for concealer of dark circles and the second is the base for the face, I apply them and blend them with a sponge, and also What I did was finish the eyeliner, first I made a line in the upper part of the eye, which came out on both sides, and also with a white pencil I delineated the eye on the upper part.

PicsArt_05-04-09.45.06.jpg

calligraphic-vintage-divider_10.png

PASO #6 CONTORNOS Y ACABADO

Para el último paso, lo que hice fue realizarme el contorno, con una paleta especial para realizar contornos, uso el tono más claro en color marrón, realizo una línea en la parte superior de los pómulos de los 2 lados, y en la nariz rodeándolo y trato de difuminar, termino con un polvo compacto para emparejar el color, y lo que hago es terminar de hacer las líneas en la cara, y también me pinte los labios de color rojo.

STEP # 6 CONTOURS AND FINISHING

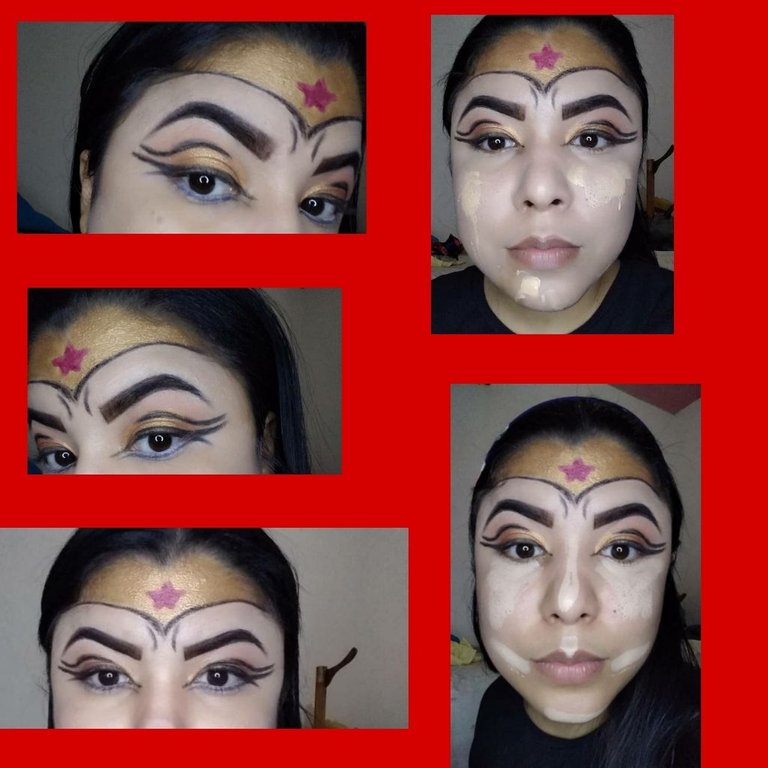
For the last step, what I did was contour, with a special palette for contouring, I use the lightest shade in brown, I make a line on the upper part of the cheekbones on the 2 sides, and on The nose surrounding it and I try to blend, I finish with a compact powder to match the color, and what I do is finish making the lines on the face, and also paint my lips red.
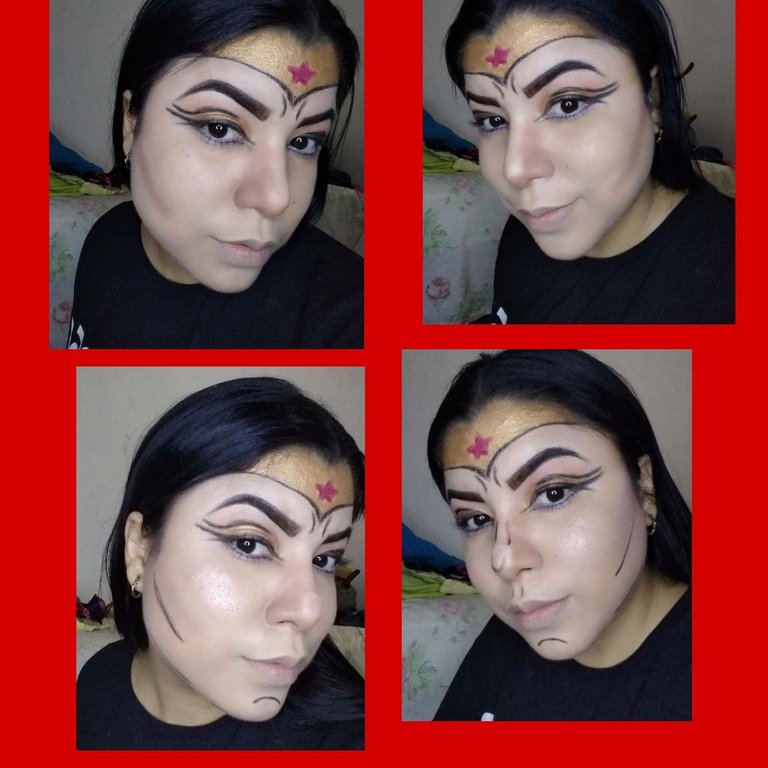
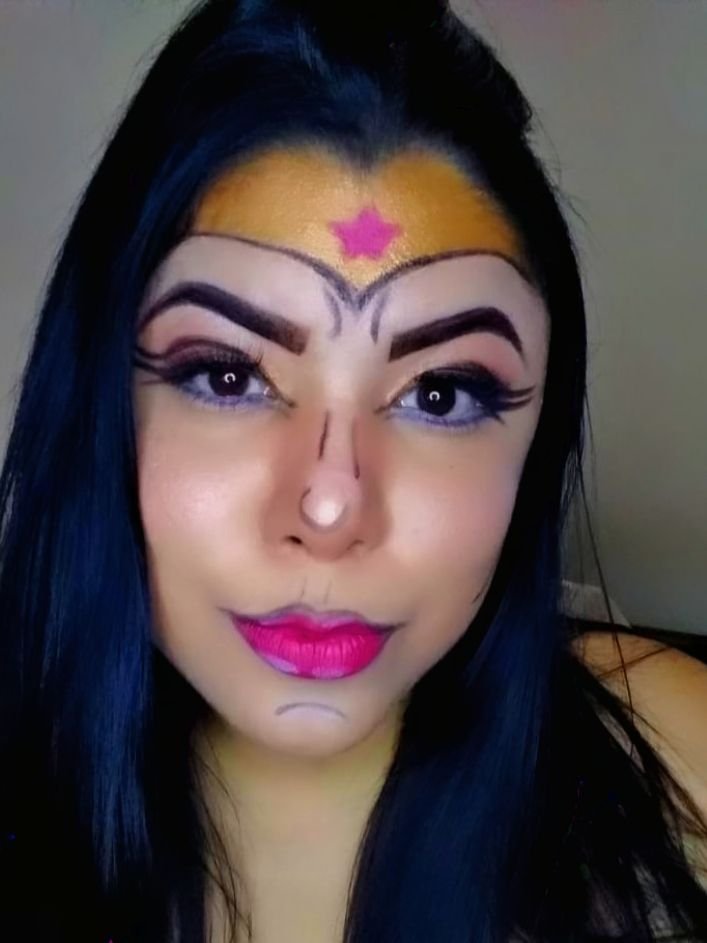
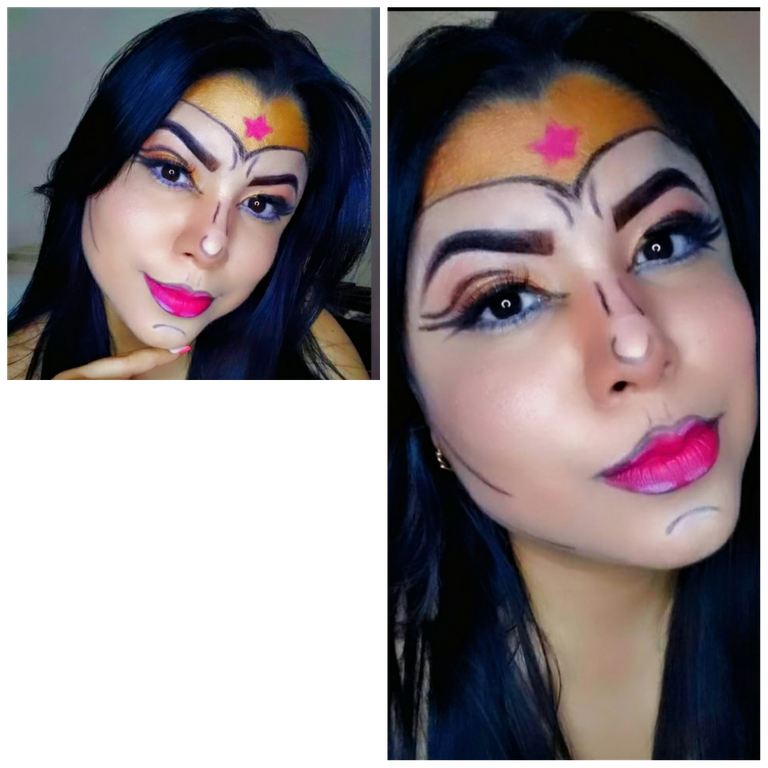
PicsArt_05-04-09.51.16.jpg

đź’›RESULTADO FINALđź’›

FINAL RESULT

PicsArt_05-05-01.34.30.png

PicsArt_05-04-05.05.24.png

Espero les guste mi pequeño tutorial de maquillaje lo hice con mucho cariño para ustedes me dediqué y trate de hacer lo mejor.

Hasta el prĂłximo post!!!

I hope you like my little makeup tutorial, I did it with a lot of love for you, I dedicated myself and tried to do my best.

Until the next post !!!


94372f8a-8838-46f3-ad69-20e0dde0d0b1.gif

Imagen realizada en canva.com


Fotos tomadas por mi celular Samsungs10

Imágenes editadas en Picsart.com

Separadores de texto realizados en Picsart.com

Texto traducido por Google Traductor

Sort:  

Me encanto!!!

@zara99 muchas gracias 🤗

Precioso!!đź’›

Gracias @yaneidys05 saludo 🤗