In this tutorial I will make use of the Esp8266 (NodeMCU) which is a simple and small microcontroller from Expressif Systems that caused a boom in the IOT (Internet Of Things).

This tutorial is based on Windows, in my case Windows 10 Education.
Step 0: Parts
First you are going to need some parts:
NodeMCU (https://de.aliexpress.com)
DHT22 Sensor (https://de.aliexpress.com)
Jumper Wires (https://de.aliexpress.com)
Micro Usb to USB Typ A (https://de.aliexpress.com)
Usb Charger Typ A (https://de.aliexpress.com/)
I used Aliexpress for my orders, but the parts can be found elsewhere too, it was just the cheapest solution for me for the sake of the long order times...
Software used:
https://www.python.org/download/releases/2.7/
Step 1: Installing the software
After plugging in the NodeMCU into your USB-Port head over to https://www.python.org and install the latest stable release for your system.
The latest release should include the PIP module.
After installing open up the command line with following lines:
Download umqtt from my Googledrive: https://drive.google.com and save it for later.
Step 2: Flashing the NodeMCU with Micropython
For the next part we'll need the firmware for the ESP-Module.
I used Micropython because I had already experience with Python and the flashing process is sped up with tools like the REPL Terminal. (..Later more about that)
Download the .bin file from esp8266-20170108-v1.8.7.bin
Make sure your NodeMCU is connected and look out for its COM Port.
The port can be found in the hardware manager ( Windowskey + pause ) under COM and LPT.
In my case it was COM4.
Then open the command line using CMD (Windowskey+R) and enter following:
Where COM4 is maybe different in your case.
After the flashing operation succeeded your should now be ready to upload some code to your ESP8266. But first we will wire up the components.
Step 3: Wiring
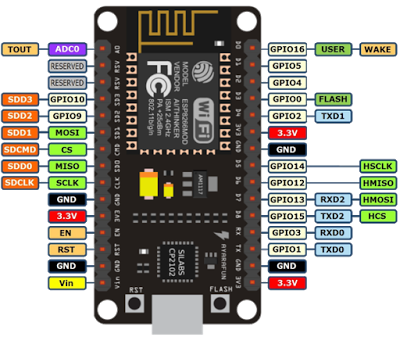
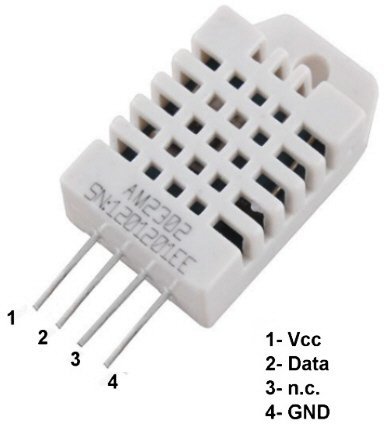
Connect the DHT22 module whith the jumper wires to the ESP8266 in the following way:
Vcc to 3.3V
GND to GND
Data to PIN 14 (GPIO 14, D5)
After securing the connection we should be ready to retrieve temperature information.
Step 4: Thingspeak Account
Visit https://thingspeak.com/users/sign_up and create and account.
Create a channel for the information to be collected. https://thingspeak.com/channels/new
After entering the name and description for your channel head over to the api keys.
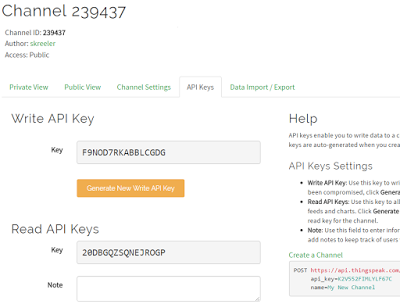
Write down the channel ID and the API Key for later use.
Step 5: Uploading the code and installing libraries
Connect your ESP8266 to the USB-Port you used in the flashing process and upload the umqtt library you downloaded before.
Look out that you are in the same folder as the umqtt files!
Create a file called "main.py" with following code.
Be sure to replace the WiFi name and passwort with yours!
Also change the thingspeak parameters like the channel ID and the API key
Finally upload the file "main.py" with following command.
Step 6: Capture data
Now reboot your ESP8266 or replug it and it should now blink and capture the temperature / humidity every 15 Seconds, which is the limit for free users on Thingspeak.
You can look at your diagrams at your channel, for example my captured data looks like this:
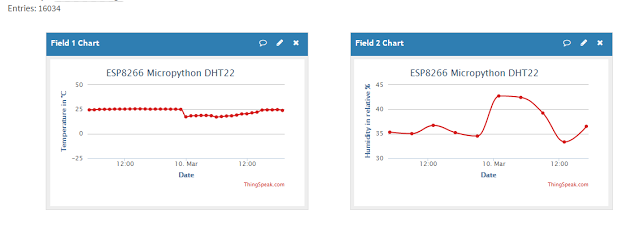
That's it! Have fun capturing data!