THEODOLITE INTRODUCTION
Theodolite / theodolit is a tool of civil engineering building instrument designed for angle measurement ie horizontal angle which is called with horizontal angle and vertical angle which is called with vertical angle. Where these angles play a role in the determination of horizontal distance and vertical distance between two field points.
THEODOLITE CONSTRUCTION
Theodolite instrument construction is fundamentally divided into 3 parts, see picture below:.jpg)
Information :
Bottom section, consisting of a base plate with three adjusting screws that disprove an axle tube and a flat plate in the shape of a circle. At the edge of this circle limbus lock is made.
The middle part consists of an axis inserted into a tube and placed on the bottom. This axis is the perpendicular axis of unity. On the axis of one one is placed again a circular plate in the form of a circle that has the radius of the plate on the bottom. At two places on the edge of the circle are made nonius reader. On this nonius plate is placed 2 feet which become the axis horizontal axis or the second axis and the sutu nivo tube is placed to make the axis one perpendicular straight. Circles are made of glass with lines of scale and numbers scratched on the surface. The lines are very thin and clearer than sharp metal scratches. The circle is divided in sexagesimal degree ie a full circle divided in 360 ° or in grades senticimal ie one full circle divided into 400 g.
The upper part, consisting of a second axis placed on the second axis of the axis. On the second axis is placed a binocular which has a diaphragm and thus has a viewfinder. On this axis also placed the plate in the form of a vertical circle the same as the horizontal plate plate.
SUMBU / POROS SYSTEM ON THEODOLITE
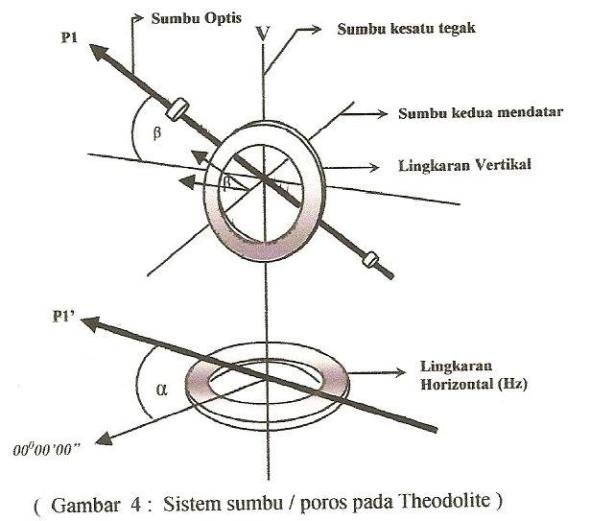
THEODOLITE REQUIREMENTS
The main requirements to be met by the theodolite tool so that ready to be used for correct measurement are as follows:
- First axis really upright / vertical.
- The Second Axis should be completely flat.
- The viewfinder should be perpendicular to the second axis / horizontal.
4.There is no index on the first circle.
TYPE - THEODOLITE MODES
From the construction and the way of measurement, three kinds of theodolite are known:
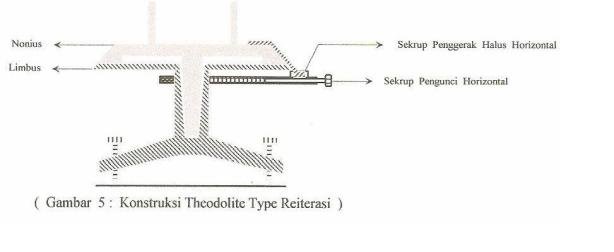
1.Theodolite Reiteration
At the reiteration theodolite, the scale plate (horizontal) plate becomes one with nonius plates and axle tubes on the kiap.
So the horizontal circle is fixed. In this type there are nonius plate lock screws.
2.Theodolite Repetition
In the repetition theodolite, the horizontal scale plate plate is placed in such a way that it can rotate itself with the shaft tube as the rotary axis.
In this type there is a horizontal loop locking screw and nonius screws.
2.Theodolite Repetition
In the repetition theodolite, the horizontal scale plate plate is placed in such a way that it can rotate itself with the shaft tube as the rotary axis.
In this type there is a horizontal loop locking screw and nonius screws.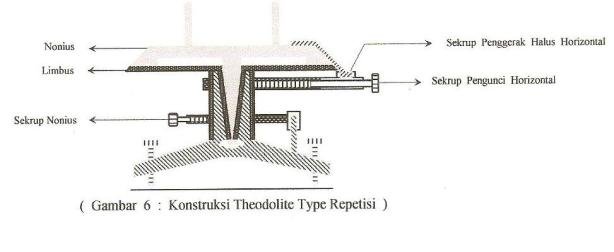
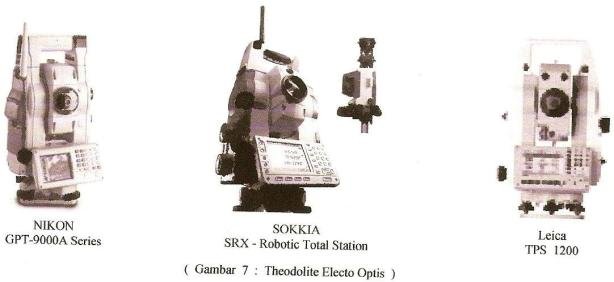
- Theodolite Electro Optics
From the mechanical construction of the system the arrangement of the angular circle between the optical theodolite with the same electro optical theodolite. However, the microscope on circular scale reading does not use lens system and prism again, but using sensor system. This sensor works as an electro optical model (an electromagnetic wave receiver). The first result of the analog system and then must be transferred to the digital number system. The counting process is automatically displayed on the (LCD) layer in the decimal number.
HOW TO OPERATE / USE THEODOLITE
- Theodolite Tool Setup
The workings of theodolita set up include:
- Loosen the locking extension screw
- Raise your chest height
- Tighten the extension locking screw
- Create an equilateral triangular stative leg
- Strengthen (step on) the foot pedal statif
- Set the height of the stative so that the tribar plate horizontal
- Put theodolite on tribar plate
- Tighten the centering screw lock to theodolite
- Set (levelkan) nivo box so that the axis of one is really upright / vertical with irregularly moving the horizontal screw on three sides of the measuring instrument.
- Set (level) the nivo tube so that the second axis is completely flattened by moving the horizontal screw on each side of the gauge.
- Position theodolite by loosening the centering locking screw and then shift left or right so that it is right in the middle of the binding titi (BM), seen from the optical centering.
12.Do test the position of the crosshairs with the help of the T mark on the wall.
13.Check the accuracy of the index value on the circle scale system by performing the usual angle and corner reading to find out the value of the index error.
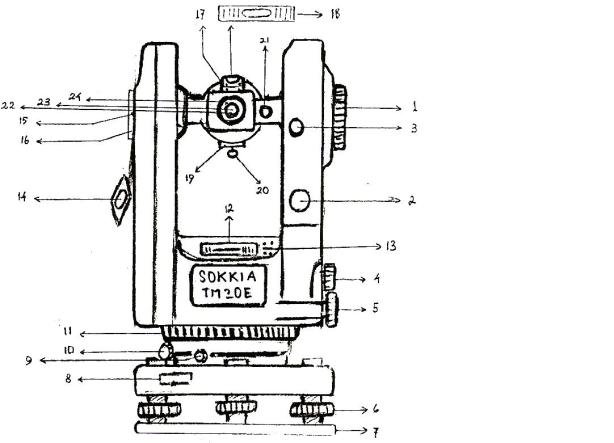
Theodolite SOKKIA TM20E view from the rear
INFORMATION : - Micrometer button 13. Nivo tube correction screw
- Fine vertical drive screw 14. Light reflector
- Vertical drive lock screw 15. Equipment altitude marks
- Horizontal drive lock screw 16. Clamp slot
- Fine horizontal drive screw 17. Nivo Tube lock screw Telescop
- Nivo Flat Screw 18. Nivo Tube Telescop
- Basic plate 19. Nivo vision light reflector
- Limbus Lock 20. Visir Collimator
- Nonius screw lock 21. Micrometer lens
- Nonius fine drive screw 22. Ring focus diaphragm thread
11.Ring horizontal position adjustment 23. Ocular lens - Nivo tube 24. Ring focus okuler
so many of me may be useful for steemit friends
thanks for steemit friends who read it
follow me in steemit @audison
Source refence;http://hendrikotsp.blogspot.co.id/2012/12/cara-menggunakanmengoperasikan.html?m=1
Nyan ka eu,nyoe ji vot le wapha ..ka ji tamah meu bacut
Nyoe beu meu ceh keudeh, beu tamong apa nyoe,beu aktif apa jeh..