Nota: Este blog esta creado con el fin de orientar y educar en el manejo de la plataforma, tanto a los nuevos usuarios como también a los interesados en ser parte de Hive.io.
Note: This blog have been created with the goal of educate and guide in the management of the platform, both at the new user, at the registered, and to the interested in being part of Hive.io.
Buenas comunidad de Hive… Espero te encuentres de maravilla y estés pasando un excelente día. Hoy aprenderemos, como crear un post en PeakD.
Good Hive community… I hope that you are having a great time and having an excellent day. Today we will learn how create a post on PeakD.
Primero nos dirijimos a PeakD, haciendo clic en el siguiente enlace: https://peakd.com/ e iniciamos sesión como lo aprendimos en anteriores Post. Y se abrirá la siguiente página.
We first go to PeakD, clicking on the following link: https://peakd.com/ and logging in as we learned in previous Posts. And the following page will open.

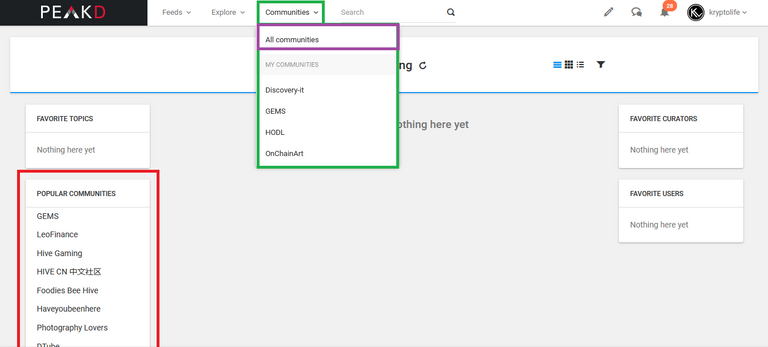
Estando aquí, buscaremos una comunidad que maneje temas relacionados con el tema del que queremos hacer nuestro post, estas comunidades las buscaremos desde el área izquierda, marcada con el recuadro rojo en la siguiente imagen (el área de comunidades) o desde el menú desplegable marcado de color verde, que si hacemos clic en el botón demarcado de color morado, accederemos a todas las comunidades.
Here, we will look for a community that handles topics related with the topic we want to make our post, these communities will be searched from the left area (marked with the red box) in the following image (the communities area) or from the drop-down menu (marked with green), that if we click on the button marked with purple, we will access to all communities.
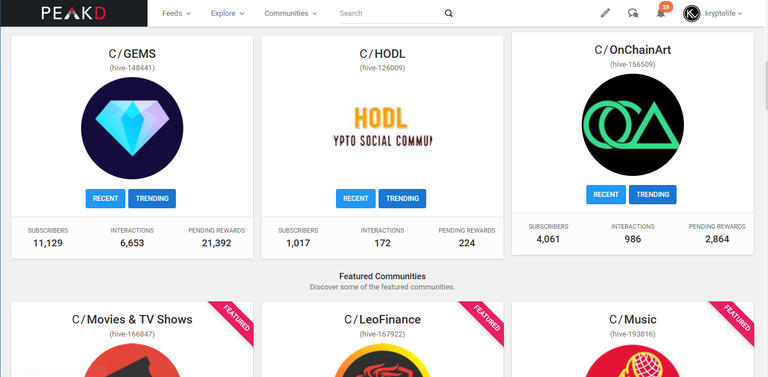
Una vez seleccionada la comunidad, haremos clic sobre su nombre y se nos abrirá el perfil de esta comunidad.
Once the community is selected, we will click on its name and the profile of this community will be opened.
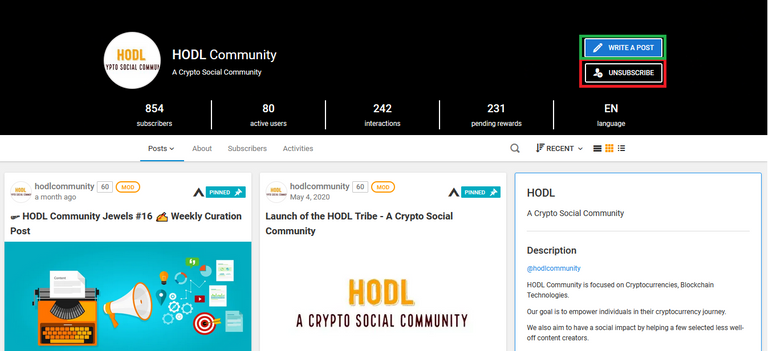
En donde podremos: suscribirnos a esta comunidad (haciendo clic en el botón que tiene el recuadro rojo, a mí me aparece “unsuscribe” porque ya estoy suscrito a esta comunidad), leer los posts que usuarios suscritos a esta comunidad han publicado e interactuar con estos posts. Y para lo que vinimos, publicar nuestros posts en esta comunidad. Para ello haremos clic en el botón que posee el recuadro de color verde “Write a Post”.
Where we will be able to: subscribe to this community (by clicking on the button with the red box, to me appears “unsubscribe” because, I am subscribed to this community), read the posts that users subscribed to this community have published and interact with these posts. And for what we came, publish our posts in this community. To do this, we will click on the button with the green box “Write a Post”.
Y se abrirá la siguiente página, en donde podremos plasmar y darles forma a nuestros posts con el lenguaje de texto Markdown y CSS, para que nuestras publicaciones se vean de manera ordenada. En nuestro proximo post aprenderemos como darle forma a nuestros post.
And the following page will open, where we can shape and give them form to our posts with the Markdown text language and CSS, so that our publications are seen in an orderly manner, in our next post. We will learn to give a better form to our post.
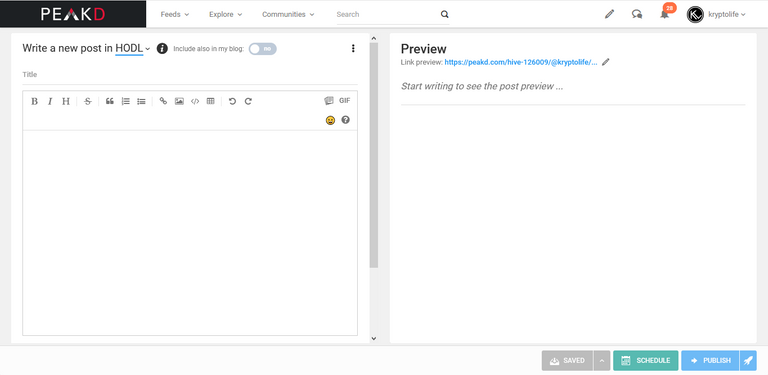
Cuando creamos un post, lo que escribimos en el área izquierda, se verá reflejado en el área derecha en tiempo real y de esta manera se verá al momento de publicarlo.
When we create a post, what we write in the left area, will be reflected in the right area in real time and in this way it will be seen when it is published.
Como lo podrás ver en la siguiente imagen.
As you can see in the following image.
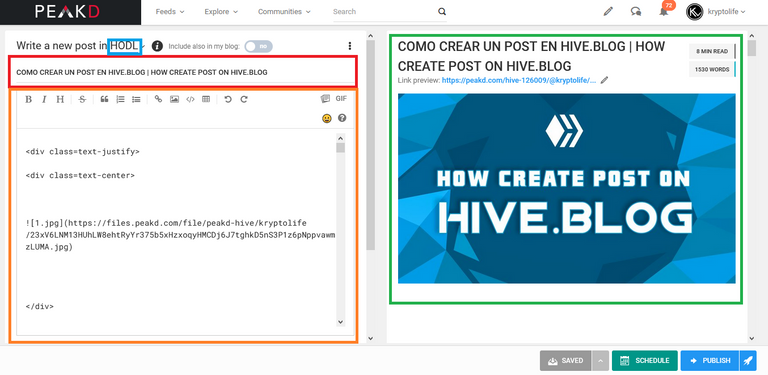
En el recuadro rojo, escribiremos el título de nuestro post.
In the red box, we will write the title of our post.
En el recuadro azul veremos el nombre de la comunidad en la cual estamos creando el post.
In the blue box we will see the name of the community in which we are creating the post.
En el área anaranjada escribiremos nuestro post y le daremos forma con Markdown y CSS.
In the orange area we will write our post and shape it with Markdown and CSS.
Y en la zona demarcada con el recuadro verde veremos la forma que está tomando nuestro post.
And in the area demarcated with the green box we will see the form our post is taking.
Es importante saber, que la primera imagen que coloquemos, será la foto de portada para la miniatura del post, es decir será la imagen pequeña que veremos antes de abrir el post.
It is important to know that the first image that we place will be the thumbnail cover photo of the post's, that is, it will be the small image that we will see before open the post.
Lo recomendable es, primero colocar la imagen de portada para nuestro post, como lo observamos en la imagen anterior y luego empezar a escribir, como lo veras en la siguiente imagen., (para una óptima visualización esta imagen, debe tener una resolución de 1360x765).
The recommendable is, first place the cover image for our post, as we observed in the previous image and then start write, as you will see in the following image, (for optimal viewing this image must have a resolution of 1360x765).
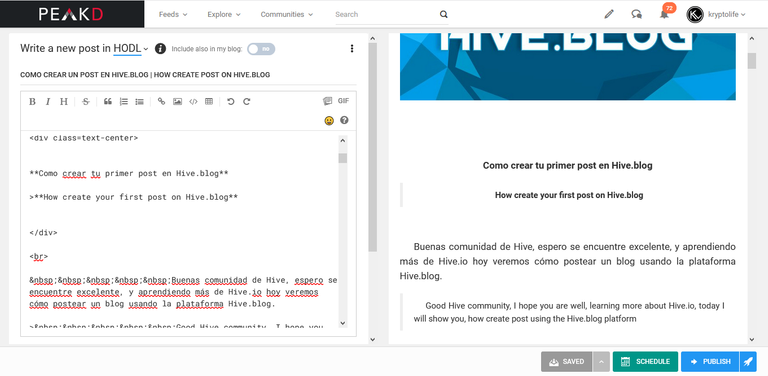
Y para terminar, hacemos scroll en el área izquierda de la página.
And to finish, we scroll in the left area of the page.
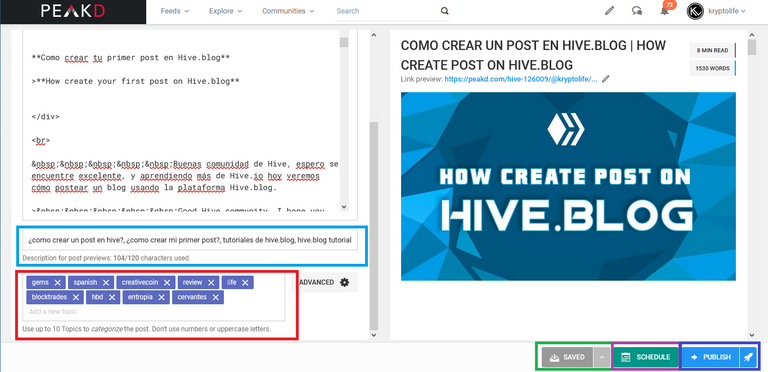
En el recuadro azul colocaremos frases para las que queremos que aparezca nuestro post.
In the blue box we will place phrases for which we want our post appear.
En el área con el recuadro rojo escribiremos los tags para los que queremos que se muestre nuestro post.
In the area with the red box we will write the tags for which we want our post be displayed.
Podremos guardar nuestro post haciendo clic en “Save” el botón demarcado con verde, y continuar redactándolo o dándole forma otro día.
We can save our post by clicking on "Save" the button marked with green, and continue writing it or giving it shape another day.
En “Schedule” tendremos la posibilidad de programar nuestros posts para que estos se publique en una fecha determinada de manera automática.
In "Schedule" we will have the possibility to schedule our posts so that they are published on a certain date automatically.
Y por último en “Publish” podremos publicar nuestro post de manera inmediata y este será publicado.
And finally in "Publish" we can publish our post immediately and it will be published.
Y de esta manera, estará nuestro post publicado de manera exitosa en la plataforma.
And in this way, our post will be published successfully on the platform.
Muchas gracias por haber llegado hasta aquí, espero esta información te allá sido de mucha ayuda.
Thank you very much for getting here, I hope this information has been very helpful to you.
Hasta un próximo post.
Until a next post.
Links
¿Qué es Hive.io?
What is Hive.io?
https://hive.blog/hive-126009/@kryptolife/que-es-hive-io-whats-is-hive-io
¿Cómo registrarse en Hive.io?
How register on Hive.io?
https://hive.blog/hive-126009/@kryptolife/como-registrarse-en-hive-io-how-register-on-hive-io
Unete a nuestra comunidad Discord en / Join to our Discord community:
https://discord.com/invite/QzzrZuU92q
Kryptolife
Nuestra redes sociales / Our social networks:
https://linktr.ee/kryptolife

Su post ha sido valorado por @goya
Congratulations @kryptolife! You have completed the following achievement on the Hive blockchain and have been rewarded with new badge(s) :
Your next target is to reach 2500 upvotes.
Your next payout target is 250 HP.
The unit is Hive Power equivalent because your rewards can be split into HP and HBD
You can view your badges on your board and compare yourself to others in the Ranking
If you no longer want to receive notifications, reply to this comment with the word
STOPCheck out the last post from @hivebuzz:
Support the HiveBuzz project. Vote for our proposal!