Tobacco has a very rich history in the world, and is a native plant that grows wild in both North and South America. It’s value for trade was very important for US, and played a huge roll in the early success of the original colonies due to its high demand in Europe. Still to this day, tobacco is one of the largest cash-crops worldwide.
Contrary to popular belief, there are very few regulations in place regarding the growing of the plant for personal use. To my knowledge, no states prohibit the growing of it. The only time licenses are needed is if you plan on selling the finished product.
Other than the obvious uses for growing tobacco such as for smoking or chewing tobacco, there are several other uses for the plant as well. The plant is a very visually stunning plant, and many people grow them ornamentally both in the garden and on patios. Another common use is using the dried tobacco leaves to make a very effective and organic pesticide (I recently did a writeup on this and will post the link at the end of this article for reference). One of the other common uses is to use it as a perimeter crop to keep critters such as deer out of your garden; due to the high nicotine contact, they will avoid tobacco like the plague. Some hunt clubs even plant tobacco in the shape of a funnel to direct deer to shooting lanes. There are tons of varieties out there, so choosing the right variety will mostly come down to what your intended use is. For most home growers, choosing a variety that can be air or sun-cured is the best option.
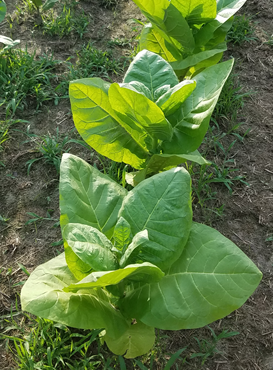
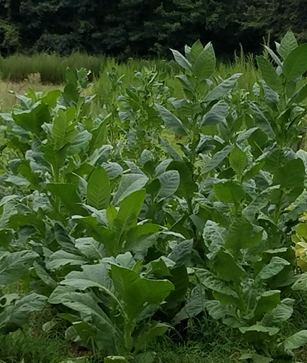
Golden Burley Variety
Tobacco is an extremely hardy plant that is easy to grow, and does best in zones 2 through 10. It requires a warm growing season, and does best with temperatures in the 70 to 85 degree F range. Ideal soil pH should be in the range of 5.8 - 6.4 along with having a well-draining soil type. If you have high clay concentrations, adding some straw with plenty of organic matter is advisable. Most varieties typically take around 3-4 months to be ready for harvest, and do best when planted earlier in the season; not only are temperatures more ideal then, but you will also have less pest problems when planting earlier. The plant is a very heavy feeder and can be prone to soil-borne diseases, so it is best to regularly rotate the crop and never grow it in the exact same spot for more than 2 consecutive years.
You can start the plants outdoors (not advised), but best results will come from starting the plants inside. Starting your seeds inside approximately 4 – 6 weeks before the last frost is best, and your success rates will go up tremendously if you do this. I prefer to start mine inside in peat pellets, and then transplant these directly into the ground. Tobacco seeds are EXTREMELY small, so definitely take care when planting them to avoid overcrowding and wasting seeds. Seeds are very cheap (you can get several hundred for just a couple dollars), but still, why waste them if you don’t have to? Unlike most other seeds, you DO NOT want to bury your seeds in the soil; tobacco seeds need sunlight to germinate and need to be placed directly on top of the soil. Tobacco typically takes around 7 – 10 days to germinate, but some varieties can take upwards of 3 weeks to germinate.
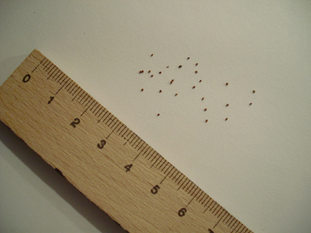
Photo compliments of commons.wikimedia
The soil needs to remain moist (but not soggy) throughout the germination period, and it is best to water them by dipping the peat pellets in water or spraying them very lightly with a spray bottle. While waiting for the plants to germinate, I will run lights on them for 24 hours a day, and then reduce that to 18 hours a day after about 2/3 of them have sprouted; you can also use a sun-lit room or window if you do not want to use lights. Once your tobacco has begun to sprout, select the healthiest looking of your plants and thin them out to one plant per peat pellet. During the first few weeks, your plants will be rather slow growing, but will explode in growth shortly after transplanting.
Prepping your grow area before planting will have a direct correlation to how successful your plants will grow. If possible, till over the area in the winter to expose and kill any pests that are over-wintering in the soil. A couple of weeks before transplanting, till the plot again and prep the soil with a well-balanced fertilizer of your choice.
After your plants reach 4-7 inches tall and the last frost has passed, your tobacco plants are now ready to take outside. Space your transplants approximately 2 feet apart, and keep rows within 3 feet of each other for optimal growing. It is very important in the early weeks, after transplanting, to keep the grow area free of weeds. Tobacco plants have a very expansive and shallow root system, with thousands of hair-thin roots growing just below the surface of the soil, so take extra care when you are working near the plants. Stop heavy tilling after about 4 weeks, and begin to only lightly scrape the soil surface from this point on to prevent from damaging the plants shallow root system and slowing its’ growth.
Throughout the growing period, keep your soil well-watered, and avoid letting the soil completely dry out. Don’t over water though. Tobacco plants do have a unique design feature with their leaves, which allow the plants to collect water from light rains and dew, and direct all this water down the stalk and deliver it to its’ shallow root system.
Tobacco plants are a very “vocal” plant that will alert you when they need additional fertilizer. Soil tests will determine exactly what you need, but for the most part, nitrogen is typically all that is needed as an amendment. Most varieties are a darker greener color while growing (however there are some lighter colored varieties out there), and will begin to get a yellow tint when they are in need of nitrogen. Yellowing in the late stages of life are expected, so don’t over fertilize at that point. Apply nitrogen starting around week 4, every 3-4 weeks until flowering. Once the plants have begun to flower, you will not need to fertilize them anymore.
If you want to maximize leaf growth, be sure to top the plants immediately following the flowers appearing by removing the top bud. Once you reach this stage, the plants are typically about a month or so from harvest. If you decide that you want to keep seeds for future planting, you will get more than you will need from just one plant. Once the flowers dry up, there will be a bulb that remains that will be full of hundreds of seeds. If you are growing several varieties at once, place a bag around the flowers with a rubber band to prevent cross-pollination of the seeds, unless of course you are trying to create your own variety.
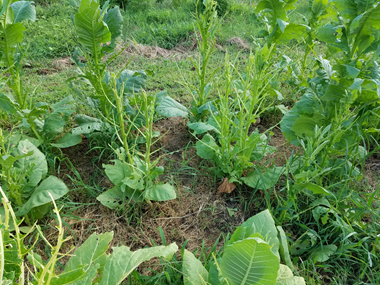
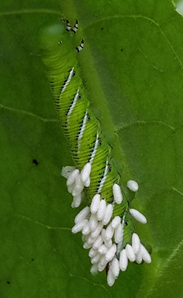
The main pest threats to your tobacco plants are going to be hornworms and aphids. For aphids, I prefer to use a soapy water mixture made with unscented dawn soap to eliminate them from infected areas. Be sure to spray very well on the undersides of the leaves, as this is where the majority of them will be. For hornworms, the soapy water method will work on them as well, but are best removed by hand picking them off the plants and killing them. You definitely want to stay on top of the hornworms because they can devastate a tobacco crop if not caught early on, as can be seen in the above picture (this happened in a 48 hour period). If you notice any eggs on the hornworms, BE SURE TO LEAVE THOSE WORMS ALONE! Those eggs are from a parasitic wasp that is the number 1 best defense against hornworms. The parasitic eggs feed off the hornworms, and they will slow down significantly and eventually stop eating altogether after the eggs are laid. Once hatched, the wasps will feed on the hornworm eggs and the host-hornworms will also die. Below is what the parasitic eggs look like.
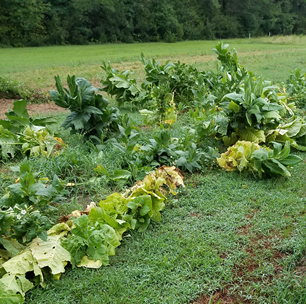
The only other main threats to worry about are heavy rains along with strong winds. As previously mentioned, the root systems are very shallow along with mature plants getting rather heavy, so it won’t take much to blow them over in saturated soil. Proper plant spacing can prevent a lot of the issues, but some growers choose to place tomato stakes to support them once they get larger. Tobacco plants are very resilient plants, and will quickly stand back up after blowing over, but this will stunt the growth so it is best to try to prevent this from happening in the first place. Last year I was late getting my crops in the ground, and you can see in the below picture what a Nor’easter did to my plants last fall.
As your plant matures, leaves will begin to turn yellowish, starting from the bottom and working its’ way up towards the top. There are two ways that you can harvest your plants – either by picking leaves as they mature or cutting the whole plant at once. If you decide to harvest by picking the leaves, try to separate harvesting of the leaves by 1 - 2 week intervals, starting with the lower leaves first. If you plan to harvest them as a whole plant, wait until approximately ¾ of the leaves are mature, and cut the plant at the base of the stalk.
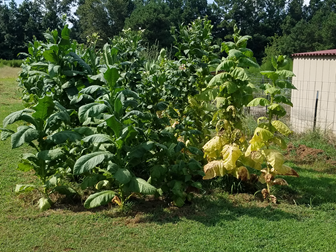
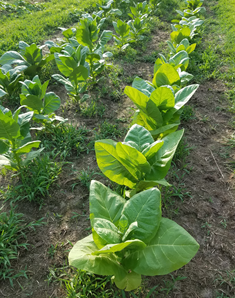
Tobacco plants approaching harvest time
One important thing to keep in mind when harvesting your tobacco and working in the field around your tobacco is avoiding Green Tobacco Sickness. This comes from rubbing against the plant and having the excess amounts of nicotine absorbed into your skin through your pores. Especially when harvesting, it’s best to wear gloves. Green Tobacco Sickness can vary in intensity, but typically will only last a short period of time. Common side effects are nausea and light-headiness. The chances of this can be significantly reduced by avoiding the plants after rain showers and/or when dew is present on the leaves.
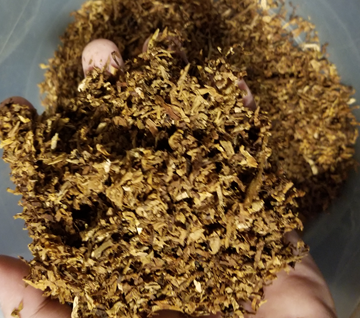
Once harvested, hang your plants (or leaves) in a relatively warm area with higher humidity, and be sure that it is well-ventilated, but not so much airflow that the plants are blowing around. Optimum drying conditions are in the temperature range of 70 – 95 degrees F with a humidity of around 70%. Hang your plants with sufficient space around them to allow better airflow as well. Be sure to monitor the plants early on in the drying process to avoid most of your issues. Drying them out too fast can cause them to dry green which can result in harsh smoke and unfavorable flavors, while drying too slow can result in mold and rot.
After drying them, you can either store the leaves for future use as pesticide as is, or if you plan on using them for smoking, curing will be required for a desirable and smooth smoke. Times required for curing vary from variety to variety, but just like a fine wine, the longer you cure them, the better the smoke.
In the near future, I will do a more in-depth writeup on the drying and curing of tobacco, but hopefully this article will get you started on producing your first tobacco crop! It’s a very exciting and rewarding crop to grow, and is one of my top 5 favorite plants to grow. If you have any questions, be sure to post them below and thanks for stopping by!
Here's my older post about how to make your own pesticide using tobacco:
https://steemit.com/gardening/@bobwhite/extremely-effective-homegrown-insecticide
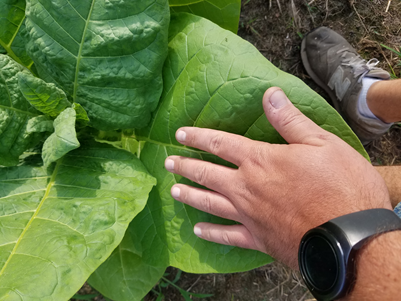
Those leaves can get big and green. I bet they compost easily.
Oh yea, they definitely do. There are some smaller leaf varieties out there such as Turkish tobacco, but Burley, among some others, certainly can get some large leafs on them.
Awesome post and VERY accurate!
I used to grow for smoking, but have since quit and now use it in making pesticide.
Cant wait for your drying and curing post!
Thanks! It definitely is an awesome plant to use for making pesticide. Thanks for checking the post out.
Congratulations @bobwhite! You have completed some achievement on Steemit and have been rewarded with new badge(s) :
Click on any badge to view your own Board of Honor on SteemitBoard.
For more information about SteemitBoard, click here
If you no longer want to receive notifications, reply to this comment with the word
STOP