So I know that this is supposed to be a blog for crypto newcomers, but all crypto newcomers are going to encounter the mysterious and polarising EhterDelta (ED), sooner or later, so I just had to get this one off my chest.
In this article you'll learn about the difference between a centralised exchange and ED, how to navigate the ED interface, how to connect a wallet and how to trade your Ethereum tokens for ERC20 tokens on ED. An interface legend is also available at the bottom of this article.
About EtherDelta
ED is a decentralised ERC20 (Ethereum Token) exchange and usually the go-to place of brand new and hard to find ERC20 tokens.
Because of its status as the home of ERC20 tokens yet to be listed on major exchanges, ED has become a gold mine for experienced crypto traders, who use their knowledge of the platform to scoop up freshly released tokens, prior to their listing on major exchanges, when their value would inevitably shoot up.
However, ED is tricky to use for users who have become accustomed to the user experience of centralised exchanges like Binance who make trading crytpocurrencies as simple as it could possibly be.
So in this post I hope to demystify ED for a whole lot of you our there who no longer wish to wait until your favourite coins, tokens and projects are listed on other exchanges so that you can support them.
Exchanges
There are two fundamental differences between a centralised exchanges and a decentralised exchanges like EtherDelta, they are:
- Where your assets are stored.
- Who sets the transaction fees.
I'm going to start by explaining centralised exchanges exchanges for you then look at how decentralised exchanges differ.
The Seamless Workings of a Centralised Exchange
Lets start with a centralised exchange like Binance. When you set up an account with Binance, they automatically set you up with brand new, native wallet addresses for each and every token they stock in their market place for trading ( I'll be doing another post on explain wallets ). For example you'll have a different wallet address for Bitcoin (BTC), Ethereum (ETH), Neo (NEO) and over a hundred other coins and tokens currently being traded on Binance.
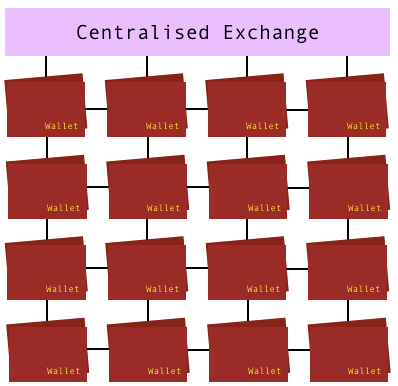
Once you make a trade, lets say BTC for ETH, those ETH you just purchased will automatically land in your ETH wallet within the Binance exchange. It's within that wallet, within the Binance exhange that your tokens will stay, until you choose to trade them again or withdraw them to a private, more secure wallet.
In Binance's market place, you play by Binance's rules, that means they automatically set trading and transaction fees for you, so you don't have to worry about any of those details, which is yet another reason trading on centralised exchanges is a breeze.
The Workings of EtherDelta
Get ready to have your mind blown. Firstly, you don't have to sign up to ED, you just go to etherdelta.com and away you go. This is probably where most first time users get confused, as they're accustomed to centralised exchanges where you always need to set up and verify you account before you can start trading.
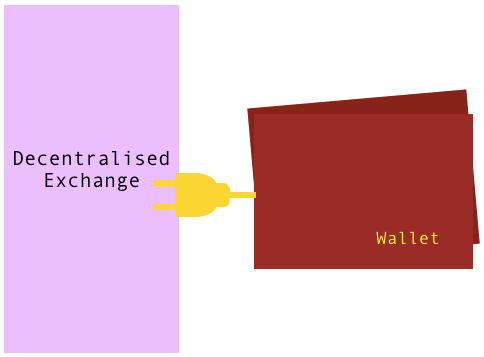
Secondly ED DOES NOT set you up with internal, native wallets like Binance and other centralised exchanges do. You have to 'plug in' your own Personal Ethereum Wallet (PEW) in order to be able to exchange.
Plugging in your PEW
There is a variety or PEW's traders can use to connect to ED, the most commonly trusted being MyEtherWallet and MetaMask
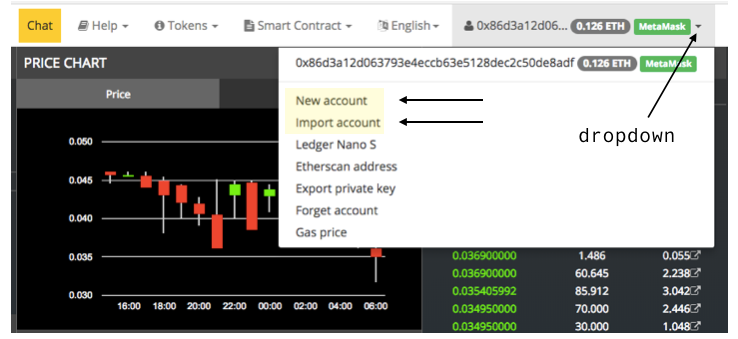
MetaMask is a PEW with a Chrome extension, that when logged in, is automatically recognised by ED. This is made evident by any ETH tokens you hold in you PEW appearing in the 'BALANCE' panel.
If you don't use the MetaMask wallet and extension, you'll either need to select 'NEW ACCOUNT' or 'IMPORT ACCOUNT' where you'll have to insert both the public address and private key to your MyEtherWallet. Once you have connected your PEW you'll see the balance of ETH you hold within that wallet appear in you 'BALANCE' panel.
The Balance Panel
Getting your head around the balance panel is crucial to having a positive experience using EtherDelta. Lack of understanding around how to work the balance panel will most likely lead to abandoning ED all together, as it can literally be a nightmare to work if you don't know what you're doing. Therefore I'm going to start off by explaining the balance panel to you as it will make you ED experience much smoother.
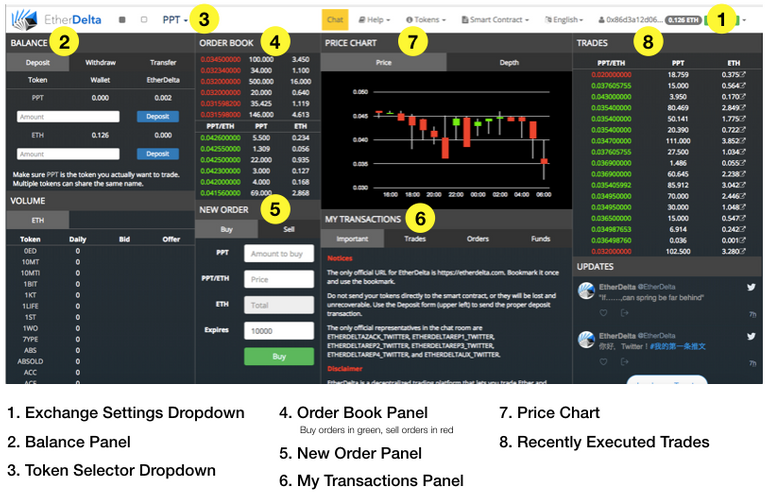
Let's start with Balance panel map.
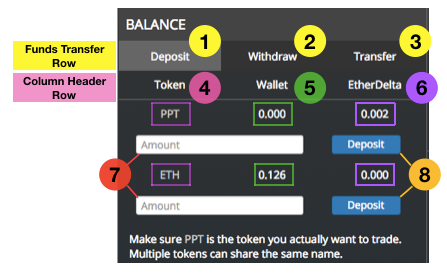
- Deposit tab activates the deposit fields for depositing either ETH or any other ERC20 token from your plugged-in PEW to the exchange.
- Withdraw tab activates the withdraw fields for withdrawing either ETH or any other ERC20 token to your plugged-in PEW to the exchange.
- Transfer tab activates the transfer fields for transferring either ETH or any other ERC20 token to any compatible wallet.
- Token column shows current viewed tokens.
- Wallet column shows current balance of the current viewed tokens in your PEW.
- EtherDelta column shows current balance of the current viewed tokens you have in the ED exchange.
- Dialogue fields for typing transfer amounts.
- Buttons for executing transfers.
Now lets use trading ETH for any other token as an example. We'll call the other token 'Token X'.
The balance panel is like a parking lot for your crypto, with 4 car parks in it showing all 4 balances at any given time. Those balances are:
- The balance of ETH within your PEW.
- The balance of ETH you have in the ED exchange.
- The balance of 'Token X' you have in the ED exchange.
- The balance of 'Token X' within your PEW.
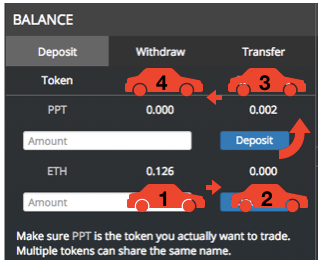
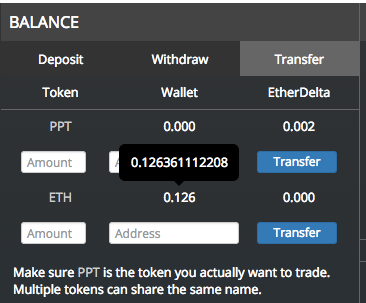
1 & 2 will always be visible as ETH. 3 & 4 will always be visible as whichever token you have selected at the time. In the above diagram that token is PPT, otherwise known as Populous.
The act of sending ETH from your PEW to ED, then trading ETH for 'Token X', then sending 'Token X to your PEW is like parking your car in all 4 parking spaces one after the other in order. Your goal is to always leave the exchange with your tokens parked in either space 1 or 4. You never just want to leave them in spaces 2 & 3. Those are just transitional spaces where trading is done. But don't worry if you accidentally do, the balances will automatically show up next time you use the exchange.
Seven steps of trading on EtherDelta
1. Once your wallet is plugged-in to EtherDelta, you'll have to transfer your ETH tokens from your wallet to the exchange for trading. You do that within the 'BALANCE' panel by selecting the 'DEPOSIT' tab, entering the sum of the ETH tokens you wish to trade in the ETH field and then pressing the blue deposit button to its right. This is going from parking lot 1 to parking lot 2.
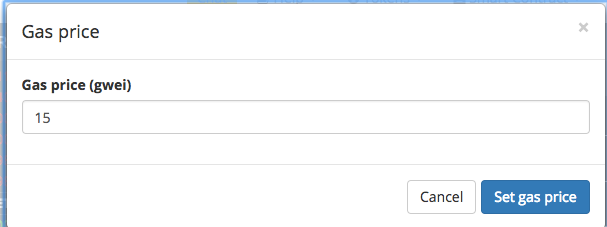
There is a fee involved with making this transfer. That fee is referred to as the 'GAS PRICE' and is measured in 'GWEI' which is decimals of ETH. The higher your gas price the faster your transaction will get confirmed buy the network in times of heavy congestion, however, GWEI is $ so be sure not to set your gas price too high as you'll essentially be paying exorbitant amounts for simple transactions. If your gas price is too low you'll get some odd error message about not having enough ETH or something to that effect.
You can set the gas price by selecting 'GAS PRICE' under the same drop down you use to connect a wallet. By default the Gas Price is set at 4 GWEI. I recommend leaving it at 4 GWEI until you encounter that odd message I mentioned. Then you'll need to raise it to say 10 GWEI.
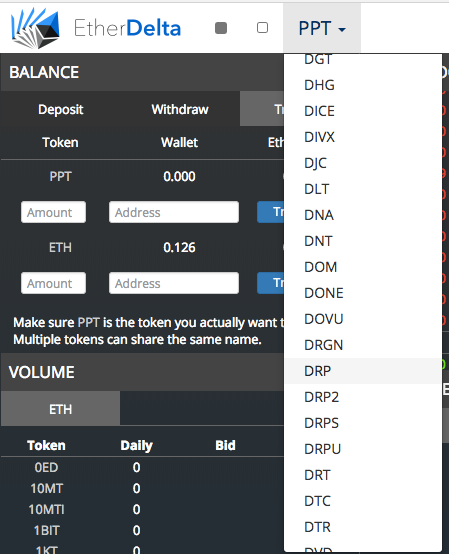
2. Once your ETH tokens are in the exchange you need to select you're desired 'Token X' from the dropdown at the top right of the interface. You'll need to know the your tokens code, for example Populous is known as PPT and Omisego OMG.
3. Once 'Token X has loaded you'll see a bunch of existing BUY and SELL orders in the 'ORDER BOOK' Panel you can choose to fulfil one of those orders or create your own order in the 'NEW ORDER' panel.
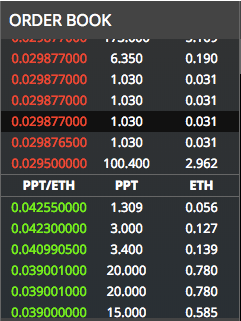
NOTE, the greater the difference between the lowest buy order and the highest sell order in the order book panel the lower the liquidity in the market. Often first time users will end up paying far more than current market price for a token in low liquidity markets, so be careful. Also if you choose to create a new order, be sure to input the correct market price as making errors with the decimals eg 0.003 vs 0.03 can be extremely costly.
4. Lets say you chose to fulfil an existing order, all you have to do is click on that order after which a pop-up will appear, basically prompting you to confirm your request before it's processed by clicking 'BUY' in the bottom left. You can also edit the order and choose to fulfil only part of it before you click 'BUY'.

5. Once you've clicked buy, your order will be processed in market and the pending order will be visible in the 'TRADES' tab of the 'MY TRANSACTIONS' panel.
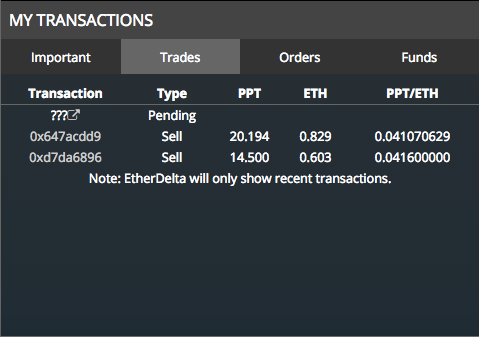
6. Once the trade is complete, two things will happen. Firstly, the complete transaction will now appear in the 'ORDERS' tab of the 'MY TRANSACTIONS' panel. Secondly, the sum of the 'Token X' tokens that you traded in will appear in parking lot 3.
7. You'll need to then transfer your tokens from the ED exchange to your PEW by selecting the 'WITHDRAW' tab, entering the sum of the 'Token X) tokens you wish to trade in the 'Token X' field and then pressing the blue withdraw button to its right. This is going from parking lot 3 to parking lot 4 and just like your initial deposit, will incur a fee.
Balances only show 3 decimal points and some of your trades may leave you with 10 or more decimals so be sure to hover your cursor over the balances to see exactly how much of any token you're holding.
The End
Now that you've read the above and hopefully followed along with some diagrams, you'll be well on your way to mastering EtherDelta, a truly simple exchange to use once you have the know how!
Please feel free to ask any questions or leave any comments and I'll be happy to answer them!
For donations I'd gratefully accept any ERC20 tokens to: 0x86d3a12d063793e4eccb63e5128dec2c50de8adf
Thanks and happy Steemin'
CCL
Thanks for the informative tutorial. I think the market will naturally trend towards decentralised exchanges due to the cheaper fees.
Thank you! Yeah, i think decentralised exchanges are the future and I hope to do some more reviews and tutorials, covering different exchanges in future so stay tuned :)