As I’ve already said in other posts, knowing how to draw is at the base of the visual arts. In this post I will show you how to reproduce a drawing in a bigger scale using a grid (grid method). This method can always come in handy, especially if you have to reproduce an image on a very wide surface.
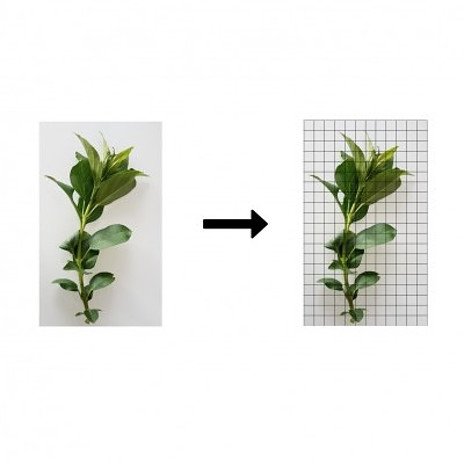
1. Divide the image in squares
Why do we have to draw a grid?
Setting up the grid takes up some time but it has many advantages:
- it forces us to respect the scale;
- it prevents us from drawing longer or shorter lines;
- it splits out a complex figure in figures and lines which are easier to draw;
- By using a grid the copy in scale of the subject will be very accurate.
You can choose a photo, an image found on internet or even a drawing that you want to zoom in. You can draw the grid by hand or using a computer program. The littler the squares are the more accurate your reproduction in scale will be. I usually use squares with 1 cm side. If the number of the squares become big I suggest you to enumerate them (e.g. every 5 squares).
Here is an example of grid:
2. Decide the scale of the reproduction
The scale is a rapport between two figures or lines. For example an object in 5:1 scale is five times bigger than the original one.
The choice of scale depends on what you want to draw and on the support size. Be sure that the subject can fit on the surface or it will appear incomplete. Through this guide I have chosen to reproduce the subject on a 5:1 scale.
3. Divide the surface where you want to copy your subject in squares
Respect the scale. For example, If you are using a 5:1 the sides of the squares will be five time bigger compared to the ones of the image you want to enlarge. (e.g The sides of the squares must measure 5 cm if the sides of the original image measure 1cm).
4. Copy the image
Now it’s time to reproduce our subject on a larger scale. During this process You’ll notice that the grid makes everything a lot easier. Without a grid this process would be much more difficult and we wouldn’t obtain an accurate reproduction
The grid isn’t the only advantage of starting from an image instead of a real subject. There is a “trick” to copy an image easily. This “trick” works well especially with subjects that are complex, like faces:
turn the image upside-down and then copy it.
By turning the image upside down we recognize the subject that showed in it with more difficulty and this allows us to switch into the “R-mode”. After a few minutes you won’t concentrate on the subject but only on the lines that compose it, and thus you will produce a more accurate drawing. We draw better when we don’t know what we are drawing.
on this book You will find everything concerning the “R-mode” and why we draw better when we don’t know the subject:
The new drawing on the right side of the brain review.
If you want a “clean” drawing you can use an eraser to eliminate the grid. If you have used an indelible instrument like a pen or you can’t erase the lines, use a tracing paper to copy the drawing and then copy it on a clean paper. BUT take into account that by following this process the definitive drawing will appear mirrored, like in the image below.
![]()
The flaws of the grid method
The grid method has only two big flaws. As you have experimented, the grid works well when we have to enlarge a subject from an image, a photo or a drawing. It works regardless of its features and complexity.
The problem is that it works only with images: we can’t apply the grid to a real life subject because we need a flat surface to draw the grid and we should be able to divide the subject in little squares, but this is not possible. This is the first flaw of the grid.
When you have to reproduce a real subject on a larger scale you have to possibilities:
1. Take a photo of the image and then enlarge it using the grid, thus following the steps above.
2.Copy directly the subject on a larger scale. This process takes up much less time than the first one, but it needs time and practice to be improved, so don’t worry if your first subjects aren’t very accurate. Ps. Also, copying subjects from real life involves a method.
The second flaw of the grid is the time. We need a lot of time to divide the image in squares, divide the surface where we want to reproduce the subject in squares and then copy it on a larger scale.
To conclude
After telling you that there is a second method, which is faster than the “grid method” you may think:
“Well, why have you lost your and my time to write about a method which is complex and takes up lots of time, when there is another one which is easier and faster?”
This thought is absolutely legit.
From my experience I can tell you that the “grid method” is the most accurate and in most of the cases it works better than the other method when we have to scale an image. I still use it when I have to reproduce images (which are often less wide than an A4 paper) on large surfaces like 70×100 cm canvases or even bigger ones. Remember the advantages of the grid method that I’ve listed at the beginning of this post.
I haven’t written a post about this method used to copy directly an object from the reality yet. So far I can only tell you that it also allows you to reproduce subject on bigger or tinier scale. So subscribe to the newsletter (the big blue rectangle in the upper left of the page) to be notified when this post is ready.
I hope you have found this post useful! If you have any question or you would like to share your opinion, fell free to leave a comment below! I will respond as soon as possible.
What about you now: Have you already used this method? Do you use another method?
Cheers,
Nathan
Hello @marble, thank you for sharing this creative work! We just stopped by to say that you've been upvoted by the @creativecrypto magazine. The Creative Crypto is all about art on the blockchain and learning from creatives like you. Looking forward to crossing paths again soon. Steem on!
Congratulations @marble! You have completed the following achievement on Steemit and have been rewarded with new badge(s) :
Click on the badge to view your Board of Honor.
If you no longer want to receive notifications, reply to this comment with the word
STOPDo not miss the last post from @steemitboard:
SteemitBoard World Cup Contest - The results, the winners and the prizes
Congratulations @marble! You have received a personal award!
Click on the badge to view your Board of Honor.
Do not miss the last post from @steemitboard:
Congratulations @marble! You received a personal award!
You can view your badges on your Steem Board and compare to others on the Steem Ranking
Vote for @Steemitboard as a witness to get one more award and increased upvotes!