.png)
If you are reading this article, then I’m guessing you have at least heard about Ethereum, the second largest cryptocurrency by market volume, in the world today, after Bitcoin!
Even if you don’t know much about Ethereum, this article is meant to provide you a quick introduction to the popular cryptocurrency and guide you in how to invest in it, if you would like to do so.
Ethereum – A Short and Snappy Intro
Ethereum, technically speaking, isn’t a cryptocurrency but a blockchain ecosystem (with its own open source programming language) on which various decentralised applications can be built.
It was first proposed in late 2013 by Vitalik Buterin, a cryptocurrency researcher and programmer from Ukraine, who is today, among the most well-known and respected names in the Cryptocurrency and Blockchain world.
Ethereum’s development was funded by an online crowdsale and its system went live in July 2015, with 11.9 million coins pre-mined for the crowdsale.
The native token of the Ethereum ecosystem is called Ether (ETH), and that is what is traded on the various cryptocurrency exchanges today. Nevertheless, Ether token itself is often referred to as simply Ethereum commonly
While the whole concept of how Ethereum works can be daunting to understand, you can get a quick and crisp view of what Ethereum is in the YouTube video below:
Ethereum’s Growth over the past year plus a cautionary note
The rise of Ethereum (or rather the Ether token) over the past one year has been phenomenal and despite all the volatility that is associated with cryptocurrency in general (it wouldn’t be surprising to see many cryptocurrencies rise or fall by over 20% in a single day), its overall growth has been phenomenal.
Ethereum tokens, on Dec 26th, 2016, were valued at $7 each. Today as I’m writing this article (24th Dec 2017), they are valued at $705 – in other words, its net growth during this 1-year period is over 100-fold.
** Crazy isn’t it? **
To put his into perspective, if you had purchased ₹10,000 ($153) worth of ETH last December, you would be having ₹10 Lakh INR ($15,300) today!
But Crypto investment is risky!
Have no doubt about the risk factor associated with any crypto investment though.
if you see what happened between Dec 2013 and Jan 2015 to Bitcoin when it entered a bear market and lost 80% of its value and fell from a high of $1130 to $205. This was following a euphoric rise when it jumped up over 600% between May and Dec, the same year!
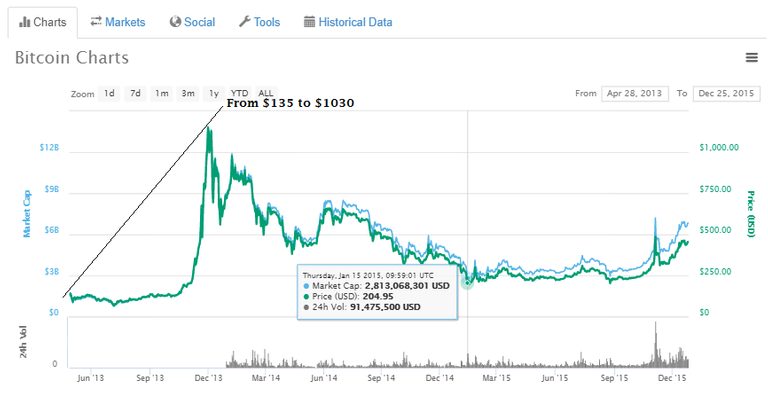
While Ethereum was not around in that period, there is no guarantee that Etherum won’t face an immensely bearish year like Bitcoin did between 2013 and 2015.
And that is why it is said, ‘do not invest more than you can afford to lose in crypto currencies’ – be that sum a week’s pay or a month’s.
While the reward could more than enough make up for the risk, the idea is to only risk money that won’t dent your life even if you were to lose all of it.
Nevertheless, as of now, there is a good amount of positivity in this space and Ethereum is expected to grow far more in coming years as more technologies start adopting blockchain and as more decentralised applications get successfully launched on the Ethereum platform. So if you can keep your emotions in check and don’t gamble away your life’s savings on crypto, a little risk could pay off well over the long term.
The remainder of this post is meant to be an easy newbies guide, for those who live India, on how to buy Ethereum, store it securely and then redeem it for cash when the time comes.
Steps to Buying/Saving/Selling Ether in India
Step 1: Setup an Account to purchase Cryptocurrencies using Indian Rupees
Given that he cryptocurrency market isn’t that prominent in India yet, the choices of providers are limited, and quality of service is not on par with the more developed countries.
Nevertheless, in India, one of the easiest ways to buy Ethereum is via Koinex – they are among the more reliable providers in India. Though at times, they take time in completing the Know-your-customer (KYC) process, especially when there is a huge surge in new applications.
NOTE: While there are other providers, for keeping things simple, we will be using Koinex as our primary reference for buying and selling Ethereum in India using INR.
The first thing you need to do in order to buy Ether in India is to open an account with Koinex. You can click here to open a new account with Koinex.
The documents you need to upload while creating a new account are:
- A scanned copy of your PAN card
- A scanned copy of your Aadhar card
- A scanned photograph
Once you are done with account creation, you will need to transfer the amount of INR you want to invest in Ethereum from your registered Bank account to your Koinex account.
PS: If you need some help to setup your account, go to https://koinex.in/how_it_works for viewing instructional videos on how to complete your KYC process and buy ETH. Also, this Article gives you further details on how to transfer INR to your account.
Step 2: Buy Ethereum Tokens
Once you have completed Step 1 correctly, you will receive an email from the provider stating that your KYC is complete (this might take a couple of days depending on how much applications are being processed by the provider).
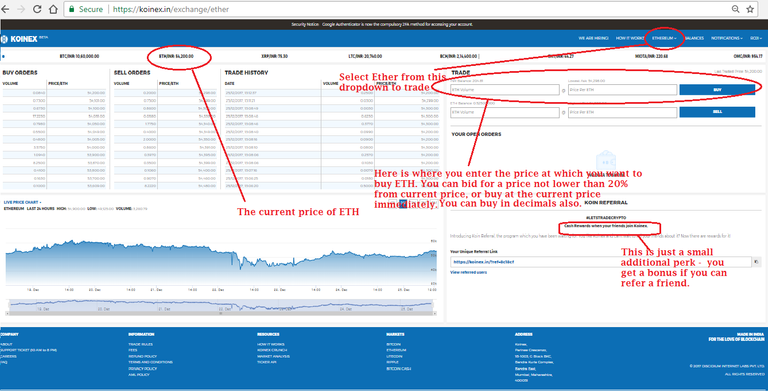
To buy Ether, login to your Koinex Account -> Select Ethereum from the dropdown menu, and then go to the trade section to place your order.
You can refer the picture below for details:
Step 3: Create a paper wallet to store your tokens securely.
After completing steps 1 and 2, you will have a fully active account for purchasing and selling ETH. In this case, the exchange, Koinex, will be the one who will be holding your ETH tokens on your behalf (akin to a bank holding your regular fiat currency).
You can store ETH in the wallet provided by the Koinex exchange itself after enabling 2-factor authentication and while this is more-or-less secure for the short term, you still have a danger of losing your tokens if this exchange defaults, gets shut-down or gets hacked, over the long term.
Ifyou are looking at Ether as a long-term investment and you do not want to trade, you shouldn’t trust any exchange to hold your coins and you should hold them yourself.
You can do the above by means of either a hardware wallet which you can buy for ₹12,000 in India (current price of the Nano Ledger S on Amazon India) or a paper wallet- that can be obtained for free.
We are not going to talk about hardware wallets in this post but will focus on paper wallets which are the more economical option.
But first, you need to know a bit more about how Ethereum tokens are stored.
Once you buy Ethereum tokens, these digital tokens will always be stored in an alphanumeric public address such as 0xc82E1B937abb872FaFFc2B2fF5a8d8f7555703fe (this is only a sample) on the Ethereum blockchain.
Note: Ethereum addresses are public and anybody can check the details of the various transactions of tokens if they know the public address using a blockchain scanning website such as https://etherscan.io/ - this doesn’t however, reveal any detail of who this address belongs too.
Nevertheless, the control of tokens in any given address is governed by an associated Private Key (think of this as the key to your virtual house where you store your Ether valuables). Format of your private key is like this: 0xc82E1B937abb872FaFFc2B2fF5a8d8f7555703fe (this is only a sample)
The person who controls the Private Key controls the tokens in the associated public address and when you keep your Ether tokens in an exchange, they control the private keys for the address in which your tokens are stored.
But if you are an investor who wants to hold on for years, it is best to get complete control of your tokens by owning the private keys of the address in which you are storing your tokens.
Using paper wallets is a safe and economic (it’s free) way to gain complete control of your tokens because you get access to the private keys of addresses that you can generate on demand, and where you can store your tokens.
When using a paper wallet, the Ether tokens you own will be residing on a public address that is 100% under your control. Nobody can touch the tokens without knowing your private key.
Here’s how you create a paper wallet for Ether.
A. Go to https://www.myetherwallet.com/
(check the spelling my-ether-wallet and always use an incognito session to open this)
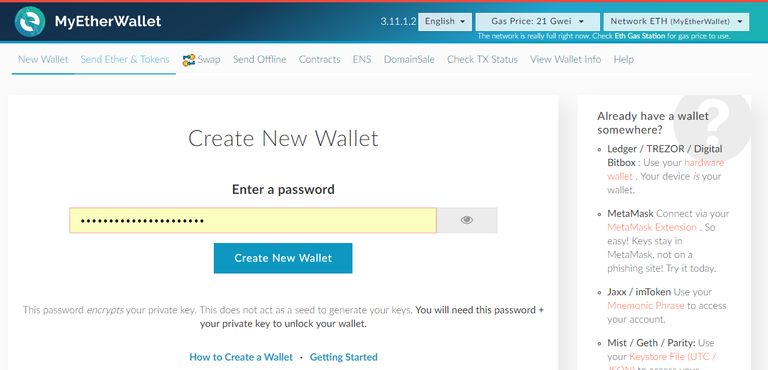
B. Enter a new password (use a strong alphanumeric one that’s very hard to guess) and proceed
Once the above step is complete, you will have created a new public address along with its private key and you will be prompted to download and save your Keystore file.
C. Download and save your Keystore File.
The Keystore file is an encrypted version of your private key that uses your password as part of the encryption. It can be used in future (along with your password) to access your wallet for sending funds as an alternative to using your unencrypted Private Key.
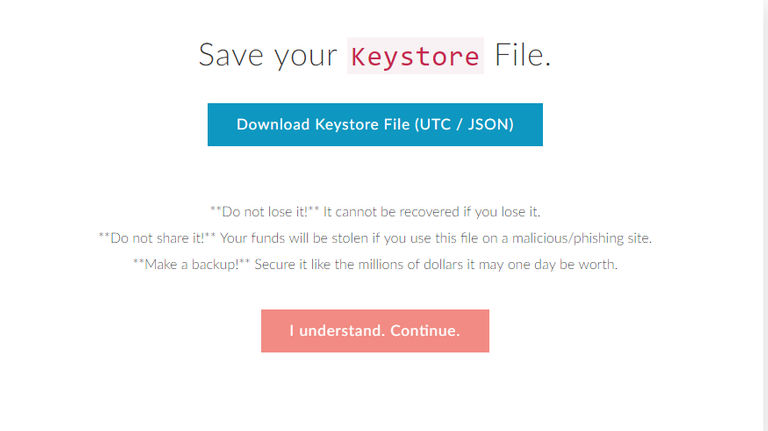
Once you save this file, proceed to the next screen where your private key will be displayed.
D. Write down your Private Key that is shown on screen on a piece of paper.
Your unencrypted private key will be shown on this screen. DO NOT STORE this on your computer or anywhere on the internet or your email. Write it down on a piece of paper that you can store securely OR alternately, simply print your private key details following instructions in Step E.
E. Click on the tab that says, ‘Print Paper Wallet’
You will be taken to a printable page like the one below.
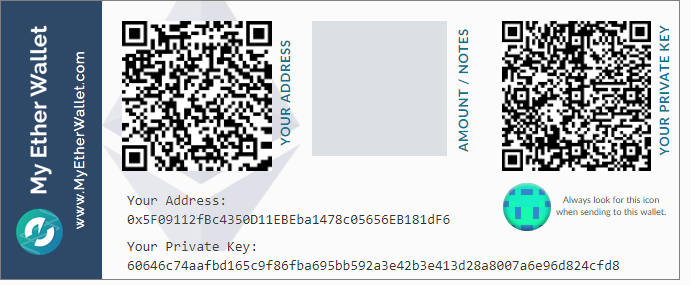
Print this page and keep this page in a safe location without storing a copy of it on your computer or on the internet – this ensure that it will not fall into the wrong hands. Do not reveal your Private Key or its QR code shown to anybody but yourself for the sake of safety. If anybody who gets to see your Private Key simply scans the Private Key QR code with their camera, they can access your funds in this address. Hence this is the reason, you need to keep this under lock and key.
Take an extra photocopy of this page as backup. You will need to store this in another safe location so that you can regain your funds if you lose the original paper wallet.
Important Note: The address and private key you generated right now in the above steps, will never be regenerated again. It is also not stored anywhere online (unless you do it yourself), and that address will never again be accessible without the private key that you have generated. IT IS OF UTMOST IMPORTANCE TO KEEP THIS PRINTED KEY SAFE AND AWAY FROM THE EYES OF ANYBODY.
F. Verify that you can access your new wallet correctly.
Once you have the above steps, verify that you can successfully open the wallet again. For this:
Create a new incognito browser session and go to https://www.myetherwallet.com/ and click on the tab ‘View Wallet info’.
Choose the option ‘Keystore/JSON File’ and upload the Keystore File you had saved previously and enter your password. You should now be able to unlock your wallet and see a screen like the one below:
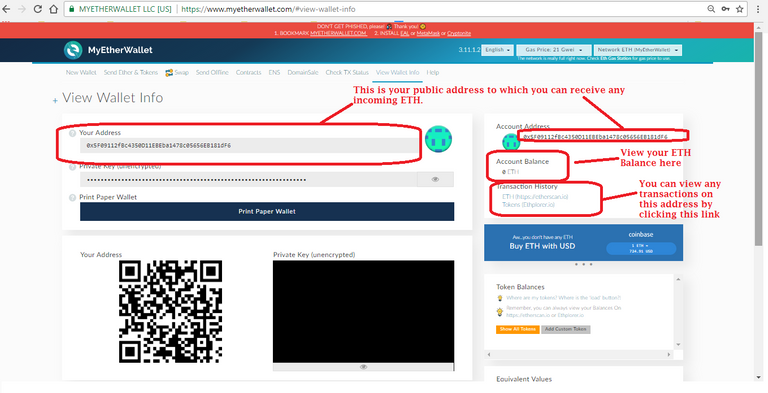
Only when you need to send funds should you unlock your wallet using your Keystore file and password. Whenever you need to receive funds, you simply need to provide your public address.
Keep your Keystore file also in a computer you trust and used by yourself (though this is encrypted, a person who accesses this can still access your funds, if they figure out the password)
Alternately, you can open your wallet using the unencrypted Private Key you wrote down or printed as your paper wallet. To use the unencrypted private key to access your tokens, when go to the ‘View Wallet Info’ page, choose the option ‘Private Key’ under the ‘How would you like to access your wallet?’ section, and then type in the private key (or scan its QR code using a camera on your phone/computer).
Step 4: Move your Ethereum to your Paper Wallet
Once you have created your new address, verified that you can access it without issues, and safely stored your printed paper wallet, you can start sending funds to your wallet. Here’s how:
A. Login to your Koinex Account and click ‘Balances’
You will see a section like the one below showing your balances against any coins you hold.
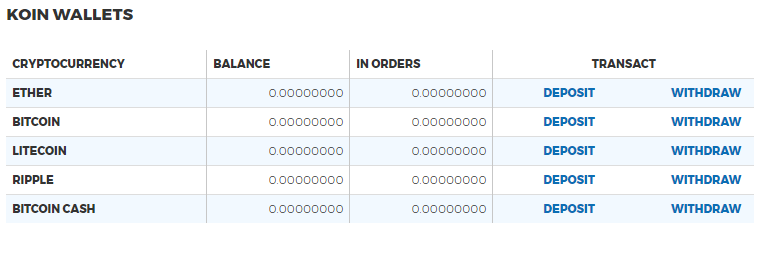
If you successfully purchased Ether earlier, you will see your balance here.
To move your funds to your paper wallet, for the row corresponding to your Ether wallet, click ‘WITHDRAW’. You will see a screen like the one below:
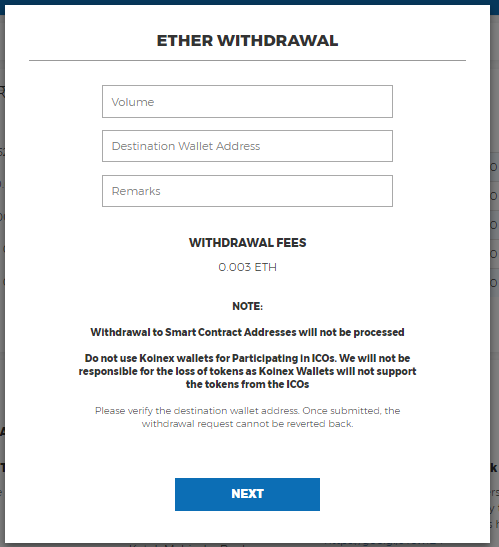
Here, you will need to enter the public address of the paper wallet you generated and the volume of Ether you want to move to your paper wallet. The box will also show you the withdrawal feel that will be charged to you (this is currently at .003 Ether so make sure the amount you send is worth the transaction fee you pay).
Enter the address (of your paper wallet), cross check the address again by checking the first and last digit and then click ok. Transactions are not reversible, so double check always.
Your funds will now get transferred to your paper wallet. This might take a few minutes and you can check the latest status of your transaction on https://etherscan.io.
Step 5: Move your Ethereum back to your exchange to sell
Once you have moved your funds to your paper wallet successfully, it will remain secure there for as long as you need.
You can always cross check the balance of your paper wallet by simply using the public address. Simply go to https://www.myetherwallet.com/ and click on the option ‘View Balance Only’ and then enter the public address of your paper wallet.
At some point in the future, maybe many months or even years later, when your Ether tokens have significantly appreciated in value and you decide you want to sell them, you can reopen your wallet using your private address that you have stored safely, and send the tokens back to the Koinex exchange.
For this this:
A. First go to the My Ether Wallet Website https://www.myetherwallet.com/ (always double check the correct website address) and click on the option ‘Send Ether and Tokens’ on the Menu Bar.
B. Open your wallet like you did earlier using your Keystore file and password, or using your private key. You will see a screen like the one below:
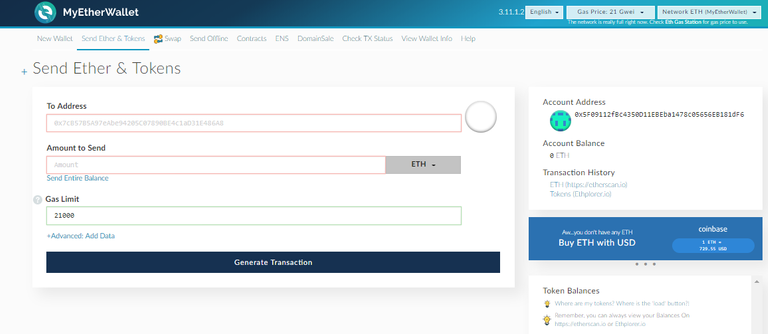
C. Fill the ‘To Address’ (this will be your Koinex ETH Wallet address – you can find this using the instructions below), and the amount of Ether you want to liquidate from your stash in the ‘Amount to Send’ fields.
The ‘Gas Limit’ can be retained at the default value (21000). In the unlikely scenario a transaction fails due when it runs out of gas (happens rarely), you can try resending the transaction with a higher gas limit (say, 42000). Gas is the fuel required on the network to complete the transaction (you can read more about Gas here, if interested).
To know the Ether address for your Koinex account, go to the balances screen and click on ‘Deposit’ link corresponding to your Ether wallet (refer screen below).
Once you do that you will get a pop-up screen like the one below:
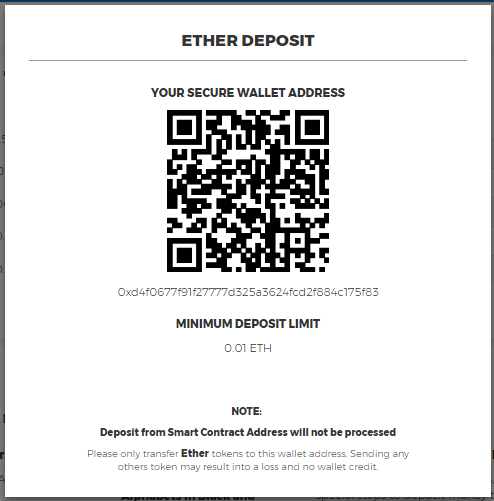
You can copy the address shown in this screen and paste this in the ‘To Address’ mention earlier in this step and initiate the transfer to your Koinex wallet.
Remember that you can always track your transaction status in http://etherscan.io/
Note: My Ether Wallet (MEW) is just a portal to access your tokens and your actual tokens always remain on Ethereum’s blockchain. It is the private key that gives you the control to move the tokens which are in the address you created using the MEW portal. There will be always other portals from which you can access your tokens, if at all MEW is not accessible in the future, as long as you don’t lose the Private key.
Step 6: Sell your Ether for INR
Once your Ether transfer is successful, it will show up in your Koinex Ether Balance screen.
Selling your Ether is quite straightforward, and you can do this from the same screen you used to buy Ether.
In the ‘Trade’ section, simply enter the amount of Ether you want to sell and the rate at which you want to sell it (you can sell at the current market price, that will result in an immediate sell, or ask for a higher price, in which case the trade will execute when a buyer is found for the asked price).
Step 7: Withdraw INR back to your Bank Account.
Once your sale is complete, you will now be an INR balance in your INR Wallet under Balances.
Click on NEW INR WITHDRAWAL REQUEST and enter the details and the amount will get credited to your registered bank account.
**Trust this post has given you all the necessary details on how to buy, safely hold and sell Ether in India. Do bookmark this page for referencing in the future and share this among other friends and family who could benefit from it. **
Disclaimer : This article is for educational purposes only and is not to be taken as investment advice. Do conduct your own due diligence and consult your financial advisory before making any investment decision.
PS: This article was originally written by the author for Bitfolio.org and published at https://bitfolio.org/your-one-stop-instruction-guide-buying-holding-and-selling-ethereum-india

please
upvote my post and follow me
i wll follow & upvote your every post.
please
This post has received a 0.42 % upvote from @buildawhale thanks to: @roji.abraham. Send at least 1 SBD to @buildawhale with a post link in the memo field for a portion of the next vote.
To support our daily curation initiative, please vote on my owner, @themarkymark, as a Steem Witness
looked into koinex. They don't have an address listed on the website or mention of legal entities ?
Whois record is also vague:
Admin Email:rakesh@koinex.in
Tech ID:CR275341021
Tech Name:Rakesh Yadav
Tech Organization:
Tech Street1:6th Floor, B Wing, Ackruti Trade center
Tech Street2:Andheri MIDC
Tech Street3:
Tech City:Mumbai
Tech State/Province:Maharashtra
Tech Postal Code:400072
Tech Country:IN
Tech Phone:+91.8377950711
They are reliable ?
Koinex is a legitimate website and I have been using this for a few months myself. However, it still faces the common problem every other provider in India does - delay in providing support - this is because the volume of users in India have been burgeoning and there are not enough cryptocurrency exchanges to support demand. https://ethexindia.com/ is the oldest Ethereum exchange in India and is even slower.
They don't give out an email contact but provide a contact page - https://koinex.in/support . I can suppose with the volumes they are managing now, they wouldn't want a flurry of emails.
Koinex is also among the most widely used exchanges by the members of the largest crypto FB group in India - https://www.facebook.com/groups/BharataFinance/ and the relative feedback on it has been good by those who have used it regularly.
With respect to reliability, all the popular exchanges (Zebpay, Koinex, EthxIndia, Pocketbits) are all in the same boat - they are simply not able to handle the volumes of KYCs these days and hence take a long time to process. While I had my KYC processed in Koinex in just a day or two, people now wait a week ore more. However, once you get this complete, things are smoother.
Zebpay is the fastest from what I've seen so far, but they only provide an option to buy Bitcoin and for Ether, you need to transfer your bitcoing to an exchange (or a website like changelly) to convert which would involve needless transfer charge.
PS: I never recommend anybody hold their investment in Koinex, or any exchanges, as mentioned in the article. Use them only for buying and selling, and not as a wallet.
I checked the team. Looks capable young engineers. I think the delay might be because of they are overwhelmed. Surprised that they are not putting the contact information - just copy paste it from angelist and put it there.
Yes - I do the same.
Thanks for the inputs.
I am actually siging up as alt coin transaction prices are quite low. Appreciate enlightening. (don't worry, all risk is mine! - I don't put money into this)
btw, check the discord for Indian community here: https://discord.gg/4UTDVMN you are welcome :)
Will do.... Thank you!
This post has been curated by TeamIndia, a dedicated team to support fellow Indians to write and promote quality content, please join our Discord Server . Delegate SP to @indiaunited to increase our influence. Community growth is precursor to Individual growth.