Making the Switch
After slowly migrating to using the Brave browser more than Google Chrome for about 3 months, I finally decided to make the switch and use it as my main browser on all my devices.
In my previous post where I wrote about how you can earn some money by using Brave I give a brief overview of some advantages and reasons why I decided to try it out.I still use Chrome occasionally but having used Brave I can confidently say that I am happy with it and won’t be switching again anytime soon. Now it’s time that I explained a bit more on how to set up Brave Rewards so you can earn BAT tokens which in turn can be exchanged to other cryptocurrencies or fiat (USD, Euro) if you prefer that. Or you can leave it in your browser’s wallet to support other creators.
You will just need to do 4 things to get started:
- Get Brave
- Sign up for Brave Rewards
- A Wallet
- A Channel
Don’t worry, I will guide through the process of completing all these steps.
1. Get Brave
Download and install the Brave browser and be sure to read my previous post on it if you have not already for more information.
2. Sign up for Brave Rewards
Go to the Brave Rewards website to sign up (https://publishers.basicattentiontoken.org/)
The only thing you will need to sign up is an email address, no password needed. The way you will login in the future is by receiving an email with a login link. And if you have Two-factor Authentication (2FA) enabled you will be asked to input that verification after you clicked the login link in your email. I highly recommend setting up 2FA after your initial login for extra security. After you log in you will be welcomed with the dashboard as seen below:
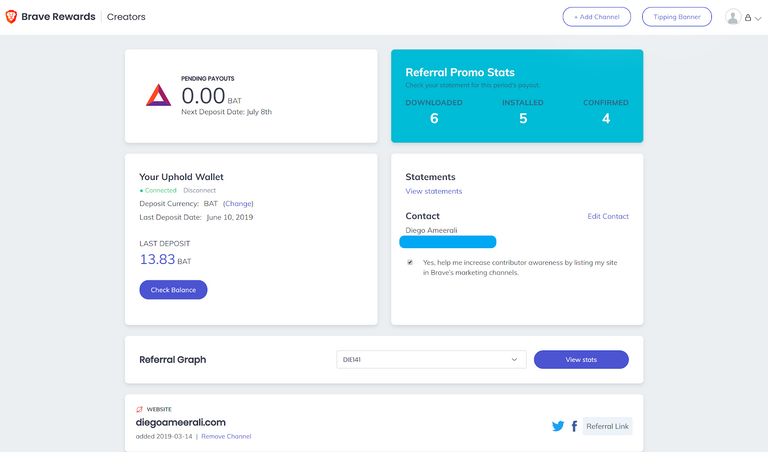
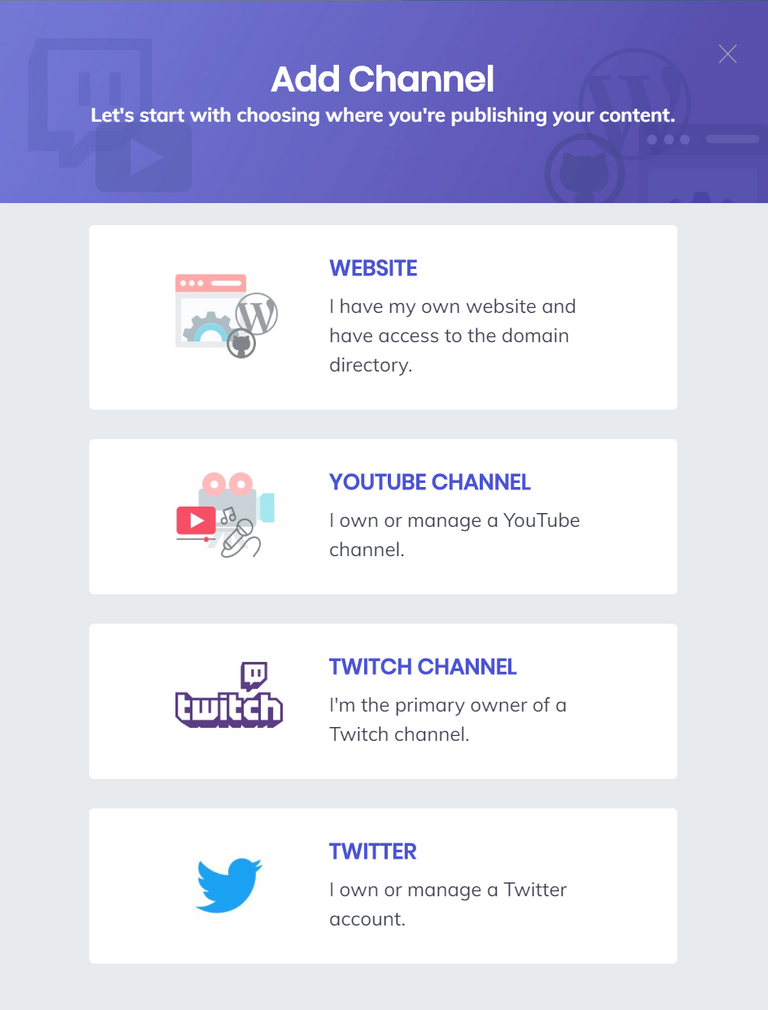
Here you can see your pending payouts (these are done once a month), referral stats, your Uphold account wallet (which I will explain more about in a bit) and your channels. The channels are the websites you have added to be able to receive payments through. Examples of these can be your personal website (you will need to prove that you actually own it or have access to it), YouTube or Twitch channels and the more recently added Twitter accounts.
3. Set up your Wallet from Uphold
Uphold is a digital money platform enabling users to buy, hold, convert and transact across currencies. Brave has partnered with them for their wallet to be able to receive funds. In the Brave Rewards, dashboard you will be able to link your Uphold account or create one if you haven’t already. After your account has been created you can choose your payout currency of choice to link to your wallet. In my case I chose BAT, but you can choose USD if you prefer that for example.
4. Adding a Channel
Now that you have your account set up and connected it to your Uphold wallet, it’s time to add some channels to your account to be able to receive transactions. Adding channels is easy and straightforward for the most part. For YouTube, Twitch and Twitter you just need to select a platform of choice and you will be redirected to their respective website to login and authorize Brave. After you’ve done that you will be redirected back to Brave and should see them listed in the channels list with a notice that the verification status will be displayed in the brave browser in the next 24-48 hours.
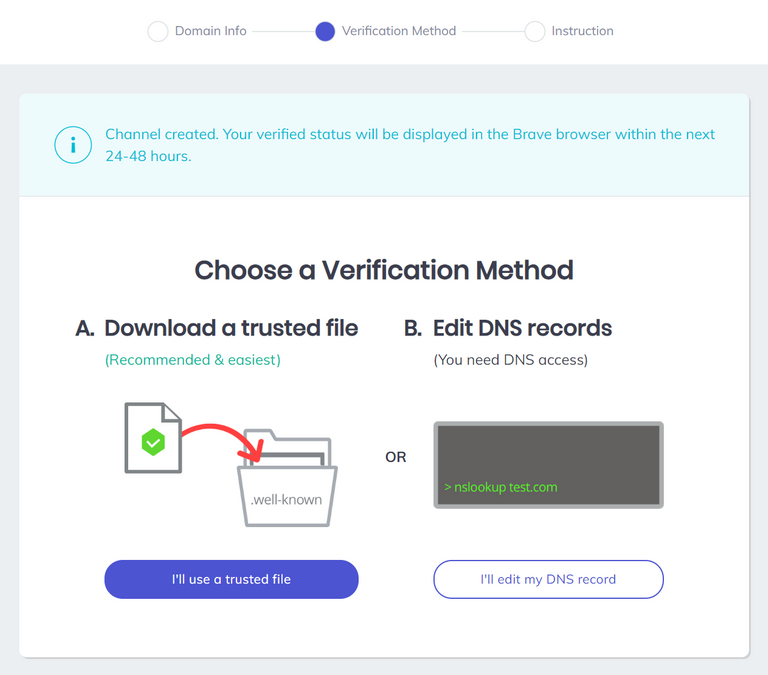
For websites you will need access to the file directory where it is hosted or have access to the DNS settings of your domain and do the verification by either uploading a trusted file or editing your DNS records. Depending on what you have access to or what you choose they will direct you to the next step with detailed instructions. One thing to note that may not be clear at first and which I encountered is to make sure that your domain is hosted with SSL security (as in you need to have HTTPS).
You can see if a website is verified by going to it in the browser and see if there is a purple check mark on the BAT icon or if you click your wallet open you can also see the verified status there with a check mark and saying “Brave Verified Creator”.

Now you might be wondering, how much can you make from doing this?
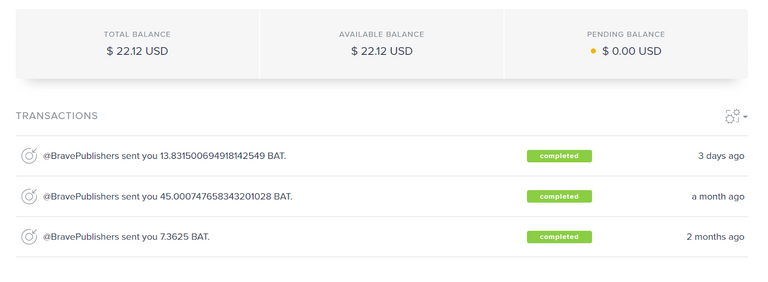
Well that mostly depends on you as a creator, on the type of content you make and your audience. But you can’t make anything if you haven’t set this up in the first place. For a quick reference, here’s my balance from the last 3 months during which I slowly made progress to fully migrate to using Brave. I also didn’t produce a lot of content, if any at all after my first article on this. As you can see my balance is around $22, so imagine if I actively produced content and used the platforms and channels to their full potential.
Some fun tidbits:
- Brave Ads: In April 2019 Brave Launched the First Advertising Platform Built on Privacy where users can earn a part of the revenue from getting advertisements. I still need to give this a try, but I will share more on it once I have given it a shot.
- BATGrowth: This website monitors Brave Browser and Basic Attention Token (BAT) adoption and has a list of verified publishers. If you’re also one you can check how you stack up against the rest. For example, when I added my twitter account recently there were less than 6000 verified Twitter Brave/BAT publishers.
If you haven’t tried the Brave Browser yet, feel free to give it a try and you can always support me by downloading it through my Referral Link:
Hit me up on Twitter and let’s get a conversation going. (As I was writing this article, I saw that twitter was added as well, so now you should see the verified creator status on my twitter account as well)
Until the next time, stay Brave!

Nice! :D
thanks, officially made the jump :D