Making money of Bitcoin and other crypto currencies is an easy way to invest and get great returns within a timeframe that puts any forex trader to shame. Most of us are buying "for the long term", we hope that the coins we buy will be worth more in a month or a year. Some people even trade on a day to day base to get the most out of the fluctuating market. Buy low and sell high! That can be very profitable indeed but if you don't have at least 10BTC to play around with every day than the effort/reward ratio will be on the downside as you will have to monitor the markets closely all day long rendering it a fulltime job!
What if I tell you that you can automate this process and make money while you are at your regular job or even whilst sleeping! Even with a balance of 0.5BTC or less. The solution is called Gunbot and Gunbot is an automated "profit generator" as the creator of this bot, Gunthar, claims on Bitcointalk.
It works as it should: buy low and sell high, it does it repeatedly generating a profit. This is not a PING-PONG algorithm, this is something more advanced that takes consideration of the market prices and volatility.
Gunbot is a bot that trades automatically on Poloniex, Bittrex and Kraken and the bot runs on Windows and Linux. You will have to purchase a license for each exchange you want to trade on. The first exchange will cost 0.1BTC and every following will cost 0.05BTC. It is recommended that you get a VPS server for your Gunbot as it needs to be running 24/7 and can take up a lot of RAM and CPU. My advice for a reliable and cheap VPS is: https://www.routerhosting.com, make sure you get at least 4GB of RAM. A compatible PC in your home that you can leave on 24/7 will also do.
Contact me if you want to get a license for Gunbot (I am not a reseller but I will put you into contact with someone that is)
The bot uses the API's from the exchange to get all the info it needs, it does its own calculations so it will know when to buy and when to sell. There are however multiple buy/sell strategies to choose from but I will talk about that later on.Once you have your PC or VPS up and running and your license purchased you can download the latest version of Gunbot here: https://github.com/GuntharDeNiro/BTCT/releases/. You can run a GUI version or a command line version. The command line version tends to be more stable en uses less RAM but here I will talk about the GUI version first because for first time users this is way more friendly to start out with.
- Open the folder where you extracted the files you downloaded and open the GUNBOT file

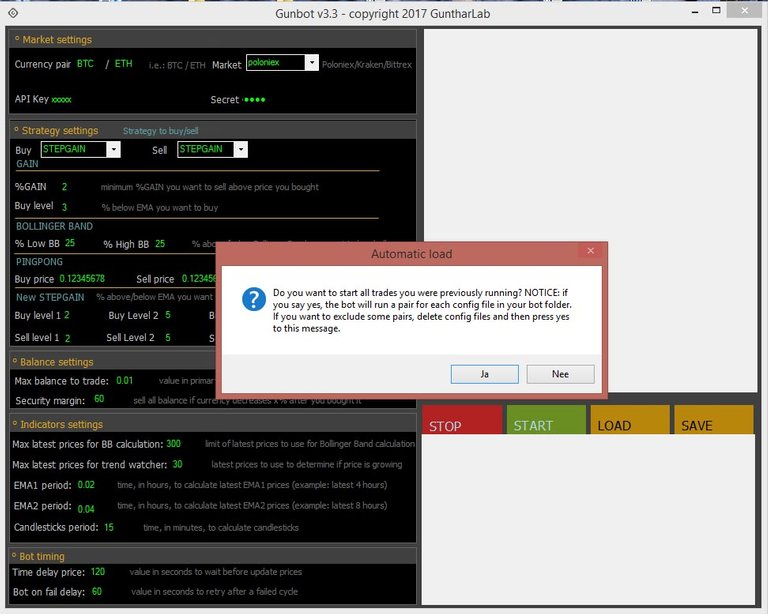
- The above screen will appear, the pop up screen will ask you to start previous pairs, as this is the first time starting the Gunbot, click no.

- The first section is the market settings, here you can select the pairs (altcoins) and the market (Poloniex, Kraken and Bittrex) you want the Gunbot to trade on. This is also the place where you need to put your public and secret API. In the picture seen above you can see the selected pair is BTC/ETH on Poloniex.

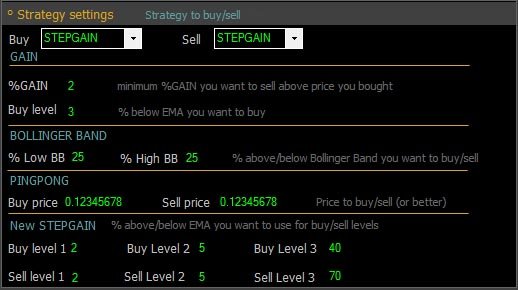
- The next section will let you select the buy and sell strategy you want to use.
- Gain will buy at the percentage below the EMA that you want and sells when the price is higher by the % you have told it to.
- Bollinger band (for more info on Bollinger band please use Google, too much info for this article) will buy when the price is 25% above the lower BB and sell when it is 25% below the higher BB. You can change the values in whatever you would want but keeping them somewhere between 10% and 30% is a nice value to start out with.
- Pingpong will buy and sell at a preset market price. So if an altcoin goes up and down by the same pattern, you can use this setting
- Stepgain lets you determine buy and sell levels under and above the EMA. If the price goes beneath the EMA further than level 1 it waits to see if it drops further to level 2. If it doesn't than it buys at level 1. If it does go down below level 2 it waits to see if it drops below level 3, if it doesn't it will buy at level 2. If it does drop below level 3 than it buys at that level. The same goes for selling only that will be above the EMA.
There are many strategies and settings you can use, you don't need to use the same strategy for buying as you do for selling. Experiment and find out what works best for you! Look at the coin you want to trade on and select your strategy on that.

- The next section is the Balance settings. You have to fill out the amount of BTC you want to use for each individual trade. The more you use the higher the profit will be, but also the higher the loss if the price drops! This section is important as it will greatly determine overall profit percentage. Some people use 10% of their BTC balance per trade and others use 35%, some even go up to 50%! Think wisely about how much you want to use.
The security margin percentage will tell Gunbot to sell when the price drops. So if you don't want to lose too much cash Gunbot will sell at loss if the price drops more than 60% from the price it bought. You can adjust this to whatever percentage you want.

- The next section is the Indicator settings. And those are pretty self explanatory, the "max latest prices for BB calculation" setting will let you determine the amount of past prices to use to calculate the Bollinger band.
- "Max latest prices for trend watcher" is used in the gain and stepgain strategy and this is the amount of last prices used to calculate a bullish or bearish trend.
- "EMA1 and EMA2 period" the time in hours used to calculate the EMA's.
- "Candlesticks period" is the time used in 1 candlestick. This is almost always 15 though. Only change it if you really know what you are doing.

- The last section is Bot timing. The first value is the amount of seconds between each API call to the exchange. So if it is 120 like this than it does a price check every 2 minutes. The second one is used if an API call fails, it will retry in 1 minute in this example.
If you use Poloniex than you will get some errors because Poloniex doesn't like you making too many calls so some get rejected and this will show as a 422 error, this is normal and the bot will handle it. The more pairs you run the more calls the more errors.. So 120/60 is a decent setting. However if you want to run faster delay times than this than there is a special proxy program that is developed by someone else than the Gunbot developer. It lets you use 3 second delay times so you will never miss a buy or sell trade because of an error! Contact me if you are interested in it. This will only work for Poloniex though!
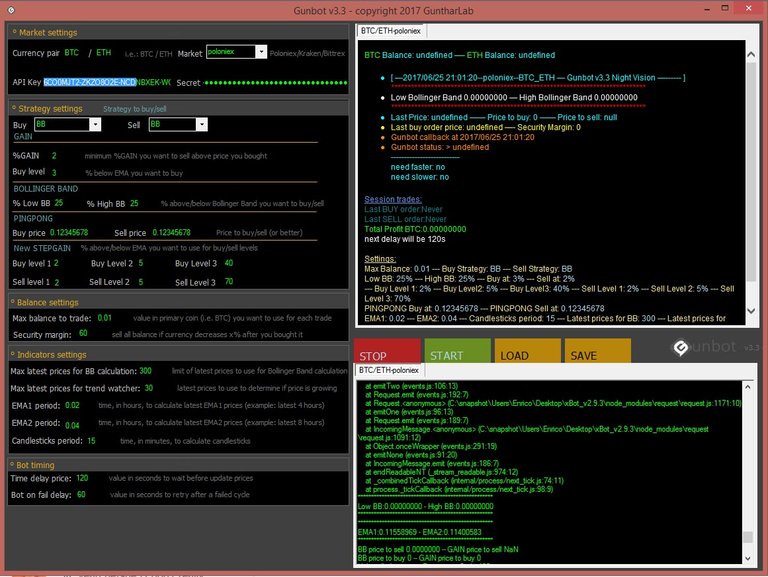
So by now you have configured all the settings needed to run Gunbot! Now all you need to do is click on SAVE and after that on START. Now wait until Gunbot has started the pair on the exchange you are using. After that your window should look somewhat like this:

Repeat these steps for all pairs you want to run.
In the right upper field you will find all the configurations you have set whilst saving the pair. Here you will also find the calculated Bollingerband levels, the levels Gunbot wants to buy and sell and an overview of the trades that were made.
Below that is the screen where is displayed what Gunbot is doing, you will also see some 422 errors appearing here. This is normal! Gunbot will handle all errors so you will not have to worry about it.
And now you have to play the waiting game! You will have to see when your Gunbot is going to buy and sell so just relax and go enjoy your day!
I hope you all like my article, after this I want to write about how to select good pairs to run on Gunbot and settings you can use. Maybe also some results I got using the bot, (56% over the last 25 days!) so follow me if you are interested!
I am always happy to answer your questions about Gunbot.
Here are some links you can use to learn more about Gunbot:
Congratulations @dutchbase! You received a personal award!
You can view your badges on your Steem Board and compare to others on the Steem Ranking
Vote for @Steemitboard as a witness to get one more award and increased upvotes!