Painting digitally is a good way to practice painting since you can experiment with the colors, delete some mistakes, and layer everything with just one click. In this tutorial, I'm going to use Adobe Photoshop CC on my PC. You can also use other software on PC or even on your phone! As long as it has a wide color swatch feature, then you're good to go!
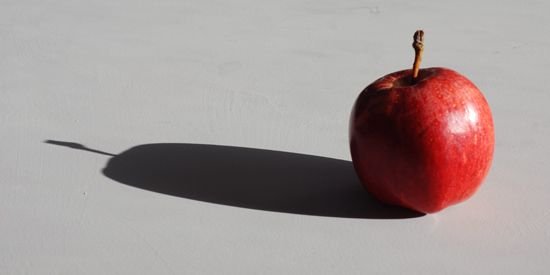
Before we start, allow me to show you my awesome reference photo from Will Kemp. He has tutorials in willkempartschool.com and I suggest you also check that out if you want to learn the traditional way.
Source: http://willkempartschool.com/how-to-shade-a-drawing-light-shadow-part-2/

Drawing Basic Shapes

When I'm drawing something, I always start with drawing basic shapes that will serve as my guide for the whole drawing. It is for me to check if it is placed in the right part of the paper or if the object is proportion to another object.
Contour Line Drawing

I then drew the contour line. Drawing it on another layer will be a lot easier so we can draw underneath it.
Distinguishing the Light and Dark

I added the necessary colors for the apple and shadow. If you're painting something, you should always check the light source for you to know where the highlight and shadow go. For this one, the light source is on the right side, so the shadow should be at the left side.
Adding More Colors

I added more colors while still being mindful of the tones. I used the Opacity and Flow to control and blend the colors. You can also use the smudge tool, it just depends on you!
Hiding the Contour Line Layer

This is how it looks like underneath the Contour Line Layer.
Cleaning the Outlines

Then I painted on the outlines to improve the shape.
Adding More Colors

I added more colors and corrected the parts that needs to be corrected.
Adding the Final Colors

I added more colors until it looks like this. I also added the necessary details and improved the highlight and shadows.
Final Look

This is the final look. I hope you like it!
Did you try it? I would love to see them in the comments!
I also did a realistic eye! Check it out here: https://steemit.com/art/@hiddenblade/how-i-paint-realistic-eyes-using-adobe-photoshop-cc
See you next time!
Thank you for providing a quality content like this. Upvoted and resteemed! #steemitachievers rocks!
Thank you so much!! Yes! The group rocks :D
Nice work! It's always cool seeing the process people undertake with their art. I've got a lot of practicing to do with digital painting as well. I've always focused a bit to much on line work.
Thank you! Practicing line is a good foundation :D