Background

Prior to building our very own Neural Network today, here's a few things you should know:
There are about a million and one Machine Learning models out there, but Neural Networks have gotten really popular recently mainly because of two things:
- Faster computers
- More data
They've helped produce some amazing breakthroughs in everything from image recognition to generating rap songs. There are mainly just three steps involved in Machine Learning:
- Build it
- Train it
- Test it
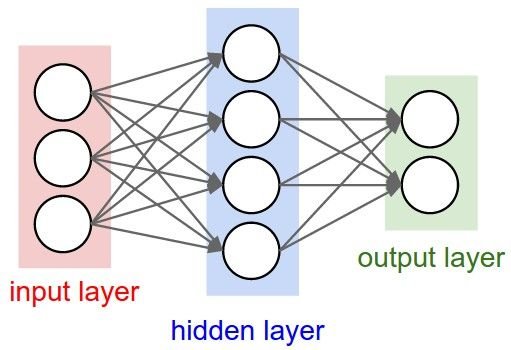
Once we build our model, we can train it against our input and output data to make it better and better at pattern recognition, so let's build our model - a three-layer Neural Network - in Python.
Writing the Neural Network
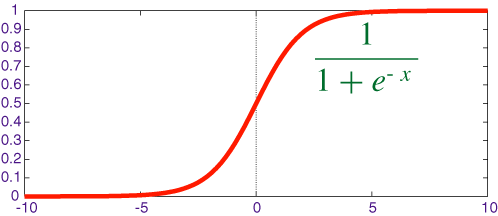
First of all, we're going to import numpy as np, my scientific library of choice for Python. Then we want to create a function that will map any value to a value between 0 and 1 - in mathematics, this is called a sigmoid. The function will be run in every neuron of our network when data hits it. It's useful for creating probabilities out of numbers.

def sigmoid(x, deriv = False):
  if deriv == True:
    return x * (1-x)
  return 1 / (1 + np.exp(-x))
For the sake of simplicity, we are not going to use OOP for this tutorial. Therefore, we'll put our code in the main function:
if __name__ == '__main__':
Now once we've created that, let's initialise our input dataset as a matrix. Each row is a different training example and each column represents a different neuron - so we have four training examples with three neurons each:
X = np.array([[0, 0, 1], [0, 1, 1], [1, 0, 1], [1, 1, 1]])
Then we'll create our output dataset - four examples, one output neuron each:
y = np.array([[0], [1], [1], [0]])
Since we'll be generating random numbers in a second, let's seed them to make them deterministic - this just means give random numbers that are generated the same starting point, or seed, so that we'll get the same sequence of generated numbers every time we run our program (this is useful mainly for debugging):
np.random.seed(1)
Next, we'll create our synapse matrices. Synapses are the connections between each neuron in one layer to every neuron in the next layer. Since we'll have 3 layers in our network, we need two synapse matrices. Each synapse has a random weight assigned to it. After that, we'll begin the training code:
  synapseMatrix0 = 2 * np.random.random((3, 4)) - 1
  synapseMatrix1 = 2 * np.random.random((4, 1)) - 1
Now we'll create a for loop that iterates over the training code to optimise the network for the given dataset:
for j in xrange(50000):
We'll start off by creating our first layer - it's just our input data:
layer0 = X
Now the prediction step. We'll perform matrix multiplication between each layer and it's synapse, then we'll run our sigmoid function on all the values in the matrix to create the next layer - containing a prediction of the output data:
layer1 = sigmoid(np.dot(layer0, synapseMatrix0))
We do the same thing on that layer too, in order to obtain a more refined prediction:
layer2 = sigmoid(np.dot(layer1, synapseMatrix1))
So now that we have a prediction of the output value in layer 2, let's compare it to the expected output data using subtraction to get the error rate:
layer2_err = y - layer2
We're gonna print out the error rate at a set interval to make sure it goes down every time:
    if j % 10000 == 0:
      print "Error: " + str(np.mean(np.abs(layer2_err)))
Next we'll multiply our error rate by the result of our sigmoid function - used to get the derivative of our output prediction from layer2. This will give us a delta, which we will use to reduce the error rate of our predictions when we update our synapses every iteration. Then we'll want to see how much layer1 has contributed to the error in layer2 - this is called backpropagation. We'll get this error by multiplying layer2's delta by synapseMatrix1's transpose. Then we'll get layer1's delta by multiplying its error by the result of our sigmoid function - used to get the derivative of layer1:
    layer2_delta = layer2_err * sigmoid(layer2, deriv=True)
    layer1_err = layer2_delta.dot(synapseMatrix1.T)
    layer1_delta = layer1_err * sigmoid(layer1, deriv=True)
Now that we have deltas for each of our layers, we can use them to update our synapse weights to reduce the error rate more and more every iteration - this is an algorithm called gradient descent. To do this, we'll just multiply each layer by a delta:
    synapseMatrix1 += layer1.T.dot(layer2_delta)
    synapseMatrix0 += layer0.T.dot(layer1_delta)
Finally, let's print out the predicted output:
  print "Output after training"
  print layer2
And there you have it. If you run this in terminal, you should have an output similar to this, based on the number of iterations your loop does - the more iterations, the higher the fine-tuning:
Error: 0.496410031903
Error: 0.00858452565325
Error: 0.00578945986251
Error: 0.00462917677677
Error: 0.00395876528027
Output after training
[[ 0.00287151]
[ 0.99637876]
[ 0.99671879]
[ 0.00426668]]
So we can conclude that the error rate decreases after each iteration, meaning that we're learning as we go and predicting answers closer and closer to the actual output (which is [0, 1, 1, 0]).
Code preview
import numpy as np

def sigmoid(x, deriv = False):
  if deriv == True:
    return x * (1-x)
  return 1 / (1 + np.exp(-x))

if __name__ == '__main__':

  X = np.array([[0, 0, 1], [0, 1, 1], [1, 0, 1], [1, 1, 1]])
  y = np.array([[0], [1], [1], [0]])

  np.random.seed(1)

  synapseMatrix0 = 2 * np.random.random((3, 4)) - 1
  synapseMatrix1 = 2 * np.random.random((4, 1)) - 1

  for j in xrange(50000):
    layer0 = X
    layer1 = sigmoid(np.dot(layer0, synapseMatrix0))
    layer2 = sigmoid(np.dot(layer1, synapseMatrix1))

    layer2_err = y - layer2

    if j % 10000 == 0:
      print "Error: " + str(np.mean(np.abs(layer2_err)))

    layer2_delta = layer2_err * sigmoid(layer2, deriv=True)
    layer1_err = layer2_delta.dot(synapseMatrix1.T)
    layer1_delta = layer1_err * sigmoid(layer1, deriv=True)

    synapseMatrix1 += layer1.T.dot(layer2_delta)
    synapseMatrix0 += layer0.T.dot(layer1_delta)

  print "Output after training"
  print layer2
Thoughts and further reading
There is so much we can do to improve our Neural Network, however, it is out of the scope for the current post. For more information and daily insights on Machine Learning and AI in general, please follow me.
Meanwhile, you might want to check my other posts where I talk about the basics of Deep Learning and Deep Convolutional Neural Networks
Credits
The images used in this post were taken from Google search and the credits go to their original creators.
And once again, thanks for reading.
@originalworks
The @OriginalWorks bot has determined this post by @quantum-cyborg to be original material and upvoted it!
To call @OriginalWorks, simply reply to any post with @originalworks or !originalworks in your message!
To nominate this post for the daily RESTEEM contest, upvote this comment! The user with the most upvotes on their @OriginalWorks comment will win!
For more information, Click Here!
Congratulations @quantum-cyborg! You have completed some achievement on Steemit and have been rewarded with new badge(s) :
Click on any badge to view your own Board of Honor on SteemitBoard.
For more information about SteemitBoard, click here
If you no longer want to receive notifications, reply to this comment with the word
STOP