One of the biggest takeaways for me from my video editing and animation studies has been color correction. Even though what I learned is pretty basic, it’s been really helpful for sprucing up video compositions that lack color, quality, or good contrast. I don’t claim to be an expert on the subject—mastering video color correction is a whole other world within editing, requiring dedicated study, mastering techniques, and proficiency with various tools. However, I want to share a few basic tips I’ve picked up so you can breathe some life into your videos.
Introducción a la corrección de color: tips básicos para mejorar tus videos
Una de las grandes novedades para mí con el conocimiento adquirido es mis estudios de edición y animación de video fue la corrección de color. Aunque lo que aprendí es algo sumamente básico, me ha sido útil para avivar composiciones con videos que carecen de color, calidad o un buen contraste. No pretendo parecer un experto del tema, dominar la corrección de color de los videos es todo un submundo dentro de la edición, requiere estudios, masterización y dominio de varias herramientas, sin embargo, de lo básico que aprendí quiero hoy compartir uno que otro tip con ustedes para que le puedan dar un poco de vida a sus videos.
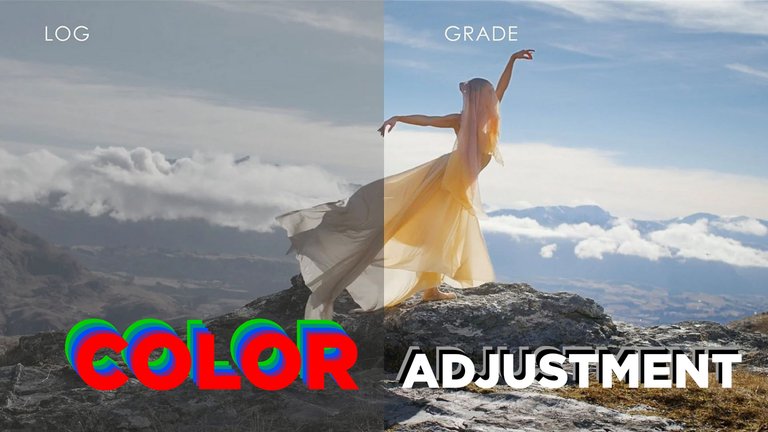
The first thing I should mention is the format you record your video in. If you’re using your phone, and it’s a relatively new model with a decent camera, you should check the settings to see if it has a mode for recording in LOG or RAW. Explaining both modes in detail is complex, and summarizing them would be a bit of a stretch, but I’d venture to say they’re modes that capture more information in the range of blacks and whites (in the case of LOG) and everything related to color and contrast. They kind of compress this information in our video or photo, and with editing, we can unlock that encapsulated range to edit it.
Lo primero que debo mencionar es sobre el formato en el que grabas tus video, si se trata de tu teléfono y es un equipo relativamente nuevo, con buena camara, debes chequear entre los ajustes y configuraciones, si posee el modo para grabar en LOG o RAW. Explicar ambos modos en algo complejo, resumirlo sería muy osado, pero me atrevería a decir que son modos que capturan mayor información en rango de negros y blancos en el caso de LOG y todo lo relacionado a color y contraste, lo comprimen de alguna manera en nuestro video o foto y con la edición podemos desbloquear todo ese rango encapsulado para editarlo.
That’s probably a pretty rough summary, and I encourage you to dig deeper if you want, because there are people who explain it much better than I can. But it’s worth mentioning these recording modes because if we use them, we can get more out of our videos when editing. Maybe you’ve recorded something and it looks dull with a grayish tone, and you don’t understand why—especially if you have a great phone with an excellent camera. It’s possibly because you have one of these modes active without realizing it, or maybe your device is older and the camera is starting to give out.
Quizás sea un resumen muy burdo, les invito a profundizar si lo desean porque hay gente que lo explica mucho mejor que yo. Pero mencionar estos modos de grabación vale la pena, porque si los utilizamos, podemos sacar mayor provecho de nuestros videos al editar. Quizás te ha pasado que cuando grabas algo y todo se ve opaco con cierto tono gris y no entiendes porque, si tienes un muy buen telefono con excelente camara, es porque quizás tienes activo uno de estos modos sin saberlo, o tu equipo es muy viejo y la camara ya esta llegando a su final.
If this sounds too complicated, you can always use the preset filters in editing software and social media with “AI,” which are designed to simplify things. But if you’re someone who likes to put some love into your videos, especially if you’re the one on camera, it’s definitely worth learning how to adjust the color. I should clarify that most editing programs have color adjustment options, but among editors, it’s said that DaVinci Resolve is the best, followed by Premiere Pro, which is what I use and will be the basis of my explanation.
Si esto te resulta muy complejo, siempre puedes usar los filtros preestablecidos de los programas y redes sociales con "IA" que llegaron para simplificar la vida de muchos, pero si eres de los que les gusta dedicarle amor a tus videos, aun mas si eres el rostro que aparece en ellos, bien vale la pena aprender a ajustar el color. Debo aclarar que la mayoría de los programas de edición poseen opciones de ajuste de color, pero entre los editores se dice que el mejor de todos en Davinci Resolve, seguido de Premiere pro, este último es el que se usar y será la base de mi explicación.
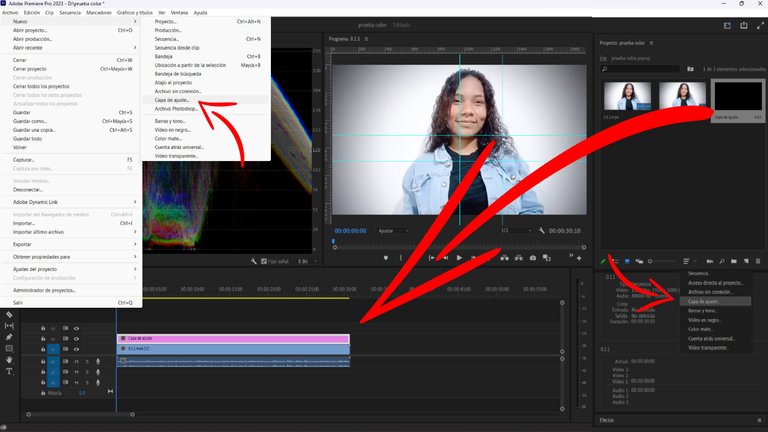
In Premiere, once we have our video on the timeline, the first thing we’re going to do is create an adjustment layer, which you can find in the File menu or in the Project panel, as shown in the following image. Then, a sequence appears, which you’ll place on the timeline above the video you want to edit.
En Premiere una vez que ya tengamos nuestro video en la línea de tiempo, lo primero que vamos a crear es una capa de ajuste, la cual puedes conseguir en el menú de archivo o en el panel de proyecto como te indico en la imagen siguiente. Luego aparece una secuencia la cual colocarás en la línea de tiempo sobre el video a editar
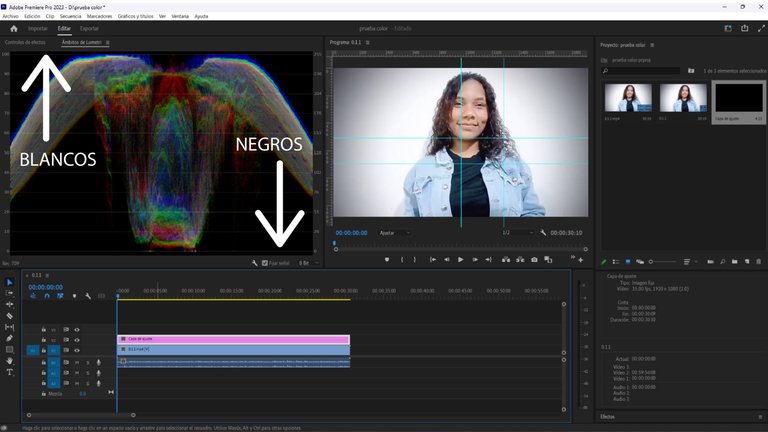
Next, go to the Window menu and select Lumetri Scopes. This graph will appear, which you can place wherever you prefer. Don’t be intimidated by the graph. What you’re seeing is a graphical representation of RGB. Notice that in my example video, all the color is in the center, and the white is on the sides. If you look at the video image, you can see that the girl recorded with a white background. This graph basically shows you that white is at the top and the darker tones are at the bottom. The important thing is not to exceed those limits.
Luego vas al menú de Ventana y seleccionas Lumetri Scope o Ambito de Lumetri, y aparecerá esta gráfica, la cual puede colocar en el lugar de tu preferencia. No te asuste al ver ese gráfico, lo que estás viendo es la forma gráfica del RGB, nota que en mi video de ejemplo en el centro está todo el color y a los lados el blanco, si ves la imagen del video, a los costados de la chica se ve que grabó con un fondo blanco. Esta gráfica básicamente te enseña que hacia arriba esta los blancos y hacia bajo los más oscuros, lo importante es no sobrepasar esos límites.
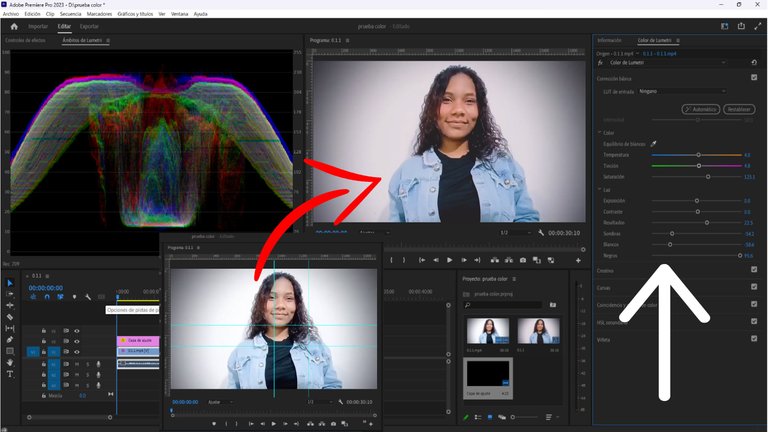
The next step is to open the Lumetri Color menu, which is found in the Window menu. In this option, we can find basic correction. Here, we start adjusting the blacks, whites, exposure, contrast, and saturation, according to our preferences, as long as the graph stays within the limits, as you can see in the image.
Lo siguiente es abrir el menú de Lumetri color, se encuentra en el menú de archivo, y en esta opción podremos encontrar la corrección básica. Acá empezamos ajustar los negros, los blancos, la exposición, el contraste, la saturación, según sea nuestro gusto siempre y cuando se mantenga la gráfica dentro de los límites como ves en la imagen.
Remember what I said about recording in LOG or RAW? If we recorded in one of these formats, the adjustment range we’ll have available will be much wider, and the difference will be much more noticeable. As you can see in the image, the video I’m editing wasn’t recorded in either format and is low quality, but with these adjustments, you can better see the colors of the skin and clothing.
¿Recuerdas lo de grabar en LOG o RAW? si lo hicimos en alguno de estos formatos, el rango de ajuste que tendremos disponible será mucho más amplio y se notará mucho mas la diferencia. Como pueden apreciar en la imagen, el video que edito no fue grabado en ninguno y es de baja calidad, pero con estos ajustes se pueden apreciar mejor los colores de la piel y la ropa.
With these basic tweaks, we can rescue a video that didn’t turn out as we expected, simply giving more life to our creations, brightening the colors, or adjusting the tones to give the effect we want. I’ll be uploading a second part soon when I have a better video to edit that was recorded in LOG, and I’ll share some more tricks to further improve our videos, but what did you think of the change?
Con estos retoques básico podemos rescatar un video que no haya quedado como esperábamos, simplemente darle mas vida a nuestras creaciones, avivando los colores o ajustando las tonalidades para darle el efecto que deseamos. Estaré pronto subiendo una segunda parte cuando tenga un mejor video para editar, que haya sido grabado en LOG, y les compartiré otros truquitos más para mejorar mucho mas nuestros videos, pero ¿que te pareció el cambio?
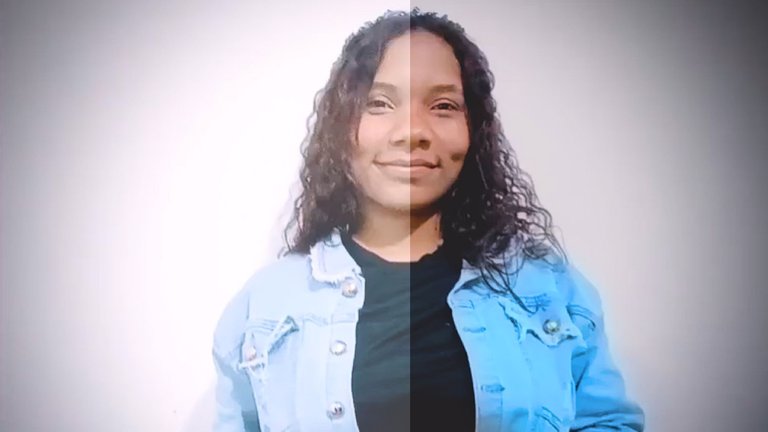
Imagen principal pertenece a https://www.canon.es/pro/stories/cinema-raw-light/
Las imagenes se toman de la edición de video con la autorización expresa de Katiusca Torres
¡Enhorabuena!
✅ Has hecho un buen trabajo, por lo cual tu publicación ha sido valorada y ha recibido el apoyo de parte de CHESS BROTHERS ♔ 💪
♟ Te invitamos a usar nuestra etiqueta #chessbrothers y a que aprendas más sobre nosotros.
♟♟ También puedes contactarnos en nuestro servidor de Discord y promocionar allí tus publicaciones.
♟♟♟ Considera unirte a nuestro trail de curación para que trabajemos en equipo y recibas recompensas automáticamente.
♞♟ Echa un vistazo a nuestra cuenta @chessbrotherspro para que te informes sobre el proceso de curación llevado a diario por nuestro equipo.
🏅 Si quieres obtener ganancias con tu delegacion de HP y apoyar a nuestro proyecto, te invitamos a unirte al plan Master Investor. Aquí puedes aprender cómo hacerlo.
Cordialmente
El equipo de CHESS BROTHERS
Hello danielcarrerag!
It's nice to let you know that your article will take 4th place.
Your post is among 15 Best articles voted 7 days ago by the @hive-lu | King Lucoin Curator by keithtaylor
You receive 🎖 2.7 unique LUBEST tokens as a reward. You can support Lu world and your curator, then he and you will receive 10x more of the winning token. There is a buyout offer waiting for him on the stock exchange. All you need to do is reblog Daily Report 520 with your winnings.
Buy Lu on the Hive-Engine exchange | World of Lu created by szejq
STOPor to resume write a wordSTART